Anybody interested in making ribs?

This site may earn a commission from merchant affiliate
links, including eBay, Amazon, Skimlinks, and others.

Do you mind providing some dimensions?
  • Depth, width, & overall length of female die
  • Depth, width, & overall length of male die

Thanks!

Evan
 
Do you mind providing some dimensions?
  • Depth, width, & overall length of female die
  • Depth, width, & overall length of male die

Thanks!

Evan

OK, Evan. First the male die.

Length of metal die is 8 1/8 inches.

IMGP6772.jpg

Width of metal die is 9/16 inch.

IMGP6773.jpg

The metal die is 1/8 inch thick steel with a 1/8 inch thick piece of micarta underneath for a total thickness of 1/4 inch.

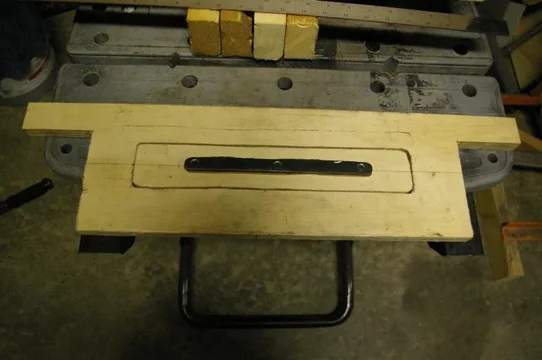
The die is attached to a piece of 3/4 inch thick plywood cut to fit snugly between the vertical rails of the press. I left the wooden "ears" as stop blocks to aid in positioning it consistently within the press. Without these ears it would be very difficult to get even presses each time.

IMGP6774.jpg

I also cut out just the center section of the upper plywood die to allow the sheet to be clamped tightly before the rib is pressed. This greatly reduced the warping of the entire sheet with each rib pressing.

Krusty
IMGP6772.jpg
IMGP6773.jpg
IMGP6774.jpg
 
Now for the female die. The length of the opening is 8 3/4 inches.

IMGP6775.jpg

The width is 1 1/4 inches. Because it is made of micarta (no steel), I was able to cut the ends with a hole saw and trim out the rest of the sides with a jig saw.

IMGP6777.jpg

The depth here is also 1/4 inch. I just used 2 pieces of micarta here instead of one steel and one micarta. All of these are attached to the ply with sheetrock screws. One note here. I had to countersink the screw heads below the surface a bit and trim off the pointy end of the screws below the surface of the plywood, especially on the male die, because the wood would compress under load, but the metal screw would not, which will very nicely emboss the outline of the phillips head screws in the center of the rib.

IMGP6778.jpg

Once again, here is an overview of the whole contraption. The outline is an exact match to the upper, to position it for an even press.

Krusty
IMGP6775.jpg
IMGP6777.jpg
IMGP6778.jpg
 
Cool idea! I see a project for my buddies mill, and some left over chunks of aluminum semi-truck frame rail that has been waiting to be re-purposed.
 
Awesome, thanks for grabbing those dimensions. I am definitely going to borrow this design. Will save a bunch of money as opposed to buying new replacement panels, money that can be spent on things much more bling than sheetmetal (gears) ! Any idea how these ribs match up to the ribs in the floor of our cruisers?

Thanks again,

Evan
 
The floor panels on my '76 40 are so much larger than my press that I can't make them the same way. Luckily, I don't need to replace any floors. Maybe with a different die setup, the floor panels could be made in small sections and used for patches, or welded together to make a new floor.

Good luck.

Krusty
 

Users who are viewing this thread

Back
Top Bottom