Adding F/R lockers to 2003 Land Cruiser (1 Viewer)

This site may earn a commission from merchant affiliate
links, including eBay, Amazon, Skimlinks, and others.

Time to pull the third. It is pretty heavy so I was trying to figure out how to do this without damaging anything, dropping it on the garage floor or crushing myself. I came up with this rudimentary jack support. There were a couple issues but it got the job done.

IMAG1905.jpg


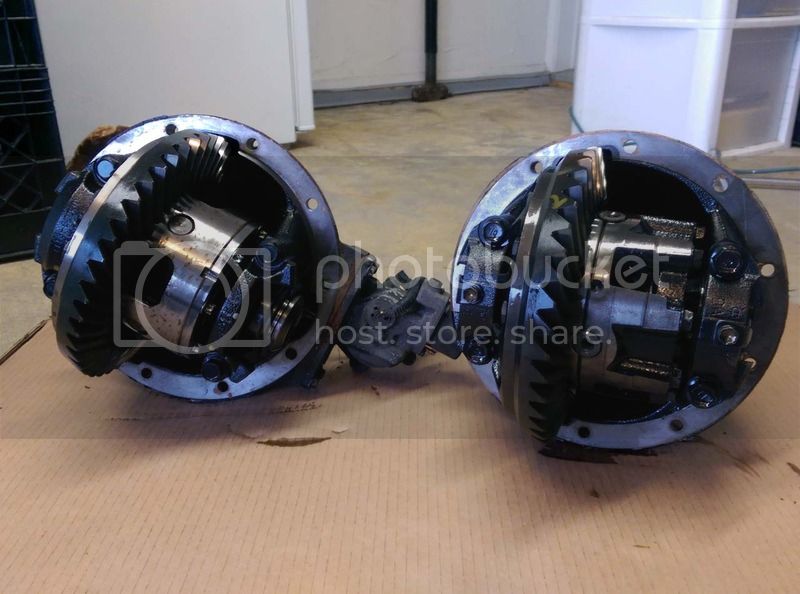
Third out. Side by side comparison between the 1999 and 2003

IMAG1908.jpg


IMAG1909.jpg


IMAG1910.jpg


IMAG1911.jpg


Old studs removed and surface cleaned.

IMAG1913.jpg


Detail of what material needs to be removed

IMAG1915.jpg


IMAG1917.jpg


IMAG1918.jpg


IMAG1920.jpg


IMAG1923.jpg


IMAG1926.jpg
 
Nice work, I'm sure this thread will help others attempting the same upgrade a lot. Did you compare shaft spline lengths on the short (US PS) side between the 99 & 03? I thought the e-locker splines were longer to accommodate the locking dog so you'd need to use the one from the 99 on that side?
 
Nice work, I'm sure this thread will help others attempting the same upgrade a lot. Did you compare shaft spline lengths on the short (US PS) side between the 99 & 03? I thought the e-locker splines were longer to accommodate the locking dog so you'd need to use the one from the 99 on that side?

Thanks, that's the idea. I couldn't find an all inclusive thread so I am hoping this will be the one.

Yes, the US PS axle shaft, while being the same overall length, has longer splines. Roughly 2" on the 2003 and 4" on the 1999.

Here are some pics

2003 on left, 1999 on right
IMAG1927.jpg


2003
IMAG1931.jpg


1999
IMAG1934.jpg
 
OK, I need some suggestions on how to remove the metal shown highlighted in blue. I tried everything I could think of to grind it, but it laughed at everything I threw at it. It is some form of high strength steel, about 3/8" thick. I tried a dremmel, a rasp bit in a cordless drill, and damaged three drill bits trying to drill though it. I didn't want to use a cutoff wheel as I didn't want sparks with the diff oil right there. I am stuck at this point. Ideas?

IMAG1926.jpg
 
Diff oil is not going to catch on fire. Lay some aluminum foil inside to catch all the iron filings so you don't have to wash the diff housing at the end (and also to prevent any spark mixing with diff oil). If you are not sure about potential fires with diff oil, have a fire extinguisher around.
NEver though the axle is that tough to deal with.
 
Also, look into what the 80-series guys are doing with their long-spline shafts. Many are now getting a section of the splines in the middle machined flat on a lathe.

The problem is it is possible to twist those splines, and if you do it with the locker engaged, there is no way to get the shaft out for diff removal without cutting the housing. A section of splines removed between where the outer collar slides and spider gear is located fixes this problem.

Sorry I don't have a link, you'll need to do a little digging.
 
^^ looks like the guys that are doing this are running big tires with low gears and are wheeling hard. I would say a few guys not many, but I could be wrong. I don't wheel hard except for the occasional obstacle to get to another area or campsite.
 
An angle grinder w/ a proper grinding wheel will take care of that part of the housing. It will make a mess, so as someone else suggested, plan ahead an lay something down to catch the dust. Then clean thoroughly. Grinding the housing is a pretty common thing to do in the helix/pickups.
 
Tungsten carbide port/polish cutters, bits.
 
Notch cut out. I lined the inside of the housing with foil as recommended to catch debris and sparks. I also plugged the axle shaft tube openings to prevent anything from getting in there. I cleaned everything really good when done.

NOTE: It is possible to seriously injure yourself here. You are working in close quarters with a high speed cutting disk. BE CAREFUL!!

Also, there will be a lot of sparks flying, and many will land on / near you. Use proper protective equipment and keep a fire extinguisher handy.

IMAG1947.jpg


IMAG1948.jpg


This is what I used

IMAG1945.jpg


IMAG1946.jpg
 
Last edited:
Nice work!
 
New studs installed

IMAG1949.jpg


Locked third installed. It was a bear to get in by myself. I highly recommend a friend to help with this part. I boogered up the gasket so I'll have to get another. I will probably brace the third on the floor jack and strap it down. Then I can pull it out enough to replace the gasket then it should slide right back in (hopefully).

IMAG1951.jpg


IMAG1952.jpg


IMAG1953.jpg
 
Youre making good progress. Can I suggest to lightly wire brush/ clean the mating surface of the pinion flange and the yoke- even a fractional amount of surface rust can affect runout and create some vibes.
 
So, did you have to check/set clearances or does that only happen if you are changing the gearing on the 3rd unit. I just bought one of these axles and this will be my guide!
 
Love seeing this done. I don't think I've seen a third member being retrofitted into an existing axle on a 100 before. Only a complete axle swap. Great progress so far!
 
So, did you have to check/set clearances or does that only happen if you are changing the gearing on the 3rd unit. I just bought one of these axles and this will be my guide!

Only need to if you change gearing or bearings. You could check those to determine condition of 3rd, if you don't know history.

Yes, what Skidoo said.

Glad this is helpful. I would highly recommend you get the diff lock ECU (and mounting bracket) at least and the switch as well if you want a factory look. I plan on making a new harness using factory plugs. I will document that once I get to it.
 
Would it have been better to swap the whole rear axle? Is the 99 axle 6 lugs or 5?
 
Not necessarily better just different. The 2003 has more brake lines (each caliper gets a dedicated run from the MC for the VSC), different brackets, attachments, etc. Plus there is more stuff to remove to get the axle out. Of course it would be a good opportunity to replace all the suspension bushings and brake lines if the axle were to come out.

I imagine if you had a known good condition donor axle and you wanted to replace the suspension and brake stuff it would probably make more sense to swap complete axle. I didn't know the history of my donor axle so I wanted to use as much of my known good axle as possible.

6 of one, half dozen of the other I guess.
 

Users who are viewing this thread

Back
Top Bottom