85 FJ60 Project, AKA "Boomer"

This site may earn a commission from merchant affiliate
links, including eBay, Amazon, Skimlinks, and others.

Joined
Feb 18, 2006
Threads
217
Messages
1,306
Location
Olalla
Website
www.rhodescreations.com
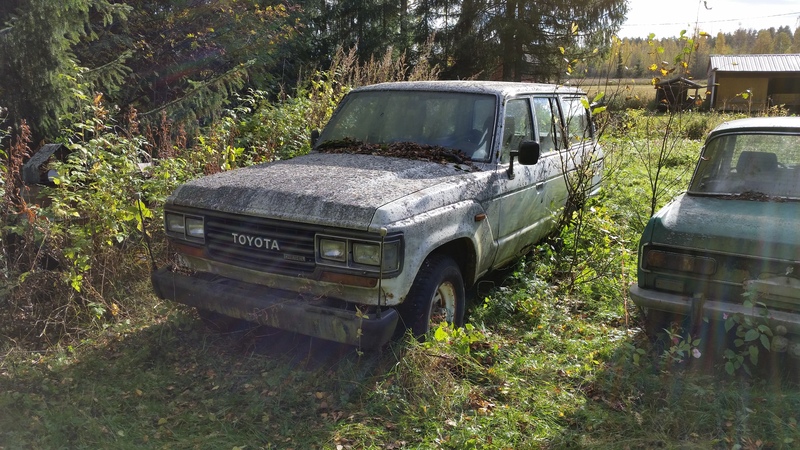
Finished remodeling my house so I decided to buy an old cruiser to eat up all this damn free time. Basic details: 1985 FJ60 purchased in WA from a retired submariner at the end of October 2022. Came with a Navy Base Kitsap sticker and some matte black primer over the original paint. 188k miles, stock with the exception of the radio. Minor rust around wheel wells (previously repaired) and a bit of rust at the bottoms of the doors, ripped driver seat, no carpet, missing tailpipe after muffler, rusty floorboards, no glove box... I went and looked at the truck about 50 miles north of my location with the intention of trailering it home. After a test drive I decided to return the next day and just drive it home. Made the trip down I-5 with no problems.
purchase fj60.jpg

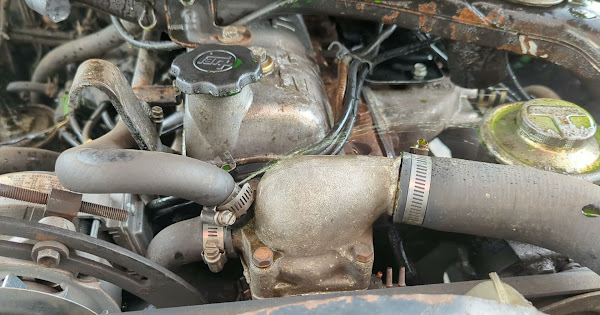
Front end had some recent work. Rebuilt knuckles and brakes.

knuckle.jpg

Springs were pretty toast as well as the shocks. The shocks were OEM and I don't know if they were original but maybe. Some rust along the frame. Planning to do the C channel when I can find a kit. Had my assistants check things over. We decided first order of business was the suspension.
team fj.jpg


front spring.jpg

It has been about 17 years since I last replaced the suspension on a 60. That was in 2005 or 2006 and was an 84 FJ60. About a 21-22 year old truck at that time. While cursing this 38 year old truck it occurred to me that my "new" '99 LX470 is 24 years old... which means something but I'm not sure what. Anyhow the front springs came off pretty easy with a long pry bar. U-bolts mostly snapped but whatever. The fixed pins on the rear springs were another story. It took a combination of grinder, air hammer, sawzall, and drill to remove them. In the end it was easiest to cheat outboard with a sledge hammer just enough to get a cutting wheel in between the perch and the pin, then cut the head off the pin and drill out the old rubber. Took a long time.
rear spring.jpg

I wish I was a little bit taller...
 
taller.jpg

Next up I decided to address the water in the floorboards so that I can go ahead and soundproof and install carpets (thanks to @dnp on here for the kit). Decided to ahead and pull the fenders.
fender inner.jpg

Looks like an attempted previous repair. Also looks like they swapped the upper hinge but I don't see any indication they sealed it. Might pull the door while I'm at it.
 
under the fender
do you have the tube assembly to go from the cowl down?

the screwdriver is in the hose coming back up from in front of the cat, yes it was part of the emissions system
 
Firewall is all sealed but in the process of removing one of the fenders I broke the radio antenna. Since I needed to swap that out I figured now would be a good time to replace the old pioneer tape deck. Might as well recover the dash.
dash.jpg

Existing dash looks to have been covered in leather at some point.
leather.jpg
 
New dash cover and stereo installed. Upgraded the speakers to some 4.5" Pioneers while I was at it. And the Koito headlight kit from Cruiser Trash. Used the Cruiser Head stereo bracket. Far better than anything I've tried in the past. I wouldn't say it's perfect but I think it looks pretty good. Need to get the headlights calibrated, then it's time for carpets. I was considering swapping the seats (have used both Saab and BMW seats in other 60 projects) but now I'm leaning towards just recovering the driver's seat.
dash1.jpg

dash2.jpg
 
Moved on to carpets. Have been referencing this thread: FJ60 sound proofing and carpet install - https://forum.ih8mud.com/threads/fj60-sound-proofing-and-carpet-install.1135377/page-5

Biggest challenge so far is that the original carpets were gone when I purchased the truck. Would have been really handy to have them for templating. Planning on using a hot knife and soldering iron to make the needed holes. Also considering removal and reinstallation of rear heater... radiator hoses need replacement so now might be the time. Funny how replacing carpets lead to fender removal and a new stereo and now perhaps coolant hoses...


PXL_20230225_204715238.jpg
 
Moved on to carpets. Have been referencing this thread: FJ60 sound proofing and carpet install - https://forum.ih8mud.com/threads/fj60-sound-proofing-and-carpet-install.1135377/page-5

Biggest challenge so far is that the original carpets were gone when I purchased the truck. Would have been really handy to have them for templating. Planning on using a hot knife and soldering iron to make the needed holes. Also considering removal and reinstallation of rear heater... radiator hoses need replacement so now might be the time. Funny how replacing carpets lead to fender removal and a new stereo and now perhaps coolant hoses...


View attachment 3261434
This is the way it goes. Sometimes replacing one bolt leads to halfway tearing down the engine. You got this!
 
Carpets are in and mostly complete. Not really happy with the wheel well sections but it will do for now. Very happy to be done with the hot knife and soldering iron.
carpet pedals.jpg

This little rubber pad ended up in a bad location but that's where it had to land in order for the rest of the section to fit. The jack storage under the driver's seat is also problematic.
carpet trans.jpg

Inner boot on the stick was toast. Replacement en-route.
 
Finally done with the carpet... for now. Not a fan of the carpeted wheel wells. I feel like my old 60s had vinyl covers so I'm going to be on the lookout for those. All of the trim and cargo panels in the back are gone. I have templates for the panels and will find those trim bits sooner or later.
boots.jpg


I knew The ties were going to need replacement soon. Found a bolt somewhere out there which moved that purchase up the list.
bolt.jpg
 
Nice work putting a 60 back in shape. You mentioned chain reaction on replacing the carpet. I thought I just fix the sills and wheel arches and it lead to a completly empty frame lol.

Those metal brackets on stick boots should be under the carpet. Here is pics of my rig.
 
Thanks @Samppahj,

I saw that the shifter boot brackets should be fitted under the carpet but thought they would be helpful to hold down the carpet. Since this 60 came to me with no existing carpet it was a challenge to match up all of bolt holes and other sections where things needed to be cut. I was quite sick of smelling melted carpet by the end (almost).

Snow White is looking very sharp. You have taken that project to another level.

Those metal brackets on stick boots should be under the carpet.
 
Last edited:
Boomer is out of the garage and wearing new shoes. Went with the Cooper AT3's. I have run BFG AT's for years across many rigs but my last set didn't last very long. So I got a flat (bolt) and made an appointment to have the new meats thrown on. On the way there, about a 7 mile trip down the highway, one of the coolant hoses gave up.
We arrived at the tire shop in a cloud of coolant. Didn't lose much fluid but it sprayed all over the engine. The good news is that I had already ordered new hoses in anticipation of these decades old examples failing.
The new spare doesn't fit underneath in the stock location. I feel like once upon a time I fit one in there somehow but with the exhaust routed there it's not going to happen. Either need to have the tailpipe moved or... rear swing out.
PXL_20230401_233557956.jpg

Front bumper caps on order too.
 
Thanks @Samppahj,

I saw that the shifter boot brackets should be fitted under the carpet but thought they would be helpful to hold down the carpet. Since this 60 came to me with no existing carpet it was a challenge to match up all of bolt holes and other sections where things needed to be cut. I was quite sick of smelling melted carpet by the end (almost).

Snow White is looking very sharp. You have taken that project to another level.
It was a pain to bolt the brackets on under the carpet. So your way to do it is easier. And it is a job to move them now when everything is in place. Luckily brackets looks nice and gives a bit more rugged look when they are above the carpet. You can spare your nose from melted carpet smell :cheers:
 
Two years later... moved twice and added a third son to the family. Not much time in the shop. I've put 794 miles on this rig. It's a runner for sure but still has some minor issues. The kids renamed her "black salamander." 🤷‍♂️

I decided to try and track down some of the more prolific oil leaks. The main culprit seems to have been the oil cooler. At some point a previous owner added lots of what appears to be RTV. It did not work. Removed the oil cooler, cleaned and reinstalled with new washers and O rings. Seems fine so far. Oil change was due. Flushed the coolant too because I had to.

I've been trying to get the vacuum system sorted out. PO de-smogged but something still is off. I downloaded JimC's desmog manual and went through every step to verify it was done correctly. The only thing I found was the BVSV1(?) valve wasn't connected so I rerouted some lines. It seems to have helped but I still have a loss of power under heavy load (going uphill or getting on the highway). I'm wondering if anyone has experienced this and what they did to remedy? I seem to recall from long ago there's a way to bench test the VSV's and such... that will probably be my next task. Kicking myself for getting rid of the piles of them I once had. I also have no idea if the distributor was re-curved nor do I know if that would manifest with symptoms like I'm seeing.

PXL_20250308_002328368.jpg


PXL_20250322_165723421.jpg


PXL_20250322_165729222.jpg


PXL_20250322_165752008.jpg
 

Users who are viewing this thread

Back
Top Bottom