8274 - crusty motor resurrection (fingers crossed)

This site may earn a commission from merchant affiliate
links, including eBay, Amazon, Skimlinks, and others.

Joined
Jun 3, 2007
Threads
118
Messages
7,242
Location
SW MB CA
EDIT - Motor failed again after less than a minute of use in Moab. This refresh did not pan out, time to get a replacement.


My 8274-50 was starting to get a bit weak after 5 years on the front of my 62, a number of submersions and countless miles of salty winter roads with no cover (note to self, make a cover). I decided to pull it off, go through it and add fill and drain plugs to keep the geartrain happy. I was expecting to find a water/oil mix in it, but when I broke the case apart, it looked beautiful inside.

The motor, on the other hand, is crusty. :frown: Both bearings are toast.

Given that a decent replacement is going to cost at least $200, I decided to see if I could tear it down, clean it up and get it back in shape. If it works, I plan to add some cross-flow venting to the motor housing inspired by the setup for the dizzy on my 62. If it doesn't work, I'm only out some time and several cans of wobbly pop. It's my first time tearing into an electric motor, so off we go. Let me know if I've got my terminology wrong.

Motor seems to be a Bosch that is made in Brazil.


A peak inside the case.
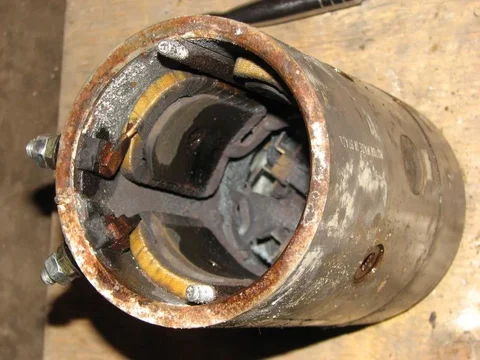
IMG_6754.webp

The rotor looks to be in decent shape other than some scuffing where it rubbing against a couple of the steel pieces that core the field coils. I thought this would be due to corrosion behind the steel pieces, but there wasn't any of significance to see once things were torn down.
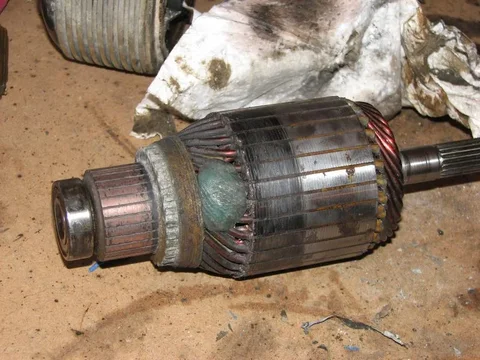
IMG_6752.webp

Just some of the loose crap that I was able to knock out before tearing it down.
IMG_6762.webp
IMG_6754.webp
IMG_6752.webp
IMG_6762.webp
 
Last edited:
The rotor came out easily with the ugly bearing stuck to the shaft (I understand earlier motors have a bushing here?). The bearing in the winch case was driven out with a brass drift through the opening for the free wheel clutch.

Disassembling the case started with soaking the meaty countersunk machine screws that hold in the steel pieces/field coils with an acetone/ATF mix from both sides. After a couple heat-soak cycles they came out relatively easy. With the steel pieces loose and removed, I striped the nuts from the field studs and forced them into the case, releasing the field coil assembly.

The two long bolts that run through the motor were carefully backed out, since they were crusty themselves, it took patience to get them out. The end cap was knocked off, then the brush assembly was removed after a bit of a soak, and pulling out the one small Phillips screw that holds it to the motor case. This assembly seems to be composed of an aluminum base structure with plastic molded over it.

Here's how it looks at this point.
IMG_6755.webp

Field coil assembly after a wash down with brake cleaner.
IMG_6759.webp

Steel pieces that retain the coils (and strengthen the magnetic field?) after cleaning up. The spots that were interfering with the rotor have been cleaned/ground back with a flapper wheel and drill. The rest will get a bit of a polish yet...
IMG_6758.webp
IMG_6755.webp
IMG_6759.webp
IMG_6758.webp
 
Last edited:
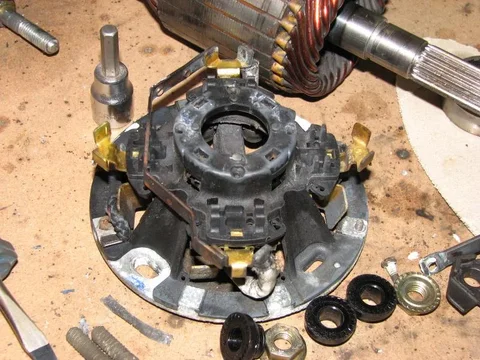
A pic of the brush assembly.
IMG_6760.webp

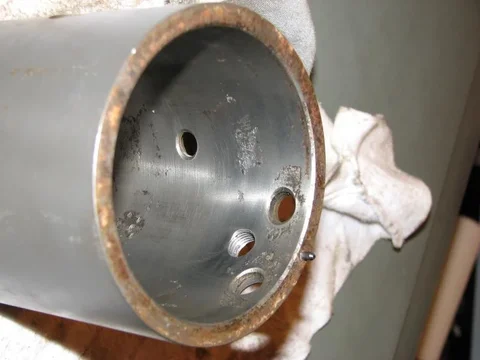
The case cleaned up inside (flapper wheel again) with two new openings drilled and tapped to accept hose barbs.
IMG_6756.webp
IMG_6757.webp

That's where I'm at right now, time to start reassembling.
IMG_6760.webp
IMG_6756.webp
IMG_6757.webp
 
Last edited:
Bosch made in Brazil.
IMG_6765.webp
IMG_6763.webp
IMG_6765.webp
IMG_6763.webp
 
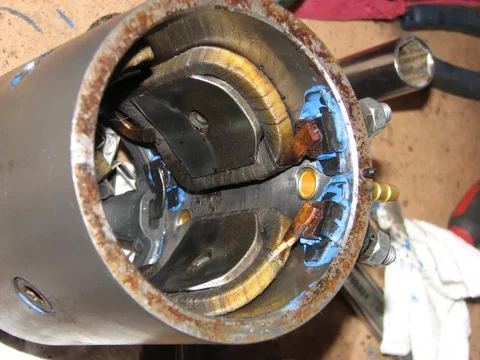
Field coils, brush assembly and related paraphernalia put back in. Breather barbs loosely in place (I'll cut them down some before sealing them in place. Liberal use of blue gasket maker to keep the outside world out and inside world in. I wiped anything I was worried about corroding again with a bit of ATF.... hope that was a good choice.

Hopefully tomorrow I can source the bearings I need.

IMG_6768.webp

IMG_6769.webp

IMG_6770.webp
IMG_6768.webp
IMG_6769.webp
IMG_6770.webp
 
All back together, wired up, hit the switch and........ :hhmm:


Could see sparks inside through the vent holes. Turns weakly in the unspool direction, won't turn at all in the spool direction. This is with the free wheel clutch disengaged. :bang: Guess I'll check with the multi meter to see if there is a short I can identify and if not call it dead.
 
Last edited:
Well, this is timely. :D

A couple of days ago, I got an 8274 to look over and make an offer on. It was traded to a friend's mechanic for work 15 years ago and hasn't been used since.

December%252015%252C%25202012%2520013.jpg


After loosening up the clutch, it freespools nicely and the gears are well-greased. Looks like water got in the motor at some point and it's in bad shape and the brake is crap.

December%252015%252C%25202012%2520018.jpg


I had decided to give up on it, but when I saw this thread, I hoped maybe you had just what I needed. :doh:

I'm going to advise the owner that he should find someone that already has a 8274 and sell it to them for parts, then offer him $50. :D
 
All back together, wired up, hit the switch and........ :hhmm:


Could see sparks inside through the vent holes. Turns weakly in the unspool direction, won't turn at all in the spool direction. This is with the free wheel clutch disengaged. :bang: Guess I'll check with the multi meter to see if there is a short I can identify and if not call it dead.

Okay, after going back out, I figured out that my ground bolt was just too corroded to do the trick, so I swapped in a fresh one (need to pick up a stainless). Still much the same, but not as weak.

Hmmm, I used to have to jiggle the remote connector to get it to spool sometimes. Sure enough, now it spools and unspools. But, when I hit the switch some times (I'm assuming some positions of the motor) all I get is one of the relays clicking in and out really fast. I assume that is an internal short?

When I was reinstalling the rotor, one of the brushes chipped off the face and left a rough surface... could this be the cause?
 
I'm curious if I can source a Bosch motor direct from Brazil? I don't know that mine is the same, but it should fit. :meh:

I believe you can swap a newer style motor into an older 8274, but need to change out the gear that rides on the motor shaft with it to go from a keyed shaft to a splined shaft. IIRC awl_teq shows this in his rebuild thread... You can get a Warn replacement motor off of Amazon for <$200 (not sure if they have the gear on there too though), and knock offs for cheaper. From what I've read here some of the knock offs don't last even a year.
 
After throwing the battery charger on the truck and running the motor a bit more, it seems to be getting better. It doesn't seem to be hitting the "dead spot" as much, runs stronger in unspool direction than spool direction (maybe I need to clean all the contacts in the solenoid pack again...). If I have time before I head back to Manitoba in the next couple days I'll do that and wire it up with the heavy leads (I've been using fairly light booster cables to test) and and see if it seems ready to spool the cable back on.
 
All done up with clean tight connections and the proper heavy leads it seems to be good.
 
RockDoc,
In looking to see what I should lube the brushes with (lithium grease) I came across this maintenance bulletin.

DO NOT USE SILICONE SEALANT TO MAKE THE MOTOR WATERTIGHT
The use of silicone near dc motors will cause rapid brush wear. Just a few parts per million can cause wear to be 10 times normal. Most motor OEM's warn that silicone vapors interfere with commutation and high brush wear may result. Silicone vapors may originate from sealing compounds, electrical insulation, bearing grease and other ingredients to certain manufacturing processes. These sources must be eliminated if good overall motor performance is expected.
There are a few theories of how and why silicone vapors cause the rapid brush wear and most are not widely accepted or always understood. One should just rely on the testimony of many who have witnessed silicone's effect on brushes, both in the test lab and in customer’s plants, and follow their recommendation not to use it. Even some well cured silicone insulations, when heated, will continue to give off enough vapors to cause problems.
Low cost, wide availability and overall good performance in other applications make silicone caulking very tempting for sealing motor covers to make them watertight or sealing ventilating ducts to make them leak free. Sealants for these kinds of motor use needs to be restricted to non-silicone products. Urethanes, polyurethanes or elastomeric adhesive sealants are recommended for use around brush type motors.

http://www.morganamt.com/us/files/Morgan Carbon US/MaintenanceConcerns.pdf Pg 6

I'm not sure which blue gasket maker you used, but this is good info for anyone else putting one back together.

Brittain
 
I appreciate the head's up. I won't worry too much about it now, since its all sealed up and I was 50-50 on replacing the motor anyway. Hopefully the ventilation I'll add will keep the vapors at bay.

It was a toss up on whether I used the blue stuff or ultra grey. Looking at the packages they both contain polydimethylsiloxanes which I assume is what is to be avoided. Good info for anyone looking at this later :cheers:
 
Nice, I almost think certain parts of a cruiser should be pressurized.

Like a small air pump that pressurizes diffs, trans/t-case, starter and winch to say 0.2 psi to keep them dry. Sure it may push a bit of lubricant out, but then you could seal things right up, and replace some lubricant instead of rusted parts.

We see this in some electrical cabinets in the oil and gas industry. In order to maintain equipment ratings in locations with potentially explosive atmospheres they can run air lines with a regulator to keep electrical cabinets pressurized to prevent explosive gases from entering cabinets with arcing/sparking devices.
 
I wonder if a smog pump would be suitable for that kind of use, or if it just puts out too much volume... I gave that some passing thought when I de-smogged my truck, but I think the accessory space would be better used for a second alternator anyway... Maybe if a custom front bumper was used as an OBA reservoir it would be worth plumbing a little bleed off of that to the winch case/motor so the get pressure at least for water crossings.

But I think it should be okay using the vacuum off of the engine and an intake in the cabin the way the dizzy does, so it will flush out whatever little bit of moisture gets in there.
 

Users who are viewing this thread

Back
Top Bottom