
Navigation
Install the app
How to install the app on iOS
Follow along with the video below to see how to install our site as a web app on your home screen.
Note: This feature may not be available in some browsers.
More options
Style variation
You are using an out of date browser. It may not display this or other websites correctly.
You should upgrade or use an alternative browser.
You should upgrade or use an alternative browser.
Build 1988 BJ74 “Number 1”
- Thread starter FJBen
- Start date
Member Builds and Stories
This site may earn a commission from merchant affiliate
links, including eBay, Amazon, Skimlinks, and others.
- Thread starter
- #82
@ceylonfj40nut reminded me that I need to update my thread.
Not a whole lot going on, other than cleaning...and cleaning and prepping.
Shipping the injection pump today with fingers crossed that it's not a ridiculous bill.
Injectors should be returning this week from cleaning/checking/setting pop pressure. I'm using Welcome to DFISPDX.com for my injectors/pump and they have been good so far. Honest and fair priced, so I will use them for my injector pump as well.
The alternator was dirty, greasy, oily. Cleaned it up. I supposed bringing it in to get it tested wouldn't be a bad idea.

Flywheel machined, there is a step machined into these so you don't want the machinist to mess that up. I can't find the spec at the moment for what it is, but I will keep looking for it and post back.

Rear power: through help here, I found out this is a power supply/plug from a marine application. This cruiser was built by someone who was overlanding/offroading with it. Seems like a smart idea for a power tap when talking about a vehicle with a removable top.

Not a whole lot going on, other than cleaning...and cleaning and prepping.
Shipping the injection pump today with fingers crossed that it's not a ridiculous bill.
Injectors should be returning this week from cleaning/checking/setting pop pressure. I'm using Welcome to DFISPDX.com for my injectors/pump and they have been good so far. Honest and fair priced, so I will use them for my injector pump as well.
The alternator was dirty, greasy, oily. Cleaned it up. I supposed bringing it in to get it tested wouldn't be a bad idea.
Flywheel machined, there is a step machined into these so you don't want the machinist to mess that up. I can't find the spec at the moment for what it is, but I will keep looking for it and post back.
Rear power: through help here, I found out this is a power supply/plug from a marine application. This cruiser was built by someone who was overlanding/offroading with it. Seems like a smart idea for a power tap when talking about a vehicle with a removable top.
That alternator looks awesome. What cleaning tricks did you use?
- Thread starter
- #84
That alternator looks awesome. What cleaning tricks did you use?
some brake cleaner on some rags, small brass brush and blue shop towels. I was careful to not get it inside the front of the alternator, although I'm not sure how much damage it would do? Most of the cleanup I do it just elbow grease. I still have some nooks/crannies to clean out, but some of that I'll just wash after it's all back together.
- Thread starter
- #85
Sometimes I only get 15~20mins at a time in the shop before work in the morning. It makes me focus on the little cleaning projects.
A little 0000 steel wool and a touch of brake cleaning and they clean right up. On the right is how they started out, not terribly dirty. Don't scrub too hard and use too much brake cleaner or you will pull the zinc coating off.

A little 0000 steel wool and a touch of brake cleaning and they clean right up. On the right is how they started out, not terribly dirty. Don't scrub too hard and use too much brake cleaner or you will pull the zinc coating off.
- Thread starter
- #86
I removed the second battery tray. This is where the location is for OME battery tray in the 12V BJ74's.

Battery trays. The factory one has seen better days, but for now it will work. The extra one looks homemade, or shop made. Plenty sturdy. The bracket on the left side is for the Redarc SBI12 dual battery isolator. I believe a mystery push button I found is related to the SBI12 as it has wiring provisions to override and allow both batteries to be used to start in case the starting battery is low.

Years of battery funk/dirt/corrosion on the fenders. I found out using some simple green and 0000 steel wool cut pretty quickly through this showing good paint as you can see in the clean spot. I"ll continue more to see if I can clean it all up.

Battery trays. The factory one has seen better days, but for now it will work. The extra one looks homemade, or shop made. Plenty sturdy. The bracket on the left side is for the Redarc SBI12 dual battery isolator. I believe a mystery push button I found is related to the SBI12 as it has wiring provisions to override and allow both batteries to be used to start in case the starting battery is low.
Years of battery funk/dirt/corrosion on the fenders. I found out using some simple green and 0000 steel wool cut pretty quickly through this showing good paint as you can see in the clean spot. I"ll continue more to see if I can clean it all up.


- Thread starter
- #89
Cleaning more and more. This part was almost fully covered in oil/grease. Overall, the engine wasn't too oily, but there definitely are a few spots that were pretty greasy. Nothing like I have seen on some cruisers though where it's just caked on. Leads me to believe it has been taken care of.
Just though this was kind of cool with the part number on it. Again, no longer available, but I would venture to guess you could find a Toyota or generic vacuum switching valve to replace it.

Just though this was kind of cool with the part number on it. Again, no longer available, but I would venture to guess you could find a Toyota or generic vacuum switching valve to replace it.
Cleaning more and more. This part was almost fully covered in oil/grease. Overall, the engine wasn't too oily, but there definitely are a few spots that were pretty greasy. Nothing like I have seen on some cruisers though where it's just caked on. Leads me to believe it has been taken care of.
Just though this was kind of cool with the part number on it. Again, no longer available, but I would venture to guess you could find a Toyota or generic vacuum switching valve to replace it.
90910-12020 is available and works.
- Thread starter
- #91
For more updates in the "As the Land Cruiser World Turns..."
Got a call from the machine shop, thats always fun. I went in and he showed me all these fun little nuggets.
Issue 1: Whatever shop did the previous wrist-pin/con-rod small bearing install hacked it up. When measuring the wrist-pin bearing is was reading all over the place on his con rod bore-machine gauge. Which he says happens when someone uses like a brake boring tool or something wrong to adjust the bore. Almost no clearance besides the fact they are way mis-shape due to the hack job on them. Thankfully they are still available from Toyota, but thats a weeks wait and $40 more bones shipped, and more shop time.
Issue 2: "rebuilt" head. So a few issues here as well. The valve recess is off 30 thousandths on a replaced valve, and the others are 5~10 thousandths different from each other. I can't find the spec for valve recess, but obviously it's pretty important to get that right. He said the engine is very similar to some Isuzu 4 cylinder diesels and he has specs, that usually put it around 60 thousandths. He was hoping to get specs, otherwise he can try to measure it out, check clearances etc.
Not sure they replaced the freeze plugs. They are all different, not OEM, and painted over so there is really no way to tell so he suggested just get new if you can, if not we will use these. They also painted the head, and the mating surface, then cleaned it off...
He's basically going over the whole head now to make sure it's in spec. I'm glad he's fixing things and asking questions, but annoyed as this was a "rebuilt" head. I'm not sure the shop that did it. I will ask my friend.
Issue 3: Cylinder liner protrusion. 2 of the liners are sitting a little low in the block. Too low for his comfort. As I understand it, if you have a liner thats too low, you run the risk of the liner moving around, which can cause the flange to break off, possible headgasket blow and parts flying around a piston are a bad thing. Probably will have to slightly deck the block, very slightly, and set the counterbore correctly on the other 2 cylinders so that everything is within spec. This also means we have to be correct on valve recess, because well again, exhaust valves coming into contact with a piston is a bad thing.
Issue 4: Fairly minor, but this plug is no longer available and after cleaning the block you can see the hole Will need to be removed and a new one made.

Not exactly the best day in engine build land, but salvageable. Just goes to show, even when you get parts that are already "rebuilt" or put together, double check everything!!! It could save you a big head/heartache further on up the road.
Clapton, Further on up the road...
Got a call from the machine shop, thats always fun. I went in and he showed me all these fun little nuggets.
Issue 1: Whatever shop did the previous wrist-pin/con-rod small bearing install hacked it up. When measuring the wrist-pin bearing is was reading all over the place on his con rod bore-machine gauge. Which he says happens when someone uses like a brake boring tool or something wrong to adjust the bore. Almost no clearance
besides the fact they are way mis-shape due to the hack job on them. Thankfully they are still available from Toyota, but thats a weeks wait and $40 more bones shipped, and more shop time.Issue 2: "rebuilt" head. So a few issues here as well. The valve recess is off 30 thousandths on a replaced valve, and the others are 5~10 thousandths different from each other. I can't find the spec for valve recess, but obviously it's pretty important to get that right. He said the engine is very similar to some Isuzu 4 cylinder diesels and he has specs, that usually put it around 60 thousandths. He was hoping to get specs, otherwise he can try to measure it out, check clearances etc.
Not sure they replaced the freeze plugs. They are all different, not OEM, and painted over so there is really no way to tell so he suggested just get new if you can, if not we will use these. They also painted the head, and the mating surface, then cleaned it off...
He's basically going over the whole head now to make sure it's in spec. I'm glad he's fixing things and asking questions, but annoyed as this was a "rebuilt" head. I'm not sure the shop that did it. I will ask my friend.
Issue 3: Cylinder liner protrusion. 2 of the liners are sitting a little low in the block. Too low for his comfort. As I understand it, if you have a liner thats too low, you run the risk of the liner moving around, which can cause the flange to break off, possible headgasket blow and parts flying around a piston are a bad thing. Probably will have to slightly deck the block, very slightly, and set the counterbore correctly on the other 2 cylinders so that everything is within spec. This also means we have to be correct on valve recess, because well again, exhaust valves coming into contact with a piston is a bad thing.
Issue 4: Fairly minor, but this plug is no longer available and after cleaning the block you can see the hole Will need to be removed and a new one made.
Not exactly the best day in engine build land, but salvageable. Just goes to show, even when you get parts that are already "rebuilt" or put together, double check everything!!! It could save you a big head/heartache further on up the road.
Clapton, Further on up the road...
- Thread starter
- #92
Just for fun, I decided to check under the carpet to see if there were any surprises.
Pulled back the carpet and found this.

I was like...

When you see something like that...it's usually holding water/mold/fungi/SARS/Ebola/Hanta and covering up rust holes patched using street signs or PBR cans.
Much to my surprise, it looks really nice under there. Other than a few very small surface spots, it looks great minus the dirt/sand. The blue lines are ARB air lines, and there are a few extra wires I'm not sure what they are for.

Some other non-tech finds. On the kick panel it looks like they have a date system. This one says 9/88 which would be about right according to the VIN.

Kick panels in great shape.

Pulled back the carpet and found this.
I was like...
When you see something like that...it's usually holding water/mold/fungi/SARS/Ebola/Hanta and covering up rust holes patched using street signs or PBR cans.
Much to my surprise, it looks really nice under there. Other than a few very small surface spots, it looks great minus the dirt/sand. The blue lines are ARB air lines, and there are a few extra wires I'm not sure what they are for.
Some other non-tech finds. On the kick panel it looks like they have a date system. This one says 9/88 which would be about right according to the VIN.
Kick panels in great shape.
Hello,
Too bad about the engine. But the issues seem repairable, and that is what matters.
Many plastic parts have that date system stamped on them.
Part manufacturing dates seem to start in late 1984, matching 70 Series' production run. "FJ70" is stamped as well.
Juan
Too bad about the engine. But the issues seem repairable, and that is what matters.
Many plastic parts have that date system stamped on them.
Part manufacturing dates seem to start in late 1984, matching 70 Series' production run. "FJ70" is stamped as well.
Juan
- Thread starter
- #94
Hello,
Too bad about the engine. But the issues seem repairable, and that is what matters.
Many plastic parts have that date system stamped on them.
Part manufacturing dates seem to start in late 1984, matching 70 Series' production run. "FJ70" is stamped as well.
Juan
Yeah she had 485Km on it when it blew a hose then headgasket, the ate a lifter, bent pushrod and scored a cylinder wall. My theory is that the cooling system wasn't up to snuff. The radiator was a little plugged and leaking, coolant looked awful and most of the hoses looked old and OEM...possibly original.
- Thread starter
- #95
double post.
Taking the rocker arm in to machine shop today to have them look at that. Overall it's pretty good but there are a few that have some deeper wear. Will figure out what options are with that.
Suspension:
Trying to find out any info on my suspension, but its pretty tough. The shocks are Maxi Trac by Repco which seems to be an auto parts store brand. Think Autozone or the like. However, what I've found is that they are made at the same factory, or are the same as Iron Man. I'm not sure if it's always been Ironman makes Repco stuff or not. The shocks are substantial and "look" comparable to OME's I have had in the past.
Also I'm not sure if the leaf springs are Repco either. I'm trying to find SOME sort of identification on the springs, but I can't. They do have pads between the springs, not sure if all modern leaf packs have those or not. It's a 9 leaf pack with the bottom 3 being very thick. That seems like a lot of overload leaves.
@roscoFJ73 Have you used or heard anything about the Maxi Trac stuff? hard to find any info about it. Eventually it will need replaced, but for now, its down the road.
Leaf springs:
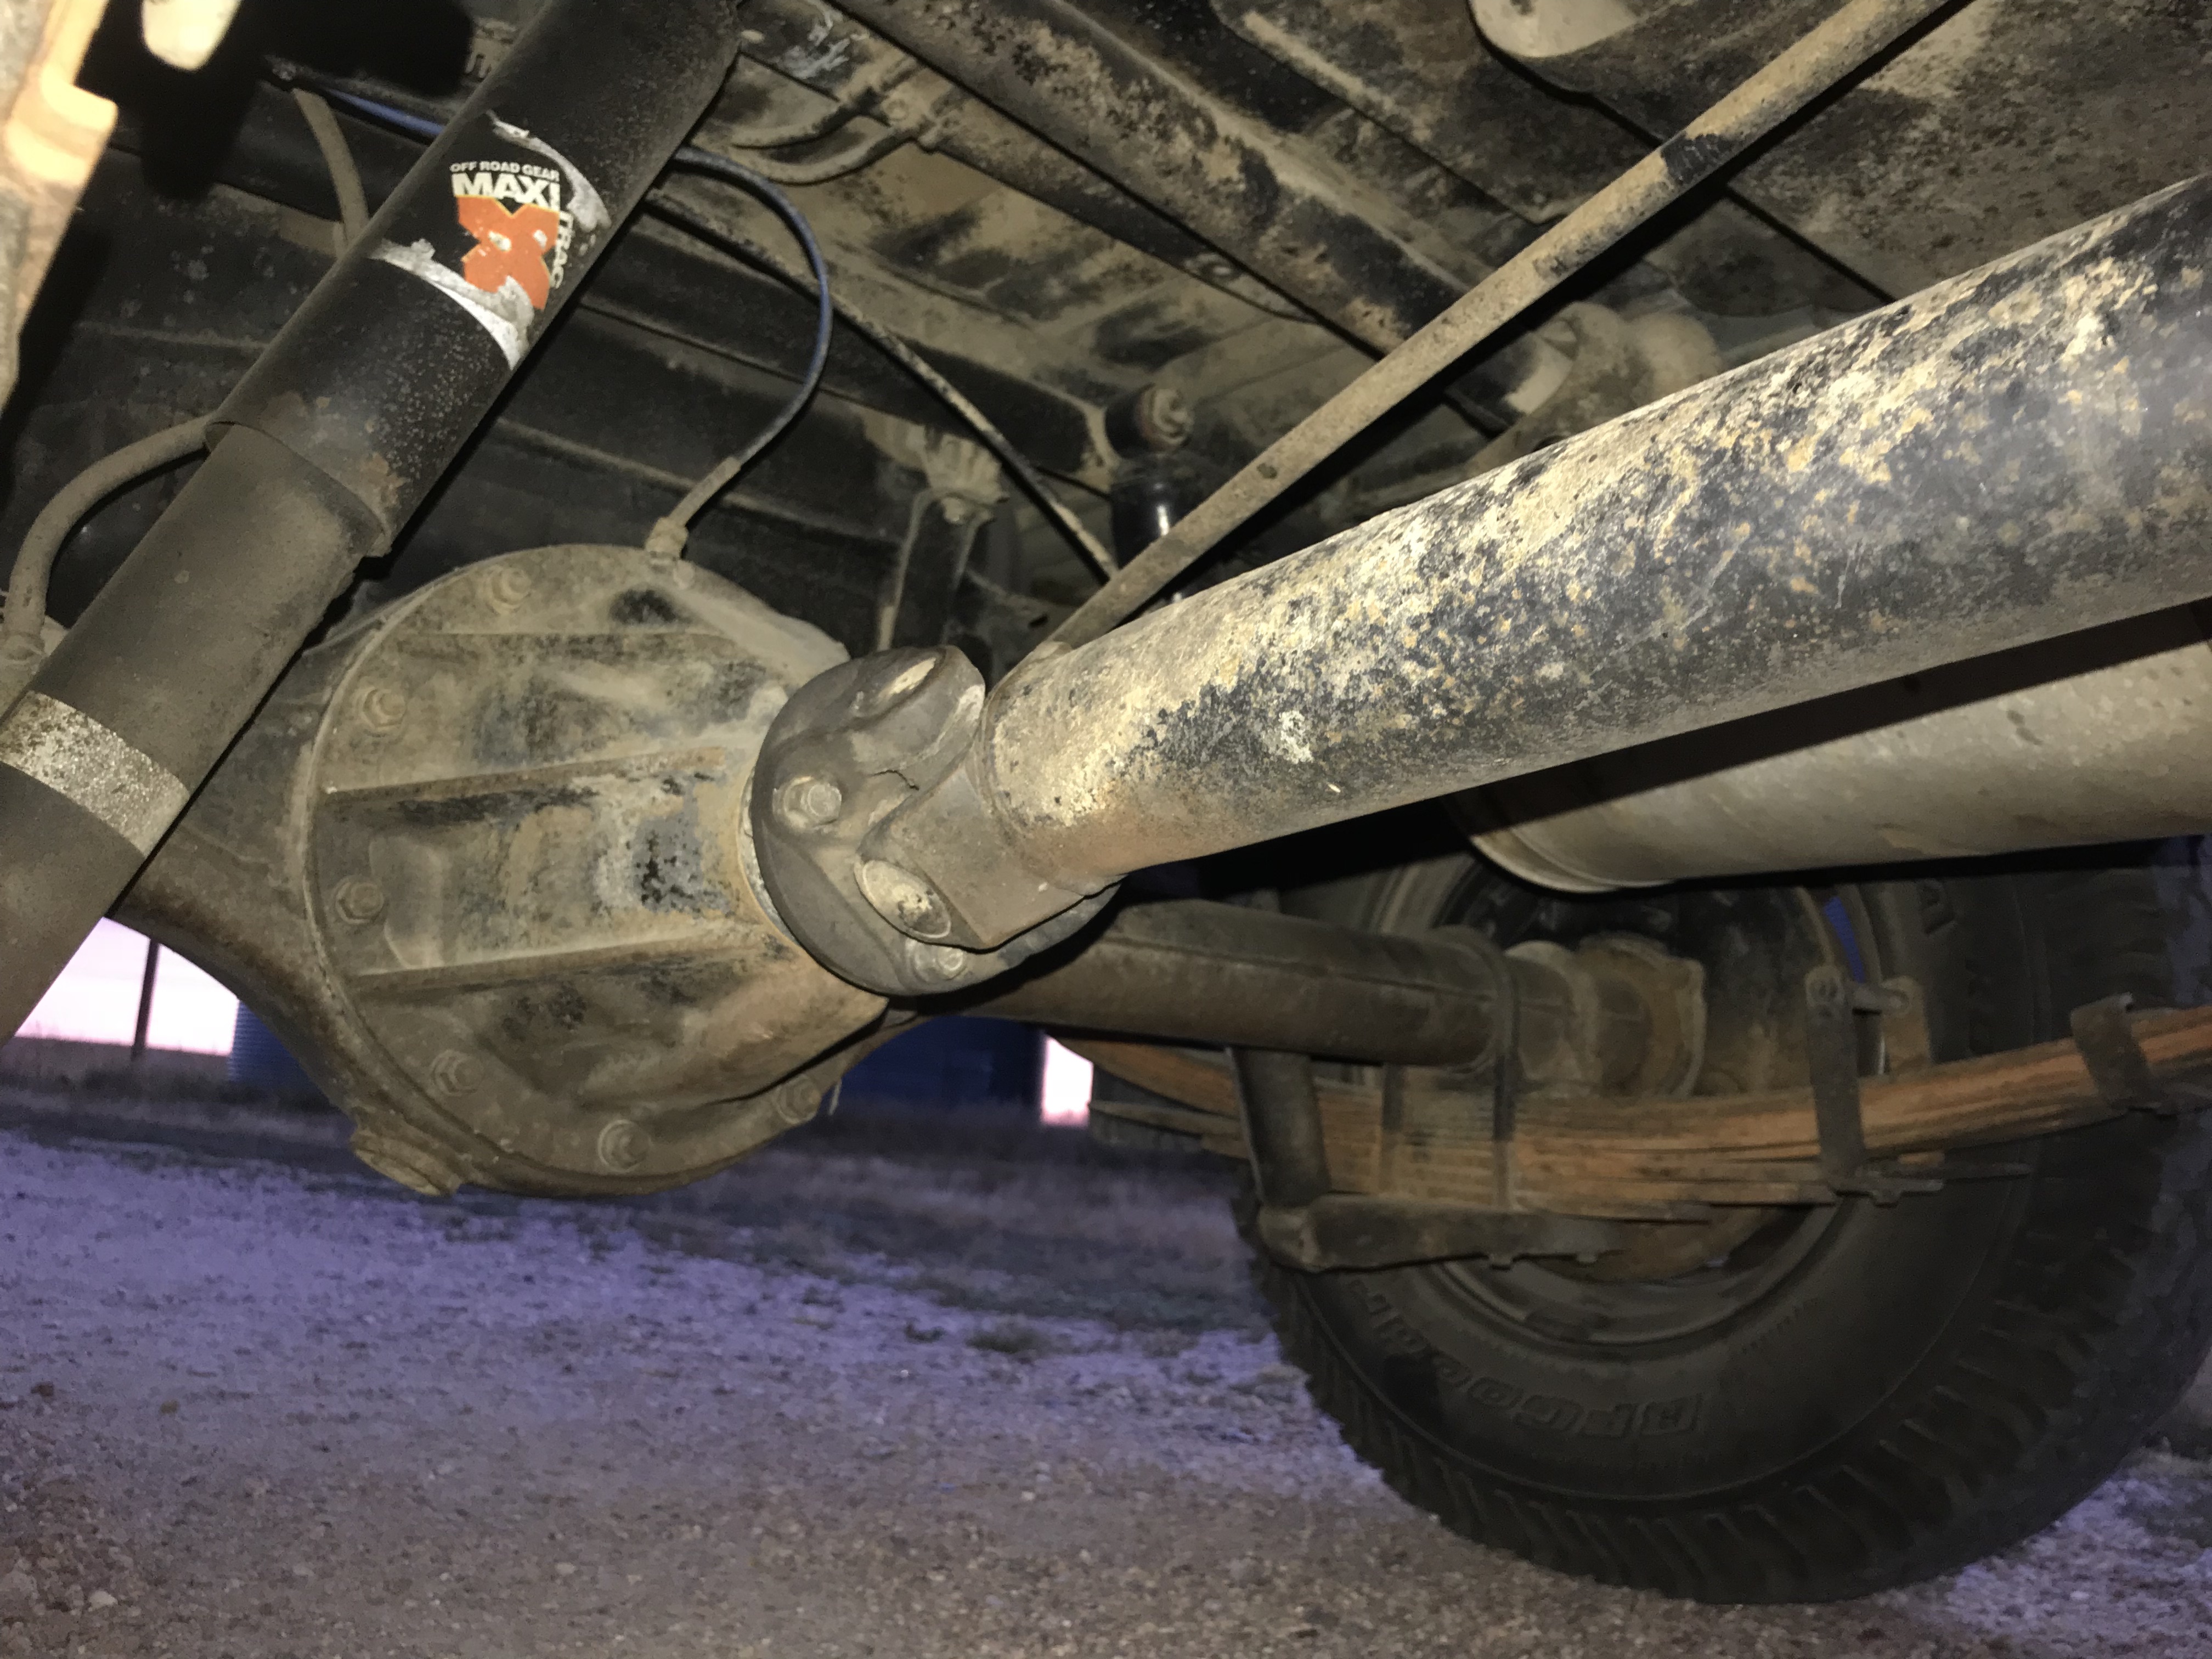
Closeup

@cruiseroutfit Have you seen this brand on any of the imports you've got? BTW, will be ordering from you shortly...might as well do a clutch at this point.
Taking the rocker arm in to machine shop today to have them look at that. Overall it's pretty good but there are a few that have some deeper wear. Will figure out what options are with that.
Suspension:
Trying to find out any info on my suspension, but its pretty tough. The shocks are Maxi Trac by Repco which seems to be an auto parts store brand. Think Autozone or the like. However, what I've found is that they are made at the same factory, or are the same as Iron Man. I'm not sure if it's always been Ironman makes Repco stuff or not. The shocks are substantial and "look" comparable to OME's I have had in the past.
Also I'm not sure if the leaf springs are Repco either. I'm trying to find SOME sort of identification on the springs, but I can't. They do have pads between the springs, not sure if all modern leaf packs have those or not. It's a 9 leaf pack with the bottom 3 being very thick. That seems like a lot of overload leaves.
@roscoFJ73 Have you used or heard anything about the Maxi Trac stuff? hard to find any info about it. Eventually it will need replaced, but for now, its down the road.
Leaf springs:
Closeup
@cruiseroutfit Have you seen this brand on any of the imports you've got? BTW, will be ordering from you shortly...might as well do a clutch at this point.
Last edited:
- Thread starter
- #96
I took my rocker arm to the machine shop yesterday just see what the machinist thinks about mine. He said absolutely no issues at all fixing them. I only have one that looks "deep" but he said no issues at all.

The worst one

Overall pretty good shape for almost 500Km.
The rocker arms are still available, at least a few are at this point. Unless they are completely trashed, I think most can be ground back to working condition.
The worst one
Overall pretty good shape for almost 500Km.
The rocker arms are still available, at least a few are at this point. Unless they are completely trashed, I think most can be ground back to working condition.
- Thread starter
- #97
Got some time in today.
Pushed back into the shop.

Cleaned up the pulley. Fine steel wool and polish. Also cleaned the heat shields in the background. More cleaning work was done in the engine bay.

While the engine is out, this is a great time to fix the input seal on the H55f.

You have to drain the transmission, I opted drain the t-case as well. Fluid looked pretty new so it's at least been changed once in it's life.
You then remove the bolts on the bearing retainer, pull the seal and the gasket. It just so happens that a 36mm socket perfectly fits the seal to drive it in.
This was after removing the bearing retainer and cleaning a little. It was pretty greasy and dirty in there. I assume it was dirty from a rear main leak, although the back of engine didn't look bad. It's mostly oil and clutch dust/grime.

After putting it all together, make sure to use some liquid sealant on the bolt threads so it doesn't leak through the bolts. Torque to 17 ft lbs according to FSM.
Cleaned some more and it got a little better, but I called it good for a part you will never see.

Pushed back into the shop.
Cleaned up the pulley. Fine steel wool and polish. Also cleaned the heat shields in the background. More cleaning work was done in the engine bay.
While the engine is out, this is a great time to fix the input seal on the H55f.
You have to drain the transmission, I opted drain the t-case as well. Fluid looked pretty new so it's at least been changed once in it's life.
You then remove the bolts on the bearing retainer, pull the seal and the gasket. It just so happens that a 36mm socket perfectly fits the seal to drive it in.
This was after removing the bearing retainer and cleaning a little. It was pretty greasy and dirty in there. I assume it was dirty from a rear main leak, although the back of engine didn't look bad. It's mostly oil and clutch dust/grime.
After putting it all together, make sure to use some liquid sealant on the bolt threads so it doesn't leak through the bolts. Torque to 17 ft lbs according to FSM.
Cleaned some more and it got a little better, but I called it good for a part you will never see.
Looking good!Got some time in today.
Pushed back into the shop.
Cleaned up the pulley. Fine steel wool and polish. Also cleaned the heat shields in the background. More cleaning work was done in the engine bay.
While the engine is out, this is a great time to fix the input seal on the H55f.
You have to drain the transmission, I opted drain the t-case as well. Fluid looked pretty new so it's at least been changed once in it's life.
You then remove the bolts on the bearing retainer, pull the seal and the gasket. It just so happens that a 36mm socket perfectly fits the seal to drive it in.
This was after removing the bearing retainer and cleaning a little. It was pretty greasy and dirty in there. I assume it was dirty from a rear main leak, although the back of engine didn't look bad. It's mostly oil and clutch dust/grime.
After putting it all together, make sure to use some liquid sealant on the bolt threads so it doesn't leak through the bolts. Torque to 17 ft lbs according to FSM.
Cleaned some more and it got a little better, but I called it good for a part you will never see.


- Thread starter
- #100
Pulled the rocker arm apart today. Appears to be wear on the arm, going to get it checked. This part is still available if it's highly out of spec.

New con-rod bushings as the old ones were honed by hand at a previous "machine shop"

More freeze plugs for the head that was "rebuilt"

New con-rod bushings as the old ones were honed by hand at a previous "machine shop"
More freeze plugs for the head that was "rebuilt"