1978 LPB Teardown and Rebuild

This site may earn a commission from merchant affiliate
links, including eBay, Amazon, Skimlinks, and others.

Well... I like 40 series the most. This set up is all 40 series with the exception of the Toybox of course. I don't want too much of a frankenstein rig, though you wouldn't know it from all of my alterations thus far.

I respect that.

I used to want to leave my rig stock, but I can't. If I ever find that super-clean BJ42 LX I've been looking for since I moved here, I will leave it as Mr. Toyoda intended; otherwise I can't stop myself from swapping stuff.:bang::bang:

Josh
 
What was the spammer selling - I didn't even see it :censor::ban:

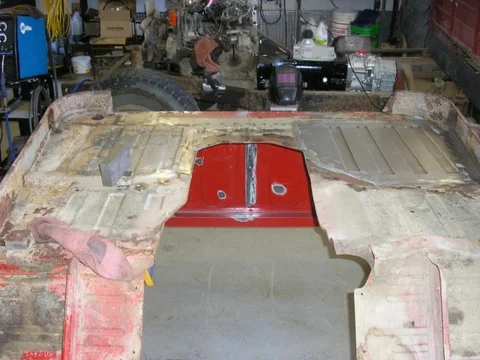
Anyway... this week at work, in my spare time ;), I drew up, punched out and bent up a panel that mimics the drivers side floor. It's got the same three long and one short rib.
P1010001.webp
Had to bring it home to position the ribs where they want to be and mark the location and angle of the spot weld flange. Took it back to work and cut and bent it.
P1010005.webp
P1010001.webp
P1010005.webp
 
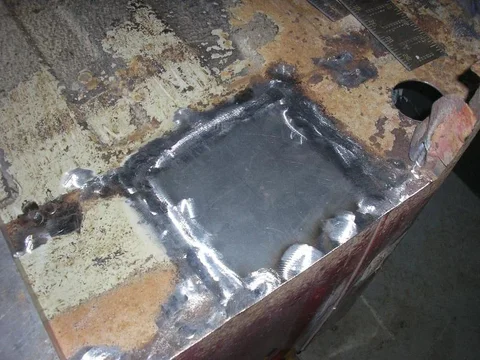
Also cut a scrap for the cab mount rust hole
P1010002.webp
and welded it in
P1010003.webp
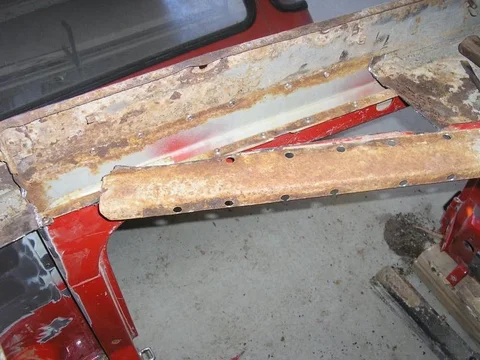
Then I had to remove the rest of the floor panel under the rocker
P1010006.webp
P1010002.webp
P1010003.webp
P1010006.webp
 
nuther shot of the rocker
P1010007.webp
Used a cut off or "zip" disc on the angle grinder to trim the panel to fit. I like to cut always on the big side and slowly trim it down to fit. Better than cutting too much.
P1010008.webp
Positioned carefully and tacked in place. I find it easiest with some copper bar or aluminum clamped under the weld area to absorb the heat and keep the seam flush. Also, I'm finding it best no to have the patch panel too tight of a fit. If you force a tight patch in you will have too much material and it will oilcan on you. Better to have a small gap and let the weld pull the panel and floor tight as it cools. Work slow so you only do it once. Oh - I primed the hidden area in the rocker too.
P1010009.webp
P1010007.webp
P1010008.webp
P1010009.webp
 
All welded in. Or rather "tacked" in cuz I never actually ran a bead. Just tack, tack, tack. The floor and my patch panel are all 18ga steel (about 0.050") so it's real easy to melt holes rather then weld. Even with a backer of copper I blew a few holes. My welder goes plenty low enough and worked well. You may notice (especially now that I point it out) that I did not weld the outer rocker skin to the flange I have on the patch panel. I removed the side steps and found enough rust that I will be re-skinning the rocker and continuing back around the rear corners where the spot welds are bulging.
P1010011.webp
All cleaned up. I will be flipping it over and likely doing a bit of touch up on the inside. Both under and inside will be textured with spray on tinted rock guard but I want it nice and smooth even though no one else will see it.
P1010012.webp

P1010013.webp
P1010011.webp
P1010012.webp
P1010013.webp
 
I decided that rather than alter the cross member like miker did I am just going to slide it back 7" to match the tranny cutout. I may add another short section of channel going from the cross member forward to stiffen the floor more.
P1010014.webp
I liberated a piece of scrap from work and will fashion it to fit across the back of the floor and underneath similar to what miker did. It is roughly the same height as the original X-braces. The interior piece of this arrangement is visible on the frame in the background in front of the bed.
P1010016.webp
Here is the rust from under the side steps - also visible without the blur above. If I have to replace this metal I may as well cut far enough down that I can get into the floor and address the spot weld flange where it is rusting nearly bad enough to start bulging. As mentioned above I will be going all the way back to the rear corners where they are also bulging with rust. The whole tub will be blasted later this summer but I cant blast inside the joints where it is need the most.
P1010004.webp
P1010014.webp
P1010016.webp
P1010004.webp
 
it is amazing what you can do with a piece of flat metal ...
when i am out there in Sept we must meet up and chat.
congrats.
 
Outstanding attention to detail on this truck. Your metal skills are great.
 
This is inspirational work (as usual) - but I must admit I would like it a lot more if you were working on stuff for me :grinpimp:.

Is it possible to explain (without going into too much detail) the motivation behind the whole "Toybox" thing?
 
Last edited:
Positioned carefully and tacked in place. I find it easiest with some copper bar or aluminum clamped under the weld area to absorb the heat and keep the seam flush. Also, I'm finding it best no to have the patch panel too tight of a fit. If you force a tight patch in you will have too much material and it will oilcan on you. Better to have a small gap and let the weld pull the panel and floor tight as it cools. Work slow so you only do it once.
I've tried heat sinks clamped under the butt joints a few times, which cut down on the excess filler material on the back side - but it also seemed to require more heat to fuse the material completely (back side seam). What I do now, which I didn't do before, is a lot more planishing of the weld dots during the process. Tack around the patch, planish the dots, grind those almost to the surface (both sides), more tacks, more hammer, grind those down, etc. Kind of trying to remove any induced shrink/stress at the tacks as it occurs in each full pass. I think if I had done more of that on my quarter patches it would have gone much easier on the finish-up hammer/dolly stuff. Pretty anal :D

I think you're spot on about the fit, you can almost create oil canning before you start welding if the patch is a forced fit. And it seems a lot harder to keep it in place with the first few tacks.

Just my limited experience .02
 
Last edited:
Gus

The Toybox was added for a few reasons. I fully intend to take this truck into the bush and wheel it as soon as the paint is dry. The toy box will allow me to crawl over and through obstacles at lower speeds and therefore in a gentler way. That will have the effect of less breakage and a more sustainable trail system in theory. I'm not a fan of big blocks and 40"+ tires throwing mud and digging holes. I'd rather follow an old seldom used trail to a scenic lookout or remote lake for some kayaking or canoeing. I'm sure I'll get my share of mud though.

The point of the heat sink behind the panel is exactly that. It allows you to use more heat without blowing holes both by absorbing thermal energy and physically providing a surface under the joint that won't stick to the filler material - if you use copper or aluminum.

Planishing is needed after and between tacks. I usually start with a tack where ever it's needed to initially position the panel. Then I will tack around the perimeter halfway between each of the previous tacks. I keep halving the tacks until either the gaps are gone or the joint starts to distort up or down. If it distorts up on the weld side I will grind the other side reasonably flat and use a block of heavy steel under it and a body hammer to pound it flat again.

On this particular panel I welded it completely by halving the gaps until they were gone. Then I took a 5" electric angle grinder to grind the tacks nearly flat. The 5" grinder is very aggressive so I finished the grinding using a 2" air angle grinder with a 36 grit disc taking the tacks down to sheet level. This usually makes the joint sink down so I used a block of steel on the weld side and hammered the joint flat so I could continue to grind the weld flush.

Grinding the weld completely flat removes a lot of the strength of a weld in general. When welding structural applications such as a roll cage or even a rack or table of some kind you would never grind the weld bead away. This is a cosmetic weld and in this particular application it is wise to weld both sides. When I get a chance I will flip the tub over and inspect the burn through closely. There will be points where more tacking is required on the other side before grinding it smooth as well. More hammering will relieve the stress and get it flat. The coating I am using will erase all trace of the joints.
 
Thanks for all the great info/detail Kevin!


Grinding the weld completely flat removes a lot of the strength of a weld in general. When welding structural applications such as a roll cage or even a rack or table of some kind you would never grind the weld bead away. This is a cosmetic weld and in this particular application it is wise to weld both sides. When I get a chance I will flip the tub over and inspect the burn through closely. There will be points where more tacking is required on the other side before grinding it smooth as well. More hammering will relieve the stress and get it flat. The coating I am using will erase all trace of the joints.

I also believe the less grinding the stronger the weld, but many seem to think it doesn't matter much (on sheet metal anyway). I kind of like the idea of an honest, solid patch that (even if it shows a bit through the paint) doesn't sacrifice strength for cosmetics. On some show car type "restoration" I guess the cosmetics would take precedence.
 
I read, and I believe it from my own experience, that the heat from grinding will distort a panel as fast as the heat from welding. The write up I read recomended grinding the tacks as you do them. That is, do a round of tacks and then grind them. Weld another round of tacks and grind again.

Looking good Kevin, are you staying at work until 4:30 or so? Would make it very easy for me to drop in after I finish work.
 
Grinding does make heat for sure. I like to use a flapper disc (overlapping sand paper disc) but it makes way too much heat. I used the 5" grinder to save time but you can't stay in one spot for long. I do quick motions back and forth over a 6" section making sure to press lightly and not turn the steel blue with heat. The 2" air grinder does not make nearly as much heat and I still move it quickly.

I will be at the shop after hours tonight. We close at 3:30 and I'll be here for a couple hours at least.
 
the guy that taught me showed me that a slow turning disc removes more material at a less heat.
i practice that now and it seems to work very well ... plus the disc lasts longer.
 
the guy that taught me showed me that a slow turning disc removes more material at a less heat.
i practice that now and it seems to work very well ... plus the disc lasts longer.

What type of grinder/disc do you use for that?
 
i use a heavy knobby disc for heavy removal, don't know the name.
i use the flapper for the rest...
 
just ignore me, I'm playing with video uploads and imbedding.

test1


test2


<iframe width="960" height="750" src="http://www.youtube.com/embed/KLPb00uhCoc?rel=0" frameborder="0" allowfullscreen></iframe>
KLPb00uhCoc


Last edited:

Users who are viewing this thread

Back
Top Bottom