Builds 10 years with the 74/after-the-fact build thread (1 Viewer)

This site may earn a commission from merchant affiliate
links, including eBay, Amazon, Skimlinks, and others.

Ok, I'm home from a great trip in the HDJ81 to AZ and UT, super good times were had by all.
So, it was time to finally head over to Vancouver Island and collect the 74!

While Rob was waiting for the last elusive gaskets to arrive, I asked him if he would figure out A) why the power door locks haven't worked in 9 years, and B, why the **** if you raise the driver's side window all the way to the top, or doG forbid, use the "auto up" feature, it makes a sound like an A bomb when the glass gets to the top of the frame (or the bottom)

It had been doing that for 8 or 9 years too - I just got real good at letting off the button at the last possible second.
It was always good for a panicked phone call if I lent the 74 to someone and neglected to mention that little "feature" :D

A was easy - turned out to be a bad switch. Factory replacement still available, problem solved!
B...
42547193981_37bd51fe4d_c.jpg


Yeah, that might do it :doh:
Part also still available, problem #2 solved!

I can't express what a luxury it is to roll the window up without fear of imminent explosion. Functional power locks is just a bonus...
 
Rob had almost everything done, but needed my help to finish it off. And by "my help" I mean I stood around and got in the way until it was time to lift something heavy... in this case it was the hardtop.

Just about every hardtop and windshield gasket was replaced. This was the only one that required the hardtop to come right off.
Removal was a bit of a PITA, but I think totally worth it. New Toyota gaskets are so sweet.
40738597060_b699d1e7f0_c.jpg


The original was still in decent shape, but it was still 30 years old(!) and fairly compressed. Good for another 30 now - and I'll be dead before it needs replacing again!


These were the little buggers that held up final assembly:
28673599558_4f19e1e115_c.jpg


More new gasket-y goodness
28670455348_86e8966b00_c.jpg


New shield in. Driving it for the first time was almost shocking, I hadn't realized how bad the original had gotten. It was like having no shield at all.
Wont stay that way long, but sure is nice for now.
[
28670453798_d1ebdd773a_c.jpg
 
Best part of all of this was getting to drive it to lunch as a convertible!
28670454758_724413abcd_c.jpg


28670454248_132216e1b8_c.jpg


Yes it looks ridiculous with the rear door windows... don't care! If I didn't live in a rainforest populated with thieving sons of b's I would be super tempted to soft top it. And may yet...
 
On the drive from Rob's to the ferry I tried to get a bitchin "driving off into the sunset " pic, but my damned iPhone camera now only works in selfie mode so this was the best I could do without actually seeing the screen :bang:
27677366387_78a79ae50c_c.jpg


It's been great to have it back after not driving it since early January(!)
This repair turned out to be a lot more extensive than originally anticipated, but well worth it in the end I think.

Rob did his usual fantastic work with his usual absurd attention to detail, put up with my truck stuck at his house for a good 5 months, AND barely scolded me at all for the quality of some of the fine "work" I've done myself on the poor thing - yes I know how hard that is :hillbilly:
A big thanks and a pile of :beer: to @REDREEFER , thanks buddy!
 
Forgot one big mod!
Excuse the lousy selfie-mode photos :bang:
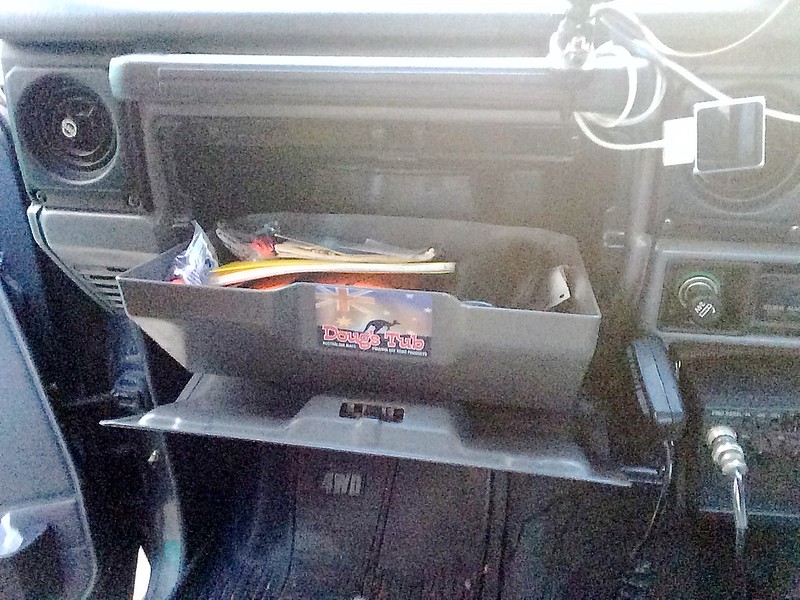
but these are friggin awesome. If you have a 70 series with that goofy glovebox you need a Doug's Tub. After years of procrastination I finally broke down and got one from Cruiser Brothers. Thanks to those guys for bringing them in.
28676559798_74e5c5cd16_c.jpg


28676559648_c351fa9c9c_c.jpg
 
I need to replace my windscreen frame and have some rust repairs done to my 73 also. Do you have a complete list of the part numbers of the seals/gaskets you used? That would save me a bit of faffing finding them!! thanks!
 
I need to replace my windscreen frame and have some rust repairs done to my 73 also. Do you have a complete list of the part numbers of the seals/gaskets you used? That would save me a bit of faffing finding them!! thanks!

Sorry, I don't. Rob ordered up most of that stuff.
 
True to my vow that the 74 wouldn't see another winter outdoors, back in November I put some badass 235/75R15 rollers on her, parked it in my heated garage and hooked maintenance chargers to all 3 batteries. Luxury!
It looks ridiculous, but it fit with plenty of room to spare.
46705898832_65816c6261_c.jpg


4 months later it's time to start farting around with it!

I had been planning on redoing the rear storage somehow. I had bought a Tembo Tusk fridge drop slide from my friend gofast, originally thinking I would mount it in my HDJ81. The thing was enormous and was going infringe way too much on my sleeping space, so I thought I'd use it in the 74 instead.

I also have a Drifta Car-back kitchen I picked up back in 2013 and never did anything with, and wanted to work it into the 74 somehow.
I thought I had a pic of test fitting the TT slide and the Drifta side by side on the top of my storage but apparently I do not. Suffice to say it wasn't good.

If I'd gone that route I'd have to give up sleeping in the 74, and was ok with it. So if I was ok with giving that up...
 
Removed the old drawer...
47304075461_0af7a0f59c_c.jpg


33255060778_271ffebaff_c.jpg


There was just enough room for the fridge on the old ARB slide and the Drifta to fit in the old base. The Drifta was a little too long to fit without cutting in to that storage cubby that's behind that wall, but that seemed like the only (super minor) fit issue. The more I thought about it the more I liked it.
 
I've had such good luck with the 100W solar panel on my 81 keeping up to the fridge that I wanted to do the same to the 74.
I had picked up a pair of 50W mono solar panels off craigslist last year, and grabbed a Victron charger.
33430959078_e9d1dd9fc6_c.jpg


I was thinking of gutting the 3rd 12V battery system, running the fridge off 24V and charging the 24V array with the solar. Without the fridge, my 12V needs are pretty small on this truck: stereo, ham and cb radios, a couple of power ports... that's about it. I could power that off a converter easy.

I also thought of ditching the speaker enclosure in the front of the drawer unit to regain all that extra space.
47251569692_c646ee4080_c.jpg


But in the end it just seemed like too much work :lol:
And it seemed silly to take out a really good functioning 12V system, so F it, it all stays.
 
Last edited:
Back to the drawer FFS...

New plan is fridge on the floor and a drawer stacked above the drifta. Storage boxes on top of the old cubby/speaker enclosure to get back some of that space I gave up by leaving all that crap as is :hillbilly:

I conned my buddy Graydon, who built the original unit, into helping me with the reno. We got started today.
Blew out the rear cubby.
33428252138_2d035b8ca3_c.jpg


Test fit with a center piece of 3/4" ply. Perfect fit!!
33428252858_2b74afa8dc_c.jpg


used some wood dowels
32362896927_6cd028e5f9_c.jpg


New walls
47306839231_d150b29d40_c.jpg
 
one more test fit
47251569232_e65510bd6f_c.jpg


And new top cut and set in place
33428252628_6d7cbfbe48_c.jpg


That's as far as we got today. I think we'll be able to do the whole redo with a single sheet of 3/4" plywood and repurposing the old drawer and top.
Nice to finally get some 74 stuff happening.
 
Test fitting the front boxes. The driver's side box with the shelf will be a front loader, and the other box is a top loader. The top loader box is huge so once I figure out what I'm going to put in there it'll most likely get a divider put in it somewhere.
46835989184_9d90d58109_c.jpg


Side wing storage:
46835988984_ed26d82d8d_c.jpg


There is a crap-ton of space in that box!
46644123265_962e067769_c.jpg


A couple of modifications are needed, but hopefully by tomorrow I should be able to start painting stuff, and measure up and make the new drawer out of the old full width drawer.
Should come together fairly quick now.

Should... :lol:
 
Getting close to wrapping this little project up, but between a bit of work, my schedule, buddy Graydon's schedule, and getting my 81 ready for Utah in 12 days(!) it's taking a while.

Greg_B came over with his industrial crimpers and we made up some new cables for the 600W Go Power cheap inverter that's going in, then installed a set of Blue Sea terminals on what I now call "The Wall of Electrical Shame"
32382795197_5c2200a311_b.jpg


Stuff like this keeps poor Redreefer awake at night - honest Rob, I'm going to clean it up!
(no I'm not...) :grinpimp:

Those terminals take power straight from the 24V array. From there it goes to the old Blue Sea battery switch that controls/feeds the 24-12V battery charger and the 24V Puma compressor.

We hardwired the ARB fridge, which now gets it's power straight off those terminals. The fuse in the upper right corner is for the fridge power line.
 
I put 2 coats of marine enamel on all of the wood - man that stuff reeks.
Here's the main box back together, with the old drawer cut down into the new drawer mounted with the old overkill Accuride slides.
47655248371_705cc149b3_h.jpg


We were able to undo the box mounts at the front and tip the whole box up just enough to install nutserts for the fridge slide's 4 front mounting bolts. The rear of the slide is bolted down with lag bolts.

33777902458_a88b5b5768_b.jpg


47655248021_e9d55eb93f_b.jpg


The front boxes are in - the driver's side box is bolted in, nutserted to the rear box, and bolted down to the speaker box.

the passenger side is just sitting in place as I have a bit more wiring to the 12V battery to do before putting it in place properly. I'll still have access to the 12V battery but it won't be instantaneous.

33777902268_73927e30a9_b.jpg
 
Last edited:
Once they were in I noticed the first major cock up...
33777902558_cccc3b1978_b.jpg


I had been looking at that front seat all winter, positive there was plenty of room for the seat to recline with those full height boxes behind it.

Well sure there was... if the seat was moved all the way forward on the rails to allow access to the rear :bang::rofl:

With the seat all the way back I can barely move the seat back at all. Fortunately I am not cursed with an overabundance of height :hillbilly: so I may be able to make it work ok.

If not I guess I'll have the first project of winter 2019 teed up...

Anyway, hopefully the rest should be done by the end of the week. Maybe.
 
Getting close...

Decided to try some UHMW tape for the Drifta runners to slide on. I figured if it didn't work very well I still have enough room between the Drifta and the upper drawer to use UHMW strips instead.

32773674587_053e2ef7db_b.jpg


A bit of material taken off the runners with a belt sander, and the Drifta slid into place nicely.

47664036772_7d73ea65f6_b.jpg


32773674857_ba50d03d9f_b.jpg


And for fridge cable management I went high tech, high dollar: a $5 keychain reel zip tied to the power cable :hillbilly:
For that extra touch of class I stuck some canopy tape around the body of the reel to keep rattling to a minimum.
32773675077_1e33312b7c_b.jpg
 
Looking good!

FWIW, Snowpeak makes an "Expo approved" keychain reel, it's made of titanium and costs $99.99

It'll go well with their $45 pizza cutter that I'm sure you already keep in the drawers :)

 
Looking good!

Bahahahaha - I know it's total caveman stuff compared to the work you do! But thanks anyway... it should serve the purpose pretty well. I hope :grinpimp:

FWIW, Snowpeak makes an "Expo approved" keychain reel, it's made of titanium and costs $99.99

It'll go well with their $45 pizza cutter that I'm sure you already keep in the drawers :)


I doubt I'll ever be "$100 titanium reel" ExpoSexy. Now, installing an inverter solely to be able to run a burr coffee grinder - well thats just good sense :lol:

I bet it's a real nice reel though...
 
Yeesh, 11 months later and not much to show... spring, summer, and winter 2019 came and went and the 74 stayed in the garage. Bits and pieces got done, but other stuff seemed to keep me busy.

With my 81 currently off the road getting ready for some maintenance, I went 3 months with no Land Cruiser to drive - that was enough of that, the salt is gone from the roads so the 74 is insured and back on the road. Really enjoying driving it again... though there isn't a lot of driving going on at the moment .

Anyway, the solar is up and running. I had some old Thule crossbars and towers lying around so decided to use them.
The crossbars I had were just long enough to fit width-wise, but not long enough length-wise to reach the rear drip rail. I didn't want to drill my hard top to install side drip rails, so bought the longest crossbars Thule makes - I believe they're 65". Good fit.

49710375228_789dab0c4b_c.jpg


Test fitting the panels looked like they were going to fit perfect with the bottom of the panel flush with the bottom of the rail. It looked great, nice and low profile.

Unfortunately once we mounted the panels to the rails and installed it all, it turned out the ribs on the roof were JUST tall enough to hit the bottom of the panels :bang:
Much scratching of heads ensued trying to make it work, but eventually realized that the panels would have to go above the rails. Doesn't look as tidy, but oh well.

49710908866_cdc3a52cca_c.jpg


This meant the aluminum L brackets we had made were now visible, stuck up too high, and look... like they were made with a hacksaw and some pop rivets :hillbilly:

48829984576_3088d5336e_c.jpg
 

Users who are viewing this thread

Back
Top Bottom