
I haven't run a fan shroud for a number of years and never noticed any real difference in operating temps - even comparing temps to my mates 80s that has a shroud fitted and we both run the same temp gauges fitted in the same place. At worst, mine has been 2-3deg more on rare occasions, mainly driving up hill, but this is more due to my turbo charger 
But I digress... with the addition of the auto trans and having just replaced the viscous fan clutch having found it to be well past it's use by date, I figured I should pull my finger out and fit a shroud so, if there really is any benefit of extra cooling with a shroud fitted, my engine, AC and gearbox wont be disadvantaged. The genuine fan shroud I purchased didn't fit and, after cutting pieces out of it to make it fit around other stuff before realising it didn't fit, it was too late to return it
After a quick look, I decided I'd make one out of fiberglass. Now, my experience with fiberglass is amateurish at best, but of the things I have made, they have been more than adequate for their application and the finished product didn't look to shabby. While this was by far my biggest mission working with fiberglass, I was confident I'd get a good result - With a bit of forward planning and lateral thinking. Let the fun begin...
Something that I've been meaning to do for a long time is drop the rad down 25mm after the body lift that went in several years ago. I did this by drilling 2 new holes in each lower mounting bracket. For the upper mounts, I cut them out oversize and welded in a new section of 2mm plate. I then marked the new holes and drilled them out with a hole saw. All up, it took about 2hrs. This was followed by a trip to the radiator repair shop to have it inspected and cleaned. I really didn't think it needed cleaning and, when I went to pick it up, the repair guy echoed my thoughts. Anyway, for $150, it was cheap peace of mind knowing 100% it was good as new. He also suggested I keep using the Toyota red coolant and he said it's the best coolant for that engine.

With the rad in position, I taped up an area where the fan spins. Using a square, I marked in several locations where the fan blade edges projected forward.

The fan measures 470mm across and the OEM fan shroud opening measures 500mm... that give 15mm clearance. Using some 12mm ply, I cut out a 500mm diameter circle. The OEM fan also sits 100mm off the face of the rad core so, I cut 4 blocks out of 90x45 pine and screwed them to the underside of the ply circle. Then, using the marks on the masking tape, I placed additional marks 15mm further (to give me 500mm over all) Once I'd positioned the plywood into place, I held in in place with a hot glue gun.

Sitting the radiator on a sheet of ply, and using some speaker cloth (purchased from JayCar Electronics) I stretched the material over the rad to give me a nice, tight fit. I held each side down with a timber batten screwed to the ply. I've used this speaker cloth before with fiberglass projects and it can be made to fit virtually any shape or profile, and it can be stretched super tight without fear of tearing.

Next, I needed to make up profiles and clamps to further control the profile I needed the shroud to take. I did this using a series of timber battens, Alloy angle, steel plate and even bricks to keep it in position.

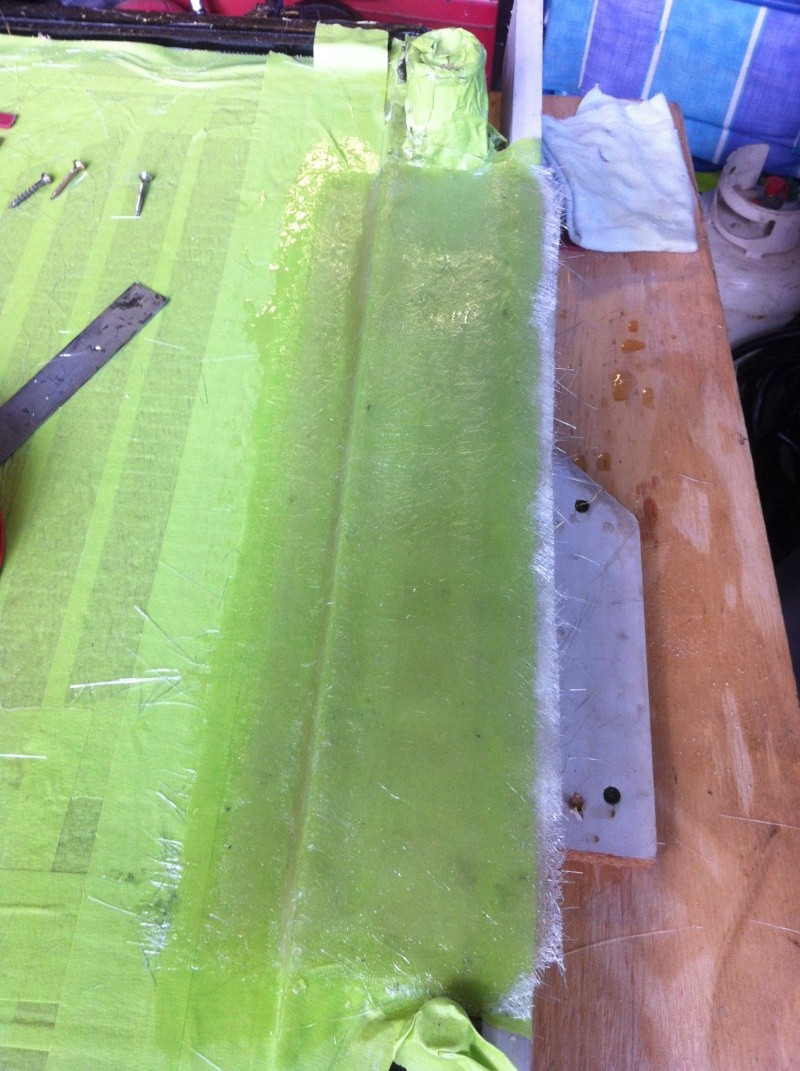
Once I knew everything fitted, I removed it all and set it aside. I then mixed up some fiberglass resin and painted it onto the speaker cloth. Once it was soaking in resin, I then reinstalled all my battens, clamps and supports.

Left to dry overnight, I then removed all the bracing to leave me with a nicely formed fan shroud template.


But I digress... with the addition of the auto trans and having just replaced the viscous fan clutch having found it to be well past it's use by date, I figured I should pull my finger out and fit a shroud so, if there really is any benefit of extra cooling with a shroud fitted, my engine, AC and gearbox wont be disadvantaged. The genuine fan shroud I purchased didn't fit and, after cutting pieces out of it to make it fit around other stuff before realising it didn't fit, it was too late to return it
After a quick look, I decided I'd make one out of fiberglass. Now, my experience with fiberglass is amateurish at best, but of the things I have made, they have been more than adequate for their application and the finished product didn't look to shabby. While this was by far my biggest mission working with fiberglass, I was confident I'd get a good result - With a bit of forward planning and lateral thinking. Let the fun begin...
Something that I've been meaning to do for a long time is drop the rad down 25mm after the body lift that went in several years ago. I did this by drilling 2 new holes in each lower mounting bracket. For the upper mounts, I cut them out oversize and welded in a new section of 2mm plate. I then marked the new holes and drilled them out with a hole saw. All up, it took about 2hrs. This was followed by a trip to the radiator repair shop to have it inspected and cleaned. I really didn't think it needed cleaning and, when I went to pick it up, the repair guy echoed my thoughts. Anyway, for $150, it was cheap peace of mind knowing 100% it was good as new. He also suggested I keep using the Toyota red coolant and he said it's the best coolant for that engine.
With the rad in position, I taped up an area where the fan spins. Using a square, I marked in several locations where the fan blade edges projected forward.
The fan measures 470mm across and the OEM fan shroud opening measures 500mm... that give 15mm clearance. Using some 12mm ply, I cut out a 500mm diameter circle. The OEM fan also sits 100mm off the face of the rad core so, I cut 4 blocks out of 90x45 pine and screwed them to the underside of the ply circle. Then, using the marks on the masking tape, I placed additional marks 15mm further (to give me 500mm over all) Once I'd positioned the plywood into place, I held in in place with a hot glue gun.
Sitting the radiator on a sheet of ply, and using some speaker cloth (purchased from JayCar Electronics) I stretched the material over the rad to give me a nice, tight fit. I held each side down with a timber batten screwed to the ply. I've used this speaker cloth before with fiberglass projects and it can be made to fit virtually any shape or profile, and it can be stretched super tight without fear of tearing.
Next, I needed to make up profiles and clamps to further control the profile I needed the shroud to take. I did this using a series of timber battens, Alloy angle, steel plate and even bricks to keep it in position.
Once I knew everything fitted, I removed it all and set it aside. I then mixed up some fiberglass resin and painted it onto the speaker cloth. Once it was soaking in resin, I then reinstalled all my battens, clamps and supports.
Left to dry overnight, I then removed all the bracing to leave me with a nicely formed fan shroud template.


 I did not even know that could be done.
")


