
Yeah, its another bumper build thread. But since bumper build threads are one of my favorites, I thought there might be others like me...
This all started because the shifter seat decided it had had enough while on the trail rendering only reverse usable (or so I thought) and I didn't know about the pull-up-to-shift method when that happens. My unnamed buddy hooked up the tow strap and I got pulled to safety. At the top of the hill I hear "Oops, sorry man". Turns out he wrapped the strap AROUND the stock bumper and not the firmly mounted tow hook. An ugly mangled bumper resulted. Oh well. Took it off and scrapped it.
In my "spare" time at work I drew up a nice looking tube bumper design. I went back and forth whether to weld or bolt on. Bolt on won and I sent my drawing to our sheet metal vendor we use at work and got this back:

At the last minute, I settled on 1/4". Glad I did. It's stout:

I'm using a Mile Marker 10500lb hydraulic winch that I had on my last 4x4. It's a pretty compact low-profile winch. I guess it's the regular non-integrated solenoid winch size? Either way, this is the winch on which I based my dimensions.
In the next photo there's some non related metal on the bench that isn't part of this. Mocking up the winch while holding the fairlead:

Disassembly:

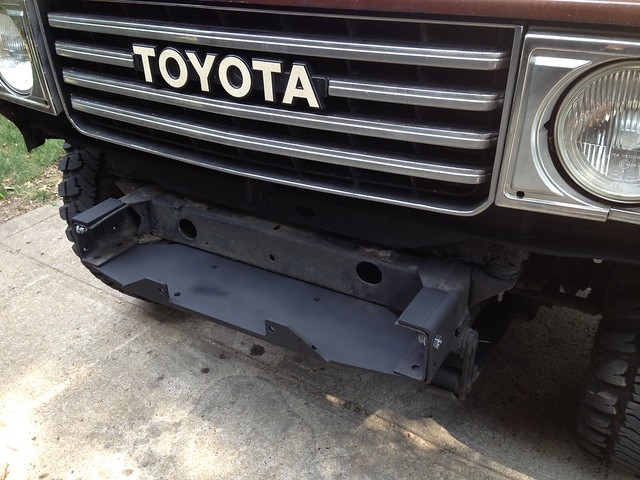
The goal was to get the winch between the frame rails and back as far as reasonable. This meant removing the valence which I didn't mind. But I knew that this would open a can of rusty worms . Ugly naked shot
  :
:

You can see how ugly the rust is at the bottom edge below the headlight:

After some rust trimming and black spray paint it's not too bad:

Now the fenders look like fangs coming down on either side
Approach angle. Of course the fairlead will stick out a little:

A shot with the plate painted and no winch:
There is some design for assembly in here too. The winch can be removed with the plate bolted to the frame. And, this is SUPER easy to install AND remove. Slide it over the frame rails and bolt using existing holes that are from drilling out the bumper bracket rivets.
Thats probably going to be all for a while due to lack of funds. But there are plans for some tubing protection, shackle mounts and other little bits that most bumpers get. This will be after the PSC pump goes in.
On a side note, the wife was glad the wEnch was back on so the jokes can commence. To which I replied that this wench, too, was just for looks and doesn't really do anything right now
This all started because the shifter seat decided it had had enough while on the trail rendering only reverse usable (or so I thought) and I didn't know about the pull-up-to-shift method when that happens. My unnamed buddy hooked up the tow strap and I got pulled to safety. At the top of the hill I hear "Oops, sorry man". Turns out he wrapped the strap AROUND the stock bumper and not the firmly mounted tow hook. An ugly mangled bumper resulted. Oh well. Took it off and scrapped it.
In my "spare" time at work I drew up a nice looking tube bumper design. I went back and forth whether to weld or bolt on. Bolt on won and I sent my drawing to our sheet metal vendor we use at work and got this back:
At the last minute, I settled on 1/4". Glad I did. It's stout:
I'm using a Mile Marker 10500lb hydraulic winch that I had on my last 4x4. It's a pretty compact low-profile winch. I guess it's the regular non-integrated solenoid winch size? Either way, this is the winch on which I based my dimensions.
In the next photo there's some non related metal on the bench that isn't part of this. Mocking up the winch while holding the fairlead:
Disassembly:
The goal was to get the winch between the frame rails and back as far as reasonable. This meant removing the valence which I didn't mind. But I knew that this would open a can of rusty worms
. Ugly naked shot :
You can see how ugly the rust is at the bottom edge below the headlight:
After some rust trimming and black spray paint it's not too bad:
Now the fenders look like fangs coming down on either side
Approach angle. Of course the fairlead will stick out a little:
A shot with the plate painted and no winch:
There is some design for assembly in here too. The winch can be removed with the plate bolted to the frame. And, this is SUPER easy to install AND remove. Slide it over the frame rails and bolt using existing holes that are from drilling out the bumper bracket rivets.
Thats probably going to be all for a while due to lack of funds. But there are plans for some tubing protection, shackle mounts and other little bits that most bumpers get. This will be after the PSC pump goes in.
On a side note, the wife was glad the wEnch was back on so the jokes can commence. To which I replied that this wench, too, was just for looks and doesn't really do anything right now
