Who has put a Toybox behind an H55? (1 Viewer)

This site may earn a commission from merchant affiliate
links, including eBay, Amazon, Skimlinks, and others.

I had an issue with the Toybox binding on the h55f output shaft as they slid together. I examined the splines with a hand lens and I'm sure they where clean and deburred. I spent a long time with a micrometer and discovered that the diameter of the output shaft was was about .008" larger at the base then where it was cut.

I marked the output shaft with a sharpie to see where it was binding, which was about 1/2 down the shaft. I filed the splines with a diamond file, cleaned, marked and test fitted the pieces. I repeated this process 4 or 5 times until the Toybox stopped binding.

You might want to consider dry fitting the bits before you apply sealant.

I saw your posts about the binding issue. They were very helpful, and part of the reason I started this thread. I am going to dry fit everything, go slow and make sure it all works before sealing anything up.

This is a great thing to do always we have run into this once but the other two we did, did not have this problem. A small 3M scotch brite pad on a small angle grinder will normally take care of this for you and polish the surface at the same time.

Cam
 
Thank you Cam, and everyone who has posted. I think I'll start on this project this weekend. It doesn't seem too bad.

Since the vehicle is an HJ45 with an H diesel (not 2H) there is no supporting crossmember for the transmission. The H has the rear engine mounts integrated with the bell housing. That simplifies things a little bit for me. I do have the IPOR 40 series skid plate and intend to modify it with a trans mount. I saw some photos from IPOR where they did this an I like the concept.

I also have the correct 40 series shifter which will save me some aggravation in modifying the floor.


I know I'll have to relocate the round crossover tube. I took some initial, rough measurements. The H55+splitcase will fit but it will be really tight. I've got 24" from the bellhousing to the front edge of the crossover tube. The H55 is 23" in length from the face that mounts to the bellhousing to the rear output flange of the splitcase. The Toybox adds another 7 inches. I'm planning to use the drum ebrake on the splitcase so that adds some length too.

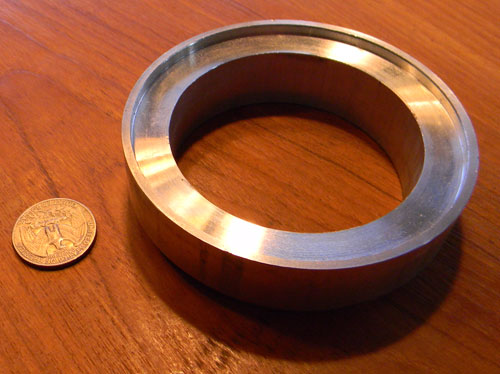
There's one part in the kit that I'm not sure where it goes. It appears to almost fit in the plate that mounts to the back of the H55, roughly where the stock rear output shaft bearing is.

Here's a photo of the part:
toybox-mystery-part.jpg


Where does it go?

Also, is the plastic 5th gear oiler still used? There is conflicting info out there on the web. It appears that it's not necessary with the new M24 adapter plate but I wanted to be sure.

I double checked today and this is in fact the adapter that goes between the late splitcase and the crawl box and yes if you have the late split case this is used and the thre coarse thread allen bolts need to come out. This adapter piece basically is samwiched between the two to support the out put bearing of the crawl box.


Cam
 
smtyblt said:
I double checked today and this is in fact the adapter that goes between the late splitcase and the crawl box and yes if you have the late split case this is used and the thre coarse thread allen bolts need to come out. This adapter piece basically is samwiched between the two to support the out put bearing of the crawl box.
Cam

Is the late model split case the one with the 38mm idler shaft? I guess I'm trying to figure out how to identify the late model vs. non-late model split case.
 
Is the late model split case the one with the 38mm idler shaft? I guess I'm trying to figure out how to identify the late model vs. non-late model split case.

Yes that is the best way to determine it the early case has the 34 mm shaft and the late case has the 38 mm shaft.

cam
 
I'm going to get started on this soon. I was hoping to this weekend but got sidelined by chemical burns from some degreaser I bought from Walmart. (The purple jug stuff.) A previous owner plumbed the crankcase vent tube into the frame rail and I had an inch of oily sand filling most of the length of the frame. All it took was 3 minutes of exposure to that degreaser and it was eating holes in my fingertips. Nasty stuff and a good reminder to always read the handling precautions, even if they are in fine print on the back of the jug.
 
I started on this today. I'm to the point where I'm getting ready to cut the output shaft on the H55. So far it's fairly straightforward.
 
A question before I cut the shaft

I'm prepping to cut the output shaft and I just wanted to be sure I'm cutting at the right location.

Cam said to cut the shaft 35mm from the face of the trans portion of the adapter plate. So this is how I came up with it. I locked my caliper just under 35mm.

h55-shaft-cut-2.jpg


Measured that distance off of the adapter plate and clamped the ring in place as a guide.
h55-shaft-cut-1.jpg


I then used the ring clamp as a guide for some electrical tape and removed the clamp ring since it's needed later. I rigged up a piece of wood to rest the grinder against for stability.

h55-shaft-cut-3.jpg


Is this the correct place to cut the shaft? I've read elsewhere that people have measured the depth of the receiving splines in the Toybox instead of using the 35mm depth measurement. I measured the depth of the input splines on mine and they are 42mm deep, a difference of 7 MM. Does this matter? Should I cut the shaft at 38 - 40 mm instead of 35?
 
Thinking about cutting at 42mm

I'm thinking the cut should be in the 40 - 42mm range. I took some more measurements and snapped photos to explain the method to my madness.

The input splines in the Toybox start at 17.8mm from the front face of the adapter plate. (I have deducted 1.1mm for the thickness of the saw blade I'm using as a straight edge.)
h55-shaft-cut-5.jpg


The Toybox input splines are 44.7mm deep:
h55-shaft-cut-6.jpg


If I were to cut the H55 output shaft at 35mm I'll end up with only 17.1mm of engagement between the shaft and the input splines. If I cut at 42mm I'll have 24.1mm of engagement and 2.5mm of room before the splines bottom out to leave room for expansion.

35mm might work fine but wouldn't 40mm - 42mm be a better place to cut? Am I missing something in my measurements?
 
I ended up cutting at 40mm. It fits perfectly.

I did measure the diameter of my output shaft in a few places. It was slightly larger than 35mm in a few spots ranging from 35.02 to 35.08mm. I spent some time with a file and 80 grit plumber's emery paper. It took about 4 hours of sanding and filing to get the output shaft to the point where I could remove the Toybox without a bunch of prying.
 
Clamp ring changed?

I'm finally back in town and working on this again. I'm running into something that doesn't make sense. (I bolded a section in the following quote.)

Once you have done this you need to dis-assmeble the plate and hardware thorughly clean all affected areas focusing on the fith gear area. Now remove the last bearing on the output shaft, and the steel spacer sleeve. It is now time to install the Clamp Ring.

Installing the clamp ring
The clamping ring will slide most of the way on, but sometimes needs to be tapped the last 1/2 inch. Tighten this with a 3/16th's inch hex key wrench pritty much as tight as you can possibly tighten it.

I removed the steel spacer and slide the clamping ring down the output shaft. This doesn't work. (The spacer doesn't easily fit down the shaft at this point, it's .5mm too small so you have to pry it open.) When you get the clamp ring down the shaft it interferes with the 5th gear shift fork. I think the spacer needs to stay in place. Is that correct?


h55-shaft-cut-7.jpg


h55-shaft-cut-8.jpg
 
I finally had a chance to finish this up today. What lube do I run in the Toybox? I see it has an oil fill plug on the side. Do the toybox and H55 share lube? If they do what level do I fill to? (The toybox fill plug appears to be higher than the H55 fill plug. Do I need to run synthetic lube?
 
I finally had a chance to finish this up today. What lube do I run in the Toybox? I see it has an oil fill plug on the side. Do the toybox and H55 share lube? If they do what level do I fill to? (The toybox fill plug appears to be higher than the H55 fill plug. Do I need to run synthetic lube?


I know that in the H41/42 Toybox, the lube is shared between the Transmission and the Toybox. My guess is it is the same in the H55. I have used conventional gear lube in mine, but synthetic will not hurt, just cost more $$.

I fill through the Toybox fill, and then fill the tranny.
 
what the hell I waited for this thing for like 5 months and from what you are showing me I am missing parts. Fxxx marlin is making me frustrated lately which parts am I missing so I can call them and get them shipped ASAP. I would know what I was missing if they would include a parts list and or instructions!!!

anyways did you have to leave the spacer in to install the clamp ring or did it end up working out??


What about the oiler anything needed for that??


a little off topic but is there different gearing in some stock split cases?? I hear some have a lower gear ratio.

I took a picture of the parts bag but I can't seem to get the link to work :doh:.
 
Last edited:
I had to leave the spacer in place, then the clamp ring. Otherwise the clamp ring would interfere with the fifth gear shift fork.
 
so I'm missing the clamp ring, I wonder what else. I have 2 dowel pins and a bunch of bolts and lock washers but nothing else. oh and did your guyses come with a shifter??
 
I think the clamp ring is only required for the H55+Toybox. Is that what you're doing?

I think the dowel pins are for the back of the Toybox. They mate to the receiving holes in the splitcase.
 
i am doing the h55 to toybox. so i need the lock ring.

Hey I hear that there is supposed to be some detent ball in the kit as well for the toy box output shaft??
 
Last edited:
How'd I miss this??? Holy s*** Rufus, is there any toy you don't have???
 

Users who are viewing this thread

Back
Top Bottom