Builds Steel City Racing: King of the Hammers 2019 Toyota 4Runner IFS 4600 Build Thread (1 Viewer)

This site may earn a commission from merchant affiliate
links, including eBay, Amazon, Skimlinks, and others.

Any prospect of dyno time, just to put that argument completely to bed?
If someone wants to dyno it for me, I’m in! Otherwise time and $ will be spent elsewhere on the build - HP/Torque matter, but not as much as suspension and drivetrain strength/travel/performance.

The clock is ticking!
 
Think this template design will work for the safety nets from PRP?
- Mesh with 1" Webbing at 8" Intervals
- Spring Steel Rod at the Top
- Spring Steel Rod at the Bottom
- Grommets around the rest (Verticals and Top Curve) for Hooks or Hose Clamps

40007589_419502448573701_7171751805498425344_o.jpg


Per the rules:
"Nets attached to door frames are permitted."
"Nets must be installed so that the occupants can release the netting unassisted and exit the vehicle regardless of the position of the vehicle."
"The net border or edge and the net attachment must be made of materials that are as strong as, or stronger than, the net itself. Net attachments must be at a minimum of every 6 inches. Acceptable attachments include, but are not limited to: steel hose clamps, snaps, lift-a-dot, metal hooks, and steel rods. Nets must be tight so that when subject to a pushing force of approximately 50lbs the net deflects no more than four inches."
 
Update: I'm still waiting on the Aeromotive parts to arrive. And I'm holding off on the Master Kill Switch until I finish the plumbing so I can test one system at a time in case either fail.

- Master Kill Switch & Fuel Line Parts: A bunch of parts arrived for the Master Kill Switch and the Fuel Cell Plumbing (but no pump just yet):
40039568_420131688510777_397687171013672960_n.jpg


- Fuel Line Adapters: I ran the fuel line plumbing as far as I could without a pump to ultimately tie into. Russell for lines and fittings was an obvious choice. The 5/16" quick connector fit the larger Supply line fine. I had to make an adapter out of fuel line and a doubled-up connector for the smaller Return line - in theory it should be very strong, but we'll find out when we test it. I literally inserted the OEM Supply line into the Male Adapter and ran fuel line across the top of both with clamps on both sides, so it's technically doubled-up.
40102028_420210051836274_7651385900252790784_n.jpg

40062153_420209985169614_77127755686215680_n.jpg


- Fuel Line Routing: I was able to route them above the frame rails and into the cab using the old fuel access hatch. It is lined with rubber, so the sheet metal cannot tear the fuel line while enduring vibrations/shocks, and clamps down tight so they cannot move. We'll see if it stays here:
40128145_420209938502952_1341486928431677440_n.jpg

40143863_420209905169622_3006285676212649984_n.jpg

39999740_420209875169625_8315479146629169152_n.jpg


- Salvage Doors: I also finished installing the salvage doors, so all "bolt-on" exterior sheet metal is now salvage and ready for KOH abuse. I ended up getting these for a steal with glass, trim, and electronics - so I can ride to CA with the glass in and pull all glass once there.
40172274_420725188451427_7819935801520685056_n.jpg

40089858_420725241784755_5629449987470393344_n.jpg

My only surprise on the doors is that the interior handle is integrated into the trim. It weights nothing, but may interfere with the cage. If so, I'll cut out the interior door handle and bolt it in or weld in some metal ones. We will need interior handles given the safety nets will prevent us from just using the exterior handles. And I'll need to cut into the trim for the secondary locks anyway.

- RCVs: I spoke with RCV on Friday and our front axle shafts are done! They are being shipped to Marlin's shop as early as this week. Our set will be the first set of Gen 2 shafts for the 4th gen ever made! I'm really anxious to see a RCV Gen 2 vs. OEM pic. Supposedly the difference vs. OEM and Gen 1 is HUGE - completely re-engineered CV Joints, additional housing clearance, and added strength throughout.

- Timeline: We had a build-team call on Friday and decided to delay the trip to CA until Mid-October instead of Mid-September. The front suspension and steering prototype simply won't be done until late September at this point and we need 2-weeks of testing before it goes on the 4Runner. I still feel good on the overall timeline, but it certainly pushes the first round of testing back. Everything else, including the Atlas II build, are all on track.

- Front Suspension/Steering: The front suspension/steering prototype looks great and is being built right with on-the-fly "flexibility" so we can tweak the designs, cut, and re-build if needed. I can't go into details, but it will be "Comprehensive". And Wyatt at RockSolidToys is of course anxious to get his hands on the T-Case, Rear Suspension, and Cage!

- Small Stuff: I reached out to Denso about sponsoring with new OEM parts (starter, alternator, etc) to refresh the vehicle. I also reached out to Royal Purple about a full synthetic refresh. I've finished first draft templates for the safety nets and need to transfer to poster board so I can mail to PRP. I'm also working on the rear race light, fuel level sender converter, and Comms/Intercom.
 
This platform defiantly has the potential to be fastest in 4600 class at least in the desert. Keep it alive in the rocks and its going to be very competitive. The problem with that theory is IFS kinda needs to get bullied around in the rocks to get through but you will learn your car with time.

I would be looking for every opportunity to shave ounces where you can. Once that thing is in full race prep with spares its going to be really heavy. Any guess on weight after the mods and cage are done?

Loosing the inner door skins and the rear hatch are good ways to make quick gains on weight as were the fenders. Even if there is a single bolt or tab not serving a purpose, cut it or loose it. Also cutting the body mounts completely off and tying your cage in that was is a way to ditch extra weight.

What are the plans for the front and rear bumpers, engine cage? Take note of the rule book there in the engine cage part, it can be helpful in how you mount your front shocks or coilovers in your case.

I for one would love to go eat up some desert in this thing. Get ready to battle it out with my POS 85 Toyota truck come Feb!
Hey, thanks for the reply. I can't wait to see you out there - keep the feedback coming! Also, there is a 3rd gen IFS 4600 build thread on T4R that should be fun to watch. I'm excited to hopefully see more and more Toyotas out there in 2019+!

No clue on the final weight - I figure I'll run it to a scale at the very end. Most of the trim items left weigh practically nothing - meaning all in they probably add up to 5-10 lbs. Everything else is gone - except the sunroof which I'll figure out in CA as we'll need to replace with steel.

The heaviest part of the doors and liftgate is the glass and motors - both of which will be stripped in CA. They're surprisingly light in shell condition with no internals. I'll have to talk with Wyatt about the cage and body mounts - especially the engine cage and how it may tie into the front coilovers.

Front and Rear bumpers, Sliders, and Skid Plates are all being envisioned/developed as we speak. Strength is being placed above weight savings, but we're hoping they'll be a solid balance of strength to weight ratio. We actually considered Aluminum for the front, but opted for steel due to KOH abuse.
 
Last edited:
can't just take the sunroof glass/motor out and leave it open?
If so, that would be awesome. It's really up to an interpretation of the rules, specifically:

KOH Rules - the closest sections that I can find:
"A minimum .040” expanded or flat sheet magnetic steel or .125” aluminum must cover the area immediately above the occupants’ seats and be attached via welding or bolting to a steel tubing frame work."

"Stock windows (glass) are not required, but are permitted, providing they meet DOT regulations. Alternatives to traditional safety-glass may be allowed, on approval of Hammerking Productions Inc."

And these quasi-touch it:
"Stock body (body is considered to be the full cab, including all interior and exterior sheet metal, bed, doors, hood, fenders, grill, etc.) required. The body must be complete and unmodified, with the following limitations and exceptions: Holes may be cut in any part of the body for the single and exclusive purpose of allowing roll cage tubes and transmission/transfer case linkage to pass-through the body. Open holes must be kept to within .5" of the diameter of any tube or linkage that passes through the body, with further restrictions related to holes in firewalls specified in Section 8.2.12, Subsection 4. The exception to this rule is the allowance for rocker panel protection limited to the area between the wheel wells. You may cut into the body and/or reinforce this area. You may not interfere with the mating surface of the stock door and doorsill. The stock doorsill must be retained and unaltered."

"All roll cage components (hoops, braces, gussets, etc.) must have a minimum of 3” of clearance from any vehicle occupant’s helmet when occupant is seated in normal driving/riding position. All roll cage components that might come into contact with the vehicle occupants’ helmets must be padded."
 
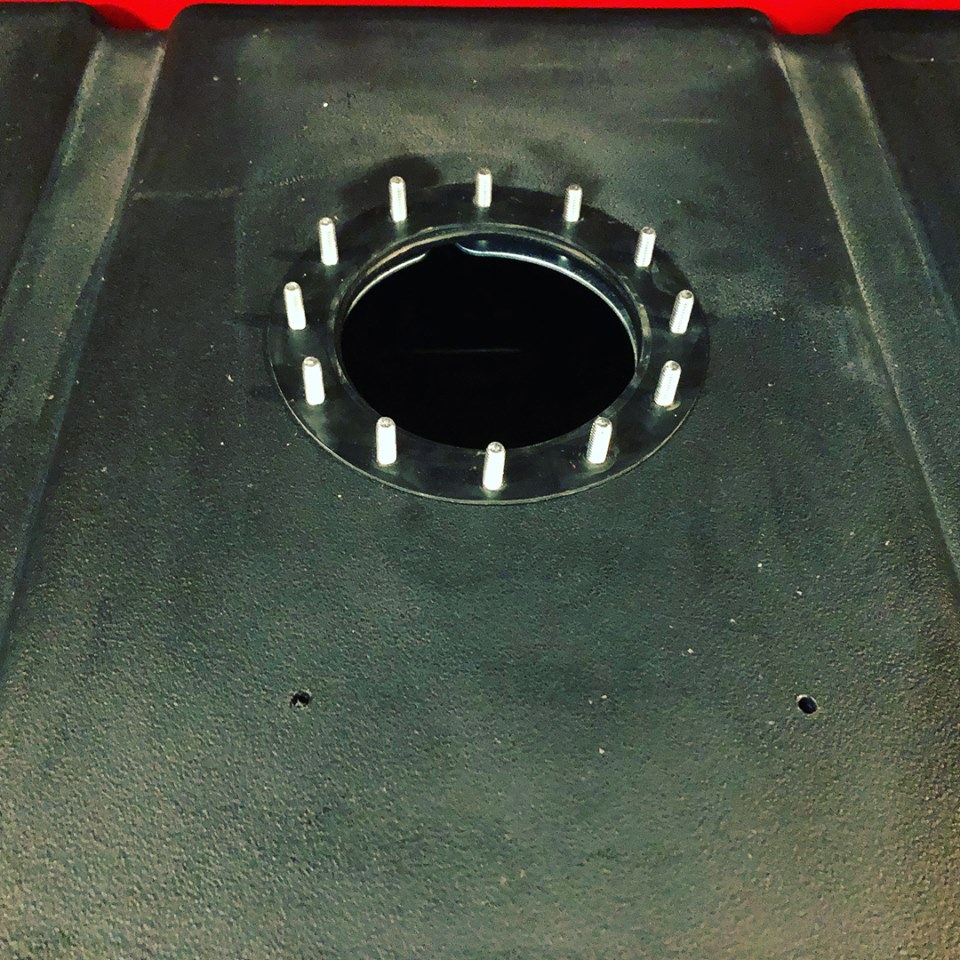
Our new Aeromotive Phantom Stealth 200 kit arrived yesterday along with the various fittings and adapters we'll need. Still waiting on the Aeromotive wiring kit and 10m filter, but I picked up all the various hole saw blades I'll need last night so I can go ahead and mount it in the fuel cell.

40377682_422011528322793_794921897287483392_n.jpg


40452363_422011574989455_614783371096096768_n.jpg


Thanks again to Aeromotive for sponsoring our build!
 
If you pull the cylinder heads on that motor and have them port n polished, I imagine you will gain a significant amount of power. Somewhere in the neighborhood of 40 hp. Easy way to gain power except you have to take the heads off.
Good idea - then we'd be getting close to LS territory :). Will probably have to wait for the 2020 race given all we still have left to do.
 
With school back in full swing here and work ramping up, my daily work sessions are starting later and later - given less traffic in the build thread, I don't think I'm the only one who is just busier!

Anyway, I stayed up till 11 last night and missed the first College Football Game of the season to get the new Aeromotive Phantom Stealth 200 system installed in the Jaz Pro Sport II cell. I also installed the Classic Instruments fuel level sender at the same time (which is missing hardware - so I'm off to get nuts/bolts/washers again today).

Nothing hardcore - pretty straight forward. The pics tell the story:
40448937_422678831589396_8916619459620241408_n.jpg


The Internals:
40467207_422678904922722_2729508010744348672_n.jpg


Drilling Pilot Holes (through both the lid and cell):
40387801_422678938256052_3618701249018331136_n.jpg


40467188_422678978256048_3440754217004826624_n.jpg


Smaller holes for inner diameter of components:
40406696_422679018256044_4991365332166770688_n.jpg


40525823_422679064922706_7789406422361440256_n.jpg


Larger holes for outer diameter of components:
40479037_422679114922701_4886996621851623424_n.jpg


40498895_422679161589363_6521919010185936896_n.jpg

Checking fitment:

40395540_422679194922693_5860686830503985152_n.jpg


Done:
40429982_422678781589401_5631727484073410560_n.jpg
 
This week I've been focused mostly on wrapping up the fuel cell and plumbing. Earlier today, I was able to fire it up for the first time in weeks.

Short Video:


The fuel system works flawlessly - Aeromotive, Jaz, and Russell are top notch! I still have to secure the lines/wiring for the drive to CA, but zero leaks and zero problems! Not bad for my first fuel cell plumbing install.
40932376_424937174696895_4174481050891714560_n.jpg


The lines run along the top of the frame, into the cab where I reused the rubber entry for the old fuel system wiring to ensure a snug and abrasion free entry, and into the cab. It connects to the Aeromotive Phantom Stealth 200 kit on the Jaz Pro Sport II cell. While there are two filters in the tank, I also installed a 10m filter on the supply line just before the Fuel Pressure Gauge port.
40673761_424564134734199_5664969173734785024_n.jpg


For the fuel vent line, it has a roll-over check valve (meets KOH Rules) and routes to the side, up, over, down, and back to the center. It then ties into the OEM fuel line vent system underneath including the old catchment system (meets KOH Rules).

I still have to finish wiring the new level sender to the gauge, but I'm calling the fuel system mostly done at this point!

While I was wiring, I went ahead and installed the Rear LED Amber/Red/White Race light. I attached it to the bottom of the spoiler with a lot of hardware. It feels strong.
40994703_424562821400997_4708626419595345920_n.jpg


40660329_424562864734326_8455137391307390976_n.jpg


There are a ton of pattern options you can select on the toggle switch where the Amber flashes differently and the Red is mostly just on. I then wired the center white LED to a toggle switch on the dash.
41039205_425013354689277_2708688977115742208_n.jpg


Other Updates:
- The 3.8 Atlas II is done and paid for. It'll be shipped out this week.
- I went ahead and ordered my Comms and Intercom from Rugged Radios while they had their Labor Day 20% off sale. I opted for their Race Ready 2-Car 6100 system with radio/intercom wiring harnesses.
- I mailed in my template on the race window nets to PRP. We'll have mesh with 1" webbing at 8" increments, a spring rod at the top and metal rod at the bottom, and 12 grommets to make sure it is tight.
- I started on the new Master Kill Switch, but still have work to do. I also have some ideas on the secondary latches for the front doors. I hope to have it done by the end of the week.
- I also shipped a ton of stuff back that didn't fit and bought more stuff that hopefully will - it's time consuming, but thank goodness for Free Returns!

More updates coming soon.
 
We got most of the Master Kill Switch wired last night - my awesome wife stayed in the garage till 11:30 to help pull wires, crimp, heat shrink, etc. We ended up missing the entire Falcons/Eagles game, but o-well.

With the flip of a switch, we will now simultaneously kill the Battery, Alternator, and Fuel Pump - surely this will finally shut the v8 down!
We ran out of 2ga wire before we could make the final connection - OEM Alternator Out Wire to the Bus. I'll close it out and test everything today.

Alternator Out Connector to Switch Input 1:
41303873_425742491283030_8167622479397781504_n.jpg


Battery + to Switch Input 2:
41299932_425742451283034_531690021799854080_n.jpg


Wiring runs through firewall:
41341839_425742384616374_674992756682129408_n.jpg


And into the cab:
41262292_425742351283044_5907084254101110784_n.jpg


To the Switch that is now securely mounted where the old Ash Tray plastic thing used to be:
41101909_425742321283047_5958860763459223552_n.jpg


Switch Output goes back through firewall to power a 4 Prong Bus. Dist. Block, Fuel Pump Power, and Wire that connects back to OEM Alternator Out Wire (not yet connected as I ran out of 2ga wire) connected to remaining 3 prongs on Bus:
41321476_425742414616371_4105620166652461056_n.jpg


I crimped all 2ga wire and used heat shrink. I still need to re-do some OEM wires (Dist. Block, for example) that need to be heat shrinked.
41282583_425742531283026_294282457518178304_n.jpg


Once I get 10' more of 2ga wire, I'll make the final connection from Bus to OEM Alternator Out Wire - this will flow through the OEM Alternator wiring and connect straight to the Battery + for normal charging.

I'll then test to make sure it all works as planned, shore up a few OEM connections, and zip-tie everything.
 
Master Kill Switch is finally done! We studied the diagram again and saw that current can flow both ways when in 1+2 mode, so no need for the final wire.

Simple Battery Connector:
41155201_425783397945606_290780405609529344_n.jpg


Bus with Switch Output, Factory Wires (2), and Fuel Pump:
41111494_425783344612278_8732801267442647040_n.jpg


1+2 - Running Mode:
41141899_425783164612296_6140715610121699328_n.jpg

41144535_425783217945624_6536649068679004160_n.jpg


OFF - Kill Mode:
41188839_425783261278953_2855310390277963776_n.jpg

41193220_425783297945616_3250229154221654016_n.jpg


Wiring Diagram on Blue Sea switch:
41388472_425783437945602_6189194288971120640_n.jpg


For what is so simple in concept, this project was harder than expected on a new gen vehicle.

Done and Moving On.
 
One thing to consider when running heavy gauge wire is to use solder plugs in your connections. It's very easy to heat the end while holding it with pliers with the plug in place, and plunge the wire in once the solder has melted. Install your marine heat wrap, and you have a connection that will be trouble free forever. I avoid the crimp only method as it doesn't take long for moisture to get in there and start causing connection issues.
 
One thing to consider when running heavy gauge wire is to use solder plugs in your connections. It's very easy to heat the end while holding it with pliers with the plug in place, and plunge the wire in once the solder has melted. Install your marine heat wrap, and you have a connection that will be trouble free forever. I avoid the crimp only method as it doesn't take long for moisture to get in there and start causing connection issues.
Thanks. There was a lot of debate on this on Pirate. I think they concluded the crimp and heat shrink method is best for applications with high vibration - like racing. The solder can often break under high vibration is what I think they were pointing out. I'm certainly not the expert!

One quote below from Hurlygo3:
"The (solder plug) connecters you posted are good option. I use them at work for wire repairs, just not on my race car. I've talked to a lot of the big names in wiring like Prowire, American and Finshline. They all crimp. Take a look at pretty much any of the top TT's. All crimp and heat shrink. Solder has no flex and can cause the wire to break. You will also never find a spliced connector of any kind on quality wiring job."
 
Another update. All small stuff:

- Got the "Drivers Assist" camera wired up and mounted. We may move it to the front bumper later:
41210573_425915111265768_1480626560103874560_n.jpg


41310276_425915147932431_615409950990008320_n.jpg


- Ran out of gas on the way to the station and was able to coast in. I got a few weird looks:
41652932_427637554426857_7042980031605243904_n.jpg


41556950_427637641093515_8019957183024201728_n.jpg


- Ran out of wiring and connectors again, so had to replinish. Also broke my HF Multimeter, so I upgraded:
41626150_427657657758180_3673189265719689216_n.jpg


- Got the Fuel Gauge and Fuel Level Sender wrapped up:
41554474_427680244422588_3447759897075122176_n.jpg


41489480_427680274422585_2080637438430019584_n.jpg


41544289_427706901086589_4536875444842004480_n.jpg


41678590_427706934419919_4878208680677343232_n.jpg


- After swapping out a faulty AEM Fuel Pressure Gauge, all fuel related gauges are done. Truck reads 14.5 AFR and 49 PSI at standard conditions. AFR dropps to 11-13.5 when above 4K RPM, but we should be able to fix it when we do the MAF Calibrator later this week:
41505241_427682584422354_7211438690587901952_n.jpg


- All our Communications and Intercom equipment arrived from Rugged Radios. Will be installing later this week:
41585512_427681207755825_5835336391629733888_n.jpg


- Almost done with all the small stuff I can knock out before CA:
41498813_427708027753143_1093503432385363968_n.jpg
 
41598577_427900457733900_5639183319665999872_n.jpg

I'm also excited to finally announce that 4x4Labs will be partnering with Steel City Racing on this KOH build. 4x4Labs will be building our Front and Rear Bumpers, Sliders, and Skid Plates - all designed and engineered for maximum strength and clearance while minimizing weight.

Luke and his team are the best in the business and the new products & enhancements designed for this build and KOH will be integrated into future 4Runner armor offerings by 4x4Labs.

In order to keep our timeline on track, the trip out to CA is now being moved back up to late-September as originally planned! The truck will be with Luke, HD, and the 4x4Labs team starting the week of 9/24 for 3-weeks for the bumpers, sliders, and skid plates to be engineered and installed - it'll be tight, but Luke's '06 4th Gen V8 will be used for mock-up until mine arrives.

Once 4x4Labs is done, Luke has graciously agreed to drive it to Marlin for me. Once BigMike is done with his work, it'll head to RockSolidToys and then may head back to 4x4Labs to finish up the skids with the 4 Link and Atlas II completed.

Thanks again to Luke, HD, and the amazing team at 4x4Labs (www.4x4Labs.com).
 
I am selling a supercharger that would be a nice addition to your build.
 
I am selling a supercharger that would be a nice addition to your build.
I bet., but unfortunately no forced induction is allowed in 4600! Otherwise it would have been the first thing we did to the 4.7L!
 

Users who are viewing this thread

Back
Top Bottom