speaker install writeup (1 Viewer)

This site may earn a commission from merchant affiliate
links, including eBay, Amazon, Skimlinks, and others.

Joined
Jan 10, 2010
Threads
38
Messages
203
Location
New London, NH
Thought I'd post my speaker install that I just did with the help of the search function and compile what I found in several threads that may help others.

Here is the link to the door panel removal thread that was very helpful.
https://forum.ih8mud.com/100-series-cruisers/327860-door-panel-removal-process.html

Only two things I might add to the door panel removal writeup is that the panel is easier to take off and put back on with the window rolled down, and the trim piece around the door release is easily removed if you put a small flathead screwdriver between the lock latch and the trim piece and push up and then between the lever and the trim piece. Dont try to pry between the trim piece and the door panel.

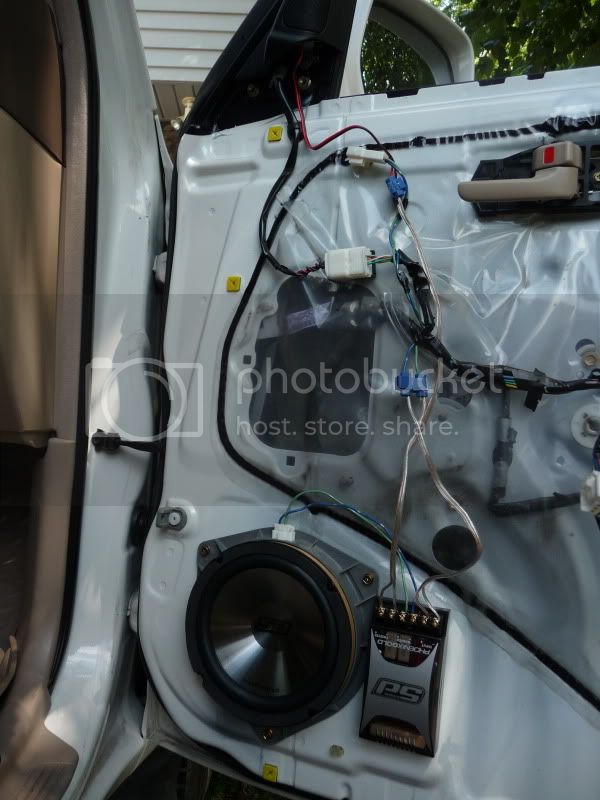
I had to gut part of the original woofer to use the rest of it as a mounting bracket. That was the only modification needed.

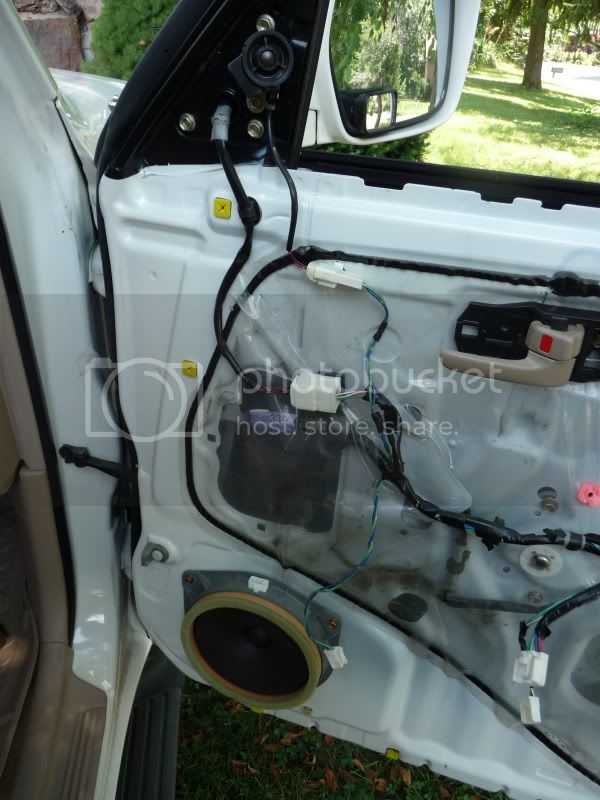
BTW on the drivers side, Pink wire is + purple is - on passenger side Green is + and blue is -.

P1020449.jpg


P1020450.jpg
 
Last edited:
P1020452.jpg


You have to remove the part on the right from the oem speaker on the left.

P1020453.jpg

Cutting frame supports with wire cutters was pretty easy to do.
 
Next you have to cut the surround of the oem speaker so you can later remove the driver from the basket.
I used box cutters. below
P1020455.jpg


Next you need to pop loose where the wires that connect to the voice coil attach to the frame so you can later twist the coil around to cut those wires to free the driver from the basket. see below
P1020458.jpg


Now after that is done, flip driver over to expose wires going to the voice coil and cut them with your wire cutters. see below
P1020459.jpg
 
Last edited:
Trim off plastic tabs on the voice coil wire holder as seen below.
P1020460.jpg


Place new driver on top of cardboard ring on the old oem basket/mount like so.
P1020463.jpg


Carefully drill some pilot holes for the screws that will hold your new driver to the mount you just made out of the old oem basket. Drill down past the cardboard ring into the plastic mount and make sure the screws go deep enough to seat in the plastic so you can snug down your driver.
P1020466.jpg
 
Flip driver over and connect speaker wires from driver to the old mounting tab. You will have to examine where the positive oem wire either pink drivers side, or green passenger side, aligns withe the plug on the oem basket and match that to your new driver. You may have to walk to the vehicle and hold the oem connector to the basket plug and see how it aligns.
P1020464.jpg


new phoenix gold rsd driver vs oem driver
P1020465.jpg
 
Mount driver and modified basket/mount back to the door just like oem speaker, align crossover beside speaker and drill two pilot holes. Use self tapping sheet metal screws to hold crossover down. I cut the oem wires high enough so that I could run the green and blue oem wires that plugged into the woofer straight into the woofer connection of the crossover. I tapped into the other part of the oem wire that I cut that came from the deck and ran them to the input on the crossover. In this pictures I had already mounted the tweeter so I tapped into the tweeter wires and extended them to the crossover.
P1020473.jpg
 
You can remove the oem tweeter and its mount by removing one screw which is easy to see and get to.
Here is a before pic of the oem tweeter and mount and the screw that needs to be removed.
P1020451.jpg


Once removed, carefully pry the oem tweeter off the mount, it was glued on at the factory. The oem metal mount is fairly bendable so try not to bend it out of shape.
P1020467.jpg


tweeter comparison, new on left oem on right
P1020470.jpg
 
Last edited:
Next this is what I did to try and get the new tweeter to line up coencentrically with the hole in the grille trim piece. I attached the metal mount with the one screw. Applied 3m double sided body moulding tape and removed the backing. I held the tweeter with one finger so that it rested in the middle of the opening on the back side of the grille trim piece and then carefully snapped the trim piece into place. Next I removed the trim piece and the tweeter stayed stuck to the mount. I pressed it on firmly and put the trim piece back on while I connected the wires to the crossover as in the previous picture.

P1020471.jpg


New tweeter behind grille trim piece.
P1020472.jpg


Finally remove the grille trim piece and replace door panel followed by lastly snapping the tweeter grille trim piece back on one final time.
 
One more final pic of install just before door panel goes back on. Remember to save the tweeter grille trim piece for last.
P1020473.jpg
 
Great write up and photos!

This is low in my priority list, but definitely on the list! With me being partially deaf, good sound, bad sound.. it makes little difference, but I like everyone else enjoying it.

Jonathan
 
Thank you for the nice write up and good photos showing steps, appreciate the extra effort that takes.
For future reference the blue splices used, while they are easy and only require pliers to set are not robust. You may not have trouble with them in this application. Would recommend barrel splices and a cheap crimping tool.
 
Good point on the connections, usually I solder them but my butane soldering iron went out. Hopefully there will be limited movement or pull on them behind the door and should be ok. Thanks guys, hope it helps some other folks out there.
Now if I could only find a writeup on instaling an aftermarket amp with factory headunit to drive the 4 door speakers........
 
There are two sets of wires, one for the tweeter and one for the woofer. Do they both carry the same signal from the OEM amp? I am wondering if there are issues with running the woofer line into the aftermarket crossover and then running your own line up to the tweeter if there has already been some redistribution of frequencies somewhere before the two lines go to the two speakers.
 
Dude, that is awesome....how long did it take you and how much would you charge me to do mine!

Seriously? I'm looking for an excuse to go fishing...... :)
 
This is awesome. I have new speakers waiting in the shop. Just need to find time to get it done. I am also leaning toward some sound dampening insulation while I'm in there. Any thoughts or suggestions on that anyone? Thank you...
 
sowbug, It would probably take from 1-2 hours. With two of us it could even be like 45min to 1 hr. The hardest part could be fitting the tweeters in, if they are close to the original size like mine were we wouldn't have to do any trimming on the inside of the little corner trim piece. If they are larger then we would have to engineer it to fit. Also if the crossover is larger than what I had we'll have to find a location where it will fit. Other than that I could probably do it pretty fast. Just bring along some Mountain Dew to drink and we'll call it good. Just let me know and we'll schedule it. You can pm me. I'd be happy to help.
 
You are the man! Let me see if I can talk my wife into the trip....she's preggo and we have another little one...so....Do you happen to fly fish? I would love to bring my gear and get in some fishing, too! I'll PM you if I can get out that way and let you know. Thanks for offering to help!
 
I love to fish but am not very good, played around with fly fishing when a teenager, managed to be able to cast out where I wanted most of the time but never caught anything. My wife is pregnant too! LOL. This will be our second. My boy is 4 1/2. Yeah we can pm and I'll give you my number. Are you wanting to fish near Bull Shoals, Norfork, the Buffalo River?
 
I prefer to fish the Norfork, then the White....that's where I used to wade fish. My little girl will be 2 on November 4 and our boy is due on December 2.

Hope something works out!
 

Users who are viewing this thread

Back
Top Bottom