speaker install writeup (1 Viewer)

This site may earn a commission from merchant affiliate
links, including eBay, Amazon, Skimlinks, and others.

Wanna mail me a couple of those bad boys?!

If I had a stack of them, I'd send you a couple, but it's just the one. I made it as a template to cut 4 for my door speakers on a router table. I don't need it anymore. If you want it, I'll mail it to you. Or I could scan it. A paper pattern would work fine if you cut them out with a jig saw.
 
If I had a stack of them, I'd send you a couple, but it's just the one. I made it as a template to cut 4 for my door speakers on a router table. I don't need it anymore. If you want it, I'll mail it to you. Or I could scan it. A paper pattern would work fine if you cut them out with a jig saw.

Whichever is easier for you. That's awesome! Thanks!
 
Whichever is easier for you. That's awesome! Thanks!

Here you go. I scanned it and cleaned it up a bit in Photoshop. Image size is 8.5x11 so just make sure the scale =100% when you print it. It should line up, but I'd just double-check that it fits your door before cutting any wood. My replacement 6 3/4" speakers called for a 5 7/8" cutout hole and they fit perfect. MDF doesn't like moisture so I hit them with a couple coats of Zinsser BIN primer and some leftover spray paint I had laying around.

speaker template.jpg
 
No problem and good luck with it. Also, I predrilled 3/16" holes in the 3/4" MDF, and used #10 x 1 1/2" stainless flathead screws to attach them to the door.
 
Here you go. I scanned it and cleaned it up a bit in Photoshop. Image size is 8.5x11 so just make sure the scale =100% when you print it. It should line up, but I'd just double-check that it fits your door before cutting any wood. My replacement 6 3/4" speakers called for a 5 7/8" cutout hole and they fit perfect. MDF doesn't like moisture so I hit them with a couple coats of Zinsser BIN primer and some leftover spray paint I had laying around.

Although I don't need the template, I appreciate you posting it. Template work is something I typically screw up, so my thanks to you and those who make life easier.

A couple of extra points that some might find helpful:
Find the scrap bin at a kitchen counter shop and grab some excess Corian (like sink cut-outs). Corian cuts like a hard wood (maple), can be sanded, and is inherently water proof.
If MDF (or any other wood product) is the only thing available, I have had great luck waterproofing with some fiberglass resin/hardener. Just paint it on and let it sink into the surface (no cloth needed).
 
Hi guys, bringing up this old post cause I wanted to upgrade my audio system on my 2006 Land Cruiser Amazon (UK). I' not sure of the speaker sizes and whether I can bypass the amplifier and still retain the OEM headunit. The head unit is the navigation one with A.C. controls so I can' really change it. In addition the car is not with me as of now hence I need help in knowing these specs to purchase the speakers.

What are the front speaker sizes?

What are the rear speaker sizes?

What is the subwoofer size?

How can I bypass the OEM amplifier but continue using only the OEM head nit?

Thanks guys
 
Skshepherd

great info, did you have an issue with the gap between the door trim and the new driver? As it's mounted ontop of the oem bracket? My oems are not dammaged at all but considering changing them. Just want to be sure before I go ahead and cannibalize them.
 
great info, did you have an issue with the gap between the door trim and the new driver? As it's mounted ontop of the oem bracket? My oems are not dammaged at all but considering changing them. Just want to be sure before I go ahead and cannibalize them.
One more final pic of install just before door panel goes back on. Remember to save the tweeter grille trim piece for last.
P1020473.jpg
 
i replaced the lower front door speakers using the stock mounts and an adapter plate. then when i put the door back on there was some resistance down near the front corners of the door and a small gap left at the very lower front underside ot the door panel when it was all tightened up. it's not much but it bugs me, think i need to take the panels off again and maybe increase the size of the openings in the wood behind the speaker grills a bit.
 
There's no space for grills behind the OEM grille. Don't use the grills that came with aftermarket speakers.
 
There's no space for grills behind the OEM grille. Don't use the grills that came with aftermarket speakers.
@ramangain i didn't, i think maybe i just didn't line everything up perfectly enough to fit properly through the wood behind the OEM grill. it's pretty close tho, shouldn't be too big of an issue..
 
Ok good.
 
added speakers in my doors today, based on this tread - thanks for giving me the courage to start...

but - after putting it all back together the membrane is hitting the inside of the doorpanel/speakerfront so I have to open it up again and have a look at it. damn...

also my front/right side isn't working at all, nor the tweeter - so I have some job to do finding the broken wire or connector.

I used these in front:
FOCAL RCX-165

I will add these in back:
FOCAL ICU165
 
Last edited:
Front speaker install on 2002 - replacing JBL speakers

This excellent writeup seems to be one of the only ones that still has pictures, so it was a great help for me yesterday while installing my new Infinity Reference 6030cs component speakers on my 2002 that had the stock JBL speakers. I'm updating this thread with a quick visual revision since the speaker stock mounting system seems to be slightly different than the earlier Hundy's, and this might help someone in the future by having the two installs in one place.

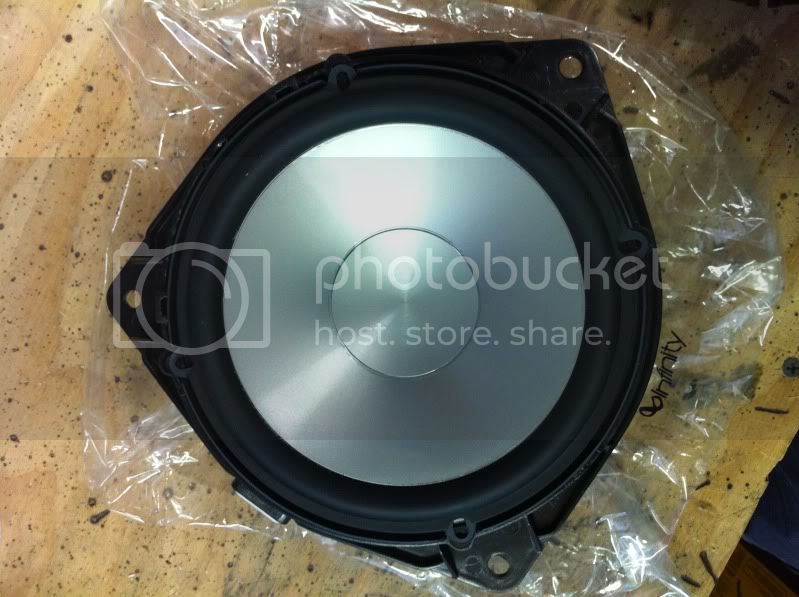
I replaced my front speakers only (so far) with Infinity Reference 6030cs component speakers. They are 6.5", 270w, 2-Ohm - pretty much a direct replacement for stock speakers on paper, and highly praised by the other Hundy owners who've also installed them. The only :banana: challenge is that you have to wire up the crossovers and do some slight modifications to the mounting system, which was stupidly simple.


Step 1 is to get the door panels off - there's a pretty good writeup found HERE. The only thing I had difficulty with is removing the trim plate behind the door lock mechanism. If you look carefully at the face of this part you'll see a black plastic "pin" between the lock and the trim piece - you need to get a flat screwdriver between this to unclip the top and bottom, then slide the trim piece toward the lock to unclip the little "J" clip behind the solid section. Do not try to pry between the trim and door panel, you'll most likely break something. After door panels are off, everything is accessible and is very simple to remove speaker parts.


I didn't take pics of everything, just the relevant items that are different.
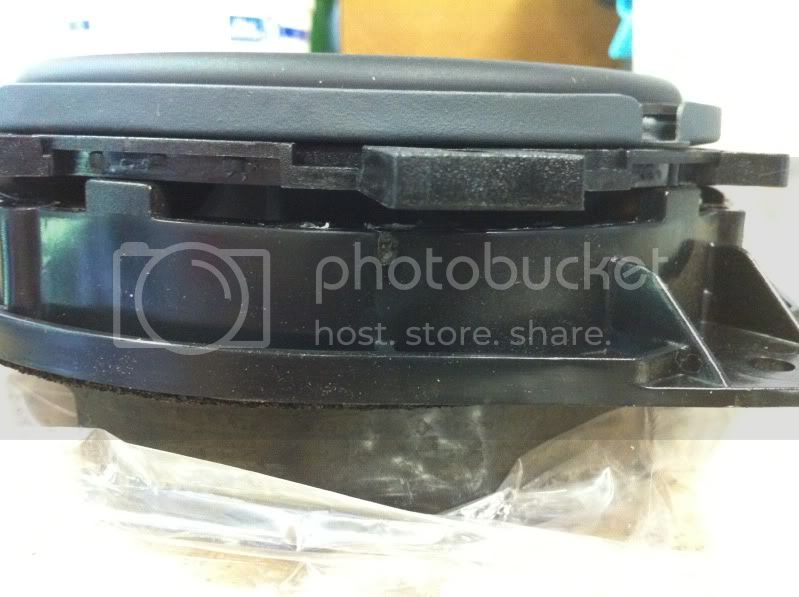
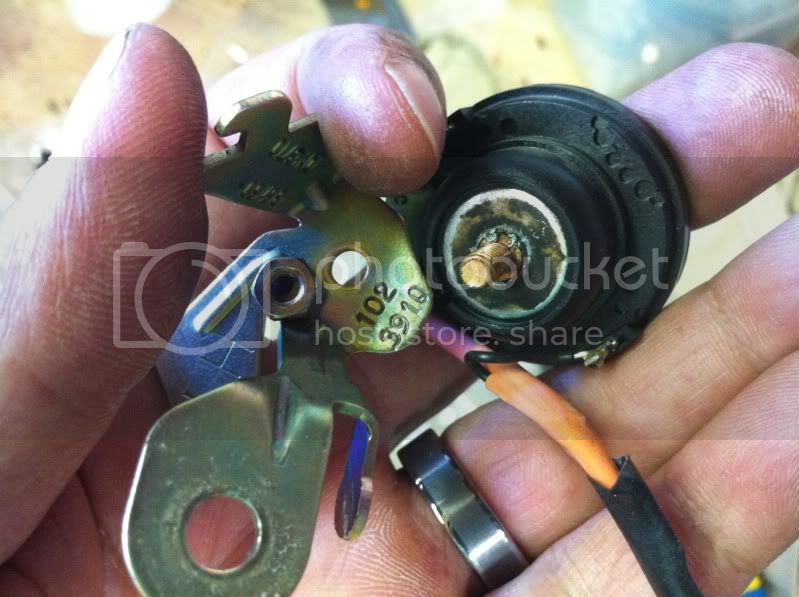
Here I've already got the JBL speaker removed from the mounting bucket - simply unbolt the 4 mounting screws and used a sharp utility knife to cut through the rubberized gasket material to release the speaker. In this pic is the stock housing with the new speaker resting in place to determine mounting


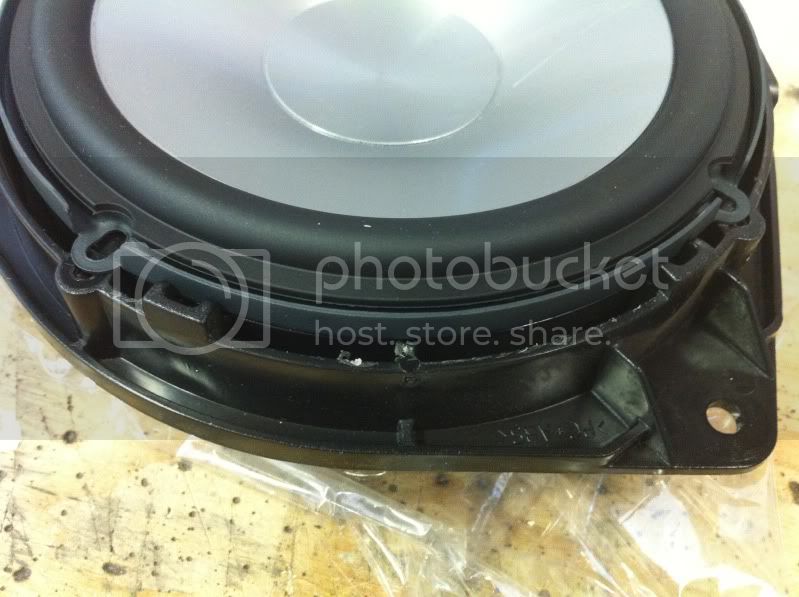
the Infinity mounting diameter is slightly smaller than stock, and there are 2 plastic tabs preventing them from mounting flush. Tab removal and adapter plates will be necessary for correct speaker install

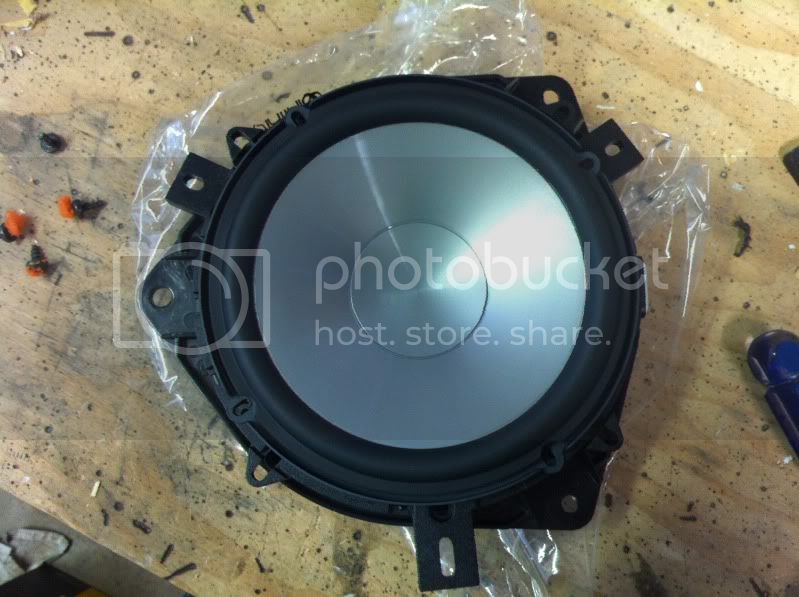
adapter plates underneath:


20 seconds with a small saw removes the tabs:


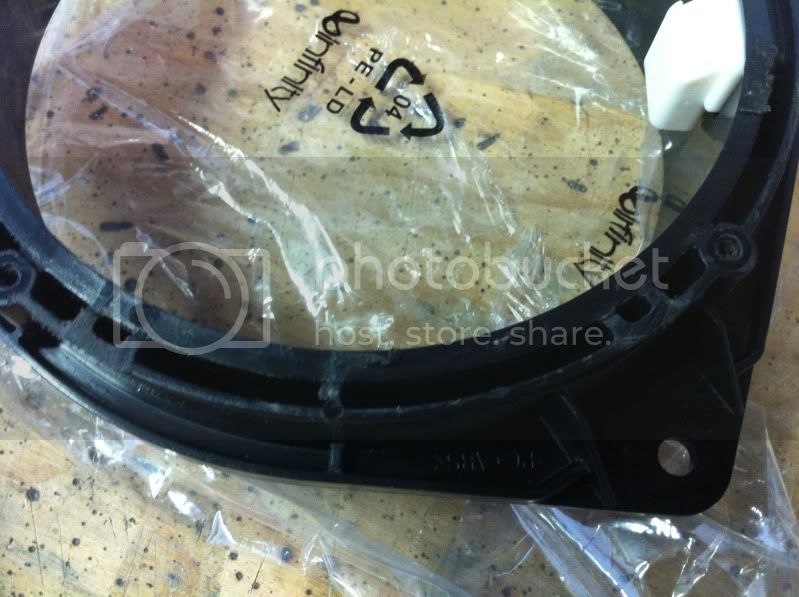
screw the adapter plates onto the housing (original screws in these holes were only 1/2", so pre-drilling was necessary to seat the replacement 1"+ screws the Infinity's come with). Then install the supplied gasket on the edge of the speaker. Lastly screw the speaker into the adapter plate which should already be installed on the housing:


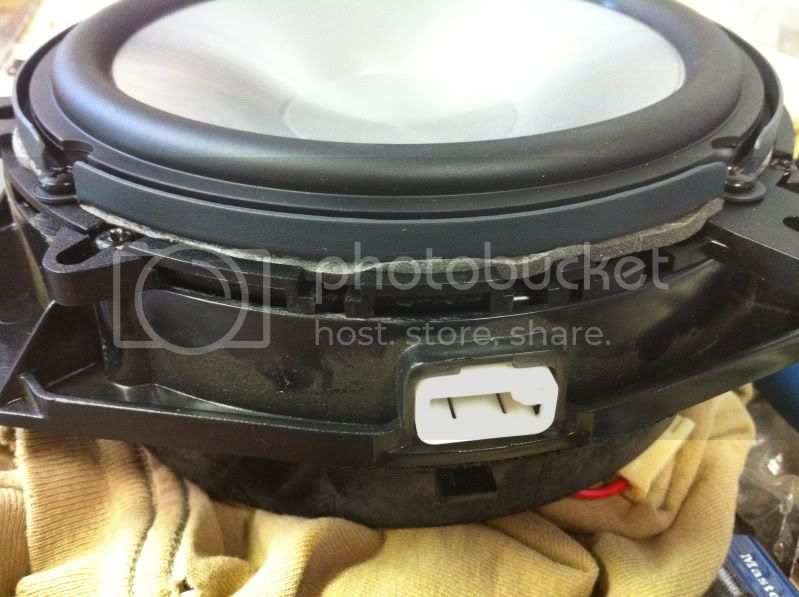
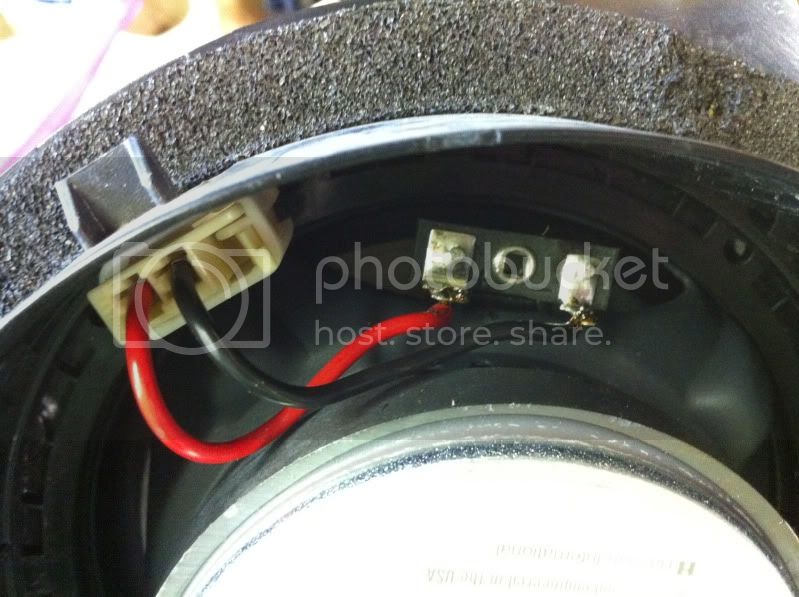
Optional: solder stock speaker connections to the back of the speaker. Other option would be to put new connectors on the wires since the JBL setup has perpendicular connections vs the parallel ones on the Infinity's:


JBL tweeters were bolted to the mounting brackets instead of glued like the OP's rig had. I mounted my tweeters the same as the OP by using some heavy-duty foam tape (mine was servo tape for RC's - stuff holds like crazy!)


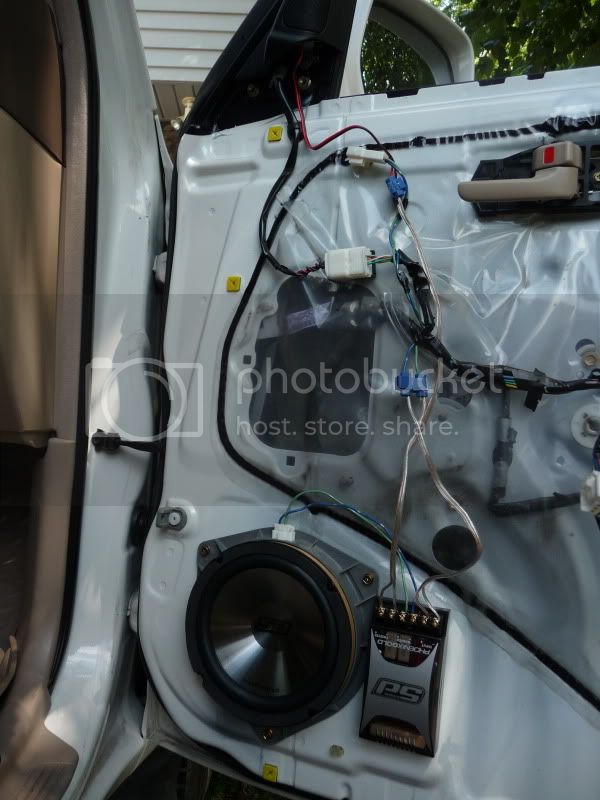
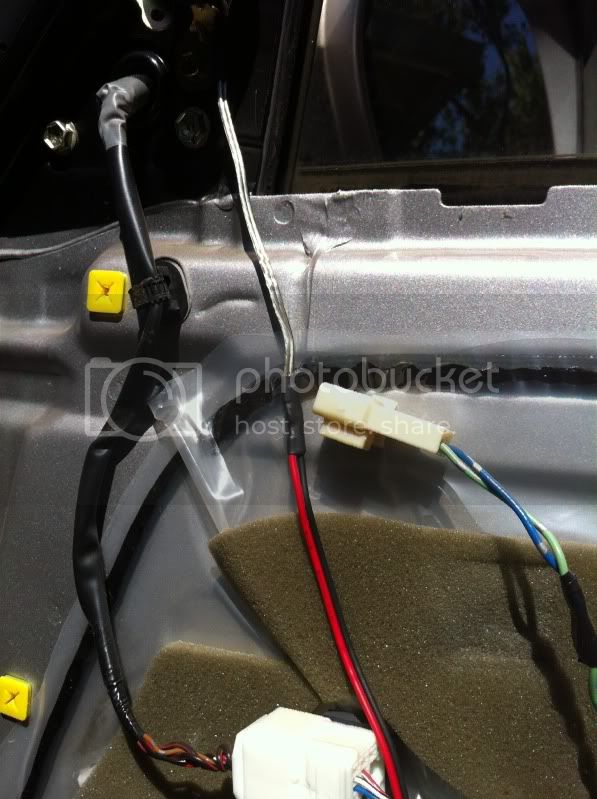
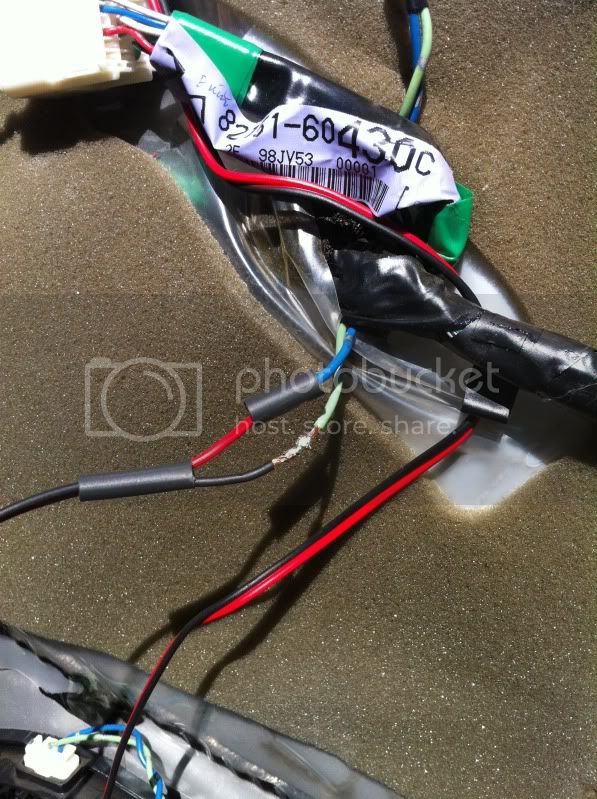
These last pics are where I chopped into the stock wiring to get my crossovers wired up. I did the optional connection method and soldered everything vs using crimp connectors. Used shrink tube to protect my connections vs tape. Tapped into the woofer wires to use as my inputs, but from research I guess either the tweeter or woofer wire could be used since the stock tweeters have capacitors on them - thus confirming the signal is the same for either set of wires.


Crossover location. Used 2 pieces of servo tape on the backs of crossovers for mounting


Before putting it all back together, make sure to test the system!!! I didn't and ended up having to take the panels back off. Problem for me was the soldering on the back of my driver's side tweeter grounding out on the tweeter mounting plate -- took me forever to figure that one out! If I'd do it over, I'd put liquid electrical tape over the solder joints on the tweeters before installing (wasn't my solder joint so I didn't even think about it when installing). Overall, I am VERY pleased with the new speakers. I put my crossovers on the +3db setting and I think it sounds much more crisp in the Cruiser. Very clean sound...now I just need to work on the back doors and the subwoofer :cheers:

@highonpottery I have an 06 and i'm just curious, can I use just the oem wiring that was headed for the lower speaker spliced to new wire for the input for the crossover, then disconnect the upper plug and play tweeter oem connector and run wire directly from the crossover to the new tweeter?
 
@highonpottery I have an 06 and i'm just curious, can I use just the oem wiring that was headed for the lower speaker spliced to new wire for the input for the crossover, then disconnect the upper plug and play tweeter oem connector and run wire directly from the crossover to the new tweeter?
Yep
 
For the record - mine where not a straight walk in the park as the FOCAL's where 1-2mm wider in diameter to fit in the outer limits of the old speaker. I also had to grind out the inner edge where the old speaker was placed. I used a sandpaper on my grinder and it went OK.

So the screws - there where no material to fasten the screws, so I had to use loooong screws - approx 5cm (2") so the reached through the end of the "adapter" (old speaker chassis) - those screws that was too long I had to cut off using my grinder before entering the speaker back into place.

Sorry - no photos as it played music while working... I could take a picture of what's left in the bin :-D
 
Ive got an Australian 100 series Toyota and they didn't come with a tweeter, bugger. Instead, they just have a blank there. I'm trying to retro fit a tweeter.

Behind the blank is exactly the same as everyone else Ive seen on here. I can source the tweeter cover from toyota but not the silver steel bracketry that holds the tweeter in place.

Im after an pics anyone has of the tweeter install and the placement of the silver bracket. Also any suggestions on where to find the silver brackets for the right and left hand side.

There is a 100 series that just went on sale in the "parting out" forum. You should ask him about them.
 

Users who are viewing this thread

Back
Top Bottom