Service: Wheel bearing, Steering Knuckle, Rack OE rubber mounting bushings, Ball joints, Transmission flush W/Surprises!

This site may earn a commission from merchant affiliate
links, including eBay, Amazon, Skimlinks, and others.

2001LC

SILVER Star
Joined
Nov 4, 2007
Threads
199
Messages
14,717
Location
Colorado
Website
www.youtube.com
So as many of you know; I've been doing some Service work on 100 series for others, mostly local mud members rigs and for some of my neighbors.

The list of work I've done for others is long. But front end work is the most common PM or repair work I see. Either the service was done by independent shop, Midas/Brakes plus etc. or a Toyota/Lexus Dealership. The PM service work was either not done, not done correctly, a mistake happened during assembly or flat out messed up due to incompetence.

The number one issues I see has to do with improper service of wheel bearings and other front end work including power steering, second is coolant system issues and third is brake issues.

So many ignore the very important Wheel bearings PM, which until this week I did not think our wheels could fall of from improper service. That the brake disk (rotor), being held by caliper, would keep wheel hub on. Even if wheel bearing locking and adjusting nuts came loose. I was WRONG!

Index:
Wheel hob & steering knuckle service begin at post #3
Transmission flush + starts at post #74
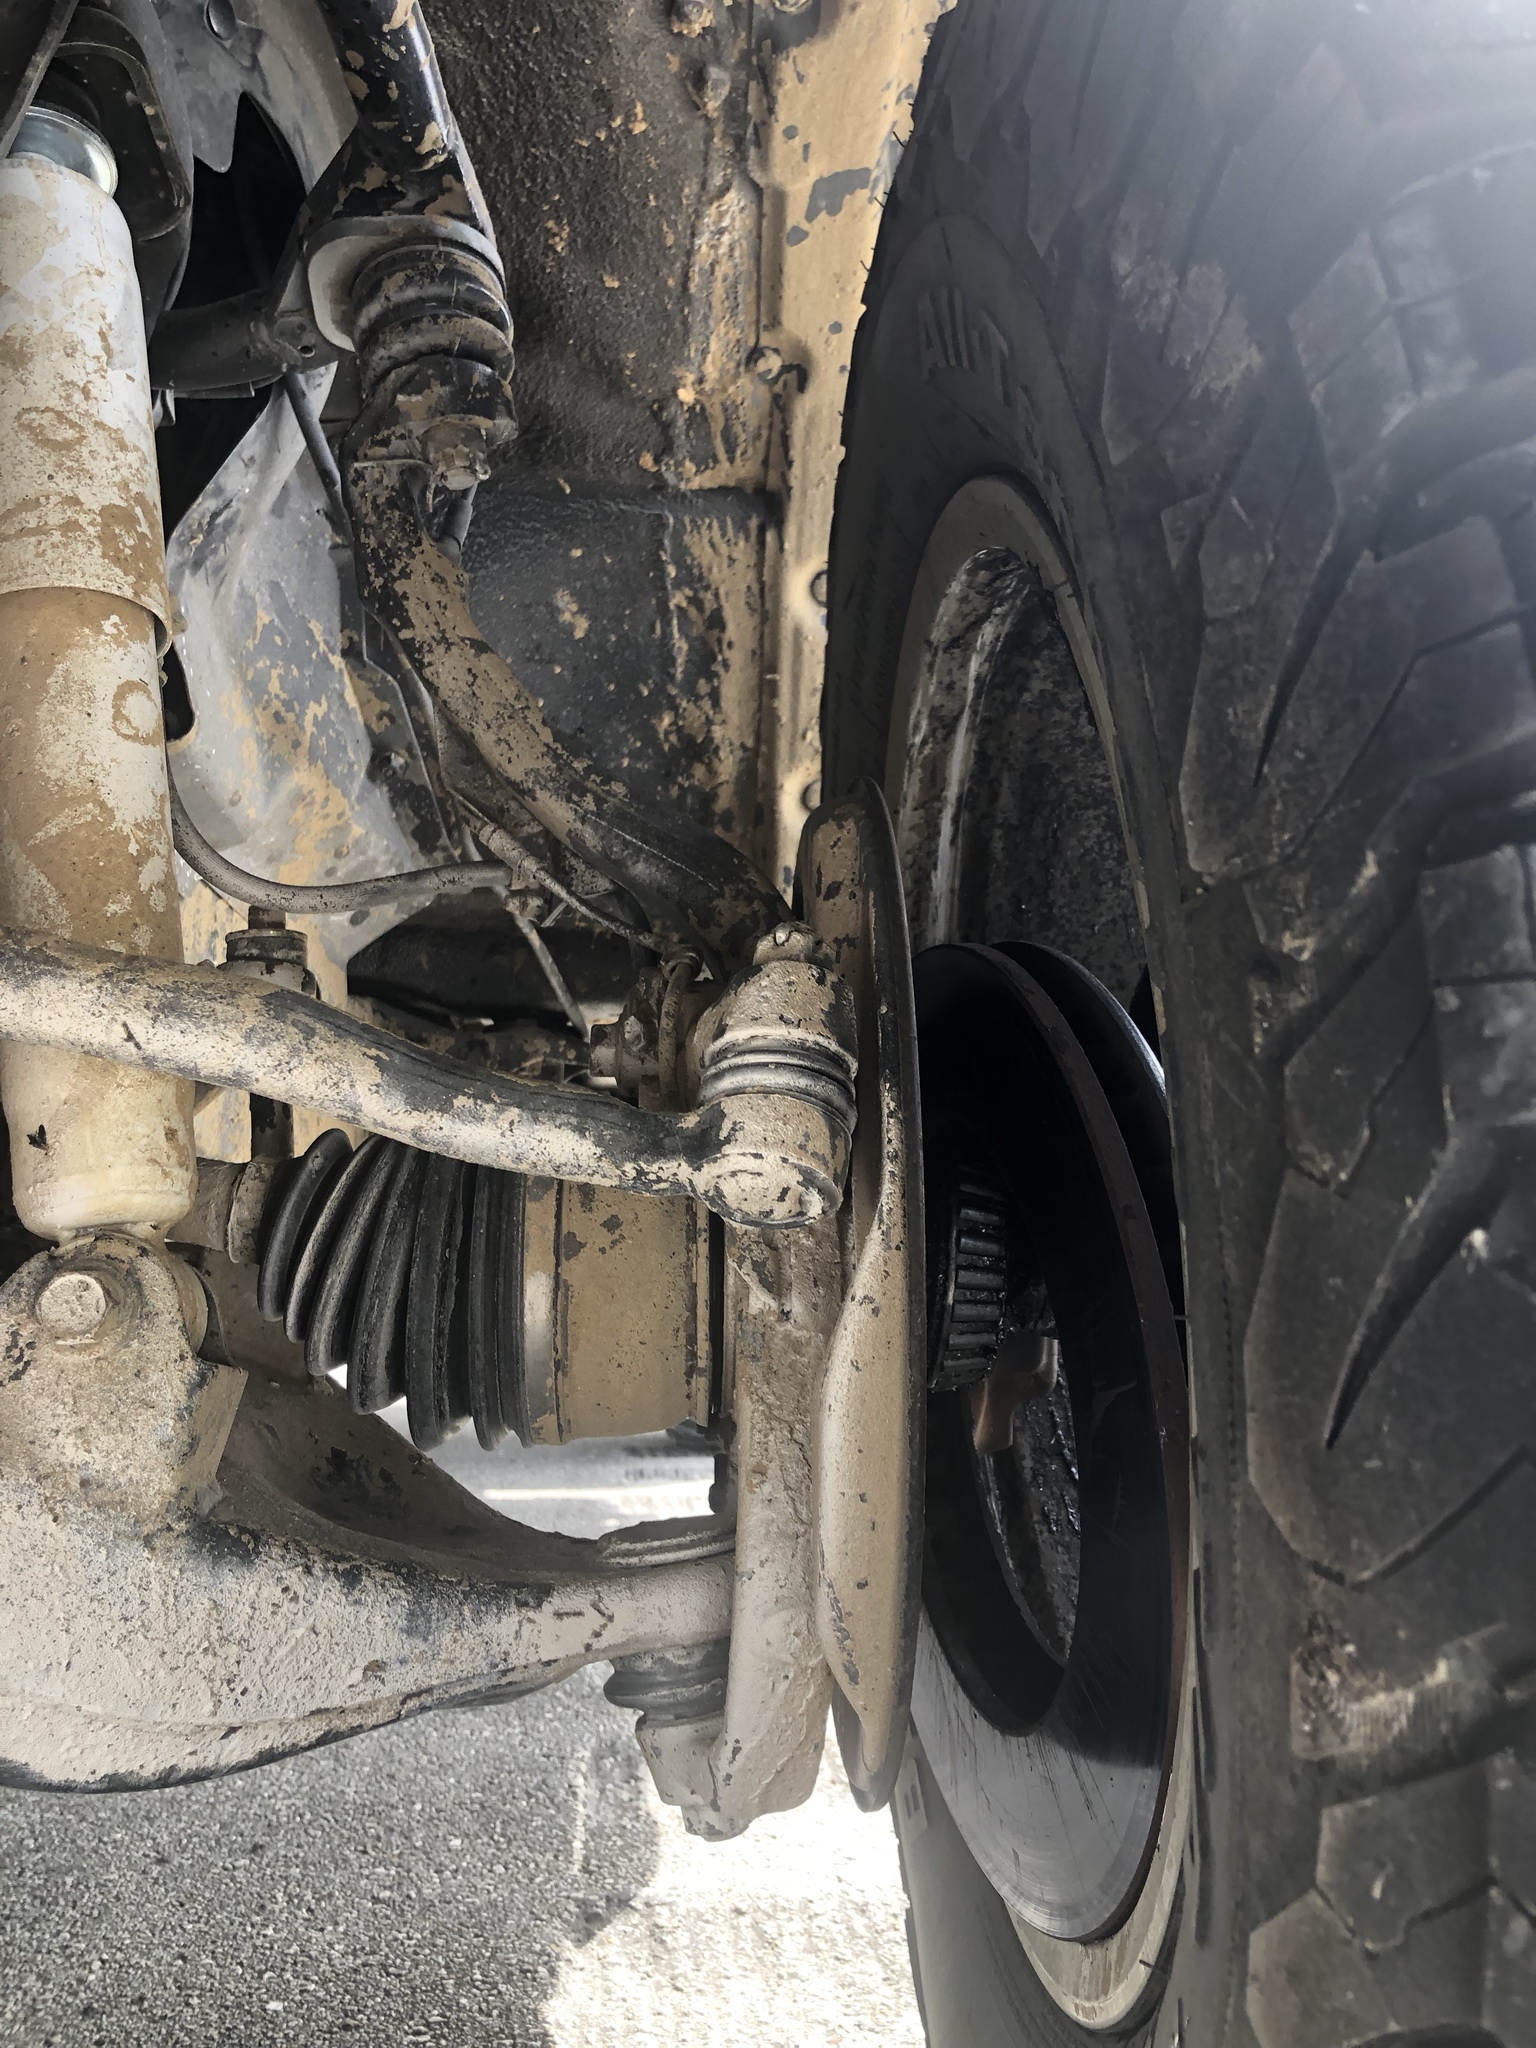

I also was not overly concerned with a weak ball joint. WRONG again!
 
Last edited:
Currently I'm working on a 06LX w/186K miles. The owner travels for months at a time, racking up about 5K miles a month for work. He came to me in May w/171K for the first time. At the time, I was a bit back up and short on time. I was working to help as many as I could with their rigs, before putting all effort and time into finishing up the restore and off- road build on Merlot, for new owner to pick-up and take too HIH.

I did a short inspection on this 06LX, for safety and common issues that could cause a problem on upcoming road trip. As usual, I found was loose wheel bearings, which I see 8 out of 10 inspection. It turned out Midas replaced a wheel lug studs on each front wheel hub. Some shop had busted studs during a tire rotation, was my understand as to why Midas was involved. This is number one reason I go into shop when tire work is being done, as they bust studs all to often.

Some pictures and some of my notes on the inspection and service I did back in May:
084.JPG

033.JPG

034.JPG

037.JPG


Inspect and service notes:
Battery acid neutralize. Br fluid dark and res over filled (set level). Br bleeder caps missing or shot, same with AHC (replaced all). WH bearing loose, snap ring gap excessive (re-set). LBJ's bad (noted). Power Steering res low and return line bad (flushed cleaned and replaced). Transmission to radiator cooler line bad (secured and watch). Coolant low. Radiator fins clogged. Oil on: PS head, Timing cover weep hole, block PS lower area, alternator and steering rack.
HP wash engine, Frt end, undercarriage, Neutralize battery acid and clean. Clean radiator fins

Engine tune (PCV valve & hoses, battery, TB, MAF, misc.)

Spark plugs re torque

Head cover bolt re torque

Wheel bearing set preload

Hub flange set snap ring gap (PS needed max thickness snap ring, 2.8mm )

FDS PS boot small inner clamp weep. Clamped

Power steering service & flush. Include reservoir R&R

Propeller shaft & spider lube

Dr belt tensioner pulley bearing

Re-set fan shroud into retainers

Parts supplies & misc.:

Tensioner bearing

Power steering (PS) reservoir OEM

PS return hose 1 1/2 " cut off to sung up and stop weep

M1 ATF PS

AT-205 PS

Vane pump idle up control vacuum line assembly OEM

PS PVC hose

DS PVC hose

MAF sensor spray

Bolts air tub securing

Battery cln & grease

Br bleeder cap OEM

AHC bleeder caps OEM

Locking washer keyed DS PS

Claw washer New DS

Claw washer Used PS

Locking washer keyed DS PS

Snap rings 2.4 DS, 2.8 PS DS PS

Grease caps

Thread locker on hub flange studs/ nuts

Toyota Pink SSL coolant

Grease MI tub & tube Hubs, spiders & propeller shafts

NAPA small boot clamp

D-greasers

I noted front drive shaft and hub flanges had likely been replaced. Could have been a reboot, but teeth of axle and hub flange were good looking from what I could see, indicating replaced or properly serviced from day one (not likely)..

I did not do a wheel bearing service, at the time. I only add some grease, re-set preload and replaced snap rings. I used a 2.4mm snap ring DS and a 2.8MM (the max) on PS.

The 2.8mm indicated issue likely with axle brass bushing, large wheel bearing or spindle as the areas I could not readily see while working on. Axle brass bushing is number one wear point the effects snap ring gap. That is if axle snap grove not damages or hub flange. which these look good as noted.
 
Last edited:
At the time we agreed to bring back in fall after trip, to take care of wheel bearing service and ball joints. So that is what I'm now doing at 186K miles.

I found two surprises during disassembly yesterday.

First was a busted bolt of the 5 that hold rotor to wheel hub. Now how and when did that happen. Could it be when Midas replaced the lug stud (BTW: using a lug nut of different size than others on the well spacers). If they didn't not busted it, certainly was visible to them and they would/should have at minimum informed owner. So likely Mechanic just though; well no one will see it right, just get it done and out of shop fast.
Is this a big deal? Well I only know one thing for sure. Toyota requires all 5 and that they be torqued in.
021.JPG

So now this requires me to pull off rotor from wheel hub and see if I can get that out and if threads are repairable.

Second was a surprise I've never seen before. Remember that very thick 2.8mm snap ring on PS I had to use to get proper gap. Well the brass axle bushing just came out by hand (that I've not seen). Both side have only factory grease, which I see often, so not greased every 30K miles as PM requires. PS look as if brass grounds in groove of bushing and grease contaminated by dirt. Like during the front drive shaft service they got some dirt in the sealed area.
025.JPG

Just came out with fingers. That's a new Surprise!
028.JPG
 
Today I spend about 3 hours recondition and cleaning the knuckles & hub rotors. I found yet one more bolt on other side not looking to good. But before I show that. I'll should a little of recondition tools, stuff I do and why.

Here's a TRE mount. Note how it's taken a hit and now the boot seal is in question. This can cause loss of grease and contaminates into ball joint. This can results in early ball joint failure. It happens for one reason. Hammering off ball joints, rather than using a puller. Often time the hammer misses it's mark and damages boot and or ball joint.
014c.webp

Rough cleaning to reveal. Boot seal compromised needlessly by pound off ball joint of TRE.
.
007.webp

Some metal work. Pounding flat with 2 # hammer.
010.webp

Filling to level
011.webp

Should give a good seal now. Only 3 more to go. 2 (upper ball joints securing points) of the 6 were okay.
013.webp
 
De-rusty is something I do with every knuckle service. During assembly I do some rust preventing.
001.webp

002.webp

De-rusting, remove crud, pound and filling all to level hub for a good flat wheel mounting surface.
014.webp

I found a 3/4 hone work well to clean out wheel speed sensor port. Wire wheel is useful, but tends to glaze over rust. The rust/paint remover wheel is the go to tool here.
009.webp
 
After rough reconditioning and de-rusting. Petroleum Solvent shrub is next. Then a water based solvent srub. Then HP water wash. Then HP air to dry and final a wipe down of bare metal.
015.webp

Water base solvent tank with a rust inhibitor.
017.webp

Then power wash. Using the water solvent tank first, keeps from making a grease mess when HP washing.
018.webp
 
I'm after that busted busted bolt. Cleaning hub & rotor, aided in separating components.

After removing bolt. Using a plastic hammer. I pound out wheel hub from rotor.
020.JPG

Looking at both sides of busted bolt, I'm not hopeful. Since the bolt is not protruding like the good bolts are, it's likely a cross thread done with impact wrench. I suppose the tech that did this, didn't have finger to start a bolt or even a hand tool. Bet he fast SOB!

Anyway, I decided to see if I could drill out and recondition threads. I elected to work from front side, as surface is flatter. After center punching a starting point, I began drilling with a small bit. I then worked my way up in drill bit size as I worked diligent to keep centered.
022.JPG

Drilling went slow, but well.
023.JPG

I tried different size easy outs as I progress in bit size. Bust one easy out, with first size I tried. It wasn't until almost no thread left through hole and a smaller hole at one end for more bite. Did a I get a large easy-out to work
024.JPG

The threads look very bad. For certain a cross thread with impact wrench.
025.JPG
 
Last edited:
Well with threads so bad my thread restoration tool wasn't working well. For half the hole, it went in loose, and keep trying to go off at and angle. I finally got 80% of way through and square with my thread restoration tool.. But darn if I didn't break, another tool bites the dust. It's not coming out! 2 hour wasted on this hub. Because some SOB hasn't got the sense to at least start a bolt by hand. And, all because some tech rotating tires didn't start lug nuts with his fingers. What the odds two incompetent techs in a row, but I bet they're fast RIGHT!
Anyone with a spare 12 X 1.25mm thread restoration tap?
001.JPG
 
Last edited:
I said I found another bolt I'd show. Well it's the other wheel hub. It too had a lug replaced. It has all 5 rotor securing bolts. But one of the bolts has been reworked. Looks like someone ground down some threads to create a point. Likely same tech that busted other bolt. I'd bet it too started cross threaded. Tech cough it, back it out, and found starting threads damage. Then ground down the tip so he could start it. So much of what I do, is correcting what others have done. I sure like virgins!

It's in securely. So I'll not mess with this one.
003.webp

003c.webp
 
Anyone with a spare 12 X 1.25mm
Similar set - just had it happen to 10x1.25 cleaning manifold stud hole :(

Speaking of chains (Dobbs, Midas) - not sure why people take their cars there. My truck was serviced there for last 4 years. Luckily they didn't do much other than oil changes, but what they did - I see it. Just doing timing belt I had to replace and add about 5 fasteners.

They changed CV axles this year. Wheel bearings have some play in them. I better get this taken care of ASAP.
Exhaust?

It was this same shop, that left wheel bearing very loose.
 
Normally I'd have the wheel bearing cleaned, inspected and packed in the hub. Then day 3 assemble the front end. Now I'll be behind days, sourcing a hub at a reasonable price.
 
Wow @2001LC .. incredible write up! I love reading your reports.

Would you by chance know of an independent mechanic in California (ideally around San Francisco Bay Area) that could inspect and properly tune the front end (wheel bearings, snap rings, and shocks)?
 
Wow @2001LC .. incredible write up! I love reading your reports.

Would you by chance know of an independent mechanic in California (ideally around San Francisco Bay Area) that could inspect and properly tune the front end (wheel bearings, snap rings, and shocks)?
No sorry I don't. You could try, posting a thread asking, and checking with local clubs.
 
Exhaust?

It was this same shop, that left wheel bearing very loose.

Yes, I took R exhaust manifold off, but 2 of the studs on manifold broke. Surprisingly all studs on engine block were great!
But those 2 gave me trouble. I replaced all 3. Used heat, drilled them out, extractor didn't work (and I didn't want to break extractor). Drilling out and re-tapping is what I ended up doing. One that came out - tried to clean hole and broke thread restorer. Not fun. Rust in holes IS a problem. I'm glad my truck is not rusty, this summer I plan to do complete check and coat of underbody.

To check bearings for looseness, do you just move wheel at 12 and 6 o clock? Mine has some noticeable movement.
 
Rusted threads I can often save. Cross threaded should be a criminal offense.;)

Wheel bearings:
Any looseness/play at 12 and 6 is to much. If I don't detect there, I then place my finger between wheel and brake caliper. Move wheel 12 & 6, 3 & 9 or any and all direction. If I feel even the slightest pinch on my finger, that also indicates wheel bearing play. No play should ever be found.

I routinely due wheel bearings and knuckle service on all my restores. Even in low miles like Merlot or The Black Knight (50K to 60K) and they needed as were both virgins never serviced (I love those). They always needed it. Either bearing aren't serviced at every 30K miles or less on a build rig or done wrong (I've yet to see signs and 100% correct job was done by any shop)). Pulling Knuckle is more or less a one time service. If after properly PM'd it only need to be pulled for lower and upper ball joints (makes easier). It is also only way to really test ball joints by the FSM method and to clean axle bearing/bushing and inspect..

It's also the time to consider other jobs while in there. Front drive shaft, steering rack, boots, bushings, etc...
 
It's also the time to consider other jobs while in there. Front drive shaft, steering rack, boots, bushings, etc...

Thats why I don't want to even touch it now :) If I start - it will be for sure $2k+ deal. Truck needs new steering rack (seeping on both sides), probably pump, hoses. I stopped leaks at top hoses will monitor. But if I do rack it just makes sense to do hoses and reservoir/pump.

Then I wouldn't do balljoints without bushings at this age/miles. Yeah, it will become a bigger job for sure. I decided to run truck for a while, at least until summer as is.
 
Now I'll be behind days, sourcing a hub at a reasonable price.


I think I can help on the above. PM if interested.
 
Thats why I don't want to even touch it now :) If I start - it will be for sure $2k+ deal. Truck needs new steering rack (seeping on both sides), probably pump, hoses. I stopped leaks at top hoses will monitor. But if I do rack it just makes sense to do hoses and reservoir/pump.

Then I wouldn't do balljoints without bushings at this age/miles. Yeah, it will become a bigger job for sure. I decided to run truck for a while, at least until summer as is.
It does tend to snow ball with some of these rigs, with the "while in there"! But once under control they are such a pleasure to drive and so reliable.

I like to deal with safety stuff, and stuff that if not corrected may cause further and or other components damage. My opinion of what this means and how to deal with, is evolving with my experience.

Power Steering:

Here's how I deal with power steering issues and leaks, which I see so often. Why so often; failure to flush is #1. Bad ball joints is also a killer of rack bushing, TRE and gears. As the extra sloppy add strain.

  1. I note all oil spots, then clean them
  2. Replace leaking hoses and clean or replace reservoir, then flush.
  3. If I suspect or see vane pump, input or output seal leak. I add in 1.3 oz of AT-205. Set level and watch level and suspect leak spots very close. Often leaks are from above, so hose may be all that's needed. AT-205 is 80% effective at stopping input shaft leak, 50% on the output shaft seals and 20% on vane pump.
  4. If leaks do not stop then it's a rack and or vane pump job. Best to flushed system beforehand anyway, so your not wasting resources flushing now and reservoirs screen need to be keep clean and hoses in good working order. I use M1 ATF which really cleans the system nicely.
  5. If leaks stop then the next question, are the gears in rack & pinion good. If leak stopped and gears good, no need to replace rack.
  6. Next question is how are the mounting bushing. If shot we get that annoying wondering down the HWY. Bad rack bushing is not only cause for wondering, so all needs considering. But if bushing are shot we just replace those.

Naturally inner and out TRE need inspecting. That's petty straight forward and just done while inspecting ball joints.

Above is what we've done on this rig. We're now of opinion rack is good and all leaks stopped. So I'm doing mounting bushing while I wait on wheel hub solution.

Typically, poly bushing are used, which I've used in both older and newer steering racks. But I prefer rubber bushing to match Toyota design & feel. I'm going to try and install rubber bushing with rack in place this weekend, a first. If I can't do in-place, I'll pull the rack and do on the bench. Which other than the pulling of the rack is easier to R&R bushings. Having knuckle out makes pulling rack easier, if I've issue with input shaft releasing from column. So now is a good time. I can just pop out the front drive shaft, which gives good accesses to input shaft.

I inspect rack & pinion bushing by check list.
  1. HWY wondering. YES. (Note: bad ball joint, alignment out, tire condition and pressure, to little rake and loose wheel bearings can all do this too)
  2. Is top cup turn CW 5% more or less. YES.
  3. Is bushing rubber cracking excessively or damage. YES. (Some cracking is expected, but watch as steering wheels turn and see if rack lifts and large cracks seen in rubber mounting bushing)
So here I do have three boxes checked YES.

Notice the transmission outbound cooler hose, that I've tie to the bracket. Also notice the hose is not OEM nor are the clamps. History at Lexus tells us this was replaced and WS ATF added. Hard to see the oil grim as I cleaned it, there was a lot. What I see happen here, is hose comes out of bracket. Then flops around as we drive. This loosen the fitting on the radiator and we get leak.. In this case that leak has damage the rubber of rack bushing, badly.

003.JPG

Anyone notice my brand new "safe" Jack Stands. A present form @abuck99. They are so nice. He feared I'd kill myself or worst with my very very old stand. What a guy! Thanks my friend from GA.

Typically this DS bushing doesn't look so chewed up. My bet is ATF leaking from ATF cooler hose, soaked the area and damage the rubber. We also tend to get oil lingering here from sloppy filter replacement.
003c.jpg

The PS bushing looks dry, but cracking. Watching while turning steering wheel, I see excessive lift and gaps in cracks
006.JPG

View from above I see bushing inner cup has turned. Strong sign it's rubber bushing has separated from cups.
007.JPG
 
Last edited:
I just bought my lx470 a month ago 200500 mi I did a quick check and from what I read in your post 2001lc I have most of those wheel bearing and ball joint problems. Thanks for the great job on your post
 

Users who are viewing this thread

Back
Top Bottom