Pressed in the hub races with some lite lithium grease, then pressed in the lug studs with oil, rubbed the hubs with acetone, and taped them up. This took a very long time, I used the most beat hubs available since I wasn’t sure if this idea would pan out… (may or may not have been the move)
4 coats of (black) Steel-It later and baking in the heat this is the result, the tape pile is an inch and half high… (I am curious to see how this paint holds up!)
Had the stone guard zinc plated, bolted it down for full mockup on my axle… One thing to note the spindles had to be tapped in with a dead blow, both sides fit very snug into the knuckle. Vast majority of Toyota knuckles I have pulled apart (FJ40, FJ55, FJ60, Mini truck, etc.; which are all the same) the spindle can be pulled out by hand or it falls out once unbolted.
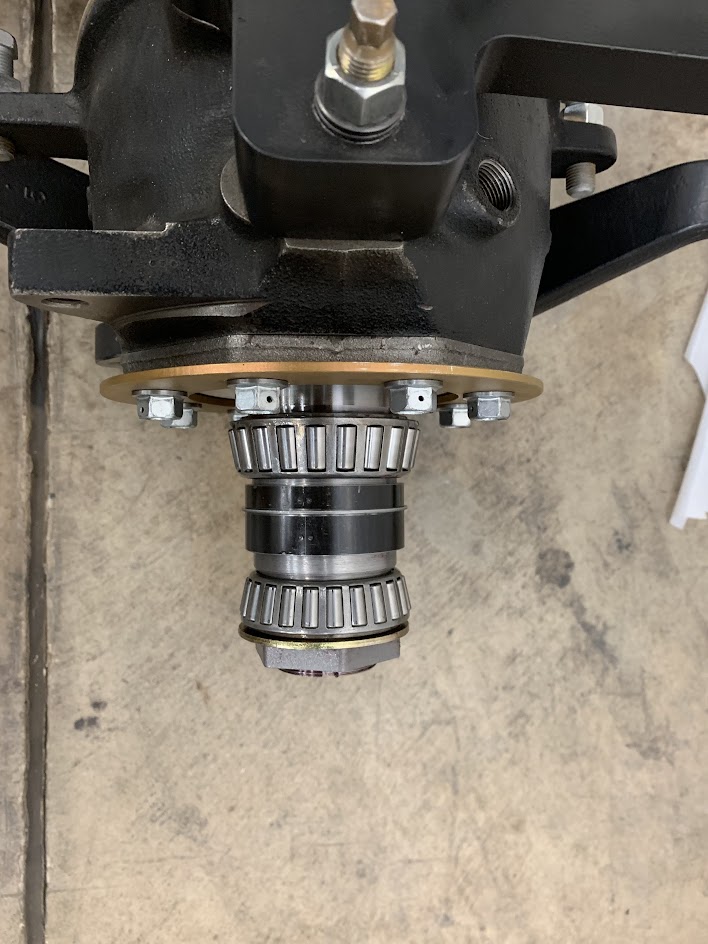
Next up are the front hub spacers, (think solid pinion spacer) it’s a spacer between two tapered roller bearings that rely on torque (and overall length) to set the preload for the assembly. This style of spacer makes any assembly with two opposing tapered roller bearings significantly stronger to axial shock loading (severe duty) while maintaining correct preload.
Left hand front (.)
30+3+5.5+11.5 = 50 (thou): 1 thou of endplay @ 50 ft lbs. of torque on the spindle nut.
30+3+5.5+10.5 = 49 (thou): 0 endplay @ 50 ft lbs. of torque on the spindle nut.
30+3+3.5+11.5 = 48 (thou): 1 thou of preload @ 50 ft lbs. of torque on the spindle nut.
5lbs of spring tension drag measured in the way the FSM mentions.
Right Hand front (..)
30+3+3+10 = 46 (thou): 1 thou of endplay @ 50 ft lbs. of torque on the spindle nut.
30+5+10 = 45 (thou): 0 endplay @ 50 ft lbs. of torque on the spindle nut.
30+3+5.5+5.5 = 44 (thou): 1 thou of preload @ 50 ft lbs. of torque on the spindle nut.
5lbs of spring tension drag measured in the way the FSM mentions.
To find the correct preload you have to start with endplay and work your way down, this is a repetitive process, however it doesn’t take that long (figured out both sides in less than a day).
Once the proper shim thickness was found I rubbed the spacers down with Acetone, then dripped in red Loctite 120* apart. I then put the spacers back on the spindles and torqued up the spindle nut to allow it to dry (overnight). (Like the above pictures that show the assembly without hubs.) This picture shows the hubs fully packed with grease (heavy lithium grease), the spacers can only go in from the back of the hub and the lip you are seeing is what the outer hub bearings sits against (along with the spindle).
Final mockup: bolted the caliper down to check all measurements, happy to say everything landed as expected! Although this is the first time for me to assemble all the parts onto my axle, we already have it working on Justin’s 80, albeit with changes he wanted to run…
Viewing the Zinc plated stone guard from the back of the rotor; this should help keep the hardware and hub clean for long term use.
Final mockup for the hubs and knuckles is complete; I have pulled the bolts that affix the hub to the rotor. Dropped the bolts off at the machinist to have them cross drilled (through the exposed thread) for safety wire as a mechanical lock. Final assembly on the hubs should be very soon!