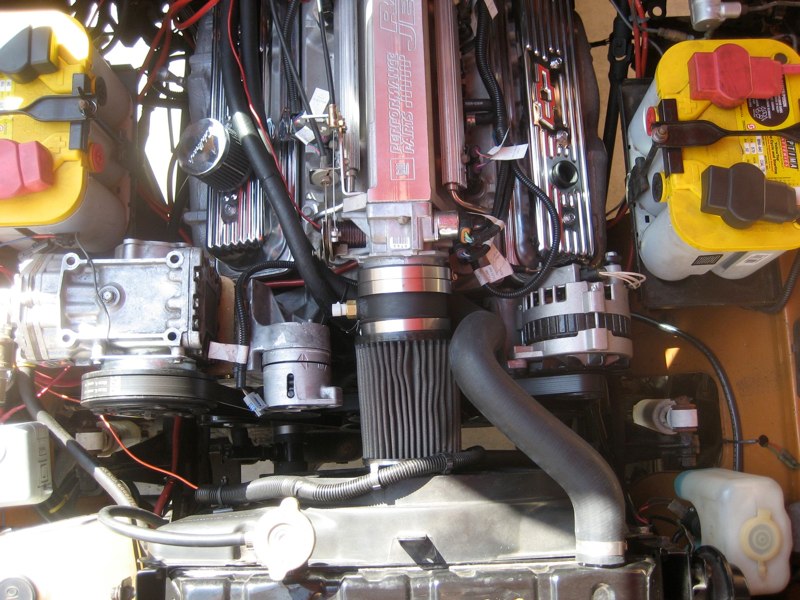
Ram Jet 350 to H55 install-73 FJ40

This site may earn a commission from merchant affiliate
links, including eBay, Amazon, Skimlinks, and others.

Once home I decided I had to figure out why the rig wouldn't get out of "green mode" as it should have hours ago. The DTC tool is a small blink code reader that is very simple and only gives codes not real values, but it's all I had. I was showing several codes after running the diagnostics including a low system voltage code. :confused: That didn't make any sense but I pulled out the multi-meter and started running every test I knew. I wrote down a ton of voltage readings from batteries 1 and 2, running and not running, under load and at rest. Alternator, starter voltage, headlights on and off, blah blah blah. Nothing seemed out of whack.

I decided at this point I needed more help. I'd just buy a code reader/scanner. But regular automotive scanners aren't plug and play with the Ramjet. It's based on a marine engine and the harness is too. After googling my brains out I needed a Rinda Techmate scanner!! GM RamJet crate engine diagnostic and tuning tools OK, not for that price. :doh:

Next step... boat service center.

The guys at Sunset Marine in Oceanside were great. It took a bit of convincing that I truly needed their boat motor scanner to connect up but alas they did. I didn't even ask what it would cost I just wanted it done...

Low voltage and most intriguing... zero hours.

(EDIT: The other codes that popped registered were: 34-MAP Low Voltage, 51- ECM Calibration Error, 81-Throttle Actuat. TAC Fault, 81-Fuel Pump Circuit Low, 5 Volt Reference Voltage Fault, TAC Error No Tac Reply).


What the F%$ck!? That made no sense. The computer is resetting every time I start the motor...
 
Last edited:
Did I mention "no charge" for the scanning? At least THAT was good news. Two twelvers of Newcastle dropped off just before they closed for the day and we were both very happy...


Needless to say it didn't take long to figure out what was happening. Why would a computer reset each time you turned off the motor? DUH! Wired to switched power rather than battery. "What an idiot" I thought. But that was impossible... I checked it THREE TIMES before connecting it up. I drove home and pulled out the tester again, unwrapped the loom and checked... I guess I should have checked it four times. I had wired the main 12v source to switched power.

:rolleyes:


I found a good source for constant power and wired it up correctly this time and all is good with the computer. I drove around for a while and took it back by Sunset Marine the next day and they confirmed... no codes and hours were now adding up on the meter.


After several hours of driving and many miles logged... green mode was gone. Now the rev-limiter popped at 5600 RPM. :grinpimp:
 
Last edited:
Two quick questions for you...

1. What wire on the harness did you (incorrectly) attach to switched power?

2. How did you time the motor to 10 deg. BTDC? (I only see one timing mark on the front of the motor)

TIA.

Jim
 
Two quick questions for you...

1. What wire on the harness did you (incorrectly) attach to switched power?

2. How did you time the motor to 10 deg. BTDC? (I only see one timing mark on the front of the motor)


Jim-

1. The large red wire with fuse referred to as "B+ lead" in the directions seen here is what I accidently connected to switched power. I thought it was to the battery and it was not...


IMG_1731.jpg


The small purple wire labeled "ignition" goes to switched power.

2. That mark is 10 degrees the way I understand it. I set it to that mark and haven't messed with it since. I have considered bumping the advance but have not done anything yet.

Dom
 
Last edited:
Well now that I had solved the voltage problem and was out of "Green Mode" I started poking around the engine compartment to see what else needed resolution. I knew that my heater wasn't working that great in it's current configuration so I decided to:

1. Order a rebuild kit from Shane (Still on the shelf).
2. Look for another route for the heater hoses.

Currently I had one hose coming off the bottom radiator hose with a shutoff valve and another off the top of the water pump.

IMG_1708.jpg


IMG_1684.jpg


For whatever reason it seemed like I couldn't get enough warm water to the heater. I figured the top of the water pump was a good location so I decided to shut the lower radiator "T fitting" valve off and remove the lower hose connection. I also figured the connection at the front of the intake was a good spot to try. I sourced a 90 degree fitting and attached it to the front of the intake.

As noted in post #15 this should be done before installing the water pump. Because I added this later I had to remove the water pump. :mad:

Here's the 90 Degree fitting installed...

IMG_1816.jpg


This helped the heater flow immensely. It's still not hot as hell like my old F motor 71 but certainly was an improvement.
 
Last edited:
This part was noted back in post #22...

I had been thinking all along about the performance of this motor and how I thought it would have a little more juice. While messing with the heater hoses my brother stopped by and now that I had an extra person I put a simple theory to the test. "Push the accelerator all the way to the floor" I asked him. I took a look at the throttle cable and linkage... hmmm.

There was a TON more throttle left that was not getting activated by the pedal. :grinpimp:

OK, so I'm an idiot, BUT... I figured out why my 350 HP motor was only purring and not roaring. I reviewed my options...

1. Order a Lokar pedal like TLC uses on their Ram Jet conversions or...
2. Bend the pedal up a bit and see what happens.

I chose the easy route and bent the pedal. WOW! What a difference! The last 3/4 of the throttle was very impressive. Now this thing was 95% finished and I was having a lot more fun...

:steer:
 
Once the throttle was resolved I was driving it more and more. I would pack up my truck the night before work and get up at 4 am to drive to LA. Ahhhh a 5 speed and a sweet motor... everything I'd be dreaming of since my very first 3 speed and F motor cruiser.

OK so it's cold that early, and I don't ever run a top but did I mention the seat heaters? :)
And yes, that novelty has worn off. A few trips to Santa Barbara and 4 am drives to LA and I was quickly back to the comforts of my "other" ride.

After logging quite a few miles I did notice a strange idle issue that I am yet to solve. It's not very bad but does get annoying at times...

https://forum.ih8mud.com/40-55-series-tech/222464-ram-jet-idle-drops-when-slowing-stopping.html

In an attempt to resolve this I decided to tackle the issue of the intake. I had nowhere to put my IAT sensor so it was zip-tied near the air filter. I had talked to a few guys about having a small extension built with a sleeve with a bung to allow the IAT sensor to be installed properly. I went to my local exhaust shop and this is what we came up with...

Sleeve that fits between the air cleaner and throttle body...

IMG_1808.jpg


We also had to come up with a large rubber connector from the throttle body to the sleeve.


Installed...

IMG_2400.jpg


This thing barely fit! There isn't half and inch to spare. Since then I've changed it again...
 
Last edited:
After driving it with the intake like this I decided to move the air filter out from behind the hot air of the radiator. After talking to a few sources here's what I came up with...

Here's a link of what I did online. I posted it up for cirbo some time ago because I was not even close to having this thread ready for it at the time. If I get off my ass and decide to I'll just post all the info here. Until then this will have to do...

Ram Jet Intake


This is how she sits today...


IMG_2549.jpg


:cheers:
 
Last edited:
Great data Dom. You continue to answer many of my questions before I get the chance to ask.

Is there any chance that you could get the lokar part number that the guys at TLC use for the gas pedal?

Did you oil your filter element? If so, what did you use?

Have you resolved the idle issues yet?

I purchased the intake tube, but was unable to use it for my application. (I had placed the motor higher and closer to the radiator than most applications)

Jim
 
its very nice

ineed to know what fan is thes ?

thank you


IMG_2549.jpg

Taurus.

I saw this rig rolling down the 101 this past weekend - I was in a bar in Encinitas watching some sports when she rolled by. Looks real nice, and sounds great too. Great build, great writeup.
 
Thanks for the Write-Up - Will do the same for 1983 Jeep CJ-7

Thanks for the detailed write-up, i have referenced it frequently. I am currently 90% through an 1983 Jeep CJ-7 install with an NV4500 and Atlas II, I will try to do the same. I started it but due to time, I have take nearly 200 pictures, saved receipts, and made notes. You can see what I have so far at Sailorslog.Net, look in the gallery as that is all I have right now.
 
Through a Google search revealed this thread hidden away.

Related to the issue on permalink #15 and #56. There is now another solution for the issues encountered. My RamJet 350 install is in a different vehicle, but I had the same problem with the water source for the heater. A standard 90 degree 5/8inch to 1/2inch NPT will not clear the plenum portion of the intake, so the solution is to use the front 1/2 inch outlet just above the water pump. As was already stated, if you have already installed your water pump, you may have to remove it to install a stand 90 degree fitting.

There is a fitting that will clear the intake installed in the top 1/2 inch outlet on the passenger side of the manifold.

It is made by a company called Performance Stainless Steel (no affiliation to me, just had a part that provided a solution). The part number is 1075.

Performance Stainless... (link valid when checked on 1/4/10)

It’s design is a two piece fitting. The first part screws into the intake. To do this requires removing the two retaining screws and plates holding the front fuel crossover tube in place. The fuel crossover tube will not come out of the fuel rail on the passenger side of the motor because it hits part of the plenum. I removed the fuel passenger side fuel rail retaining bolts. I removed the throttle cable bracket retaining bolts. Then carefully wiggled the passenger side fuel rail with the injectors still installed up from the intake. This allowed the front fuel crossover tube to be removed from the fuel rail on the passenger side, and pivoted in the driver’s side rail. This created enough working room to thread in the main part of the fitting. After installing it, re-assemble the fuel rails and associated parts. Afterwards, the front fuel crossover tube will clear the fitting by about 1/4 inch. The nipple portion of the two piece fitting can then be installed with some blue loctite and a little oil on the o-ring as listed in the included instructions.

This fitting could also be used on the front water outlet. Being a two piece design, should eliminate the need to remove the already installed water pump.

About the only drawback is the stainless steel fitting runs about $33 from most vendors.
 
Did I mention "no charge" for the scanning? At least THAT was good news. Two twelvers of Newcastle dropped off just before they closed for the day and we were both very happy...


Needless to say it didn't take long to figure out what was happening. Why would a computer reset each time you turned off the motor? DUH! Wired to switched power rather than battery. "What an idiot" I thought. But that was impossible... I checked it THREE TIMES before connecting it up. I drove home and pulled out the tester again, unwrapped the loom and checked... I guess I should have checked it four times. I had wired the main 12v source to switched power.

:rolleyes:


I found a good source for constant power and wired it up correctly this time and all is good with the computer. I drove around for a while and took it back by Sunset Marine the next day and they confirmed... no codes and hours were now adding up on the meter.


After several hours of driving and many miles logged... green mode was gone. Now the rev-limiter popped at 5600 RPM. :grinpimp:

Hey Dom , got the Ramjet running tonite, started right up not a single problem, but runs a little rough for a FI motor. Your post mentions the red wire goes to B+. As my harness has no labels, i assumed the Red and Purple go to switched power, grey to tach,thats all i need, the Painless harness had the Fuel Pump and Tach in it, so i opted to used them directly than the RJ harness. Why does the purple goe to Battery+ as opposed to switched? Thanks
 
Hey Dom , got the Ramjet running tonite, started right up not a single problem, but runs a little rough for a FI motor. Your post mentions the red wire goes to B+. As my harness has no labels, i assumed the Red and Purple go to switched power, grey to tach,thats all i need, the Painless harness had the Fuel Pump and Tach in it, so i opted to used them directly than the RJ harness. Why does the purple goe to Battery+ as opposed to switched? Thanks

Just double checked my wiring. Purple goes to switched "ON" not "ACC" and large red wire with 50 amp fuse goes directly to battery power.
 
Bookmarked and Subscribed. We are doing the same exact build right now, thanks for all the great photos and problem solving.

Orygun,

I'm about to start my ram jet installation as well. I've read this thread over and over and made lots of notes for parts and such. I'll be placing my order sometime this week if all goes well. Maybe we can stay in touch for technical and moral support ;)

Also, Thanks to DomSmith for the awesome write up!

Dom,
How did you handle the external coolant bypass requirement on the ramjet? I see that you have the coolant ports attached to your heater, but if you have an inline heater control valve that is normally closed, it won't flow coolant. Just curious. Great thread.
 
Honestly guys I don't remember the coolant bypass issue. I plumbed my heater as an "always on" with no heater control valve. Being in San Diego the temperature never gets too hot and I don't have a hard top anymore so this rig just lives in the garage. I do remember thinking the valve was a necessity on my '71 with a hard top as it put off a lot of heat if the valve was left open in the summer.

Sorry not much help on that issue.

Glad this thread has been a good reference for some.
 

Users who are viewing this thread

Back
Top Bottom