Builds Project Overland

This site may earn a commission from merchant affiliate
links, including eBay, Amazon, Skimlinks, and others.

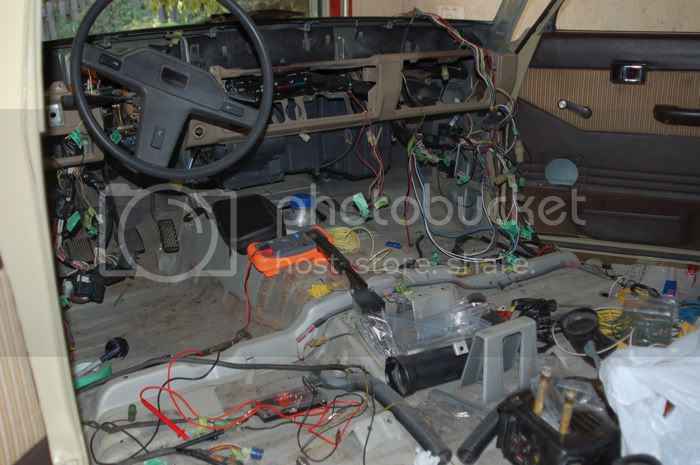
I am finally just about done with the electrical. There were some wires that needed to be moved to adapt the 1HZ to the FJ60 harness, and a list additions that need to be installed. Instead of extending wires to move them from one side of the engine bay to another, I ended up actually pulling the harness apart and feeding the wires back through to keep the engine bay and under-dash as clean a possible. I also fed the wires for the new circuits in as well. It was a mess for a while, but now that it's all back together I am glad I did it. Here's a break down of what was done.

Oil pressure sender - moved the wire from the right to left
Starter wire - moved the wire from the right to left
Fuel cut-off solenoid - I used the wire to the FJ carb solenoid for the 1HZ fuel cut off. It seamed appropriate and was already on the correct side of the engine bay and gets power from the ignition switch.
A/C Comp - The FJ wire was already on the correct side.
Alternator - The FJ wire was already on the correct side.
Water temp - The FJ wire was already on the correct side.

I also added several new circuits to the harness including some things I will not install yet, but wanted to pre-wire for when I do. Relays were used in many of these circuits so I installed two new fuse blocks (6 gang each), one under the dash on the passenger side, and one on the driver side. The driver side fuse panel gets power on ignition from the old FJ ignition coil wire, and provides power to the low-draw devises such as warning lights and the relay switch coils. The passenger side fuse panel gets power directly from the battery, and provides power for the higher-draw accessory relays. I'll write more about these later. Here are some pics of the process. The wires I added are tagged with green tape...

DSC_5083.jpg


DSC_5084.jpg


DSC_5085.jpg
 
Glow Plugs - Previously, the glow plugs were wired to a momentary toggle switch which I held for the desired amount of time. This time I decided to use a timer. DEI makes a "universal" timer (model 528T) that can either turn on or turn off power after a desired amount of time, adjustable from 0-60 seconds, and is triggered by a 12v pulse. I bought it for $10 on ebay. The built in relay is rated for 15 amps, so I used an external glow relay for a powerstroke ford from Napa that brownbear posted about at one point. The momentary switch get poser from the low draw fuse block and is used to pulse the timer to initiate the cycle currently set for 5 seconds. The timer then supplies power to the relay coil and triggers the the glow plugs. The common voltage for the relay is supplied from the battery via the high-draw fuse panel. After five seconds, the timer switches off. This way I no longer have to hold the glow switch, and I can adjust the timer based on season/climate. I haven't cranked the engine yet but I've tested the circuit and it appears to work exactly as it should. I also rewired the glow lamp in the gauge cluster from the HJ to illuminate when the plugs are activated.

4WD - The split t-case behind the 1HZ is vacuum actuated. Since the HJ solenoid is 24V, I decided to try and make my own from the mini truck units available from Toyota (see write up in the 60 forum). The wiring is pretty straight forward. I rewired the HJ 4WD switch to control a SPDT relay with power from the low-draw fuse block. The normally closed circuit send power to the "off" solenoid, and when the relay coil receives power from the switch, I send power to the "on" solenoid instead. After testing the everything works as it should, but unfortunately the HJ solenoids are wired with out connectors, so i need to find a pigtail from a 62 before I can finish the install.

Aux Fuel Pump - This was very straight forward. Common power to the relay comes from the high-draw fuse panel, and the relay coils receives power from the low-draw fuse panel via the ignition switch.

Fuel Heater - The heater in the Racor filter was wired the same way as the fuel pump, only a there will be a switch on the dash to control the relay coil so it can be turned off when not needed.

Other stuff - Other things I pre-wired include two aux power supplies that will eventually be mounted under the tuffy console, the indicator lights for the lockers, and the "Filter" light from the HJ for a water sensor for the Racor.

FYI, summit racing sells a weather proof connector kit I used for all the under-hood connections. It came with a bunch of 1-4 wire connectors an everything you need to install them. Also, radio shack has some inexpensive 2-wire connectors that are a little less bulky and work great under the dash.

pics to come...


Can you snap some pics of the weather proof connectors? Are they pretty good quality?
 
Here's a pic of the glow relay and timer mounted temporarily...
DSC_5118.jpg


VT requires annual inspections so I needed to get the emergency brake working. I bought the rear axles with GM disks already installed. The PO had started to get the e-brake working but said he never got it to work well. Picking up where he left off, I modified the FJ60 e-brake cable, and made new extensions to the calipers. I bought a 14" hand swager and some aluminum end stops and swages and used 1/8" SS cable. Modifications to the OE brake cable just involved shortening both ends.
DSC_5112.jpg


DSC_5116.jpg


DSC_5114.jpg


It came out pretty well i think. The left wheel locks up really well, but the right side not as well. I'm going to wait and test it on the street before I make adjustments, but either way I expect it to work just fine.

I also got the front carpets and seats back in...
DSC_5106.jpg


...and finishing installing the heater lines..
DSC_5108.jpg


DSC_5107.jpg


I am doing a contour e-fan conversion as well. I found this one out of a '99 V6 contour for $50 at a local salvage yard. Fits great.
DSC_5109.jpg


DSC_5111.jpg


I mounted it using 1" square tubing. With some slight modifications to the A/C "receiver" bracket, I was able to mount back in it's original location.
DSC_5122.jpg


DSC_5124.jpg


DSC_5127.jpg


I'll snap some completed pics tomorrow.
 
lookin really good and really clean gehnner...keep it up
 
How are you controlling the fans? Is there an automatic heat actuated switch to kick the fans to high from the regular idling speed?
 
How are you controlling the fans? Is there an automatic heat actuated switch to kick the fans to high from the regular idling speed?

i plan to use a delta controller eventually but they are back ordered. For now, I will run it through an 100 amp relay. From what I know, the delta controller does run off a thermostat.

Awesome work Gehn! What is the countdown to the first road test?

Good question. I installed the new TRE's and refinished my wheels today. The fan relay should be here tomorrow, and I need to pick up some copper washers to finish up the steering. I may crank it tomorrow, but I don't want to rush it. Maybe by Wednesday I'll take it around the block.
 
I got the fans wired up and they work great. Right now I have them wired to an override switch and a 100amp relay i got from 4x4 connection. In the future I plan to get a delta controller for them. The steering is all done and I have the front end back together. It's getting close!

I'll post some pics later...
 
Here's the final mounting of the contour fan...


Fan and clutch removed and new belts. The A/C comp is off a '90 3FE.

Were you having problems with the cooling using the 60 radiator and clutch fan?
Apologies if you have already mentioned it

How did the 3FE A/C compressor line up with the drive pulleys. I looked into but others here told me it wasnt worth the bother so I bought a new OEM I did want the new type that could run the R124 gas without modding the pump but my old 3F comp would have done for a while.:confused:
 
Looking good! Can't wait to see it at the BBQ!
 
Were you having problems with the cooling using the 60 radiator and clutch fan?
Apologies if you have already mentioned it

How did the 3FE A/C compressor line up with the drive pulleys. I looked into but others here told me it wasnt worth the bother so I bought a new OEM I did want the new type that could run the R124 gas without modding the pump but my old 3F comp would have done for a while.:confused:

No trouble cooling. It's something I have been planning for a while and instead of modifying the FJ60 radiator as I did last time or moving it down, I decided to go ahead and do it and keep the rad "stock". if I ever need to a new radiator, I can just drop in a stock unit without have to modify it. I also didn't want to have to fab up a new shroud again. Lastly, the override switch will be nice for deep water crossings.

Kevin rowland and I have been discussing the A/C comp discrepancies. the 3FE comp he had didn't line up properly, but the one I pulled off a '90 62 parts rig lines up perfect. My comp is a Denso unit, but does not have "TEQ" stamped anywhere, so it could be an aftermarket replacement. Regardless, they both came off of 3FE's so they should be the same. We haven't quite figured it out yet. I am going to compare mine to some other 62's at the next cruiser meet.

thanks carp!
 

Users who are viewing this thread

Back
Top Bottom