Well, I am a drama queen...I considered that at first but I was able to get the banjo bolt off without much drama.
Navigation
Install the app
How to install the app on iOS
Follow along with the video below to see how to install our site as a web app on your home screen.
Note: This feature may not be available in some browsers.
More options
Style variation
You are using an out of date browser. It may not display this or other websites correctly.
You should upgrade or use an alternative browser.
You should upgrade or use an alternative browser.
ARCHIVE Power steering hose, fitting and cooler upgrades
- Thread starter NLXTACY
- Start date
This site may earn a commission from merchant affiliate
links, including eBay, Amazon, Skimlinks, and others.
More options
Who Replied?I haven't been able to access the site http://absolute-wits-end.com/ in almost a week now? Is anyone else having this problem?

I haven't been able to access the site http://absolute-wits-end.com/ in almost a week now? Is anyone else having this problem?
View attachment 2151847
We’re all having that problem. Luckily it’s temporary and heres an alternate link.
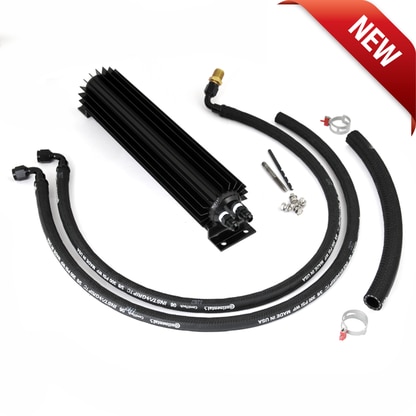
80 Series 1FZ Power Steering Cooler and Hose Upgrade Kit
80 Series 1FZ Power Steering Cooler and Hose Upgrade Kit (PSC-1KIT)

Wits' End Temp Website -https://wits-end.mybigcommerce.com
Just went to go browsing Wits' End online, and found it was down. Ended up seeing Joey has a temp site up fyi. https://wits-end.mybigcommerce.com
 forum.ih8mud.com
I don’t have the high pressure part numbers handy. I ordered a few different ones and I just chose whichever brought me the most happiness. I honestly can’t remember right now if I used ultimately used Gates or not.
The low pressure hoses you can get here:
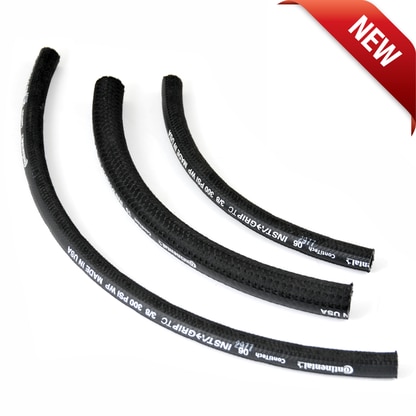
1FZ-FE Power Steering Low Pressure Hose Kit
1FZ-FE Power Steering Low Pressure Hose Kit (PSH-1KIT)wits-end.mybigcommerce.com
Many thanks.
Does anyone have the alternative part number to the HP hose?
I also have had zero issues getting the hp line off the pump, long extension and six point socketI considered that at first but I was able to get the banjo bolt off without much drama.
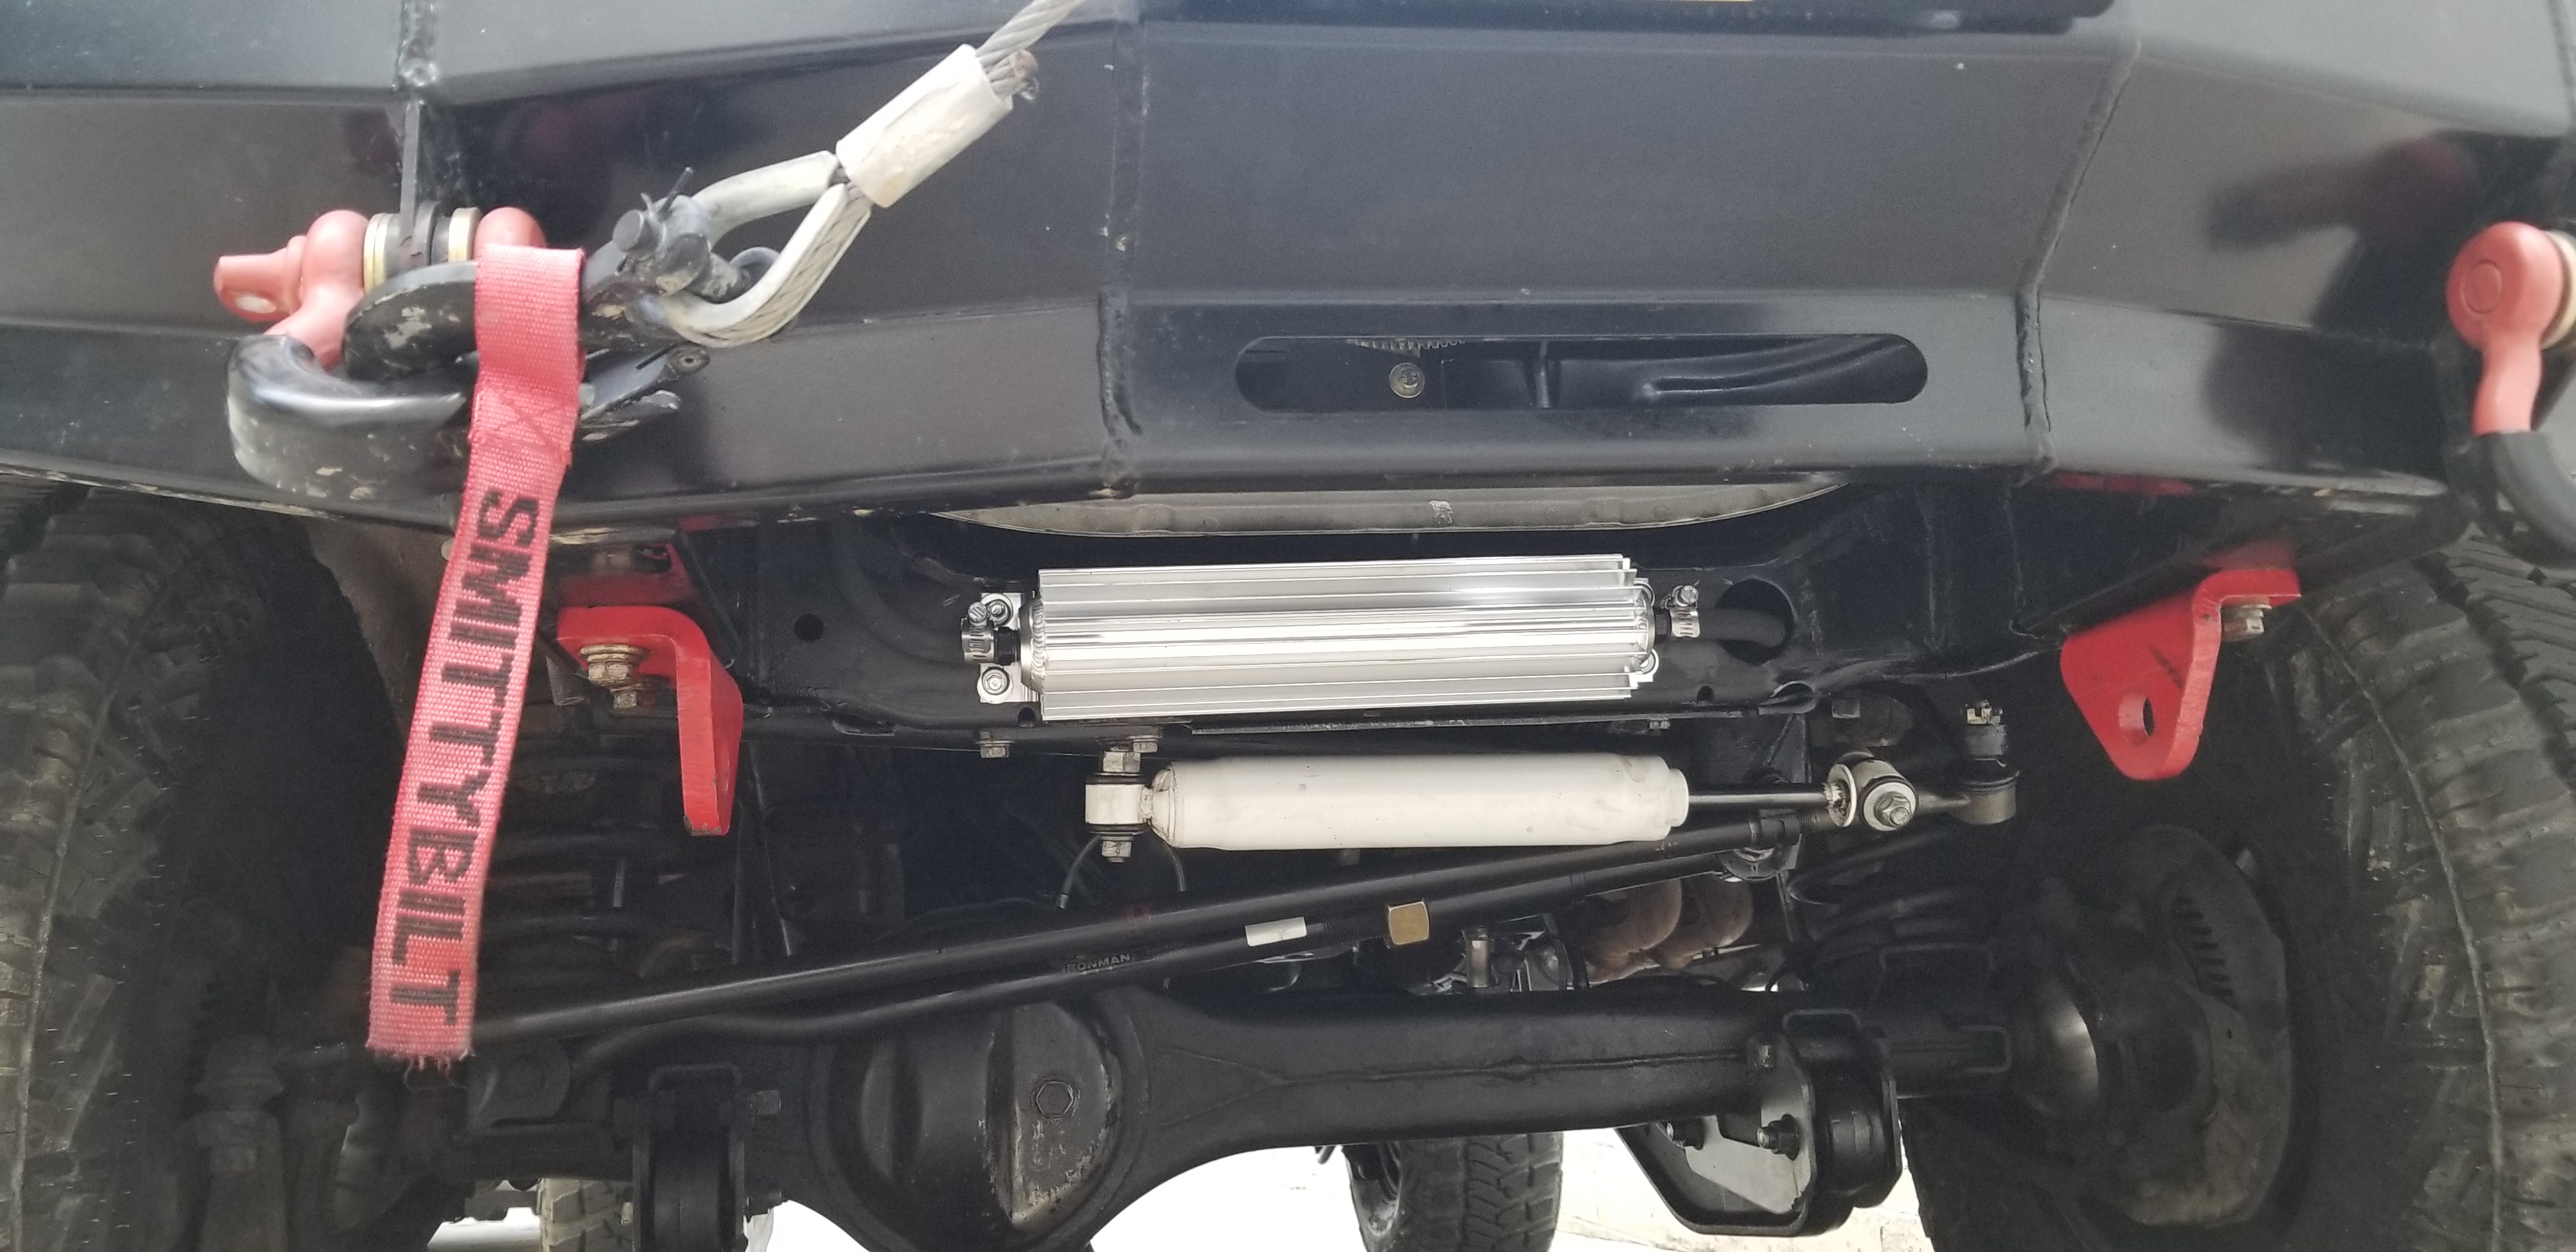
Looks like your cooler is the same size as the one that comes in the kit. Just to let others know, a larger unit fits fine. This is a Derale 13261 17” overall. It dropped fluid temps nearly 40 degrees lower than the stock paper clip cooler.Did mine a while back when both high pressure and low lines started leaking, so far zero complains...
Is is possible to have too cold PS fluid temps?
I'm sure there is an ideal range adjusted for climate.
The replacement for the high-pressure side comes from RockAuto I believe. Identical; have one floating around, couldn't find it just now.
I'm sure there is an ideal range adjusted for climate.
The replacement for the high-pressure side comes from RockAuto I believe. Identical; have one floating around, couldn't find it just now.
Excellent write up as usual! I'd suggest adding one more thing; the wrench size for the hellish banjo bolt/nut thing on the pump-side of the high pressure hose which is 24mm (15/16"). You can't see this nut and it's hard to get a wrench on when you do know the size! I've dealt with this little sh*t twice now over the past 7 years and have engraved the size into my fender should I ever have to refer to it again.Instructions:
• First decide if you are doing the pressure hose at this time or not. The pressure hose is about $300 from Toyota or about $30 from various aftermarket sources. Doing this hose at the same time as the rest of the kit does makes things smoother. The instructions follow the assumption that you are indeed changing the pressure hose.
• The next step in this mod is to drain your power steering system of fluid. The easiest way to undo the bottom of the smaller resevoir hoses and have a bucket ready to catch the fluid. The reservoir will drain. Then you can remove the bottom of the larger reservoir hose and drain out that. From there you can remove both return hoses completely.
• There are two bolts holding down the paperclip cooler that are above the front crossmember, under the radiator, that need to be removed in order to start removing the paperclip.
• There is a bracket on the driver's side inner frame that is the junction point of the low and high pressure hoses. Remove the 12mm bolt and the main bracket and high pressure how can now go to the next step of removal.
• On the steering gearbox you have an 16mm and 17mm threaded port. These are sized on the box so that you really can't make a mistake. Go ahead and remove both of these fittings using a flare nut wrench. Access to these is challenging but going in from the wheel well helps.
• The paperclip can be removed without taking out the radiator but it does take some finagling.
• Removing the banjo bolt on the pump side of the high pressure hose is a pain in the ass. Be sure to hold the nut on the pump still and you work getting the banjo bolt out. Its a bear. Be sure to remove the two copper gaskets when the hose and banjo bolt come out.
• At this point you should have removed the small and large hoses and clamps from the reservoir, the high pressure hose and the paperclip.
• Now you can move on to the install by just hand threading in the 1/4NPT to 6AN flare fittings into the black anodized Derale cooler. DO NOT TIGHTEN.
• Take the two 90º ends of the hoses and fish them thru the driver's side hole in the front crossmember until they are poking out thru where the cooler will be mounted.
• Place the cooler onto the crossmember to where the fittings are facing the hole where the two hose 90º are facing. Go ahead and thread the 90s onto the flare fittings on the cooler. The orientation doesn't matter.
• Get the cooler positioned so that the two hoses are dead center to the crossmember hole. Once that is decided, go ahead and mark the two REAR mounting holes. NOTE: center the mark as best you can since you will be drilling and tapping those holes.
• Now that you have the two rear holes marked, go ahead and unscrew both the 90s and the 1/4NPT fittings from the cooler.
• Line up the marks from the rear up again and now mark the two front holes.
• Start by drilling out the two rear holes first by using the supplied drill bit, then trap the holes using the supplied tap. Use cutting oil.
• Once trapped and deburred, test fit the mounting for the cooler and use the supplied bolts. Once you have the two rear bolts in hand tight, note the marks on the front two mounting holes. Are they still good where marked or should it be adjusted?
• Once confirmed, drill and then tap the two front holes.
• Using teflon tape on ONLY the NPT ports (never the flare side of the fitting), thread in and tighten the 1/4NPT to flare fittings. Do not over-tighten.
• The cooler is now ready to be mounted using the supplied bolts.
• You can now attach both hoses with the 90º fittings but hand tighten for the moment.
• This is the best time to not only install the pressure hose from the gear box to the power steering pump, but its also a good time to thread in the supplied 16mm to 6AN steel adapter fitting into the other hole in the gear box. Tighten down both the pressure hose and fitting into the gear box.
• Place a new copper washer under the banjo fitting onto both sides of the pressure hose before running the banjo bolt thru.then tighten the banjo bolt and hose per the FSM torque spec.
• Going back to the hoses from the cooler, route the hoses from the crossmember, to the frame bracket and behind the mounting bracket of the pressure hose. Using the stock holding bracket from the paperclip could be possible but I didn't see the need for it and it can be difficult to make it work. Your call.
• The hose with the 90º fitting now goes onto the steel fitting you previously tightened down into the gear box.
• The longer hose without a fitting now gets a small supplied clamp before it is pushed onto the small tube of the reservoir.
• The 12" long 5/8" hose gets the two larger supplied clamps and goes from the pump to the large port of the reservoir.

I’m fairly certain that is the one I used with the wits end kit
Yeah. That is the same one I used. Just double checked.I’m fairly certain that is the one I used with the wits end kit
yep....i did mine to replaced my leaky factory paper clip and had to source all the parts and fittings myself...Joey's kit makes easy work and is a no brainer...Looks like your cooler is the same size as the one that comes in the kit. Just to let others know, a larger unit fits fine. This is a Derale 13261 17” overall. It dropped fluid temps nearly 40 degrees lower than the stock paper clip cooler.
FWIW, that's the one that was leaking on mine. I replaced it with OEM and there is a significant build quality difference between the 2.Is this the one you guys been using?
Food for thought...
THIS, is the HP replacement hose. Comes with brass washers and correct bracket at the U in the hoses.

Trying to finish up the install on this. Having the worst time getting the small hose onto the reservoir.


NLXTACY
Wits' End
- Thread starter
- #36
You are the 4th person to say they are having issues with that very hose. On four vehicles I’ve not experienced the same issue so I’m not 100% sure on the cause especially since I’m still working on the same 500ft roll of that 3/8” hose from over a year ago. So I think it’s differences in the reservoir. That being said I had folks use a heat gun on the end of the hose to soften it AND used some oil to lubricate the hose and res nipple. They all eventually go on.
One guy posted a video of a supercut of 20 mins of straight cursing that hose
One guy posted a video of a supercut of 20 mins of straight cursing that hose
Drip some PS fluid down the hose, coat the reservoir port with the same. Slips on with a bit of rotation.
More lube.
The cursing helps quite a bit as well.
The cursing helps quite a bit as well.
There has definitely been some cursing so far. I’ll try the fluid trick.You are the 4th person to say they are having issues with that very hose. On four vehicles I’ve not experienced the same issue so I’m not 100% sure on the cause especially since I’m still working on the same 500ft roll of that 3/8” hose from over a year ago. So I think it’s differences in the reservoir. That being said I had folks use a heat gun on the end of the hose to soften it AND used some oil to lubricate the hose and res nipple. They all eventually go on.
One guy posted a video of a supercut of 20 mins of straight cursing that hose
Well I ended up using all the above, but I also took the reservoir completely out and putting it in the bench vice so I could use all my 145 lbs on it.

Similar threads
Users who are viewing this thread
Total: 1 (members: 0, guests: 1)