pillguy's 4runner build (with pics) (1 Viewer)

This site may earn a commission from merchant affiliate
links, including eBay, Amazon, Skimlinks, and others.

Joined
Sep 12, 2008
Threads
100
Messages
1,851
Location
behind enemy lines FEMA sector IV
Pillguy’s 4runner build

I think I finally (really this time for sure) found out how to upload pictures directly into a post. It seems you can only load 3 in at a time so we will have several posts to show the entire build (not that it is anywhere near Eventhough’s build)

So lets start off with a bit of history…. I always wanted a 4x4 (something about the mud, snow, dirt, etc.) ever since the early 1980s, first jeeps because that is all we saw up in Ohio and then fast forward to the 1990s when I wanted a toyota 4x4. I read as many Petersons 4x4 magazines I could read, but unfortunately, pharmacy school, and $$ were in the way. Still, it was in the back of my mind as I always saw the various 4x4 club ads in the AJC and it seemed like fun going someplace most people would never go. So fast forward to Spring of 2007, I see a late 1980s landcruiser for sale for about$2500 (rusted with about250K miles) and I said to myself….self, I think I need a 4x4 (used and affordable) so I sort of started looking. Can you believe I was considering a Nissan and embarrassing enough a Honda pilot, but I had a Toyota camry and I kept seeing 4runners with 250K-300K miles in the paper getting top dollar it seemed. Finally later that fall, I decided to pull the plug and look for one.

So, finally, I find the truck, price check, carfax check, and drive it. No accidents, but needed deferred maintenance and interior was rough in some places. I had to explain to the guy my modest offer, he declined and two weeks later he accepted. I was excited, after all these years of waiting, I finally got one. I did not do much to it as I had to get some work done on it and I well…. had no clue until I got “mud-ucated” here on IH8mud and after a trail ride or two realized it was time do the modifications (budget build) I was reading about. So here it is, so far, 6 months into the project and my wife keeps asking, how much $$ have you put in the truck. Guys, I need so creative answers here, so please feel free to comment on the best reasons why you needed to put money into your truck.
Here is the before picture of the truck,
IMG_1057.jpg
xa4AJY7fpQR3Nb6StKvxVA


first thing to do is remove the running boards
and that was pretty easy, just like the instructions said so I felt ready to attack the rear breather diff modification I read about on yotatech and other sites.....
So I started working on the rear diff breather extension as a first easy modification

Truck is up on ramps to follow the instructions on other sites.
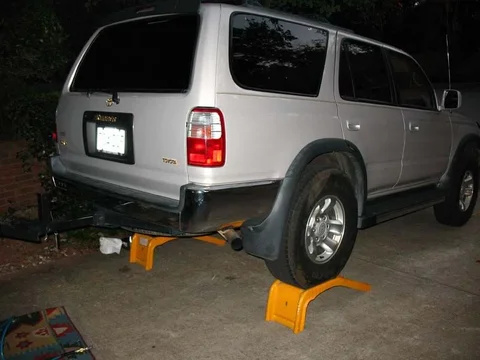
IMG_1047.JPG
That is it for now as I will get more pictures up tomorrow.
IMG_1047.JPG
IMG_1057.jpg

updated

Zzz.
:worms::worms::worms:

2007-09 GRE-262 copy.jpg
 
Last edited:
Note to wife ---buy plenty of life insurance in case 6000# truck falls off cheap ramps and kills husband!!!
 
Aww come on guys he posts up the start of a build tread and all you can do is complain about his ramps?!? Good job Pillguy and keep sending money on your truck posting the progress. :clap:
 
Aww come on guys he posts up the start of a build tread and all you can do is complain about his ramps?!? Good job Pillguy and keep sending money on your truck posting the progress. :clap:

Yep, agreed but don't spend any more $$ on your truck, spend it on mine. Looking good Andrew, keep the pics coming. oh, the trucks is good too. :flipoff2:
 
Last edited:
next set of mods

So finally I am getting somewhere with my work on the breather hose and after about 2 hours, I am done..


IMG_1056.JPG

About 2 hours work since I do not really know what I am doing...
So that does it for the rear breather diff mod and on to bigger and better things.


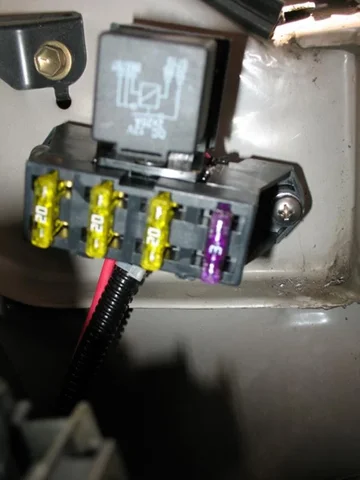
Next mod is an extra fuse block. I had read several forums that used marine grade fuseblocks, etc. but I ended up finding one at one of the online auto stores. It was quick and easy and all the wires were labeled. I cannot tell you how many pairs of speakers, radios and EQs I put in cars over the years and this was… well painless. I did not even have to drill a hole in the firewall.

I put in an extra fuse block, quick and easy from painless wiring
Here I mounted block on left firewall

IMG_1108.jpg
Here I ran it through the firewall without drilling another hole
IMG_1102.jpg

Still need to do some final sealing though.
[FONT=&quot]So I finally get a change to go with the crew in my rig to Stonewall falls....
It is on this trip that I realize, my vehicle, I need a suspension upgrade, as I have a sag in the rear end and I want to get a winch bumper, etc. etc.... so I figure out a budget

[/FONT]
IMG_1056.JPG
IMG_1108.jpg
IMG_1102.jpg
 
No budget necessary....remember it's spending recklessly that's going to get this country going again. Looking good though!
 
update 3

So I am back and now I need a few things to hook up.....

The holidays are fast here and I am ordering things and the :princess: is wondering what I am doing in the "man cave" either I am reading mud forums or working on my truck till late in the evening.
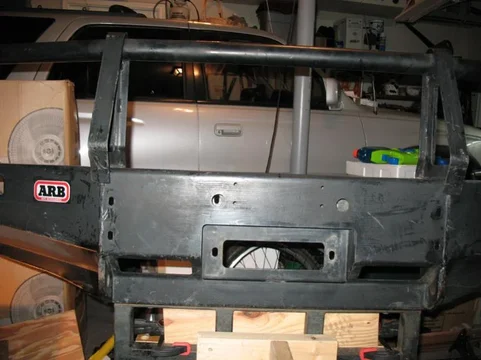
The holidays come and pass and I missed the Tellico trip despite Ted’s urging to go :frown::frown: and they had some nice weather. I am busy working on my used bumper. Here is the bumper
4x4-bmpr-002.jpg
A sheet sander with 80 grit got most all of the powder coat off. Lucky for me, it has some extension bolted on by some fool that allowed it to be locked in my trusty workmate.
4x4-bmpr-013.jpg
I went to priming in the warm weather and duplicolored the back of the bumper as well with their version of Rhinoliner in a can. I was impressed with the smooth results.:cheers:
4x4-bmpr-014.jpg
4x4-bmpr-013.jpg
4x4-bmpr-002.jpg
4x4-bmpr-014.jpg
 
next build up

Finally got to paint around X-mas time

4x4-bmpr-025.jpg

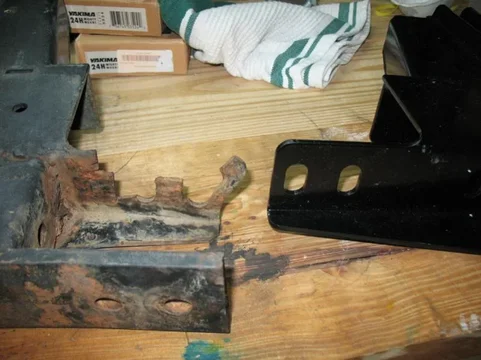
Next after several phone calls to ARB and identification of bolts needed, I start work on the brackets and carefully started to cut off the front brackets of my old bumper with a dremel and a angle grinder


4x4-bmpr-012.jpg


At this point I had to stop and took it to ACC in Atlanta to do some fabrication and welding of faceplates to get the brackets to fit the correct way. They were quite helpful and showed me some of the cool rigs they were working on.... impressive...
Here is a picture of the mangled bracket and the new ones I ordered from ARB


Also, picked up some spare parts and went to the general hardware off of Peachtree in brookhaven to pick up some grade 8.8 metric black phosphate bolts.


4x4-bmpr-017.jpg
(best selection I have ever seen)

Well, Thats it for tonight, I will work on the rest of the buildup tomorrow.
[FONT=&quot]


[/FONT]
4x4-bmpr-025.jpg
4x4-bmpr-012.jpg
4x4-bmpr-017.jpg
 
I think I'm seeing you near Johnson ferry road. Do you have. Antenna on the back left? I see you all over!!! Looks good. Well. The 4runner I see.
 
General Hardware is supposed to be pretty good. A buddy of mine uses them all the time, I have yet to go there.

I usually get special hardware from mcmaster.com. I often find myself with a box of 50 pieces for the price of 10 at the hardware store. Regular freight gets you next day in Atlanta.

There's also Threads of the South.

Just throwing this information up here as you may find it useful in the future.
 
THat is good to know as I looked on several websites to find what I needed then stopped by one day to check them out and was blown away at their selection. They have a lot of other misc. stuff as well, say you wanted to make a sleeping platform with storage boxes, you can pick up piano hinges, etc. there.

General Hardware is supposed to be pretty good. A buddy of mine uses them all the time, I have yet to go there.

I usually get special hardware from mcmaster.com. I often find myself with a box of 50 pieces for the price of 10 at the hardware store. Regular freight gets you next day in Atlanta.

There's also Threads of the South.

Just throwing this information up here as you may find it useful in the future.
 
I am making headway....

Sorry for the delay, but we are house hunting and the :princess: wants me to go along and preview all that we have found on our internet searches.

I finally set up a HAM day for late January and get my ducks in a row, i.e. my suspension kit from Sonoran Steel, and…..at the last minute, I decide to order an elocker axle from a 96 4runner from Blakes salvage place in CO(Erie) 1-800-665-4326 for less than 7 bones (including delivery) for a 96 axle with 127K miles on it. I used one of the online car part locators to find to find them and got prices from that low end to over $1300. Just a note to everyone, they said that have lots of toyota FJ parts, just to call and check out.

IMG_1337.JPG

Man, I a really sweating.... I have never done more than a head replacement on a car and that was in the 1980s... and the :princess: is wanting to know what just arrived in the garage as I had to explain what an e-locker was for. I get a puzzled look and ask if "posi-traction" meant anything to her...the :princess: just smiles and says no.... I digress.
Here is a quick look above as I realize it is missing the wiring harness so more phone calls to Blakes and scoured IH8MUD and yotatech for writeups. (More on the elocker wiring later) In retrospect, I wish I had painted with rust bullet, or something better than Rustoleum as I did during the process. I will see how it goes.
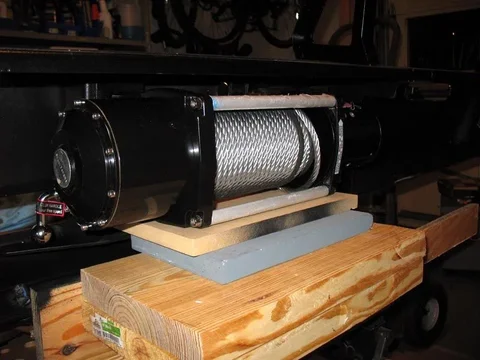
I locate a winch (perhaps, I should have bought a titan) and a few other things along the way. I installed the winch on the bumper, man it is heavy, thank god for the workmate.

In the meantime, another nasty letter (garage door being open and not having both cars in the garage[how am I supposed to work on my cars or god forbid the kids want to play outside]) from the HOA and my evil neighbor across the street, lets say her name is Helga, a self proclaimed member of the HOA Gestapo) who is retired and patrols the neighborhood in her daily drive by.
I always make an effort to offer a smile and a friendly gesture. I think she is still irritated with me because our friendly lab ran over to her house one morning as she was walking out to get her paper and he runs inside. It was too much for her, the insults flew at me as I was calling for Sam and she is screaming at me how we are ruining the neighborhood and her yard is full of our dog do-do. LOL!


4x4-bmpr-029.jpg

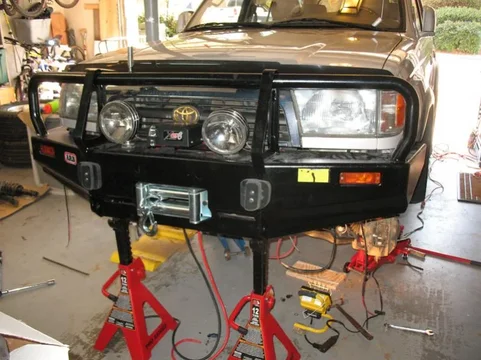
Well, build day is here and Larry and Jesse show up to help. Its cool outside, but sunny so that is a plus, plenty of light. I drilled my through frame bolt holes and we attached the brackets. We got the bumper on with a bit of loosing of the brackets and everything fit.


4x4-susp-003.jpg


[FONT=&quot]Well, this is it for a few days as I have to get ready for a business trip, more pics in a few days.

[/FONT]
IMG_1337.JPG
4x4-bmpr-029.jpg
4x4-susp-003.jpg
 
You have a great helper in Larry...... :grinpimp:
 
:)naaaa.... its the blue gloves, they do not match his overalls... LOL!
... but he takes a very dorky looking picture!!
 
I am back from Vacation

New post


On build day, things went pretty quick. The first thing we did was install the front bumper which went pretty smoothly once we loosened the brackets and put it on. It looks good and the ACC frame end cap modification was perfect.
.


09-4x4 build-018.jpg

Next up was the front end. Jesse and I attacked the front end of the car and Larry dropped the Diff. Three people really made the work go by quick Below is the finished front suspension, it was well worth the $50 preassembly fee for the springs


4x4-susp-002.jpg

Next was removing the old rear end and installing the elocker axle. I was surprised at how quickly it went in. Here is the rear end in place, still needs a lot of finish work in terms of brake lines, sway bars, etc. By this time, it is nearing 6pm and I promised the :princess: a date so we had to stop and clean up. The rest of the stuff could be done by myself so I went to work figuring out the elocker wiring.


4x4-susp-005.jpg
[FONT=&quot]
I will have more up later today:cheers:
[/FONT]
09-4x4 build-018.jpg
4x4-susp-002.jpg
4x4-susp-005.jpg
 
Looks good. Wow. If ya need any help. Let me know. I'm usually free on the weekends. Got a nice lttile tool kit and a few drills.

I need to do some rides and get to know you guys. Plus I need to change my rear springs out. An you have the jacks :)
 
PM me if you want about a date to change out your springs or post up a HAM date. I was surprised how quick it went to swap out the rear axle and install the springs.

Definitely get out with us, life is too short.

Andrew
Looks good. Wow. If ya need any help. Let me know. I'm usually free on the weekends. Got a nice lttile tool kit and a few drills.

I need to do some rides and get to know you guys. Plus I need to change my rear springs out. An you have the jacks :)
 

Users who are viewing this thread

Back
Top Bottom