
Ok got it, does this look better?

Navigation
Install the app
How to install the app on iOS
Follow along with the video below to see how to install our site as a web app on your home screen.
Note: This feature may not be available in some browsers.
More options
Style variation
You are using an out of date browser. It may not display this or other websites correctly.
You should upgrade or use an alternative browser.
You should upgrade or use an alternative browser.
My Desmog Thread
- Thread starter fowldarr
- Start date
This site may earn a commission from merchant affiliate
links, including eBay, Amazon, Skimlinks, and others.
Doing this from memory but IIRC the hose from the air cleaner goes to the top of the little white spaceship just under the air cleaner assembly. The two on the site should be the ones that are T'ed together..
- Joined
- Sep 26, 2003
- Threads
- 117
- Messages
- 11,199
- Location
- Lancaster, Ohio, USA
- Website
- www.tlcperformance.com
Different, yes.
Better, not really.
As Breck sez:
Hose from air cleaner lid goes to end fitting on VCV.
Two side fittings tee together, go down to dissy cap.
Single vac fitting goes to manifold vac source.
The hose from HIC (hidden under air cleaner) goes to the Tee above PCV valve.
Better, not really.
As Breck sez:
Hose from air cleaner lid goes to end fitting on VCV.
Two side fittings tee together, go down to dissy cap.
Single vac fitting goes to manifold vac source.
The hose from HIC (hidden under air cleaner) goes to the Tee above PCV valve.
I think I've got now please correct me if im wrong.

Looks right. Jim is the master though.
- Joined
- Sep 26, 2003
- Threads
- 117
- Messages
- 11,199
- Location
- Lancaster, Ohio, USA
- Website
- www.tlcperformance.com
Breck is right, except for that last bit. Jim is only the master on those occasions that his wife happens to agree.
@FJ40Jim that made me laugh out loud.
Hehe, much appreciated boys ...
I'm glad I didn't have to draw this...

Not sure if appropriate to bump here (please re-direct me if necessary), but I am presently mid de-smog and have everything torn down, except for the EGR cooler and J-Pipe.
My question is, how the heck are you guys getting to the two nuts to disconnect the J-Pipe and subsequently the EGR cooler?
Reaching down from above, it doesn't seem like there's enough real estate without removing the manifolds. From below, I can reach the forward nut with a socket extension and maybe the rear with some kind of elbow extension? I see many people remove the exhaust manifold to install their EGR block-off plate or weld it shut, but it doesn't seem like I could remove the exhaust manifold with the J-pipe and egr cooler still attached to it?
Thanks in advance y'all
- Remove the crappy little bracket with it's rusty U-bolt that holds the EGR cooler flex pipe. It is located halfway between the EGR cooler and the EGR valve.
- Remove the metal splash shield that is bolted to the top of the frame that juts in towards the EGR cooler and is thus in the way. It is not absolutely necessary to remove it, but will make removing the cooler a lot easier. Replace it when the cooler is out.
- Remove the manifold heat shield at the rear of the manifold.
- Remove the two 12 mm (hex head) nuts that retain the J-pipe to the manifold. Replace those nuts with new ones. Use anti-seize on them too.
- Remove the two 14 mm (hex head) long bolts that bolt the EGR cooler to the block.
Trying to do it "the easy way" by skipping steps is actually the hardest way.
Trying to do it "the easy way" by skipping steps is actually the hardest way.
- Remove the crappy little bracket with it's rusty U-bolt that holds the EGR cooler flex pipe. It is located halfway between the EGR cooler and the EGR valve.
- Remove the metal splash shield that is bolted to the top of the frame that juts in towards the EGR cooler and is thus in the way. It is not absolutely necessary to remove it, but will make removing the cooler a lot easier. Replace it when the cooler is out.
- Remove the manifold heat shield at the rear of the manifold.
- Remove the two 12 mm (hex head) nuts that retain the J-pipe to the manifold. Replace those nuts with new ones. Use anti-seize on them too.
- Remove the two 14 mm (hex head) long bolts that bolt the EGR cooler to the block.
Ok, thanks for your reply. I've already removed the EGR cooler flex pipe and its u-bolt bracket thing, and loosened the two 14mm bolts to the EGR cooler so it is free from the block but still down there.
Where I'm having trouble is accessing the two 12mm nuts retaining the J-pipe to the manifold, and for that matter the lower bolt of the manifold heat shield. I can't even get my hands down there let alone a ratchet with enough room to move and apply loosening torque. Any tips here from those who have been there?
I'm on to vacuum line routing, and accidentally threw away the T-fittings for the distributor-side VCV and HAC/gas filter, as well as the check valve for the HAC to gas filter line.
Does anyone know where to purchase the 3-6-6 mm t-fitting for the pass. side VCV? I've haven't found one locally or online that mimics the stock layout.
I've found used check valves on SOR and other places, but I have the option for "blue" or "green"... do the different colors have different functions (does it matter) and if so, which should I use?
Thanks
Does anyone know where to purchase the 3-6-6 mm t-fitting for the pass. side VCV?
Order the Tee from any Toyota dealer (it may still be avail).
PN: 90413-06002
It costs about $4
VTVs are not really check valves. Toyota calls them "Vacuum Transfer Valves". They restrict the flow of air through the valve in one direction.
There is a check valve in the spaghetti snarl, but it's not a VTV. A check valve is not colored.
The colors of the VTV do matter. The colors correspond to the volume of air they restrict/pass.
The green VTV is supposed to pass 50 cc/min of air at some unspecified pressure, while the blue one's rate is 200 cc/min.
The blue VTV is (maybe) still available new too.
PN: 90925-01021
Last edited:
Thanks again for your help, Output.
I ordered a new t-fitting and the blue VTV, assuming that's the correct restriction between the HAC and gas filter.
I ordered a new t-fitting and the blue VTV, assuming that's the correct restriction between the HAC and gas filter.
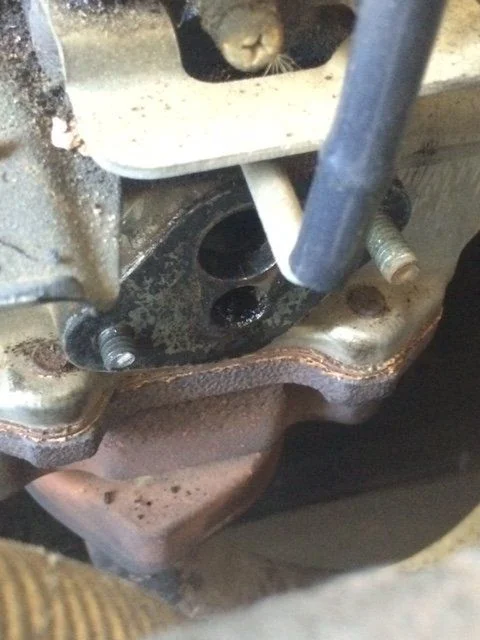
So when installing my PCV plate from Man-a-Fre on the intake manifold, I sheared one of the studs in half when torquing down to the recommended 25 ft/lbs per the graphite gasket specs.
How screwed am I?
Could I JB Weld the plate directly to the manifold? There's enough stud left to guide the plate, but not with the gasket.
New intake manifold? Just frustrated right now.
How screwed am I?
Could I JB Weld the plate directly to the manifold? There's enough stud left to guide the plate, but not with the gasket.
New intake manifold? Just frustrated right now.
Shearing off a bolt always sucks.
JB Weld won't work.
Unfortunately, the torque spec for that stud in the manifold is more like 8 ft-lbs instead of the 25 recommended by the gasket maker.
25 ft-lbs will shear a M8 bolt every time (or the next time).
Anyway....
What's done is done. Accept it.
The good news is: That broken stud can be extracted.
The maybe not so good news is: It may require more work than you had planned on.
You might be able to extract the broken stud while the manifold is still installed... but don't get your hopes too high.
Things to try:
If you can get two nuts on that busted stud, thread them both on then back the inner one out against the outer one.
or
Try ViseGrips
But my guess is.... the manifold has to come off and the broken stud extracted. If you have a machine shop nearby.. they do work like this all the time.
OK, I'm glad I checked back one last time for replies, as I was literally mixing up some JB to throw on there right beforehand.
I was able to extract the stud with some locking pliers and the help of PB blaster with the manifold still installed. If I order a new one am I able to twist it back in with the manifold still installed? If not, can I use a bolt in the existing threads on the manifold?
Thanks once again Output, you're saving my bacon on this project.
Luckily that stud is (maybe) still available from a Toyota dealer. It's cheap. Less than $2
Toyota Part No.: 92112-60818
BOLT, STUD
You can use a metric M8X1.25 bolt, but the stud above is much better to install into the aluminum. With a stud, you will only be screwing it into the aluminum once, while with a bolt, the threads in the soft aluminum get stressed every time the bolt is moved.
That's great you got the broken stud out with locking pliers. I wouldn't have bet on that.
To install the new stud, screw two new nuts onto it and use a wrench on the outer nut to gently screw the stud in. It does not need to go in very tight. Do it by feel. Don't use a torque wrench. Remember that it's kinda soft aluminum.