
I've found the Costco rule saves me some time - if Costco carries it, that's good enough their stuff tends to be the best quality/value.... not perfect, but good enough. Enjoy that they enjoy washing the rig, it tends not to last (but it still is pretty sweet while it does).
Navigation
Install the app
How to install the app on iOS
Follow along with the video below to see how to install our site as a web app on your home screen.
Note: This feature may not be available in some browsers.
More options
Style variation
You are using an out of date browser. It may not display this or other websites correctly.
You should upgrade or use an alternative browser.
You should upgrade or use an alternative browser.
Member Builds and Stories
This site may earn a commission from merchant affiliate
links, including eBay, Amazon, Skimlinks, and others.
- Thread starter
- #242
I've found the Costco rule saves me some time - if Costco carries it, that's good enough their stuff tends to be the best quality/value.... not perfect, but good enough. Enjoy that they enjoy washing the rig, it tends not to last (but it still is pretty sweet while it does).
Hadn't thought about it that way, but good point. They do do a reasonable amount of due diligence.
- Thread starter
- #243
I’ve been building stuff for the Cruiser (I promise), so time to get back to that.
I’m trying to lock down my big interfaces such that I can fit things around them. One of the ones I left as work in progress when moving was the fuel tank/rear seat interface. As a reminder, in the search for capacity I went a little crazy on making my tank use every iota of space available.

There’s also a secondary skid plate that’s intended to support the rear of the tank.

Up front was a bit of a problem since I can’t strap across the tank easily given where the links need to reside. For purposes of shipping everything over to the island, I c-clamped some wood to the frame rails.

That actually worked pretty well so I set about making something more permanent. The vertical walls shown are to support rubber and ensuring it can’t run away. Triangular cross section because I like triangles and they are strong in bending. I’ll both seal any unwelded seams and be sure it has water drain paths before I’m done.

Planning rubber pucks and using some of my mountain of bulb seal edge trim. I’m started by trying good old fashioned rubber cement to see if it’s enough to hold them down.

Final configuration (with the side mounts burned in):

I’m trying to seal all the way around the tank so that it doesn’t have a path in for rocks/mud from above. Someone made the point prior that if I get gravel in between my tank and the skid, a shot to the skid could still try to poke the tank… Having gotten a flavor for how dirty Hawaiian wheeling can be I’m doing the best I can. I did get to weld a couple extensions on the tank to be sure I had good engagement of the bulb seal.

Kinda hard to see but the tank feels really solid in there when squeezed down among the trim and rubber bits. It’s GOOD.

I’m planning to clamp this down from the topside partly using the floorboards/firewall (TBD) with some heavier straps built in.
Anyone have thoughts on firewalls above a tank? NHRA general specs for firewalls are 0.024" Steel or Ti or 0.030" aluminum (at least that runs up through most of the normal classes). Still, those guys have safety peeps that can be on scene momentarily. I'm planning on this bolting down my firewall from above with stiffener ribs and maybe some bead rolling. I already have some 0.060" aluminum laying around so I'm thinking that might be appropriate.
Next up final fitment and more mods to the rear seat (while leaving sufficient clearance for the floorboards)
-Joel
I’m trying to lock down my big interfaces such that I can fit things around them. One of the ones I left as work in progress when moving was the fuel tank/rear seat interface. As a reminder, in the search for capacity I went a little crazy on making my tank use every iota of space available.
There’s also a secondary skid plate that’s intended to support the rear of the tank.
Up front was a bit of a problem since I can’t strap across the tank easily given where the links need to reside. For purposes of shipping everything over to the island, I c-clamped some wood to the frame rails.
That actually worked pretty well so I set about making something more permanent. The vertical walls shown are to support rubber and ensuring it can’t run away. Triangular cross section because I like triangles and they are strong in bending. I’ll both seal any unwelded seams and be sure it has water drain paths before I’m done.
Planning rubber pucks and using some of my mountain of bulb seal edge trim. I’m started by trying good old fashioned rubber cement to see if it’s enough to hold them down.
Final configuration (with the side mounts burned in):
I’m trying to seal all the way around the tank so that it doesn’t have a path in for rocks/mud from above. Someone made the point prior that if I get gravel in between my tank and the skid, a shot to the skid could still try to poke the tank… Having gotten a flavor for how dirty Hawaiian wheeling can be I’m doing the best I can. I did get to weld a couple extensions on the tank to be sure I had good engagement of the bulb seal.
Kinda hard to see but the tank feels really solid in there when squeezed down among the trim and rubber bits. It’s GOOD.
I’m planning to clamp this down from the topside partly using the floorboards/firewall (TBD) with some heavier straps built in.
Anyone have thoughts on firewalls above a tank? NHRA general specs for firewalls are 0.024" Steel or Ti or 0.030" aluminum (at least that runs up through most of the normal classes). Still, those guys have safety peeps that can be on scene momentarily. I'm planning on this bolting down my firewall from above with stiffener ribs and maybe some bead rolling. I already have some 0.060" aluminum laying around so I'm thinking that might be appropriate.
Next up final fitment and more mods to the rear seat (while leaving sufficient clearance for the floorboards)
-Joel
- Thread starter
- #244
Realized I skipped something so excuse the out of order pics. I burned in my seat side brackets a while back. I had them mocked up here:

I went back and forth a few times about whether I needed the weight but I did like the fact that the full length version also serves to reinforce my frame notch for the shocks.

Got them heavily tacked in only to discover that one side had pulled over by a 3/32” or so. I was tempted to let it go but dammit, I’d know and it would bug me, so I fixed it. If I ever sell this damn thing, I want the buyer to know I made it as perfect as I could.


Like working in a jungle gym…

The seat interface is a welded flange nut I sunk into the face and welded upside down to be sure I’d have plenty of threads.
Fast forward past welding these fully (and primer) and I was ready to weld in the interfaces to the seat frame.
Except I wasn’t.
Turns out my rubber isolation for the fuel tank is driving the tank up every so slightly higher than intended. That was making it a bitch to try to get the rear of the seat to land since the seat back risers are almost rubbing on the rear shock diagonals. I’d already trimmed these to fit as you may recall.

The only way to go up on the seat frame was also to shift forward, but I’d already locked in this interfaces as well. Simplest solution was to both raise the fronts and slide the seat frame forward. I made some Nike “swooshes” to get ‘er done.

Since I was making that mod, I realized I could kill two birds with one stone. I still had a problem that I needed a middle support point for harness lap belts. The outboard side is planned to tie to the side supports I welded in prior. While I could go back to the center upright on the tailgate that meant I’d have seat belt webbing running from far aft and not quite at the correct angles.
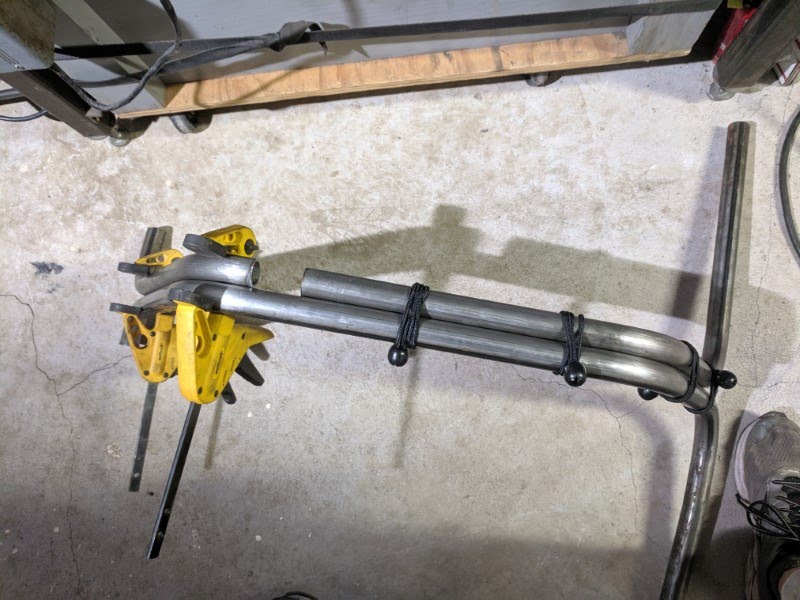
It would sure be convenient if I could attach to the seat frame itself in the middle but the cross bar isn’t up to it. I debated sleeving the bar more tube cut in half, but it’d be a ton of work and ends up with all kinds of stress risers and what not…

The bar also wasn’t especially straight.

Eventually I just said “screw it” and decided to replace the whole damn bar with some upsized DOM (it really is nice having your own mini metal mart, I recommend it).

-Joel
I went back and forth a few times about whether I needed the weight but I did like the fact that the full length version also serves to reinforce my frame notch for the shocks.
Got them heavily tacked in only to discover that one side had pulled over by a 3/32” or so. I was tempted to let it go but dammit, I’d know and it would bug me, so I fixed it. If I ever sell this damn thing, I want the buyer to know I made it as perfect as I could.
Like working in a jungle gym…
The seat interface is a welded flange nut I sunk into the face and welded upside down to be sure I’d have plenty of threads.
Fast forward past welding these fully (and primer) and I was ready to weld in the interfaces to the seat frame.
Except I wasn’t.
Turns out my rubber isolation for the fuel tank is driving the tank up every so slightly higher than intended. That was making it a bitch to try to get the rear of the seat to land since the seat back risers are almost rubbing on the rear shock diagonals. I’d already trimmed these to fit as you may recall.
The only way to go up on the seat frame was also to shift forward, but I’d already locked in this interfaces as well. Simplest solution was to both raise the fronts and slide the seat frame forward. I made some Nike “swooshes” to get ‘er done.
Since I was making that mod, I realized I could kill two birds with one stone. I still had a problem that I needed a middle support point for harness lap belts. The outboard side is planned to tie to the side supports I welded in prior. While I could go back to the center upright on the tailgate that meant I’d have seat belt webbing running from far aft and not quite at the correct angles.
It would sure be convenient if I could attach to the seat frame itself in the middle but the cross bar isn’t up to it. I debated sleeving the bar more tube cut in half, but it’d be a ton of work and ends up with all kinds of stress risers and what not…
The bar also wasn’t especially straight.
Eventually I just said “screw it” and decided to replace the whole damn bar with some upsized DOM (it really is nice having your own mini metal mart, I recommend it).
-Joel
- Thread starter
- #245
Having already cut out the middle of the bar, I got a little creative with a new tubing notcher (Baileigh TN-250, I like it a lot!).

Well that was easy...

And burned in all the support bits that I cut off the old tube with a spot weld cutter.

Good news! The side support vs shock diagonal tube clearance is bang on!


Side note: Why do I look at the above and in my head some British voice is saying “make the noise”? Anyways, the cardboard under the bar is to account for the eventual floorboards/firewall so I think I’m in good shape.
I was planning on two bungs for lap bar support points so I turned some bar I had lying around (making sure it was low alloy steel this time, having learned that lesson the hard way on my jeep at one point).


Note to self, I should have also used the lathe to at least start the tap. Tapping deep holes by hand meant that the threads are a touch lopsided on the back side. I thought it would track the hole better but maybe now. I used the better of the two bungs and decided on a single point interface that I’ll stack the lap belt connectors on.
Well that was easy...
And burned in all the support bits that I cut off the old tube with a spot weld cutter.
Good news! The side support vs shock diagonal tube clearance is bang on!
Side note: Why do I look at the above and in my head some British voice is saying “make the noise”? Anyways, the cardboard under the bar is to account for the eventual floorboards/firewall so I think I’m in good shape.
I was planning on two bungs for lap bar support points so I turned some bar I had lying around (making sure it was low alloy steel this time, having learned that lesson the hard way on my jeep at one point).
Note to self, I should have also used the lathe to at least start the tap. Tapping deep holes by hand meant that the threads are a touch lopsided on the back side. I thought it would track the hole better but maybe now. I used the better of the two bungs and decided on a single point interface that I’ll stack the lap belt connectors on.
- Thread starter
- #246
The rearward seat interface went mostly as planned. Notch cross bars and weld to fit, albeit I did also add a few short risers to get clearance to the tank. Younger daughter helping me work the lathe.

And burned in.

I wasn’t in love with the cantilevered load path so I made up a couple corner gussets (after checking bolt clearance)

And here it is all together. It’s stout!

Last step was to reassemble the foam and seat skin. I picked up some hog ring pliars on Amazon that seem to do the trick. Amazon product ASIN B01N2IJ64A

Given the larger diameter tube I did get to get a bit creative and stack a few hog rings to be sure I could tie back to all the factory internal bits. There was some hand sewing to widen the notch in vinyl for my seat belt bung too.

And finally back together.

Anyone have hot tips on reconditioning vinyl? The brown spots in the back corner are from a hot piece of weld slag that dropped on the seat then danced all over the place as we tried and failed to brush it off. It didn’t burn a hole but if some shoe polish would minimize the appearance I’d try it.
Still looking for commentary on fuel tank firewalls as well.
And burned in.
I wasn’t in love with the cantilevered load path so I made up a couple corner gussets (after checking bolt clearance)
And here it is all together. It’s stout!
Last step was to reassemble the foam and seat skin. I picked up some hog ring pliars on Amazon that seem to do the trick. Amazon product ASIN B01N2IJ64A
Given the larger diameter tube I did get to get a bit creative and stack a few hog rings to be sure I could tie back to all the factory internal bits. There was some hand sewing to widen the notch in vinyl for my seat belt bung too.
And finally back together.
Anyone have hot tips on reconditioning vinyl? The brown spots in the back corner are from a hot piece of weld slag that dropped on the seat then danced all over the place as we tried and failed to brush it off. It didn’t burn a hole but if some shoe polish would minimize the appearance I’d try it.
Still looking for commentary on fuel tank firewalls as well.
You can paint vinyl upholstery just clean well before you do.
I have a friend in Hawaii to whom I sent Corvette spindles - to me they were scrap, so forevermore I've been sending scrap to Hawaii.... seems to me you outdid me by like a billion ") that said, the same person told me the cost of DOM tube there.... you were wise to bring your own.
that said, the same person told me the cost of DOM tube there.... you were wise to bring your own.
Binky for the win
that said, the same person told me the cost of DOM tube there.... you were wise to bring your own.Binky for the win
I painted mine last year and my kid crawls all over it to no ill effects. He uses the cage as a jungle gym and the seat as a ladder/trampoline.You can paint vinyl upholstery just clean well before you do.
- Thread starter
- #250
Another area I'm rolling around in the head trying to figure out is a small fix needed in regards to my carbon fiber tailgate and dash.
I had a couple parts cut before bailing on CA in aerospace scrap from my buddy who works for Scaled Composites. It's intended to be both dash and tailgate area.


Issue is that even with very decent pre-preg, the carbon delaminated slightly around various holes while being cut on the water jet.

You can see it around most of the holes in the tailgate... I was match drilling the support structure in this pic.

In many cases it's only at the hole and I'll probably be able to get away with it via some fender washers when I bolt this down. The challenge is that a few areas of delamination are bigger (2" is about the max) and break out of the edges. I'm trying to figure out whether I can use syringes or some such to force some epoxy in there and clamp it back closed.
Apparently guys do something similar things on a much larger scale with RVs and the like.
 docs.google.com
Thoughts?
I had a couple parts cut before bailing on CA in aerospace scrap from my buddy who works for Scaled Composites. It's intended to be both dash and tailgate area.
Issue is that even with very decent pre-preg, the carbon delaminated slightly around various holes while being cut on the water jet.
You can see it around most of the holes in the tailgate... I was match drilling the support structure in this pic.
In many cases it's only at the hole and I'll probably be able to get away with it via some fender washers when I bolt this down. The challenge is that a few areas of delamination are bigger (2" is about the max) and break out of the edges. I'm trying to figure out whether I can use syringes or some such to force some epoxy in there and clamp it back closed.
Apparently guys do something similar things on a much larger scale with RVs and the like.
Journey Delamination Repair Writeup
Thoughts?
yes, but it might be faster to look through my build (Shipwreck)...Sorry for the hijack....
SuperBuickGuy....am I understanding correctly that you are using a Hydramat with a stock tank? DO you have anymore details about the install?
- Thread starter
- #253
Pardon, but I'm going to take a detour for another round of fab on my XJ. I wasn't really planning this but it is something I'll have to do on the cruiser eventually so I'd love some feedback on the process or how I could do this better next time. Topic at hand: flat fenders.
-----------------------
99% of the time I love our new home. It's unbelievably gorgeous on the Big Island, amazing weather/sunsets all the time, so many things to see and explore, a job where I'm getting to do some pretty neat work... Kinda a fairy tale as evidenced by the crazy rainbows we seem to get several times a week.


That being said, real-life smacked me in the face the other day and ended up in a bit of a fabrication saga.
A while back I mentioned something about Hawaii's safety check program, and guys running garden trim to get fender tire "coverage," right? Unfortunately, when I setup my jeep that way I don't have enough clearance for proper tire flex and I end up ripping the flares right off.
It seems like everybody else around here runs tire poke, so I figured when in Rome, and pulled all that stuff back off. I prefer my rig without fender flares anyways.
Turns out the Waimea police department does not agree with my preferences... :-(
Yep, it seems the locals can do whatever they want, but if you happen to be wearing a mainlander dress shirt on your way to work in a Jeep with some tire poke, that'll get you pulled over even if you are obeying the rest of the traffic laws.
The officer pulled me over as I was turning into the parking lot of my work as well, so naturally I'm sitting there getting a ticket the cop is parked right behind me lights flashing away. Several of my coworkers are walking in for the morning and waving at me. The heckling game was strong that morning.")
4x traffic infractions, one per corner, $72 per tire for $288 fine. Ouchie...
So I break out my metal supplies and a tube bender I bought from a friend before leaving and figured what the heck, I'll try bending some flat fenders.
Testing out the machine I started by bending up a stack of FD trans mounts bars (aka, development efforts in work). I know I need a bigger garage, but it is expensive over here so when the time you have to work on it happens to be raining, you do your best.

That worked fine so it was time to try some multi plane bends. Hmmm.... This is going to be harder than I thought. Multiple bends end up being a tolerance nightmare. If you are a degree off on a bend and a degree off on rotation, the end result 5 feet later is damn hard to get exactly what you intended (much less replicated in a mirror image for the other side.)
It kind of looks okay but I'm not really that happy with it either, particularly as I compare side to side.


More to come (a lot more).
-Joel
-----------------------
99% of the time I love our new home. It's unbelievably gorgeous on the Big Island, amazing weather/sunsets all the time, so many things to see and explore, a job where I'm getting to do some pretty neat work... Kinda a fairy tale as evidenced by the crazy rainbows we seem to get several times a week.
That being said, real-life smacked me in the face the other day and ended up in a bit of a fabrication saga.
A while back I mentioned something about Hawaii's safety check program, and guys running garden trim to get fender tire "coverage," right? Unfortunately, when I setup my jeep that way I don't have enough clearance for proper tire flex and I end up ripping the flares right off.
It seems like everybody else around here runs tire poke, so I figured when in Rome, and pulled all that stuff back off. I prefer my rig without fender flares anyways.
Turns out the Waimea police department does not agree with my preferences... :-(
Yep, it seems the locals can do whatever they want, but if you happen to be wearing a mainlander dress shirt on your way to work in a Jeep with some tire poke, that'll get you pulled over even if you are obeying the rest of the traffic laws.
The officer pulled me over as I was turning into the parking lot of my work as well, so naturally I'm sitting there getting a ticket the cop is parked right behind me lights flashing away. Several of my coworkers are walking in for the morning and waving at me. The heckling game was strong that morning.
4x traffic infractions, one per corner, $72 per tire for $288 fine. Ouchie...
So I break out my metal supplies and a tube bender I bought from a friend before leaving and figured what the heck, I'll try bending some flat fenders.
Testing out the machine I started by bending up a stack of FD trans mounts bars (aka, development efforts in work). I know I need a bigger garage, but it is expensive over here so when the time you have to work on it happens to be raining, you do your best.
That worked fine so it was time to try some multi plane bends. Hmmm.... This is going to be harder than I thought. Multiple bends end up being a tolerance nightmare. If you are a degree off on a bend and a degree off on rotation, the end result 5 feet later is damn hard to get exactly what you intended (much less replicated in a mirror image for the other side.)
It kind of looks okay but I'm not really that happy with it either, particularly as I compare side to side.
More to come (a lot more).
-Joel
- Thread starter
- #254
In a rare move for me, I actually gave up a project part way through. As much as I wanted to be a bad ass and make my own custom custom stuff, I just decided that this was likely to be hard enough and time intensive enough that I was being an idiot and should just throw down for a set of Bushwhacker Flat Fenders. They look decent, they're light, and between time and materials it was looking like I was gonna have way more cost (or opportunity cost) making my custom ish...
So I pulled the trigger and bought them.
Amazon product ASIN B003VR4CG2
Amazon even had a coupon going and the $420 I spent didn't feel too bad vs my $288 ticket, plus fitment looked to be pretty spot on.
Result: fitment WOULD be spot on... If you were starting from a stock Jeep, but I'm not.

The fronts might find the don't have some sheetmetal anymore.


The fender line looks decent up front.

But that rear fender you kissed with a tire in the whoops that's not quite perfect? Yep, that gap is almost guaranteed to suck dirt...

You'll have to trim for your welded rockers too, but that's not a big deal...

But now we reach the deal breaker: Bushwackers are not compatible with cut and fold rear quarters.

No way I can live with this hanging off that far and now way to plug this in a manner that will last, look good and not suck mud.
I was prepared to weld back in some interfaces to allow these to mount (my fender lips having been trimmed and massaged before), but I just plain missed the whole "Bushwackers no likey the cut and fold bit".
Busted... So back they go. When return shipping only cost me $25 (if I'd shipped this on my own I guess close to $150) I made the call and back they went.
Sigh, looks like custom fab after all. Not the project I wanted to be working on.
-Joel
So I pulled the trigger and bought them.
Amazon product ASIN B003VR4CG2
Amazon even had a coupon going and the $420 I spent didn't feel too bad vs my $288 ticket, plus fitment looked to be pretty spot on.
Result: fitment WOULD be spot on... If you were starting from a stock Jeep, but I'm not.
The fronts might find the don't have some sheetmetal anymore.
The fender line looks decent up front.
But that rear fender you kissed with a tire in the whoops that's not quite perfect? Yep, that gap is almost guaranteed to suck dirt...
You'll have to trim for your welded rockers too, but that's not a big deal...
But now we reach the deal breaker: Bushwackers are not compatible with cut and fold rear quarters.
No way I can live with this hanging off that far and now way to plug this in a manner that will last, look good and not suck mud.
I was prepared to weld back in some interfaces to allow these to mount (my fender lips having been trimmed and massaged before), but I just plain missed the whole "Bushwackers no likey the cut and fold bit".
Busted... So back they go. When return shipping only cost me $25 (if I'd shipped this on my own I guess close to $150) I made the call and back they went.
Sigh, looks like custom fab after all. Not the project I wanted to be working on.
-Joel
the rear fenders on my '40 are cut-down-TJ flares. It's easier to modify the built flares then bend your own. my opinion, cut 4" out of the bit above the bend and weld back together.... it's not like this is ever going to be a show rig, just something to avoid tickets..... again, my opinion, but I'd keep them because the fix would take minutes and the build-new would take hours
- Thread starter
- #256
So here's the kinda tolerances-killing-me crap I was talking about:


Measure where you think the bend wants to be but you come up short. Learn from your mistake and you can make your other side properly, but now you either scrap tube or deal with the mismatch or something.
Dammit, I will not be defeated by metal fab! I am learning as I go, but you know what, this isn't really that structural apart so I'm just going to cut and weld this bastard to make it do what I want it to.
V groove bevel weld just about all the way through the thickness... That's as close to a CJP (complete joint penetration) weld as I can do simply. It's not really structural so I just can't bring myself to sleeve this internally like I might on a chassis repair.

Much closer...

For frame interfaces I learned my lesson on the slugs that hardened on me so I figured I could go the other way and pre tap some plate that I'd them match drill and tap the rest of the way through.


Problem is that it been so windy working on the driveway I can barely get these to tack, much less get a weld I trust. Up front I finally cave and pull off the bumper attachment plates so I can bench weld them.

Still don't know how I can burn the rears in though. That bit of steel isn't removable and I need to move a ton of stuff (including a non running Land Cruiser), if I'm going to pull this into the garage.
By the way, I should probably mention that when you bring a vehicle to the island, you have 30 days to do a safety check for your new registration. I'm assuming that's how long I have to get these fenders flares installed and the clock is ticking...
Measure where you think the bend wants to be but you come up short. Learn from your mistake and you can make your other side properly, but now you either scrap tube or deal with the mismatch or something.
Dammit, I will not be defeated by metal fab! I am learning as I go, but you know what, this isn't really that structural apart so I'm just going to cut and weld this bastard to make it do what I want it to.
V groove bevel weld just about all the way through the thickness... That's as close to a CJP (complete joint penetration) weld as I can do simply. It's not really structural so I just can't bring myself to sleeve this internally like I might on a chassis repair.
Much closer...
For frame interfaces I learned my lesson on the slugs that hardened on me so I figured I could go the other way and pre tap some plate that I'd them match drill and tap the rest of the way through.
Problem is that it been so windy working on the driveway I can barely get these to tack, much less get a weld I trust. Up front I finally cave and pull off the bumper attachment plates so I can bench weld them.
Still don't know how I can burn the rears in though. That bit of steel isn't removable and I need to move a ton of stuff (including a non running Land Cruiser), if I'm going to pull this into the garage.
By the way, I should probably mention that when you bring a vehicle to the island, you have 30 days to do a safety check for your new registration. I'm assuming that's how long I have to get these fenders flares installed and the clock is ticking...
or.... cut the end off and extend the box section forward...
- Thread starter
- #258
SuperBuick, not sure I follow that. What are you suggesting? I was victorious, but advice toward future efforts is appreciated.
--------------------
I'm taking my kids to school every day so still driving the Jeep. Figure my ticket should give me a few weeks of immunity. Nope, I get flagged down at a traffic stop and given ANOTHER ticket. Another $288. Same cop. The guy wouldn't cut me a break even thought it had only been 28 days (not the 30 I thought I'd have).
His take: "28 days is enough." My take, "Here's the pics of what I'm working on, it wasn't long enough for me!"
He reminds me of the garden trim thing... I don't WANT to run garden trim. I'll just be taking it on and off a hundred times to continue progress. Super frustrating, but I can't exactly pick a fight with a cop. Even a complaint to his Sergeant could easily go bad as and I sure don't want to be targeted in a small town...
Nothing to do but stay the course. We're down to the last week of school so at least my wife can drive the kids in and I have my RX7 to fall back on... So now the Jeep is sitting in my driveway not moving.
The wind is unrelenting though. I finally decided to pull the Jeep most of the way into the garage (partly shielded) and MIG weld weld the rear interfaces.


It's burned in but you can tell where the breeze caught me on the left side of the circle. Whatever, it'll hold.

Back to tube work, it's a game of fractions of inches but I'm winning.


You know things like cutting off the tacked brackets shimming tube with some weld filler rod and re tacking with 1 degree different clicking.


Then naturally it's starts raining on all my raw steel.

I need a bigger garage... This is some bull****.
-Joel
--------------------
I'm taking my kids to school every day so still driving the Jeep. Figure my ticket should give me a few weeks of immunity. Nope, I get flagged down at a traffic stop and given ANOTHER ticket. Another $288. Same cop. The guy wouldn't cut me a break even thought it had only been 28 days (not the 30 I thought I'd have).
His take: "28 days is enough." My take, "Here's the pics of what I'm working on, it wasn't long enough for me!"
He reminds me of the garden trim thing... I don't WANT to run garden trim. I'll just be taking it on and off a hundred times to continue progress. Super frustrating, but I can't exactly pick a fight with a cop. Even a complaint to his Sergeant could easily go bad as and I sure don't want to be targeted in a small town...
Nothing to do but stay the course. We're down to the last week of school so at least my wife can drive the kids in and I have my RX7 to fall back on... So now the Jeep is sitting in my driveway not moving.
The wind is unrelenting though. I finally decided to pull the Jeep most of the way into the garage (partly shielded) and MIG weld weld the rear interfaces.
It's burned in but you can tell where the breeze caught me on the left side of the circle. Whatever, it'll hold.
Back to tube work, it's a game of fractions of inches but I'm winning.
You know things like cutting off the tacked brackets shimming tube with some weld filler rod and re tacking with 1 degree different clicking.
Then naturally it's starts raining on all my raw steel.
I need a bigger garage... This is some bull****.
-Joel
- Thread starter
- #260
Each tube ended up having a 5th bend to hit the frame where I need to hit it. Half bevel groove on these showing the full thickness bevel (and damn near CJP on the splice inboard which is cool).

I tacked these on the rig (one evening with minimal wind) then burned in the plates on the bench.
Capped the ends because I could. Used a hole saw in wood to guide the steel hole saw cut on the OD without needing a pilot drill.

That was some time intensive tube.

I also bought a couple big rivet nut drivers. To date m6 was a big as I could set. These go to m12 and by getting two I have a fall back if I failed one.


Two very different companies (or so it looks online) that seem to be made in the exact same factory.
Amazon.com: TACKLIFE 14" Auto Pumping Rod Rivet Nut Tool, Nut Sert Kit, 7Pcs Metric & Inch Mandrels, 35Pcs Rivet Nut: Home Improvement
Amazon.com: 16”Hand Rivet Nut Tool, Professional Rivet Nut Setter Kit with 11PCS Metric & Inch Mandrels,110PCS Rivet Nuts, Sturdy Plastic Case for Protection and Organized Storage: Home Improvement
Kinda stoked on the speed release feature of the 14" version and the power available by the 16" handles.
Finally getting into the skins for these things. Kind proud of how this worked out. By making a tight fitting paper doll I could then do a crayon rubbing to get an ideal fit vs the tubes.


This is how you transfer to metal when each template is 50-51" long and your steel is only 48" wide. Much cleaning with a stripper disc prior to this to get the major rust off this 16 guage plate.

When you're stuck working on something you'd rather not (and twice over bitter for a pair of tickets that locals don't seem to get) it's good to pause and admire a sunset or two.

I'm now rocking both Milwaukee's metal cutting circular saws. The battery version is my go to when I need something quick that doesn't fit on my band saw. Nothing moves metal like the big dog corded guy when needed.

I tacked these on the rig (one evening with minimal wind) then burned in the plates on the bench.
Capped the ends because I could. Used a hole saw in wood to guide the steel hole saw cut on the OD without needing a pilot drill.
That was some time intensive tube.
I also bought a couple big rivet nut drivers. To date m6 was a big as I could set. These go to m12 and by getting two I have a fall back if I failed one.
Two very different companies (or so it looks online) that seem to be made in the exact same factory.
Amazon.com: TACKLIFE 14" Auto Pumping Rod Rivet Nut Tool, Nut Sert Kit, 7Pcs Metric & Inch Mandrels, 35Pcs Rivet Nut: Home Improvement
Amazon.com: 16”Hand Rivet Nut Tool, Professional Rivet Nut Setter Kit with 11PCS Metric & Inch Mandrels,110PCS Rivet Nuts, Sturdy Plastic Case for Protection and Organized Storage: Home Improvement
Kinda stoked on the speed release feature of the 14" version and the power available by the 16" handles.
Finally getting into the skins for these things. Kind proud of how this worked out. By making a tight fitting paper doll I could then do a crayon rubbing to get an ideal fit vs the tubes.
This is how you transfer to metal when each template is 50-51" long and your steel is only 48" wide. Much cleaning with a stripper disc prior to this to get the major rust off this 16 guage plate.
When you're stuck working on something you'd rather not (and twice over bitter for a pair of tickets that locals don't seem to get) it's good to pause and admire a sunset or two.
I'm now rocking both Milwaukee's metal cutting circular saws. The battery version is my go to when I need something quick that doesn't fit on my band saw. Nothing moves metal like the big dog corded guy when needed.