mattressking
10 digits to freedom
Promised to a few folks that I would put up the specifics on the dash swap that I just performed on my truck, so here goes.
Background: I wanted to install a double din screen with modern features into my October 1985 build FJ60 but still retain all OEM parts and utilize the new dash pads while available. Dash and associated parts were sourced from 1988-1990 USA FJ62. This is how I did it. I will not be going into each screw for removal and installation.
Disclaimer: For this type of job, its more informative on what is and isn't needed for the swap. This is done assuming you have a mechanical prowess and general mechanical ability for installation/removal of electrics and body/chassis parts. Take care and caution when handling old plastic parts, they are brittle and need additional attention when being removed and reinstalled. When possible, use new OEM parts for peace of mind and beauty. Also keep track of all hardware.
Parts Required:
FJ62 Dash Pad (upper)
FJ62 Dash Frame (lower)
FJ62 Glovebox (for color matching purposes only)
FJ62 Fusebox Cover (For color matching purposes only)
FJ62 Instrument Bezel
FJ62 Instrument Bezel lamp housings (4wd, seat belt, CEL)
FJ62 Center Vents
FJ62 HVAC Bezel
FJ62 Ashtray
FJ62 Bezel Switches and blanks
FJ62 HVAC tubes for center vents and driver side vents.
FJ62 radio brackets
FJ62 center dash support bracket
Additional sheet metal screws for dash.


Disassembly:
1. First begin by removing entire dash assembly from FJ60. See Chassis/Body manual. Upper and lower dash assembly needs to be removed. Wiring for instrument cluster and center bezel will need to be disconnected. This is what it will look like before and after. Steering wheel does not need to be removed for this, however the steering column will be unbolted from dash frame during this procedure, which is a total of 2 bolts and 2 nuts.


2. Once upper and lower dash is removed, this is a great time to clean out HVAC tubes, HVAC assembly, heater core replacement, anything! Use this time wisely if you have other tasks to be performed, it will make it very easy.
3. Begin by installing the FJ62 lower dash frame. This is the central support for the entire dash, once this is in, you are making great progress. Note: Install bolts for right and left side of frame into lower A-pillar first and align the holes, this will reduce headache. Once tightened, install the hardware for the steering column. Also install illumination rheostat. Wiring and rheostat are the same between 60 and 62.


4. Install FJ62 HVAC tubes. FJ62 center and driver side tubes must be sourced, but all mount using the existing brackets, no modifications. Direct exchange.
5. Upper Dash Pad. USA 60 and 62 series have defrost ducting on the upper dash pad. The ducts and vents are the same. The Fj62 dash will either have the vents installed (if used) or need the opening cut out (if new). Cutting the openings for the defrost ducting is simple as Toyota provides the outline. Follow the outline with a sharp blade and take your time and care. It is a very simple procedure. The upper and lower bolt holes have a small mark on the pad on where to start threading the bolts into. Again, very simple.
5a. Now install the dash pad into the truck. This is a direct exchange, no modifications and all hardware is the same. There is a center support bracket for dash, this should be installed and is specific to FJ62 dashes. Ensure you have one prior to swap as it can only be found used or NOS.


4. Assemble your existing speedometer, tachometer and multi function gauges into the instrument bezel. This is where the specifics come in. All wiring will be reused and will not be changed. HOWEVER. The Emergency Brake indicator is no longer available using the original wiring as it does not exist in the same location. FJ62s had the emergency brake indicator in the multi-function gauge. You must decided if you want it to illuminate and how. I haven't been concerned, so currently it is not working and I removed the bulb. The seat belt indicator can be connected, however the bulb housing is smaller in the FJ62 housing, so it must be exchanged for it to illuminate as originally designed. The CEL lamp housing works perfectly as the CHOKE illumination and the 4wd lamp is a direct fit and functions without any changes. All gauges fit into the 62 bezel, no modifications necessary.
4a. Clock. The clock will not work unless wiring is added. This is up to the owner, it can be left not working, or wired into the existing vehicle harness. It needs an +12v for illumination, +12v for constant power, +12v for switched power and a ground. There is also a dash clock blank to eliminate. This is up to the owner. I haven't decided my method for wiring as I'd like to keep it very original. I might build a harness using oem terminal housings, details will follow.
4b. At this time, the center vents must be installed, these are proprietary to FJ62 so make sure you have these. The driver side vent is the same as FJ60 however the mounting bracket from the vent must be unclipped as the clip housing is actually part of the FJ62 instrument bezel. Easy exchange.

5. Install Instrument bezel. Nothing fancy here, just use the dash assembly screws and install. There are 7. I'd recommend getting a few new from Toyota or used if you have a spare parts truck or access to extras.

6. HVAC bezel. Install the HVAC sliders and lamp assembly. This is interchangeable between 60 and 62. Use whichever you like most or is in best condition. Minor visual differences between the two, but otherwise the same. This is where it gets interesting. The wiring for the switches are DIFFERENT. Only the Cigarette Lighter is the same. In order for this to work, you will have to become creative. You will need to use the 62 switches and change the wiring to suit and the rear seat heater switch will need to be sourced from a 62 and also needs some creativity as it is a a Hi/Lo switch, not On/Off. Again, I haven't had time to get it sorted, so right now my defrost, wiper and rear heater aren't functioning. You will also see an additional lamp for the lower switches, up t the owner if you'd like it to illuminate, it only needs a +12v illumination and ground to function. More to follow.
6a. Make sure the ash tray slider is installed on bezel before assembly.

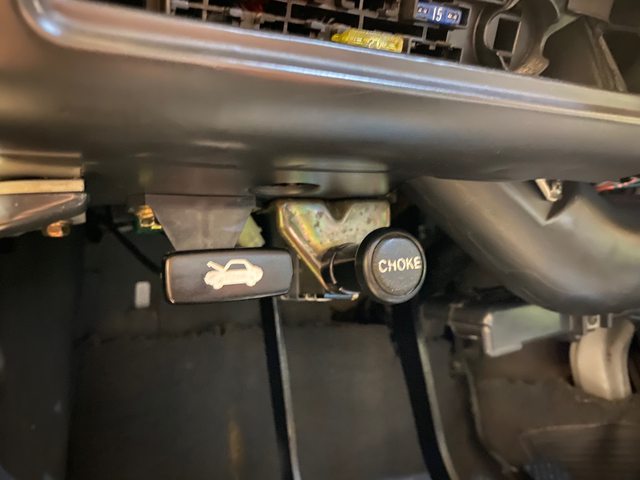
7. Choke. This was a surprising one. The FJ62 rear gas flap release bracket is a PERFECT choice for the choke mount. The hole is essentially identical to the choke opening hole on FJ60 dash however it needs to be opened up just a small amount. Use a dremel and lightly open it up. Not a lot needed, then mount Choke like factory. Cable and illumination wire reaches with room to spare. Black ring on bracket shows what material needs to be removed.

8. Radio wiring. This is up to the owner, but the factory FJ60 wiring contains two plugs. Plug 1 has 2 wires, +12v switched and ground. Plug 2 has 3 wires, Right Spkr, Left Spkr, unified ground. With aftermarket radios, use only one ground and connect to the front right or left output from new radio. I used oem terminals and terminal housings so it can be installed using factory wiring. No hacks here.


9. Thats it! The overall swap is a direct installation with some work or imagination needed for wiring. Beach and sunshine not included.


Background: I wanted to install a double din screen with modern features into my October 1985 build FJ60 but still retain all OEM parts and utilize the new dash pads while available. Dash and associated parts were sourced from 1988-1990 USA FJ62. This is how I did it. I will not be going into each screw for removal and installation.
Disclaimer: For this type of job, its more informative on what is and isn't needed for the swap. This is done assuming you have a mechanical prowess and general mechanical ability for installation/removal of electrics and body/chassis parts. Take care and caution when handling old plastic parts, they are brittle and need additional attention when being removed and reinstalled. When possible, use new OEM parts for peace of mind and beauty. Also keep track of all hardware.
Parts Required:
FJ62 Dash Pad (upper)
FJ62 Dash Frame (lower)
FJ62 Glovebox (for color matching purposes only)
FJ62 Fusebox Cover (For color matching purposes only)
FJ62 Instrument Bezel
FJ62 Instrument Bezel lamp housings (4wd, seat belt, CEL)
FJ62 Center Vents
FJ62 HVAC Bezel
FJ62 Ashtray
FJ62 Bezel Switches and blanks
FJ62 HVAC tubes for center vents and driver side vents.
FJ62 radio brackets
FJ62 center dash support bracket
Additional sheet metal screws for dash.
Disassembly:
1. First begin by removing entire dash assembly from FJ60. See Chassis/Body manual. Upper and lower dash assembly needs to be removed. Wiring for instrument cluster and center bezel will need to be disconnected. This is what it will look like before and after. Steering wheel does not need to be removed for this, however the steering column will be unbolted from dash frame during this procedure, which is a total of 2 bolts and 2 nuts.
2. Once upper and lower dash is removed, this is a great time to clean out HVAC tubes, HVAC assembly, heater core replacement, anything! Use this time wisely if you have other tasks to be performed, it will make it very easy.
3. Begin by installing the FJ62 lower dash frame. This is the central support for the entire dash, once this is in, you are making great progress. Note: Install bolts for right and left side of frame into lower A-pillar first and align the holes, this will reduce headache. Once tightened, install the hardware for the steering column. Also install illumination rheostat. Wiring and rheostat are the same between 60 and 62.
4. Install FJ62 HVAC tubes. FJ62 center and driver side tubes must be sourced, but all mount using the existing brackets, no modifications. Direct exchange.
5. Upper Dash Pad. USA 60 and 62 series have defrost ducting on the upper dash pad. The ducts and vents are the same. The Fj62 dash will either have the vents installed (if used) or need the opening cut out (if new). Cutting the openings for the defrost ducting is simple as Toyota provides the outline. Follow the outline with a sharp blade and take your time and care. It is a very simple procedure. The upper and lower bolt holes have a small mark on the pad on where to start threading the bolts into. Again, very simple.
5a. Now install the dash pad into the truck. This is a direct exchange, no modifications and all hardware is the same. There is a center support bracket for dash, this should be installed and is specific to FJ62 dashes. Ensure you have one prior to swap as it can only be found used or NOS.
4. Assemble your existing speedometer, tachometer and multi function gauges into the instrument bezel. This is where the specifics come in. All wiring will be reused and will not be changed. HOWEVER. The Emergency Brake indicator is no longer available using the original wiring as it does not exist in the same location. FJ62s had the emergency brake indicator in the multi-function gauge. You must decided if you want it to illuminate and how. I haven't been concerned, so currently it is not working and I removed the bulb. The seat belt indicator can be connected, however the bulb housing is smaller in the FJ62 housing, so it must be exchanged for it to illuminate as originally designed. The CEL lamp housing works perfectly as the CHOKE illumination and the 4wd lamp is a direct fit and functions without any changes. All gauges fit into the 62 bezel, no modifications necessary.
4a. Clock. The clock will not work unless wiring is added. This is up to the owner, it can be left not working, or wired into the existing vehicle harness. It needs an +12v for illumination, +12v for constant power, +12v for switched power and a ground. There is also a dash clock blank to eliminate. This is up to the owner. I haven't decided my method for wiring as I'd like to keep it very original. I might build a harness using oem terminal housings, details will follow.
4b. At this time, the center vents must be installed, these are proprietary to FJ62 so make sure you have these. The driver side vent is the same as FJ60 however the mounting bracket from the vent must be unclipped as the clip housing is actually part of the FJ62 instrument bezel. Easy exchange.
5. Install Instrument bezel. Nothing fancy here, just use the dash assembly screws and install. There are 7. I'd recommend getting a few new from Toyota or used if you have a spare parts truck or access to extras.
6. HVAC bezel. Install the HVAC sliders and lamp assembly. This is interchangeable between 60 and 62. Use whichever you like most or is in best condition. Minor visual differences between the two, but otherwise the same. This is where it gets interesting. The wiring for the switches are DIFFERENT. Only the Cigarette Lighter is the same. In order for this to work, you will have to become creative. You will need to use the 62 switches and change the wiring to suit and the rear seat heater switch will need to be sourced from a 62 and also needs some creativity as it is a a Hi/Lo switch, not On/Off. Again, I haven't had time to get it sorted, so right now my defrost, wiper and rear heater aren't functioning. You will also see an additional lamp for the lower switches, up t the owner if you'd like it to illuminate, it only needs a +12v illumination and ground to function. More to follow.
6a. Make sure the ash tray slider is installed on bezel before assembly.
7. Choke. This was a surprising one. The FJ62 rear gas flap release bracket is a PERFECT choice for the choke mount. The hole is essentially identical to the choke opening hole on FJ60 dash however it needs to be opened up just a small amount. Use a dremel and lightly open it up. Not a lot needed, then mount Choke like factory. Cable and illumination wire reaches with room to spare. Black ring on bracket shows what material needs to be removed.
8. Radio wiring. This is up to the owner, but the factory FJ60 wiring contains two plugs. Plug 1 has 2 wires, +12v switched and ground. Plug 2 has 3 wires, Right Spkr, Left Spkr, unified ground. With aftermarket radios, use only one ground and connect to the front right or left output from new radio. I used oem terminals and terminal housings so it can be installed using factory wiring. No hacks here.
9. Thats it! The overall swap is a direct installation with some work or imagination needed for wiring. Beach and sunshine not included.
Last edited:


