
Oh wow, you are doing everything at the same time... crazy... HOPE YOU HAVE A GREAT MEMORY SKILLS...
Navigation
Install the app
How to install the app on iOS
Follow along with the video below to see how to install our site as a web app on your home screen.
Note: This feature may not be available in some browsers.
More options
You are using an out of date browser. It may not display this or other websites correctly.
You should upgrade or use an alternative browser.
You should upgrade or use an alternative browser.
Builds Greenbriar's '96 Build (1 Viewer)
- Thread starter Greenbriar
- Start date
This site may earn a commission from merchant affiliate
links, including eBay, Amazon, Skimlinks, and others.
More options
Who Replied?- Thread starter
- #22
Oh wow, you are doing everything at the same time... crazy... HOPE YOU HAVE A GREAT MEMORY SKILLS...
I've got enough zip-lock bags full of bolts to fill up the interior of the truck. It's honestly a little intimidating when I look at it, but so far I've only "lost" one bag for about 15 mins. I went through the pile twice, only to realize I had pulled it out the night before in preparation...
- Thread starter
- #23

Anybody have a full float unlocked rear axle housing they want to part with? Somebody drove with the parking brake on until it caught fire and spun all four bearings on the spindles. Then they put new bearings in, pulled the parking brake guts, called it good, and obviously spun those too. Frustrated...
Good news is I got the block painted the other day...
What color did u paint your wheels and where can I get it?
- Thread starter
- #25
Another hundred miles and I'll be back where I started last night... I'll get the paint info when I get home.

- Thread starter
- #26
@White Stripe
Color is graphite, they've got it at all the chain parts stores I've been to. I used about a can of each, plus a can of etching primer per wheel.
Color is graphite, they've got it at all the chain parts stores I've been to. I used about a can of each, plus a can of etching primer per wheel.
- Thread starter
- #27
We had a vacation to Grand Teton National Park, and Yellowstone towards the middle of May. The plan was to drive the LC. Hence the online silence. Nothing but wrenching, at any free moment, trying to get this thing together in time for the trip. This is a few months late, but here is the progression, in a picture->explanation format from where I left off...
Rigging up a way to torque the ring gear bolts.
Realizing that I forgot to tap the air line hole until the chunk was together...
Then tapping it too deep, letting the fitting bottom out on the 3rd, popping the top off...
LandTank's oil pump bushing installed, with puller that I made out of an air brake lock bolt and the end of the supplied install tool.
Crank in place
Measuring ring gap
#6 in...
Headed in the right direction...
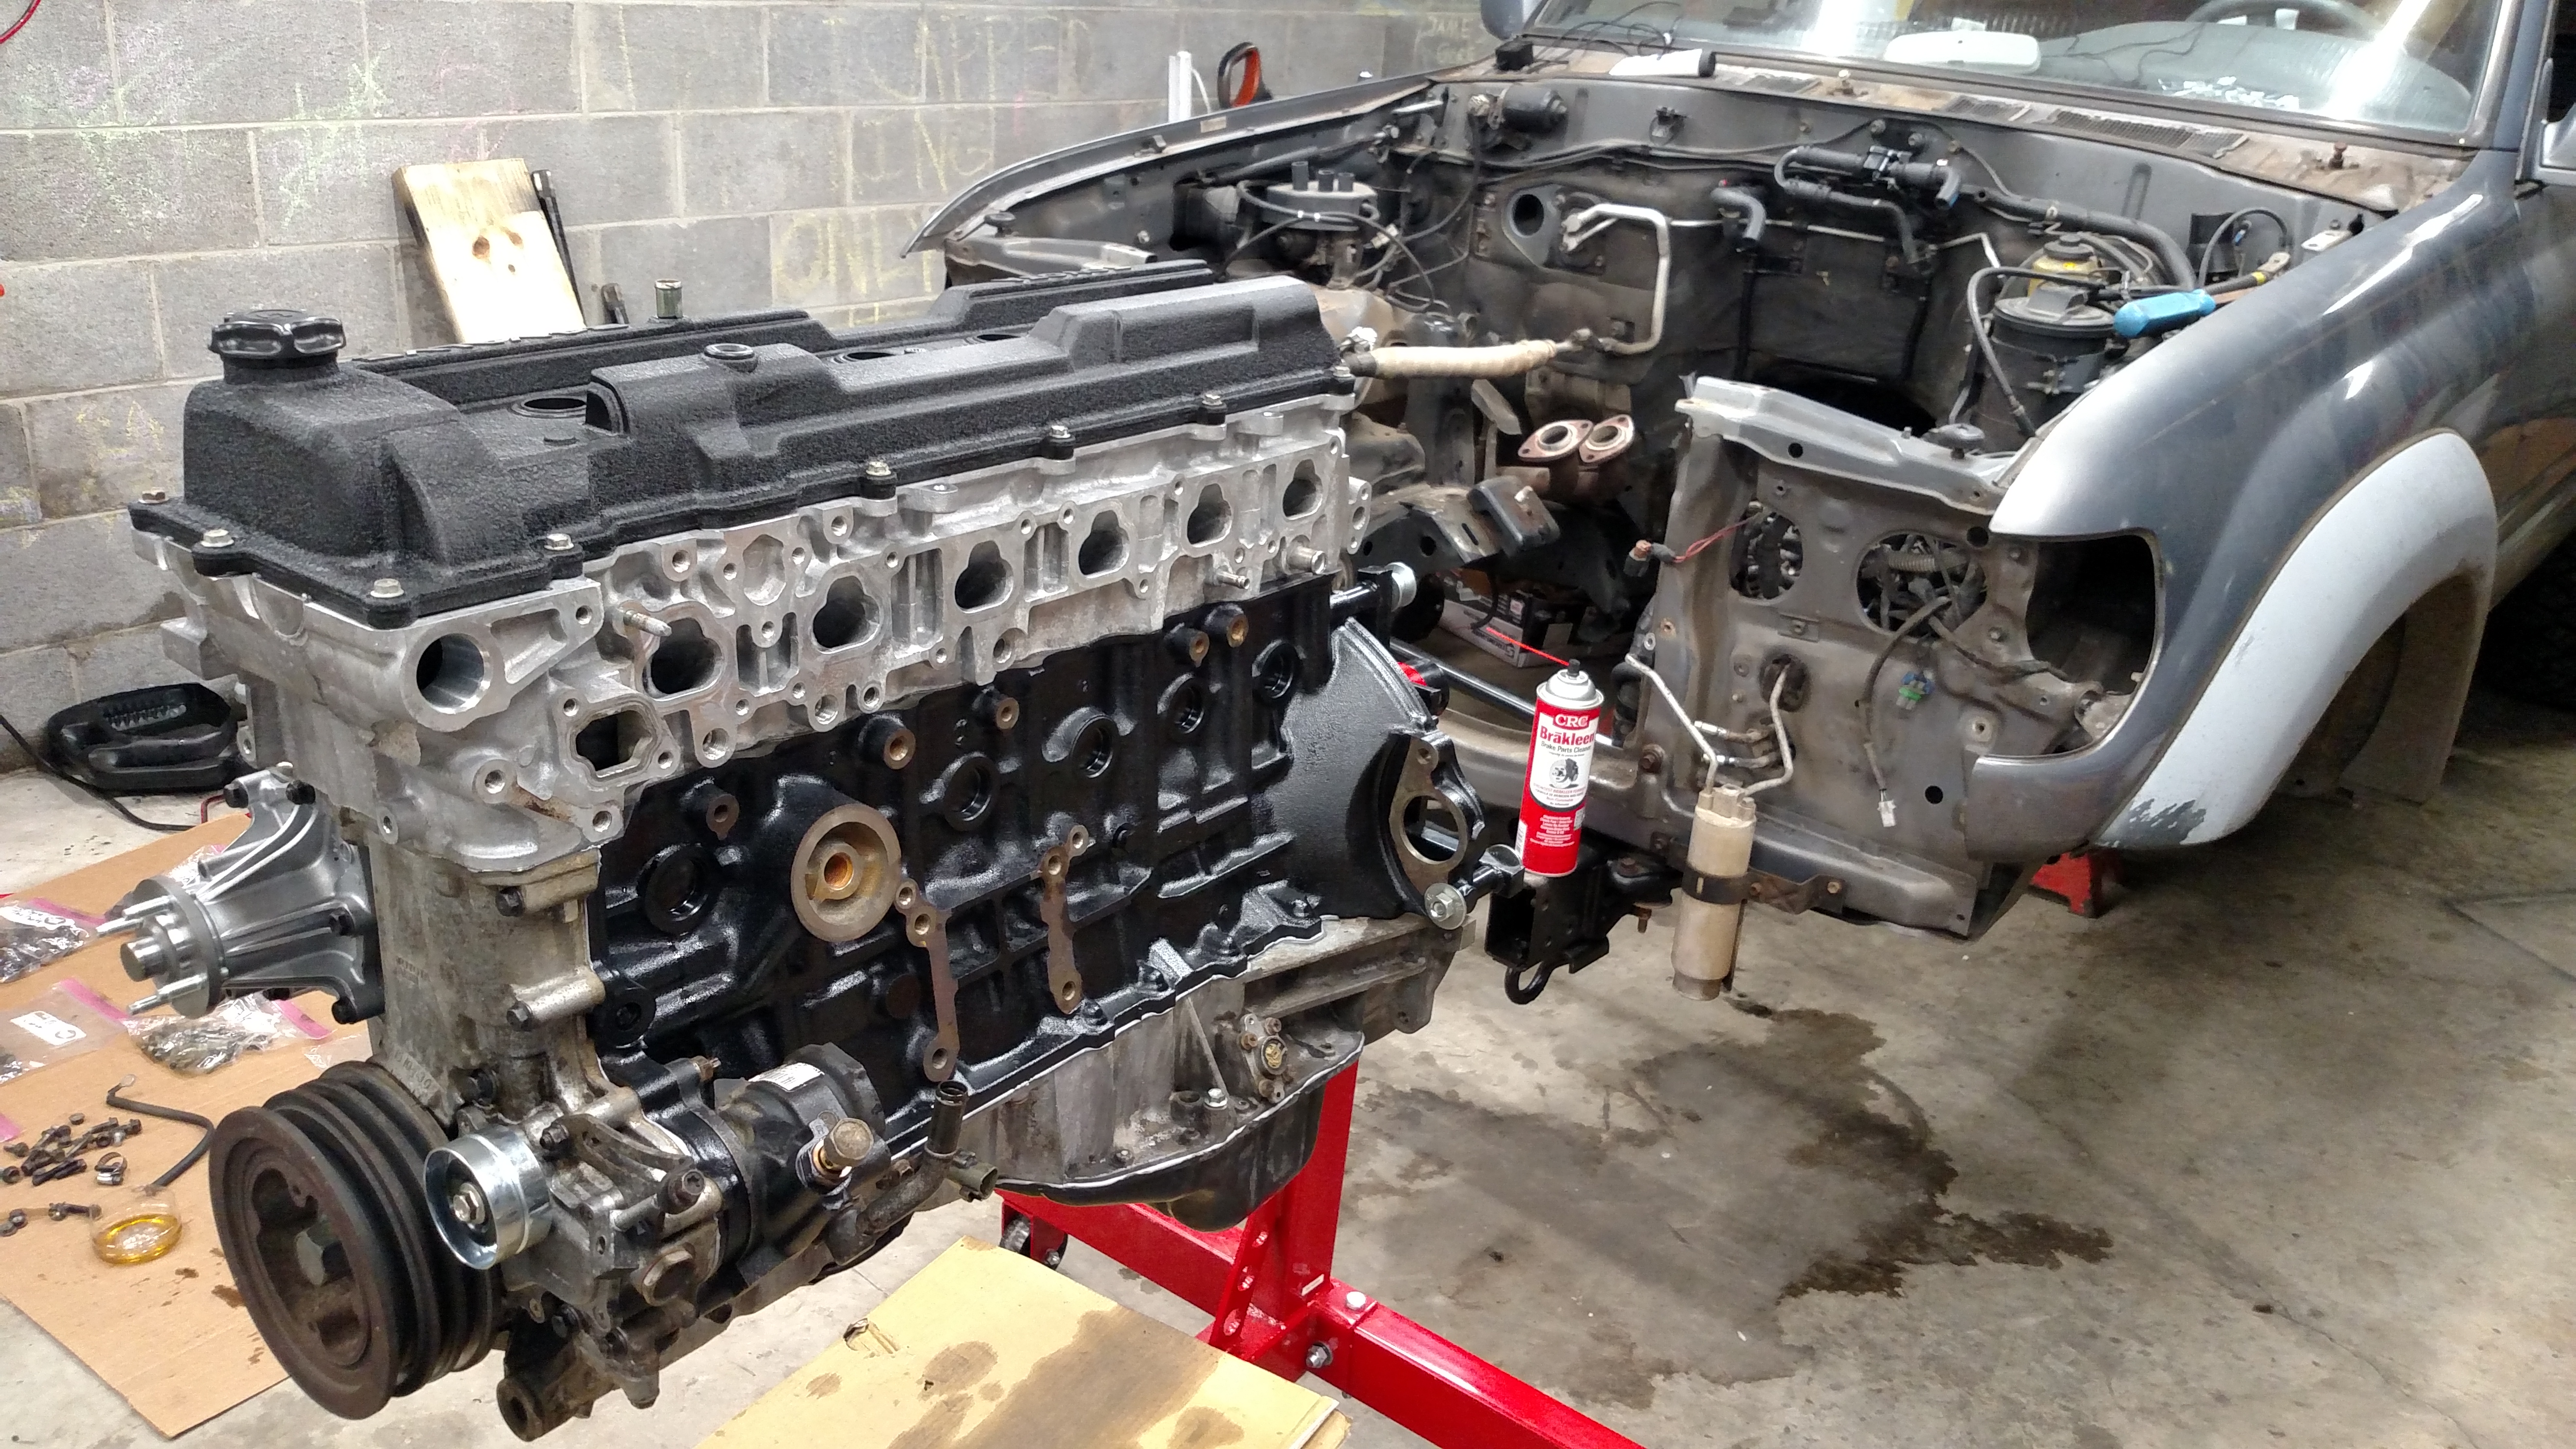
Short Block done
See the little holes in the side of the oil pump cover? That was the solution to get some penetrating oil in there and help break the stubborn two free...
Better view of where the holes came in, just above the threads...
These are the tops of the Supra ARP studs, backed out 1/2 turn from bottom in the block, with the Mr.T factory head bolt washers (a little thinner than the supplied ARP, and fit the head better). Worked out perfect if you ask me...
Ready to go back in.
Finally off the stand and in the truck.
Starting to come back together. This is the first time the axles had been back under it (still sitting on the bumpstops).
The first time I got to see it with the springs under it! A little taller than I had wanted, and I've still got some plans for that, but that will be another post. It did throw off all my planned driveline angles, which almost blew the timeframe for the trip, but I ended up getting it sorted last minute (ok... it was actually something like 24hrs before we left...)
At this point, the engine had been rebuilt and the engine compartment got new rubber/seals/wear items/hoses/water pump/fan clutch/trans lines/you name it. If it could wear or fail, it was re-built or replaced. Both axles fully built (birfs, knuckles, wheel bearings, ring+pinion, air lockers, pads, rotors, brake lines, everything). Trans replaced with a 70k mile unit. I ended up having to buy a used transfer case for the trip to make the timeline work. Mine had a bearing going down, and I had run out of time to re-build it (and now I have a spare I can build at my own pace). Mechanically this thing should be very nearly like it was when it rolled off the showroom floor. Still haven't touched the interior, except to pressure wash the headliner and carpet and put it back together.
May 24th we headed out with a spare driveshaft and a pile of tools. I had installed the air compressor and wiring for the lockers the night before.
5000 miles of this, and the only casualty was a brand new OEM AC idler pulley bearing that I was able to replace on the road. Other than that, not a leak one, and everything ran beautifully! (I had been driving it to work while I finished ironing out the driveline angles and re-installing the interior, so the gears and engine had a decent chance to break in)
And this is where it took us! It came down to the wire, but it worked out! Can't believe the faith Jaime had in me by just hopping in, ready to ride cross country...
I've got lots more to do to get to where I want it to be, but I haven't shut it down long enough to work on it since we got back (and frankly, I'm sick of working on it right now).
I haven't driven my car once since I got her running...
I want to put together a decent cost list at some point, because that was something I looked for when deciding to take this on, but the stack of receipts 6" tall is telling me I may not want to know exactly (and that it'll take a long time to crunch out). It's on the list of things to do though. I can't thank this forum enough, you guys made this possible, and saved my tail a few times along the way.
THANK YOU!
Rigging up a way to torque the ring gear bolts.

Realizing that I forgot to tap the air line hole until the chunk was together...

Then tapping it too deep, letting the fitting bottom out on the 3rd, popping the top off...

LandTank's oil pump bushing installed, with puller that I made out of an air brake lock bolt and the end of the supplied install tool.

Crank in place

Measuring ring gap

#6 in...

Headed in the right direction...

Short Block done

See the little holes in the side of the oil pump cover? That was the solution to get some penetrating oil in there and help break the stubborn two free...

Better view of where the holes came in, just above the threads...

These are the tops of the Supra ARP studs, backed out 1/2 turn from bottom in the block, with the Mr.T factory head bolt washers (a little thinner than the supplied ARP, and fit the head better). Worked out perfect if you ask me...

Ready to go back in.
Finally off the stand and in the truck.

Starting to come back together. This is the first time the axles had been back under it (still sitting on the bumpstops).

The first time I got to see it with the springs under it! A little taller than I had wanted, and I've still got some plans for that, but that will be another post. It did throw off all my planned driveline angles, which almost blew the timeframe for the trip, but I ended up getting it sorted last minute (ok... it was actually something like 24hrs before we left...)

At this point, the engine had been rebuilt and the engine compartment got new rubber/seals/wear items/hoses/water pump/fan clutch/trans lines/you name it. If it could wear or fail, it was re-built or replaced. Both axles fully built (birfs, knuckles, wheel bearings, ring+pinion, air lockers, pads, rotors, brake lines, everything). Trans replaced with a 70k mile unit. I ended up having to buy a used transfer case for the trip to make the timeline work. Mine had a bearing going down, and I had run out of time to re-build it (and now I have a spare I can build at my own pace). Mechanically this thing should be very nearly like it was when it rolled off the showroom floor. Still haven't touched the interior, except to pressure wash the headliner and carpet and put it back together.
May 24th we headed out with a spare driveshaft and a pile of tools. I had installed the air compressor and wiring for the lockers the night before.
5000 miles of this, and the only casualty was a brand new OEM AC idler pulley bearing that I was able to replace on the road. Other than that, not a leak one, and everything ran beautifully! (I had been driving it to work while I finished ironing out the driveline angles and re-installing the interior, so the gears and engine had a decent chance to break in)

And this is where it took us! It came down to the wire, but it worked out! Can't believe the faith Jaime had in me by just hopping in, ready to ride cross country...

I've got lots more to do to get to where I want it to be, but I haven't shut it down long enough to work on it since we got back (and frankly, I'm sick of working on it right now).
I haven't driven my car once since I got her running...
I want to put together a decent cost list at some point, because that was something I looked for when deciding to take this on, but the stack of receipts 6" tall is telling me I may not want to know exactly (and that it'll take a long time to crunch out). It's on the list of things to do though. I can't thank this forum enough, you guys made this possible, and saved my tail a few times along the way.
THANK YOU!
Last edited:
- Thread starter
- #28
Went and checked out Stony Lonesome in Cullman AL today. Never been to an OHV park before. Got to flex it a little, and ended up needing both lockers (in the mud unfortunately, because we got lost). This is with both sway bars attached. I was pretty impressed with how it did, but man are the trails tight there...


- Thread starter
- #29
So, my leaky windshield has gotten worse, and I finally gave in and decided to do something about it. I've spent too much time on this thing to have it rusting out from the inside. Inspection revealed that it was installed dry (without any adhesive or sealant). It looks to be only leaking between the glass and the seal, so I decided to seal it up today. We'll see if this does it, or if I need to go back and seal the rubber to the truck as well. I'm trying to put that off if I can, because I need another windshield badly. This one is cracked, chipped, and it looks like somebody washed it with sand at some point too.
1st step, warm the urethane up:

My water heater is pretty warm, but it only will get up to about 130deg F. I've heard that 140deg F is about all you want to get this stuff to, but I can confirm that it does come out much better if it's warm. I wanted to be able to use a relatively small bead at the base of the glass, so I needed it to flow well through a small opening. Here's what I used...
Next step, mask the windshield:
Then, clean out all the grit (since there was never any sealant, there was a lot of it in there). Also had to clean out a little silicone from the PO. Oddly enough, it was just in a small area at the top...
Then, I lifted the seal, which was surprisingly still soft enough for this, and put a thin bead all the way around the windshield, right at the base of the glass where it met the rubber. There is a pocket in the rubber to build up sealant, and I tried to fill this without going too overboard. Then, once I had enough in the seal, I very lightly went around the gasket and pressed the "pocket", to be sure that I had a little squish out everywhere.
You can go overboard here and push all the sealant out, which is not what you want. Just very light pressure to be sure that you have a continuous bead without any gaps.
Here's one of the spots that was hard to see while I was doing it, so there's a little extra. Once it cures enough to handle, I'll go around the edge of the seal and trim the excess. It's supposed to rain pretty good here later this week, so we'll see how it does...
Edit: Had a wicked storm come through the other day. Floorboards dry as a bone. Success.
1st step, warm the urethane up:
My water heater is pretty warm, but it only will get up to about 130deg F. I've heard that 140deg F is about all you want to get this stuff to, but I can confirm that it does come out much better if it's warm. I wanted to be able to use a relatively small bead at the base of the glass, so I needed it to flow well through a small opening. Here's what I used...
Next step, mask the windshield:
Then, clean out all the grit (since there was never any sealant, there was a lot of it in there). Also had to clean out a little silicone from the PO. Oddly enough, it was just in a small area at the top...
Then, I lifted the seal, which was surprisingly still soft enough for this, and put a thin bead all the way around the windshield, right at the base of the glass where it met the rubber. There is a pocket in the rubber to build up sealant, and I tried to fill this without going too overboard. Then, once I had enough in the seal, I very lightly went around the gasket and pressed the "pocket", to be sure that I had a little squish out everywhere.
You can go overboard here and push all the sealant out, which is not what you want. Just very light pressure to be sure that you have a continuous bead without any gaps.
Here's one of the spots that was hard to see while I was doing it, so there's a little extra. Once it cures enough to handle, I'll go around the edge of the seal and trim the excess. It's supposed to rain pretty good here later this week, so we'll see how it does...
Edit: Had a wicked storm come through the other day. Floorboards dry as a bone. Success.
Last edited:
- Thread starter
- #30
Does anybody have any experience with the new(ish) textured Avery vinyl? I'm thinking about trying it out, but I'm worried about it tearing on limbs where you'd normally just get a pinstripe on the paint. I ordered a bunch of small pieces (not all textured or Avery) to test it out, since I've never used any before, and to check colors.
The textured stuff hides the peeling clear coat way better than the "satin" variety. The first picture below is just to the front of the fuel door. The fuel door is actually worse with the peeling clear, as it still has a little left on it, leaving a lot of vertical stripes. It's just way harder to see with the texture.
I flaked off all the unbound clear before applying.
I think I like the "bedrock grey" (light grey) one. I shouldn't have to do the door jambs with that color either. I plan to pull the flares if I wrap it, so won't have to worry about adhesion issues on them.
If anybody has any experience with this stuff, good or bad, I'm all ears.
Edit to add: I'd like to paint this thing one day, but it won't happen any time soon. Otherwise I'd be all over the Monstaliner...
Last edited:
Similar threads
Users who are viewing this thread
Total: 2 (members: 0, guests: 2)