
- Thread starter
- #41
New set of shoes. All pretty with the paint and little rubber castings still attached.
I have been fighting with the old set in that either they were a bad batch or a set of wheels I had them on egged them, so with trips coming up very soon and throughout the summer it was time to invest in a smoother ride. Moved the old ones to the pickup on crappy steel wheels. The don't seem to affect the ride quality on the pickup as much (hah, what ride quality?).
Just have to replace my rear driveshaft (splines getting loose) and all my known vibration sources should be gone, probably so the very next day a new one can appear.
Also mounted a 1/2 wave dual band (HAM) antenna on the rear hatch to work with a new Yaesu mobile radio. Works nice!


EDIT: I am also adding my shock install from another thread since it was around this time in the build. Other thread is - https://forum.ih8mud.com/60-series-wagons/378119-bilstein-7100-shocks-installed-62-a.html
Thought others might find this useful as I've had some time put into researching how these shocks could work.
This post got my brain going- https://forum.ih8mud.com/80-series-tech/157677-slee4-1-w-bilstein-7100s.html
I've been looking for a replacement for my 10 year old OME shocks. I like the ride on the softer side, have always heard great things of Bilstein shocks, and wanted something that could last. Most of my travel in the 62 is to explore, so road conditions are anything but tend to end up over long stretches of rough gravel or dirt roads. I settled on 7100s because they measured closest to the OMEs that I could find and seemed to be well regarded. They can also be rebuilt and can be built for different ride qualities. So these should last forever if they aren't damanged and if parts exist.
I forget my actual measurements, but the closest shock I could find in all of Bilstein's range was the short body 10" travel, AK7110SB. I don't expect to ever go beyond running 33s in SUA, so planning for future increase travel wasn't in the cards.
My list of parts-
4 shocks, expect to pay around $700
4+ stem conversion adapters... I want to say w/14mm hole, 2x $17.50 @ man-a-fre
Dodge truck bushings for '69-93 truck, 1" spring eye
This is about a 2 banana job, mostly in figuring out how to mount things. Not a bolt up job.
After finding a post in the 80s forum, I decided to only use the front top heim joints that come on either end of each shock. The rest I converted to bushings, mostly for ease of use. I have 4+ U-bolt flip kits on each corner and that's how things worked out. The 4+ kit for the 60 uses 16mm mounting surfaces. The top rear OEM mounts for a 62 is 19mm. I had to drill out two bushings to fit the rear upper mounts and that was another adventure to find a 3/4 bit that would work (don't bother a gradual hole increase for poly bushings, just go for it).
Now that I know, I would have built the front stem adapters out of square tube. The adapters from 4+ have a massive vertical bolt.. 7/8", and is just a pain to deal with finding a bit to hone out the OEM mount. I'm not sure why such a huge bolt is needed.
I'd like to find a better way to do the bushings, but was limited to a size that fit and what form it came in. Ideally I wanted to find two hat-shaped ends and sandwich them together with a metal inner sleeve. Prothane sells something that might work if I cut the ends down, but I just went with what I found at the local 4x4 shop. Why are all my projects the weirdest thing a counter jockey has ever seen?
what comes in the box.. including 4 bushing rings, one goes on either side of each heim (i used 3 per top front shock to get spacing right with the stem adapters)

shot of the poly bushings used

easy end

with clip removed

this clip is more difficult.. see how the ends are formed?

my makeshift press bits.. 8mm and 25mm sockets

shade tree in action (a press would work better, be careful of the top shock housing)

what I came up to remove the clip.. prevent the clip from spinning with vice grips and pry the end I could get on with a small screwdriver... there has to be an easier way

vice grips don't mar up the end that bad.. nothing some emery cloth or die grinder can't correct

another angle

bushing fits

shot with a spare mount pin... this could be mounted better, but should serve to keep the end in place

very close in length to OME, my stock bumpstop should hit before the shocks bottom out according to measurements

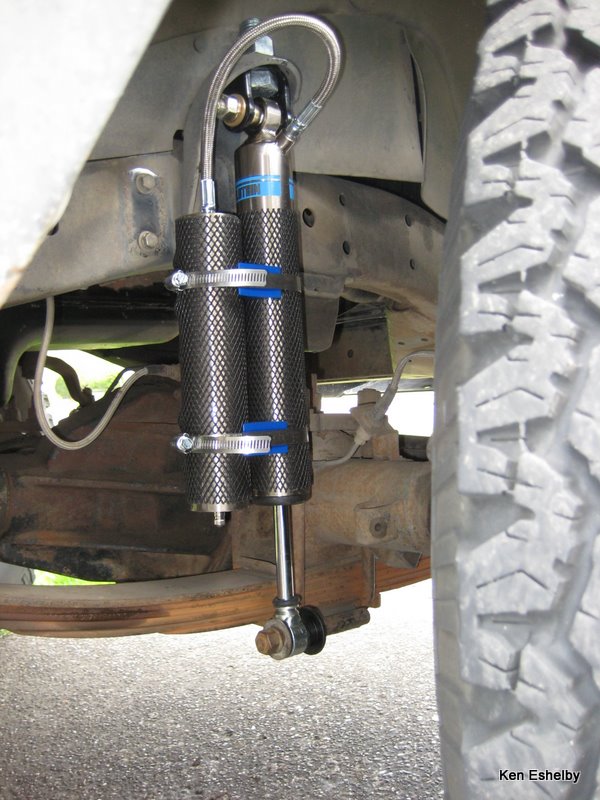
front mounted, need to swing the clamps around but they don't interfere with anything
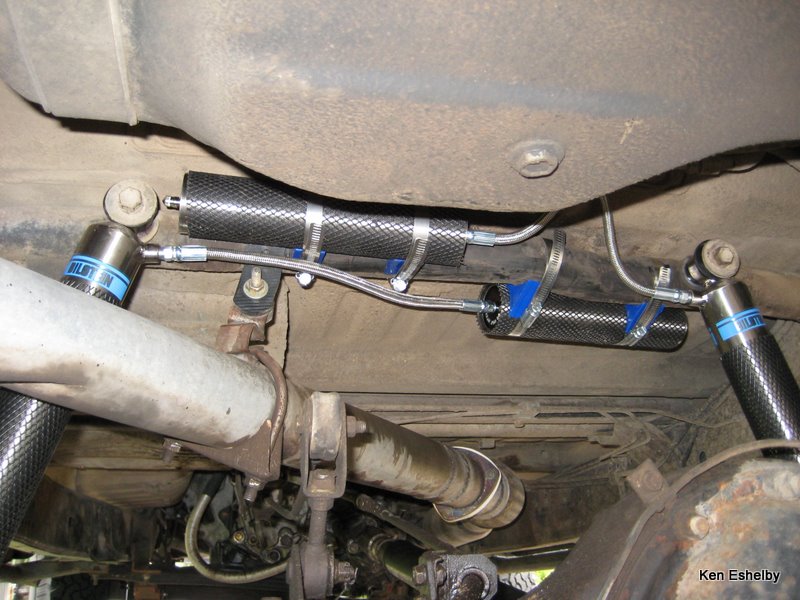
rear resevoirs clamped in.. my 3" exhaust is going to move so I might make a few adjustments then
and a few pics at different angles


I have been fighting with the old set in that either they were a bad batch or a set of wheels I had them on egged them, so with trips coming up very soon and throughout the summer it was time to invest in a smoother ride. Moved the old ones to the pickup on crappy steel wheels. The don't seem to affect the ride quality on the pickup as much (hah, what ride quality?).
Just have to replace my rear driveshaft (splines getting loose) and all my known vibration sources should be gone, probably so the very next day a new one can appear.
Also mounted a 1/2 wave dual band (HAM) antenna on the rear hatch to work with a new Yaesu mobile radio. Works nice!
EDIT: I am also adding my shock install from another thread since it was around this time in the build. Other thread is - https://forum.ih8mud.com/60-series-wagons/378119-bilstein-7100-shocks-installed-62-a.html
Thought others might find this useful as I've had some time put into researching how these shocks could work.
This post got my brain going- https://forum.ih8mud.com/80-series-tech/157677-slee4-1-w-bilstein-7100s.html
I've been looking for a replacement for my 10 year old OME shocks. I like the ride on the softer side, have always heard great things of Bilstein shocks, and wanted something that could last. Most of my travel in the 62 is to explore, so road conditions are anything but tend to end up over long stretches of rough gravel or dirt roads. I settled on 7100s because they measured closest to the OMEs that I could find and seemed to be well regarded. They can also be rebuilt and can be built for different ride qualities. So these should last forever if they aren't damanged and if parts exist.
I forget my actual measurements, but the closest shock I could find in all of Bilstein's range was the short body 10" travel, AK7110SB. I don't expect to ever go beyond running 33s in SUA, so planning for future increase travel wasn't in the cards.
My list of parts-
4 shocks, expect to pay around $700
4+ stem conversion adapters... I want to say w/14mm hole, 2x $17.50 @ man-a-fre
Dodge truck bushings for '69-93 truck, 1" spring eye
This is about a 2 banana job, mostly in figuring out how to mount things. Not a bolt up job.
After finding a post in the 80s forum, I decided to only use the front top heim joints that come on either end of each shock. The rest I converted to bushings, mostly for ease of use. I have 4+ U-bolt flip kits on each corner and that's how things worked out. The 4+ kit for the 60 uses 16mm mounting surfaces. The top rear OEM mounts for a 62 is 19mm. I had to drill out two bushings to fit the rear upper mounts and that was another adventure to find a 3/4 bit that would work (don't bother a gradual hole increase for poly bushings, just go for it).
Now that I know, I would have built the front stem adapters out of square tube. The adapters from 4+ have a massive vertical bolt.. 7/8", and is just a pain to deal with finding a bit to hone out the OEM mount. I'm not sure why such a huge bolt is needed.
I'd like to find a better way to do the bushings, but was limited to a size that fit and what form it came in. Ideally I wanted to find two hat-shaped ends and sandwich them together with a metal inner sleeve. Prothane sells something that might work if I cut the ends down, but I just went with what I found at the local 4x4 shop. Why are all my projects the weirdest thing a counter jockey has ever seen?
what comes in the box.. including 4 bushing rings, one goes on either side of each heim (i used 3 per top front shock to get spacing right with the stem adapters)
shot of the poly bushings used
easy end
with clip removed
this clip is more difficult.. see how the ends are formed?
my makeshift press bits.. 8mm and 25mm sockets
shade tree in action (a press would work better, be careful of the top shock housing)
what I came up to remove the clip.. prevent the clip from spinning with vice grips and pry the end I could get on with a small screwdriver... there has to be an easier way
vice grips don't mar up the end that bad.. nothing some emery cloth or die grinder can't correct
another angle
bushing fits
shot with a spare mount pin... this could be mounted better, but should serve to keep the end in place
very close in length to OME, my stock bumpstop should hit before the shocks bottom out according to measurements
front mounted, need to swing the clamps around but they don't interfere with anything
rear resevoirs clamped in.. my 3" exhaust is going to move so I might make a few adjustments then
and a few pics at different angles
Last edited:
")


 ) so whatever gets done will have to do for my 3-week Colorado trip


