
Cool, thanks for the insight.
Navigation
Install the app
How to install the app on iOS
Follow along with the video below to see how to install our site as a web app on your home screen.
Note: This feature may not be available in some browsers.
More options
Style variation
You are using an out of date browser. It may not display this or other websites correctly.
You should upgrade or use an alternative browser.
You should upgrade or use an alternative browser.
Build Finally got my own...Meet BeBe
- Thread starter gregnash
- Start date
Member Builds and Stories
This site may earn a commission from merchant affiliate
links, including eBay, Amazon, Skimlinks, and others.
- Thread starter
- #1,302
Fel... this might help with some understanding... Which welder is for me?Cool, thanks for the insight.
- Joined
- Jun 21, 2011
- Threads
- 238
- Messages
- 22,264
- Location
- Redding, California
- Website
- trail-tailor.com
It may or may not pop the circuit more I think that depends on what you are welding and how much duty cycle it is pulling. I am no expert at this so by all means do your own research and talk with the pros like Jason (@reevesci ) which I have done a fair bit of to figure things out.
Just from what I have seen, MIG will give you more control of what you are doing than stick. Stick is also basically flux core, so you will have slag that you need to chip off once you are done welding. The 225 is the old school, tombstone arc welder. My understanding is they are great for larger, thicker applications (like if you were doing heavy metal repair or maybe frame repair) but not so great for thin sheet metal (like the body panels which are 20ga-ish). Most ARC welders also require a strike to initiate the spark and weld so that makes it more difficult to control in those fine motor skills sections.. If you can, and only plan on stuff like body work then a small 110v MIG should do you fine.
Never used stick on sheet, ever... The arc strike will blow through the thin sheet more often than not. Plus its DIRTY (slag/residue) and causes cleaning and body filler issues if not properly taken care of.
Every welding process has its pros and cons. MIG (GMAW) is 99% used in a controlled atmosphere, SUCKS outdoors. Stick (SMAW) is more for outside welding, but done inside frequently. TIG (GTAW) is very controlled, the cleanest and arguably the strongest (But the slowest process of all).
Bodywork -- MIG or TIG
Pharmaceutical or food grade industrial-- TIG
Gas/Oil field pipe and structural -- Stick
J
Yup that is what I am talking about @mcguirejohnson .... What size steel did you use?
I used a piece of 16 gauge steel. I can't remember If I cut it off a piece of flat plate, or if I bought the piece as is. From the edge to the body is about 5/8"
- Thread starter
- #1,305
Perfect!! So it sticks out from the body, to hold the gasket, approximately 5/8"? Is that correct?I used a piece of 16 gauge steel. I can't remember If I cut it off a piece of flat plate, or if I bought the piece as is. From the edge to the body is about 5/8"
Yessir. I'd double check how much the stock piece stick out and go from there. And for what its worth, when I weld body panels or any thin gauge steel for that matter I tend to stick with a tacking pattern so that the steel can cool and prevent blowing through and or warping. So say tack both ends, then tack the center and just keep that pattern till the whole thing is welded solid.Perfect!! So it sticks out from the body, to hold the gasket, approximately 5/8"? Is that correct?
- Thread starter
- #1,307
Yeah I planned to try and replicate it as much as possible so planned on spot welding it in place and then getting seam sealer and using that around the perimeter instead of trying to weld the entire thing.
That is what to do^^^. I seam welded my fj55 halfcab. prolly have 300# of additional weight in wire alone...
- Thread starter
- #1,309
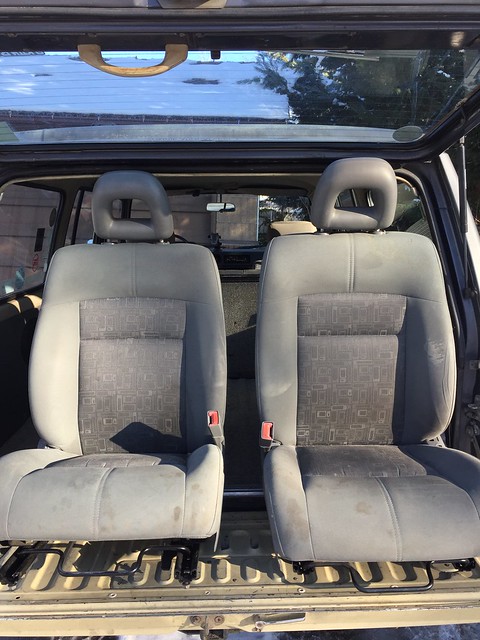
Well finally finished cleaning the seats and have to say while they aren't perfect and could probably use a couple more go throughs with the shampoo'r I am done with doing that. The passenger seat finally dried out after I brought it in the house and hit it one last time (still had a bunch of shampoo residue on it).
Last night I decided to take a stab at getting the butt warmers the wife got me as part of my xmas gift installed. I have to say that the upholstery for the PT Cruiser seats comes apart to give you access SUPER EASY! The top and bottom both have separate "clips" that pop up that are what cause tension on the upholstery. These are actually sewn into the upholstery so you want to be somewhat careful when you do it but seems like they are pretty sturdy.
Once the that is unclipped you can then just work it back between the crease of the back and bottom pans and that will give you access. Don't worry I will document a little better when I do my drivers seat. Kinda like the OP did in the PT Cruiser seat swap thread, I used the passenger as an informative one to get the other done properly for documentation.
Basically once that is done you can easily slide your hand between the foam and the upholstery. Since the seat warmers that I got are a cut to fit type, I figured out how far I could go and cut the excess off. Then I unpeeled the stickers that cover the adhesive and put them back down to make things a little easier when I install them (instead of trying to blindly find a corner and unpeel it). From there I just pushed them into place, found the edge of the adhesive cover and started from front to back and peeled it off. Then smoothed everything out. Awesome part is that my 07 cruiser seats already had a hole in the seat pan to pass wires through for the butt warmer! Top is a different story for that unfortunately..
Needless to say here they are. Both with multiple shampooings.
 Untitled by Greg Fisicaro, on Flickr
Compared to when I first got them.
 Untitled by Greg Fisicaro, on Flickr
Drivers seat so you can see just how dirty they were. While the PT had only been there for a few weeks (wanna say it was given to the PnP on the 28th of December) I have a feeling that everyone that looked at it kept leaving the doors open and what not to allow the elements in.
 Untitled by Greg Fisicaro, on Flickr
 Untitled by Greg Fisicaro, on Flickr
Last night I decided to take a stab at getting the butt warmers the wife got me as part of my xmas gift installed. I have to say that the upholstery for the PT Cruiser seats comes apart to give you access SUPER EASY! The top and bottom both have separate "clips" that pop up that are what cause tension on the upholstery. These are actually sewn into the upholstery so you want to be somewhat careful when you do it but seems like they are pretty sturdy.
Once the that is unclipped you can then just work it back between the crease of the back and bottom pans and that will give you access. Don't worry I will document a little better when I do my drivers seat. Kinda like the OP did in the PT Cruiser seat swap thread, I used the passenger as an informative one to get the other done properly for documentation.
Basically once that is done you can easily slide your hand between the foam and the upholstery. Since the seat warmers that I got are a cut to fit type, I figured out how far I could go and cut the excess off. Then I unpeeled the stickers that cover the adhesive and put them back down to make things a little easier when I install them (instead of trying to blindly find a corner and unpeel it). From there I just pushed them into place, found the edge of the adhesive cover and started from front to back and peeled it off. Then smoothed everything out. Awesome part is that my 07 cruiser seats already had a hole in the seat pan to pass wires through for the butt warmer! Top is a different story for that unfortunately..
Needless to say here they are. Both with multiple shampooings.
Untitled by Greg Fisicaro, on FlickrCompared to when I first got them.
Untitled by Greg Fisicaro, on FlickrDrivers seat so you can see just how dirty they were. While the PT had only been there for a few weeks (wanna say it was given to the PnP on the 28th of December) I have a feeling that everyone that looked at it kept leaving the doors open and what not to allow the elements in.
Untitled by Greg Fisicaro, on FlickrUntitled by Greg Fisicaro, on FlickrI wouldn't worry about getting the seat fabric spotless. I've alwats draped nice gray bath towels over all my seats in all the cars I've had with the headrest poked through the top to hold them up.
Much more comfortable, easy to throw in the washing machine, absorbent and soft. And when they get dodgy in a few years just replace them. I get my "seat covers" at Bed Bath & Beyond -ha-
The original fabric on my seats still looks like new.
Much more comfortable, easy to throw in the washing machine, absorbent and soft. And when they get dodgy in a few years just replace them. I get my "seat covers" at Bed Bath & Beyond -ha-
The original fabric on my seats still looks like new.
- Thread starter
- #1,311
LOL... my parents used to do this with all their cars until they upgraded to leather and we all were old enough to no better than to spill in the car. Weird thing with these seats is the headrests dont come out?! At least not that I have been able to find. Button depressed and pulling hits a block or some sort.I wouldn't worry about getting the seat fabric spotless. I've alwats draped nice gray bath towels over all my seats in all the cars I've had with the headrest poked through the top to hold them up.
Much more comfortable, easy to throw in the washing machine, absorbent and soft. And when they get dodgy in a few years just replace them. I get my "seat covers" at Bed Bath & Beyond -ha-
The original fabric on my seats still looks like new.
Eventually I may look at some easy seat covers but that will be down the road.
Oh yeah and with the wife being gone this coming week I am hoping to get this completely taken care of during that time since I will have her car!!!


- Thread starter
- #1,312
And they are in!!! Took about three days of working off and on from 5pm to 9pm. That includes getting the drivers seat butt warmers installed (bought an hour or so time). I have to say that these things are TALL. I am 6' tall and I am now a few inches from the ceiling.
Oh and Louie approves.


Oh and Louie approves.
- Thread starter
- #1,313
Referencing for work to be done in coming weeks.
Bodywork advice, rear hatch perimeter seal
Bodywork advice, rear hatch perimeter seal
- Thread starter
- #1,314
And posting this for additional taggings.
Emission Computer testing?
Since I rebuilt the top end in January of 2016 I had killed the ICS. Well apparently that was not the only thing that died at that time because it would not run without the Green Wire Mod (grounding ICS to carb body). I don't remember if I actually ever tested the computer to see if it was that or something else but finally the other day after reading some other threads I decided to test.
Test light shows that the 12v from the plug is hot when the key is turned however after further investigation it seems that the ICS and ECM (Emissions Control Module) work as a switched ground allowing it to turn on and off with the coil and vacuum switch. This helps with deceleration and not flooding the cylinders with gas and what not. what I am wondering is if the ECM was somewhat working (even with the Green Wire Mod) until after Thanksgiving when I ran over the hill and then started having massive fuel economy issues.
Needless to say I found a ECM on ebay, that is supposedly good from the seller, for $20 so I splurged and purchased it. When the ICS goes bad or starts having issues there are others that have stated that normally it is because the ECM has tanked and needs to be replaced.
- Thread starter
- #1,315
Well got the new ECM today in the mail. Wife and I had been out of town all weekend so we got home and took care of things. After a few and while there was still light I handled the ECM. Since I had the ICS grounded to the carb body and I had an old weatherpack connector sitting around I decided to get that handled. I went started working on that and while I was letting the water resistant shrink tube cool I pulled the kick panel. Only to $&%^#* find that the ECM had come unplugged!!!
I finished up the weather pack connector and connected everything and sure as $&#% it fired right up. So looks like I have a spare ECM for some day down the road.
I finished up the weather pack connector and connected everything and sure as $&#% it fired right up. So looks like I have a spare ECM for some day down the road.
great fix , when your dog is on the ground not moving DO NOT REPLACE IT!!1!
It might be sleeping
, when your dog is on the ground not moving DO NOT REPLACE IT!!1!It might be sleeping
- Thread starter
- #1,317
LOL... believe me after all the agonizing and what not I wanted to take the screwdriver that I had with me and shove it into my temple... Such a dumb thing, now hopefully she will be a little happier.great fix
It might be sleeping
- Thread starter
- #1,318
So the truck has been running great the last few days after "fixing" the ECM issue...
She seems to have a bit more pep to her while driving and definitely idles and drives smoother. Happy that I got that taken care of while I had some nice weather because as of about 3am this morning the next set of storms started rolling in and the wind has been howling and rain pounding. Bought some split loom last night so I could cover up the weatherpack wiring for the ICS but never got to it.
Last night was all about getting the "butt warmers" wired up. Was trying to figure out if there was an easy plug that I could utilize that would allow me one of two options;
a) off an illumination plug so that way it would only come on with lights being on, or
b) off an ignition plug so that they would only come on with ignition.
With time pretty short to work on the truck I did what I could, I found the bulb to my glove box (always forget there is a little light in there) was burnt out and really it seemed like the switch didn't work. So I found which wire was hot on that and created a little jumper line to my BlueSeas busbar. From there I put some holes (slight egged out 3/4" holes) for the switched into my SmittyBilt console, ran the lines under the passenger side carpet and up to the glovebox and BAM I now have butt warmers.
First test ride with them was on the way to work this morning and they are oh so nice!! Will post up some pics later once I get the chance. Next on the agenda will be working on the spare rear passenger door to convert the color from white to grey and pull the dent out. Since I am having a bitch of a time finding a drivers door locally I am going to have to see about repairing the rust on it. But first, to grab some L-Bracket flat bar to replace the rear lower gate lip!
- Thread starter
- #1,319
Oh and finding out where my damn drivers floorpan leak is coming from.. All these storms have it sopping wet down there, I know that the windshield gasket is part of it but have a feeling there is another culprit somewhere.
@gregnash ,
Hey I have that update for you on the mpg. Right now the milage ranged varies but keep in mind that I have five tires that weigh 40 lbs over the stock size, two custom bumpers with a winch and a cargo box on top of the rig.
Highway:
On my recent skiing trip through the mountain out here I was surprising happy at getting the results I was getting. Elevation ranged from 4500 to 9000 feet with the passes on I-70 and US road/state road.
Consistently as I would stop for gas the average in the 12's. On one trip it was as high as 12.83/mpg
The most astonishing time I filled up on my way to @reevesci house for a quick diagnosis of a fuel delivery problem I was on I-80 going west.
The wind and gust where hitting 40+ knots over the deck and I had some gust that felt like 70. Mind you I was only going about 50 mph for safety and the 2F hit it's wall. Milage calc to be 11.75/mpg.
For around town in GJ I'm hitting no better that 8.9/mpg. I would like to play around and see if I can get better but feel it's not worth it.
Hope this helps, Jim.