
Here's some tips about how to make sure you set up your system so that it charges properly and you get the most out of your system...
It's simple as long as you use the right bits, and put it together the right way……
Auxiliary Batteries.
Basically you should be thinking about how big a battery can you fit, and less about how small and cheap a battery you can get away with, the larger the battery the less percentage wise you will be draining it, and the longer it will last both in power usage and battery life, with the extra advantage of more capacity when needed.
Hot Tip … Most people don't realise that Batteries love being fully charged, they don’t like being discharged at all, they like it when you only take them down to 50% of their capacity and then top them back up soon after, they will lose capacity and die quickly when left discharged for long lengths of time.
Deciding on what size and type of Auxiliary Batteries to use is really a whole other story, I only use quality AGM (Absorbed Glass Matt) batteries as they charge FASTER off an alternator and they can withstand being drawn down to 80% without reducing their life versus a standard lead acid deep cycle only at 50% - so for the same AMP hour rating, you get 30% more USABLE AMP Hours. I use a 90 AMP Hour AGM that was about $350 AUD - that gives me up to 72 USABLE amp hours versus a 90 amp hour led acid (not much different in cost for a good one) which would only give me 45 amp hour usable and that is if it was fully charged by a smart charger(You wont fully charge a standard lead acid off an alternator - you will only generally get to 80% charged at best by an alternator so you really would only have 26 usable amp hours max - where as an AGM will get real close to 100% charged by an alternator) - when you understand this concept - it is cheaper in the long run to go AGM as you wont shorten the life when you drain them down like you will with a lead acid because of the above.
The battery isolator is a device that allows the cars alternator to recharge the auxiliary battery while protecting the cars starting battery from discharging, if these batteries are simply linked together you run the very real risk of draining them both to a level that you can not start the engine, and there are many other reasons why you should not do it this way.
There are many different methods used to isolate the batteries, most use some form of solenoid, this is an electronic switch that can handle large (charging) currents, much more than standard switches can, and they are operated by applying a small amount of power to them, this is turn actuates a solenoid that links the batteries together so that large currents and be passed between the batteries.
There are many ways to operate these battery isolators, some much better that others.
The cheapest way is that you manually turn them on and off, the problem with this is that sooner or later people will forget to turn the switch on (no charge goes into the aux battery) or off at the right time (and then the starting battery gets drained as well).
Another way of doing it is to have the solenoid turn on as soon as you start the engine up, and turn off when you shut down the engine, this has been the cheap way of doing it for many years, but it’s far from ideal.
I believe the best way for most situations is to use a VSR (voltage sensitive relay) activated solenoid, and the one I like the best and use is one of the most inexpensive ones, it does the job very well, and as good as, and sometimes better than many of the very expensive ones too which is from Redarc.
The way it works is that when you start your engine the Redarc is first letting your starter battery recover it’s charge, it lets it achieve 13.2 volts, at this point that battery has about as much charge in it as it's going to get, once the Redarc sees this 13.2 volts it closes the contacts on the solenoid, this links both batteries together for charging purposes.
The next thing the Redarc is looking for is 12.5 volts, in other words you have shut down your engine and started to draw power from the batteries, so very quickly the voltage across both batteries will fall to 12.5 volts, as soon as the Redarc sees this voltage it will open the solenoid contacts and isolate the batteries, leaving your starting battery for starting and your auxiliary battery for auxiliarying....
The Redarc Smart Start battery isolator is rated at 100Amps constant duty with a surge capacity of 400Amps, it has silver contacts unlike some of the cheaper ones that have copper (silver is much better), the Redarc also has spike protection so it won’t upset the delicate electronics on newer vehicles, you can pick up a Redarc at $150 AUD
The Wiring & Cable is the other most important ingredient.
Wiring…this is without doubt where many people get it wrong and end up with a system that may work, but nowhere near as well as it could and should, If you do it right, you can double the usable capacity of your auxiliary batteries over and above what many people normally have, and help the batteries charge much faster and last longer too.
Understand that when charging from vehicle alternator one of your biggest enemies is voltage drop, you need to have the highest possible voltage at the auxiliary battery, this will allow it to charge as quickly as possible, and as fully as possible.
A lot standard set-ups that have been fitted by the so called professionals is where they use twin 6mm auto cable (really 4.59mm²), this is next to useless for fast deep charging.
A very basic explanation would be, that the larger the current draw, the larger the wire needs to be, and the further the distance the wire needs to run, the increasingly larger again the wire needs to be.
Use no less than 6 B&S cable.
A very important thing to consider is where you are going to place your batteries, standard open wet cell batteries give off hydrogen gas when they are charging and discharging, this is a very explosive gas, remember the Hindenburg, there is no problem if you are putting the auxiliary battery under the bonnet of your vehicle, or mounting it somewhere on the chassis with good ventilation to the open air.
Just throwing them under a seat is far from ideal and just down right dangerous, even worse some people place battery chargers and even inverters next to these batteries, just think about that for a moment, a hydrogen producing device next to a possible spark producing device.
Wet cell batteries must be housed in a properly vented area, all but Gel and AGM batteries must be well vented externally away from any ignition source and from human habitat areas, hydrogen gas rises so sealed battery enclosures should be vented externally top and bottom.
If you need to place batteries inside vehicles, then AGM batteries should be seriously considered here as they are totally sealed, AGM batteries if placed in an enclosure only need to be vented to atmosphere not necessarily vented externally.
Putting AGM batteries under the car bonnet is fine as far as safety goes, the only consideration here is that AGM’s and Gel batteries should be kept away from the extreme temperatures of turbochargers, and if they must be placed close to the turbocharger then heat shields should be used. There is a lot of byth about this heat subject when people look at the specs - the specs on heat with AGM's are CHARGING TEMPS - ie. temps that result from charging not Ambient temps.
Now it needs to be wired up, this is much simpler than most people think, it is not complex, and as long as you take care almost anyone can do it.
Some more tips………
Do not install the maxi fuses until the last thing, when you have completely finished all the cable runs and tightened up all connections. Make sure you use maxi fuses not standard blade fuses which cause resistance.
Although not always totally necessary (some people can use the chassis for earth return), but it really is best to run the earth/negative cable all the way between the start and auxiliary batteries, for the extra few dollars in cable it really is worth it.
If you can mount the Redarc close enough to the start battery you can use the maxi fuse as the link, there for saving having to add a short bit of cable onto one end of the fuse cable.
When running the cables between the batteries you should take great care with where you place the cable, making sure that it won’t rub or be cut through, also be careful to keep it clear of sharp corners etc, and if the auxiliary battery is going to be placed anywhere other than under the bonnet, you should seriously consider using a protective covering like split convoluting tubing and secure it well with clips or cable ties at well spaced intervals.
The cable should also be protected against short circuit, and I have found the most economical way to protect the cable is with Maxi fuses of 100A, an all too common mistake made by many people and even some auto sparkies is that they only fuse at one battery (normally the starting battery), but the cable needs to be protected from both ends, i.e. a fuse at both batteries, after all it is being feed from both batteries.
All cable lugs used with the 6 B&S cable are far too big to be crimped with standard crimping tools, so they should be crimped by an auto electrician, or you can solder them if you have a gas torch, they do take a lot of heat to solder on properly - and you should be aware that Soldering is not the ideal as Soldered joints in an environment with constant vibration has potential for problems unless the soldering is done very well with high temps - even then, professional crimping is my preferred method.
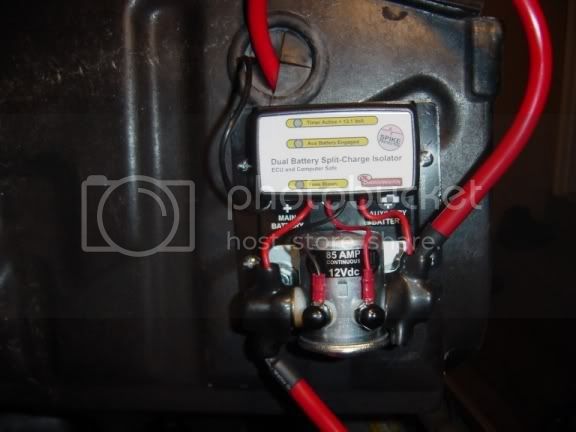
The Redarc battery isolator has two wires coming from it, one blue and one black, and it has two terminals for attaching heavy cable, now the blue wire is rarely used, so lets forget about that one for the time being, the black one is simply an earth that should be secured under one of the screws that you mount the Redarc to the vehicle with.
Now with the terminals, the one with the small black box attached to it is where you connect the cable from the start battery positive terminal, and the other terminal gets connected to the cable that goes to the positive on the auxiliary battery, it's that simple, next the earth/negative cable simply gets connected to the negative terminal of both batteries, see easy.............
Now the blue wire coming from the Redarc, most people don’t need to use this wire, is for back-starting(starting off both batteries in an emergency), and/or putting a indicator light on the dash of your car. If you want an LED light to come on when the smart charger is linking the batteries for charging then run a small 2mmsq wire from that terminal to one side of an LED and the other side of the LED to a ground. If you want a remote button on the dash(there is one on the Redarc already - but obviously that is under the bonnet) then connect a 2mmsq wire to this terminal and run it to a momentary sprung switch on the dash. Then, run the other side of the switch back to the positive terminal of the auxiliary battery. When you want to join both batteries for an emergency start - hold the button down while cranking and then release when the car is started.
I have no association with Redarc products - this is based on experience of the best type of unit I have found.
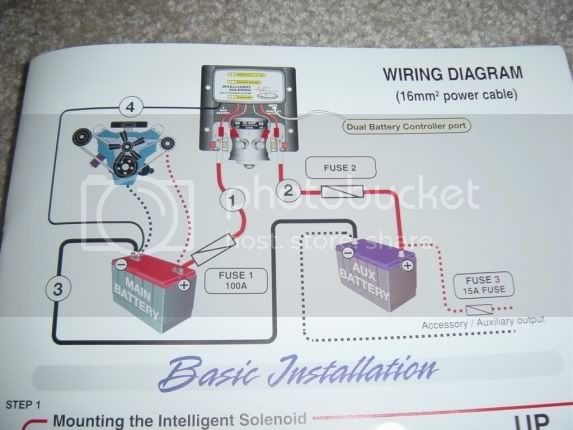
Below is an example of how an auxiliary battery set-up may be done - (without the switch or LED)

It's simple as long as you use the right bits, and put it together the right way……
Auxiliary Batteries.
Basically you should be thinking about how big a battery can you fit, and less about how small and cheap a battery you can get away with, the larger the battery the less percentage wise you will be draining it, and the longer it will last both in power usage and battery life, with the extra advantage of more capacity when needed.
Hot Tip … Most people don't realise that Batteries love being fully charged, they don’t like being discharged at all, they like it when you only take them down to 50% of their capacity and then top them back up soon after, they will lose capacity and die quickly when left discharged for long lengths of time.
Deciding on what size and type of Auxiliary Batteries to use is really a whole other story, I only use quality AGM (Absorbed Glass Matt) batteries as they charge FASTER off an alternator and they can withstand being drawn down to 80% without reducing their life versus a standard lead acid deep cycle only at 50% - so for the same AMP hour rating, you get 30% more USABLE AMP Hours. I use a 90 AMP Hour AGM that was about $350 AUD - that gives me up to 72 USABLE amp hours versus a 90 amp hour led acid (not much different in cost for a good one) which would only give me 45 amp hour usable and that is if it was fully charged by a smart charger(You wont fully charge a standard lead acid off an alternator - you will only generally get to 80% charged at best by an alternator so you really would only have 26 usable amp hours max - where as an AGM will get real close to 100% charged by an alternator) - when you understand this concept - it is cheaper in the long run to go AGM as you wont shorten the life when you drain them down like you will with a lead acid because of the above.
The battery isolator is a device that allows the cars alternator to recharge the auxiliary battery while protecting the cars starting battery from discharging, if these batteries are simply linked together you run the very real risk of draining them both to a level that you can not start the engine, and there are many other reasons why you should not do it this way.
There are many different methods used to isolate the batteries, most use some form of solenoid, this is an electronic switch that can handle large (charging) currents, much more than standard switches can, and they are operated by applying a small amount of power to them, this is turn actuates a solenoid that links the batteries together so that large currents and be passed between the batteries.
There are many ways to operate these battery isolators, some much better that others.
The cheapest way is that you manually turn them on and off, the problem with this is that sooner or later people will forget to turn the switch on (no charge goes into the aux battery) or off at the right time (and then the starting battery gets drained as well).
Another way of doing it is to have the solenoid turn on as soon as you start the engine up, and turn off when you shut down the engine, this has been the cheap way of doing it for many years, but it’s far from ideal.
I believe the best way for most situations is to use a VSR (voltage sensitive relay) activated solenoid, and the one I like the best and use is one of the most inexpensive ones, it does the job very well, and as good as, and sometimes better than many of the very expensive ones too which is from Redarc.
The way it works is that when you start your engine the Redarc is first letting your starter battery recover it’s charge, it lets it achieve 13.2 volts, at this point that battery has about as much charge in it as it's going to get, once the Redarc sees this 13.2 volts it closes the contacts on the solenoid, this links both batteries together for charging purposes.
The next thing the Redarc is looking for is 12.5 volts, in other words you have shut down your engine and started to draw power from the batteries, so very quickly the voltage across both batteries will fall to 12.5 volts, as soon as the Redarc sees this voltage it will open the solenoid contacts and isolate the batteries, leaving your starting battery for starting and your auxiliary battery for auxiliarying....
The Redarc Smart Start battery isolator is rated at 100Amps constant duty with a surge capacity of 400Amps, it has silver contacts unlike some of the cheaper ones that have copper (silver is much better), the Redarc also has spike protection so it won’t upset the delicate electronics on newer vehicles, you can pick up a Redarc at $150 AUD
The Wiring & Cable is the other most important ingredient.
Wiring…this is without doubt where many people get it wrong and end up with a system that may work, but nowhere near as well as it could and should, If you do it right, you can double the usable capacity of your auxiliary batteries over and above what many people normally have, and help the batteries charge much faster and last longer too.
Understand that when charging from vehicle alternator one of your biggest enemies is voltage drop, you need to have the highest possible voltage at the auxiliary battery, this will allow it to charge as quickly as possible, and as fully as possible.
A lot standard set-ups that have been fitted by the so called professionals is where they use twin 6mm auto cable (really 4.59mm²), this is next to useless for fast deep charging.
A very basic explanation would be, that the larger the current draw, the larger the wire needs to be, and the further the distance the wire needs to run, the increasingly larger again the wire needs to be.
Use no less than 6 B&S cable.
A very important thing to consider is where you are going to place your batteries, standard open wet cell batteries give off hydrogen gas when they are charging and discharging, this is a very explosive gas, remember the Hindenburg, there is no problem if you are putting the auxiliary battery under the bonnet of your vehicle, or mounting it somewhere on the chassis with good ventilation to the open air.
Just throwing them under a seat is far from ideal and just down right dangerous, even worse some people place battery chargers and even inverters next to these batteries, just think about that for a moment, a hydrogen producing device next to a possible spark producing device.
Wet cell batteries must be housed in a properly vented area, all but Gel and AGM batteries must be well vented externally away from any ignition source and from human habitat areas, hydrogen gas rises so sealed battery enclosures should be vented externally top and bottom.
If you need to place batteries inside vehicles, then AGM batteries should be seriously considered here as they are totally sealed, AGM batteries if placed in an enclosure only need to be vented to atmosphere not necessarily vented externally.
Putting AGM batteries under the car bonnet is fine as far as safety goes, the only consideration here is that AGM’s and Gel batteries should be kept away from the extreme temperatures of turbochargers, and if they must be placed close to the turbocharger then heat shields should be used. There is a lot of byth about this heat subject when people look at the specs - the specs on heat with AGM's are CHARGING TEMPS - ie. temps that result from charging not Ambient temps.
Now it needs to be wired up, this is much simpler than most people think, it is not complex, and as long as you take care almost anyone can do it.
Some more tips………
Do not install the maxi fuses until the last thing, when you have completely finished all the cable runs and tightened up all connections. Make sure you use maxi fuses not standard blade fuses which cause resistance.
Although not always totally necessary (some people can use the chassis for earth return), but it really is best to run the earth/negative cable all the way between the start and auxiliary batteries, for the extra few dollars in cable it really is worth it.
If you can mount the Redarc close enough to the start battery you can use the maxi fuse as the link, there for saving having to add a short bit of cable onto one end of the fuse cable.
When running the cables between the batteries you should take great care with where you place the cable, making sure that it won’t rub or be cut through, also be careful to keep it clear of sharp corners etc, and if the auxiliary battery is going to be placed anywhere other than under the bonnet, you should seriously consider using a protective covering like split convoluting tubing and secure it well with clips or cable ties at well spaced intervals.
The cable should also be protected against short circuit, and I have found the most economical way to protect the cable is with Maxi fuses of 100A, an all too common mistake made by many people and even some auto sparkies is that they only fuse at one battery (normally the starting battery), but the cable needs to be protected from both ends, i.e. a fuse at both batteries, after all it is being feed from both batteries.
All cable lugs used with the 6 B&S cable are far too big to be crimped with standard crimping tools, so they should be crimped by an auto electrician, or you can solder them if you have a gas torch, they do take a lot of heat to solder on properly - and you should be aware that Soldering is not the ideal as Soldered joints in an environment with constant vibration has potential for problems unless the soldering is done very well with high temps - even then, professional crimping is my preferred method.
The Redarc battery isolator has two wires coming from it, one blue and one black, and it has two terminals for attaching heavy cable, now the blue wire is rarely used, so lets forget about that one for the time being, the black one is simply an earth that should be secured under one of the screws that you mount the Redarc to the vehicle with.
Now with the terminals, the one with the small black box attached to it is where you connect the cable from the start battery positive terminal, and the other terminal gets connected to the cable that goes to the positive on the auxiliary battery, it's that simple, next the earth/negative cable simply gets connected to the negative terminal of both batteries, see easy.............
Now the blue wire coming from the Redarc, most people don’t need to use this wire, is for back-starting(starting off both batteries in an emergency), and/or putting a indicator light on the dash of your car. If you want an LED light to come on when the smart charger is linking the batteries for charging then run a small 2mmsq wire from that terminal to one side of an LED and the other side of the LED to a ground. If you want a remote button on the dash(there is one on the Redarc already - but obviously that is under the bonnet) then connect a 2mmsq wire to this terminal and run it to a momentary sprung switch on the dash. Then, run the other side of the switch back to the positive terminal of the auxiliary battery. When you want to join both batteries for an emergency start - hold the button down while cranking and then release when the car is started.
I have no association with Redarc products - this is based on experience of the best type of unit I have found.
Below is an example of how an auxiliary battery set-up may be done - (without the switch or LED)


")