CV Boots Replaced with directions (1 Viewer)

This site may earn a commission from merchant affiliate
links, including eBay, Amazon, Skimlinks, and others.

Boot clamps

I've done well with crimp clamps from NAPA. They also sell the crimpers for ~$20. With the screw-less design, I have less concern with clamps causing a balance issue.
 
2001LC said:
I've done well with crimp clamps from NAPA. They also sell the crimpers for ~$20. With the screw-less design, I have less concern with clamps causing a balance issue.

I have had various screw type clamps over the past 90K miles. No balance issues at all. I would not even consider it when choosing a clamp style. Fwiw.
 
bluecruiser said:
I have had various screw type clamps over the past 90K miles. No balance issues at all.

What bluecruiser said. I have pfran's CV boot clamp kit with a few hundred miles on them with no issues whatsoever. I did offset the clamps 180 degrees to minimize any potential problems. YMMV.
 
clamps; one small part in the balance of the system

I’m just very anal when it comes to balancing "most things for that matter". I’ve not been 100% happy with any balance job, in fact, I now have them road-force balanced. My last set had block hop on at least one tire, which was found after 50,000 miles of voicing my concern to Discount Tire. They and Michelin made good on it and bought me a new set. I suspect this set of Michelin’s has tread wobble on two tires, I haven’t press this issue yet. I’m very carful on all components of the drive train, from drive shaft(s) out to the wheel hub cap(s), so I don't confuse the issue.
 
Last edited:
just did this and would like to add a little to it

don't forget to lube the spindle once the axle is out

if you use a sharpie for your reference marks do not use brake cleaner as your marks will vanish

if you are looking for the right kind of grease to add to the boots just do yourself a favor and replace the cv boots. if your factory cvs are leaking then the boots have already lost their elasticity and they are warning you ahead of time to replace them. mine tore about six months after they showed signs of leakage at the bands.

you need to remove the plastic undercarriage cover to get to the inner cv to pop it out.

the upper ball joint can be removed easily with a hammer on the flat spot(see pic) as stated by gottagetone. loosen the nut and leave it on so when it pops it stays in place.

the only way I was able to get the axle out without removing the lower ball joint was to remove axle from the diff tube first then the spindle and had to reinstall the same way spindle first then diff tube.

if you don't have a brass drift and hammer, a regular hammer and a piece of wood work pretty good.

I had to use that hammer and piece of wood to pop the axles out by laying under the truck and hitting the inner axle housing on the ribbed part.

In order to pop the axles back in and since I had to put the spindle side in first I positioned the axle in place(not popped in yet) , reinstalled the upper ball joint bolt, put a jack under the lower arm and jacked up until most of the weight was on the arm which made the axle fairly straight then I was able to take a wooden dowel and hammer on the axle end and hammer it in(see pic).

flat spot for popping upper ball joint

IMG_0317.JPG

popping the axle back in after install

IMG_0318.JPG
 
Last edited:
FYI -
You do NOT need to remove the brake calipers to remove the CV axles! I learned this the hard way. Save yourself some time and skip step #5 in the OP.
Just pay close attention to the brake line when breaking the UCA knuckle free. It will pop and the axle hub will drop towards you stretching the brake line close to its limit. You can turn the axle hub towards the rear of the truck and leave plenty of slack in the brake line. Also watch the brake line when pulling the CV axle, although I didn't even come close to it.

Aj

I would recommend you do. That way if something slips you don't tear a line or shear anything.
 
In the middle of this and just wanted to add

If you're in the rust belt Do not remove the speed sensor


I broke mie trying to get it out. Better option is to undo the wiring harness for the speed sensor and let it hang down.
 
More CV removal/install questions

I'm tacking these questions on to this very informative thread to keep all the info in one place. This will be the fourth reboot I've done between two 100 series in the last 3 months, but I've run into these problems in the two of the four (the other two had no issues):

1. One of the CV axles will not budge from the diff. I've tried a pry bar between the diff and the tulip, and as I saw some FJ guys doing, attaching a strap to the ring on the tulip and pulling. Is it just a matter of brute force and a pry bar, or is there another trick? I was able to do the other three easily with a pry bar. Any ideas to get this thing free?

2. One of the diff seals won't stop leaking. Just a few drops here and there, but still a leak. As suggested in other threads, I've tried: a new diff seal, polishing the diff port and CV with a Scotchbrite pad, greasing the CV before install, and using black RTV. The leak slowed with the RTV but did not stop. I ordered another new diff seal in case I buggered up the other, but I am looking for any more tips before I dig into it again.

I've spent a lot of hours on these and I'm hoping to be done with them soon to move on. Any ideas are much appreciated.
 
On removing the axle, a pry bar and well placed short 2x4 may help get it out. I seem to remember a post about the inside end ring being loose or bent but don't remember the solution.

If the seals are set a little too deep they will leak. Replaced the passenger side two times before it stopped leaking. Good idea to use OEM seals as they seem to work best. Had issues with a NAPA seal that was too large and one from Advance that was too small.

I took another's advice on the seals and went very slow when installing. It worked just fine with no leaks.
 
Use bigger pry bar.

You many have issue with out-of-round (leak). No RTV should be needed, use old seal as tool to replace or get SST. Use drop of gear lube on rim of seal when installing.
 
Last edited:
Thanks for the responses. I set a new OEM seal too deep the first time and had to pull it out. I might have damaged it in doing so I got another new OEM seal to replace it. My usual practice is to use diff oil to lube the diff port and spindle. Hopefully that will do it with a new seal.

Good point about the pry bar. I have a compact and a gooseneck. Neither are super rigid. I got lured into thinking they should work since they did three times before. I'll give it another go with a bigger pry bar and new OEM seal after the holiday.
 
Good idea about using a new seal. When removing one it's almost impossible to reuse it without leaks.
 
A few weekends ago I replaced my CV boots on my 99 LX470 which had one split and the other one was leaking. I chose not to disassemble the hubs because vehicle only has 56K. Reboot kits were purchased from Dan at American Toyota for about 30 bucks/side. For reference I used the 2004 FSM that I found here: https://forum.ih8mud.com/100-series-cruisers/375561-pdf-download-lc.html (pages SA-25 through SA-36 found under “Suspension and Axle”)


1. Jack up one side of the vehicle. Remove tire. Keep the side you are working on at least 4” higher to keep from losing differential fluid after pulling axle.
2. Remove the hub dust cap by tapping the seam with a very sharp screwdriver or scraper blade.
3. Remove the outer axle snap ring. New one not included in kit.
4. Remove the ABS sensor and harness (3 screws; 2 are 12m and a 10m holds it in place).
5. Remove the brake caliper (2 bolts) and hang it up out of the way with zip ties.
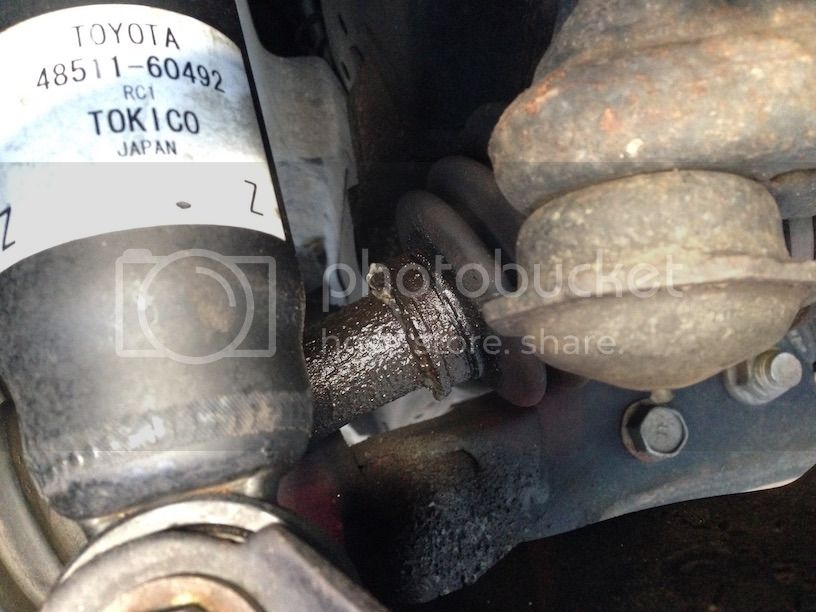
6. Remove the upper ball joint with a pitman arm puller. This usually creates a loud pop when separated.
7. Go underneath and use 2 pry bars to work the inboard joint assembly out of the differential. Be careful not to bend the dust covers. If you do just straighten them prior to assembly.
8. Pull inboard joint assembly out of differential. Now pull outboard joint out of hub.
9. *In order to clear the shock mount and the stabilizer mount I turned the steering wheel to align the outboard boot with maximum clearance between the two.
10. Cut bands off the boots with a 3” air powered cutting disc or tin snips.
11. Place the inboard joint over a small pan to catch grease and cut the boot length-wise with a sharp knife or large scissors.
12. *Remove inner tulip ring next to the balls and cage. (Very important)
13. Now the inboard balls and cage will slide out of the tulip. No need to use a BFH. Note cage direction before removal and marking of matchmarks using a paint pen (see FSM).
14. Remove the inner snap ring that holds the inner race on the shaft.
15. Remove the inner race by striking it with a brass hammer sliding it off the axle end.
16. Clean balls, cage and parts with brake cleaner. *Be careful while cleaning the cage it is extremely sharp and will cut your fingers.
14. Place outboard joint over a pan and cut and remove the boot.
15. *Outboard joint does not come apart. Clean with a can of brake fluid.
16. Position outboard joint and axle shaft vertically to fill with CV grease (larger tube).
17. Tape axle splines with electrical tape to protect boot installation. Install boot. *I chose to use 3/16” smooth band worm-drive hose clamps found here: McMaster-Carr
part #5574K25 4” to 4-3/4” and part #5574K16 1” to 1-5/8”
18. Slide inboard boot over shaft, then cage, note cage direction (smaller end goes first).
19. Remove tape and install inner race with brass hammer and install new snap ring.
20. Reassemble cage with balls while installing it in tulip or use CV grease to hold balls in place. Install new inner ring.
21. Fill assembly vertically with smaller tube CV grease and install boot with clamps.
22. Remove old and install new axle snap ring on the end of axle. Apply grease to snap ring in order to position it with the opening towards the bottom.
23. Insert axle into differential and apply pressure on the inboard tulip until in “locks” in. Look underneath at other axle to insure that full insertion is achieved. Try pulling it out to make sure it is locked in. Driver’s side went in easy. *Passenger side was a 1 ½ hour project which I couldn’t get it to lock in until I ended up tapping a 3’ 2”x2” with a towel on the boot end to lock it in.
24. Insert the outboard joint into the hub. Prior to I added some wheel bearing grease into exposed hub bearing and used a needle tip to insert grease into upper ball joint bottom boot opening.
25. *Pull the upper and lower arms together to set the ball joint by using a small ratchet strap. Torque the ball joint nut to 81 ft lbs. Install cotter pin. Install outer axle snap ring and dust cap.
26. Install brake caliper, abs sensor and tire/wheel.
27. 2 hours later, one side complete, now perform the same on the other.

(*) indicates helpful hints I learned.

1st pic is the Pitman arm puller on the upper ball joint.
2nd pic is the important inboard inner tulip ring removed in order to remove the cage and balls.
Last pic is installed with smooth band hose clamps.

More pics available.
View attachment 423872View attachment 423873View attachment 423874

Hey I've got an issue with mine. I did some off roading and i noticed the other day that my right cv axle is leaking where the axle meets the diff. It looks like the axle simply slid out of place... should I try to just knock it back into place or is there something else that might of happened to bring complications?
 
Thanks for all the info. I used this thread and some common sense to get the job done. Taking it apart was easy. Putting the cv back in was the only challenge for me. I took the tie rod loose from the spindle to give me more room.
ImageUploadedByIH8MUD Forum1434569039.742674.jpg

I did notice some scars on one of the balls. Tell me what you think? I wasn't sure if it mattered that much. I went back together with it anyway.
ImageUploadedByIH8MUD Forum1434569141.529801.jpg
 
Last edited:
ImageUploadedByIH8MUD Forum1434569285.726079.jpg
 
Those ball bearings have had it. You will continue to have trouble and they will eventually destroy the holders and generate a lot of heat breaking down the grease. If it lasts long enough. Suggest you replace the axle(s) with new or reconditioned. There will be noise also.
 
Picked my hundy up from the shop after getting new CV axles today. The job is way above my pay grade. $1400. Ouch, but glad it's done and no worries about it for a while.
 
Hopefully my self-induced misery helps someone out there.

I set out to replace both CV axles' boots in one weekend due to a leaking PS inboard boot:
CV%20Leaking.jpg

Started with the DS (because I'm an idiot and it was closer to the door to the garage). Following the directions in this post it was difficult, but straightforward. Albuquerque, being a Third World city, apparently lacks any source for a brass drift so I used a large Pitman Arm puller to remove the center ball guide which worked like a champ:
CV%20Press.jpg

When I went to install the inner-side small clamp that I hit my first snag as the supplied clamp immediately broke, requiring me to purchase aftermarket clamps from Autozone which worked. Broken clamp:
CV%20Broken%20Clamp.jpg

It was upon attempting to re-seat the axle into the differential that things went full-pear-shaped. Following the directions in this thread I used a cloth-wrapped piece of wood and managed to seat axle while placing a ~1.5" long cut in my brand new boot (too busy cursing to take photographic evidence). So off it came, was re-booted (again) and replaced. Having learned my lesson I seated the axle by using my seal puller placed against the groove at the top of the below photo / at the differential-side of the axle, a BFH, and a little rage. I would suggest using this groove for anyone reading this pre-job.
CV%20Complete%202.jpg

Continued in next post.

Dan
 

Users who are viewing this thread

Back
Top Bottom