Cummins 4bt into my FJ60 (2 Viewers)

This site may earn a commission from merchant affiliate
links, including eBay, Amazon, Skimlinks, and others.

Hey, thanks a lot Cullman.

Do you happen to know where on the pump that number is located?

It will be stamped on the side of the main pump housing, below the top cover and toward the front of the engine from where the injector lines come out of the pump. The cold start advance may block it slightly, but you should still be able to read the numbers.
 
Have you had a chance to work on this lately? The updates are missed!

Working, working, and more working.

Good news: I'm taking next weekend off to stuff this 4bt in. I will not be working the second job all next week and I will be taking the next weekend off too to finish (fingers crossed).

I've been collecting parts. I've slacked at taking pictures and showing them to you all.

I-Man, it's gonna look good in there... I'm ready to see this..

J
 
I finally got some time to work on the engine on Sunday. I also got a pleasant surprise when a fellow cruiser-head, Josh, and his wife stopped by for a quick visit on their way out west. Thanks for the visit Josh.

Anyway, I got back to the engine. The first thing I did was the final bolt up of the turbo and exhaust manifold, including the oil feed and return lines for the turbo. The cobra-head intake and the Perma-Cool filter relocation fitting are a tight squeeze (thanks to Dave for the cobra-head, and Cullman for the Perma-Cool), but they work and I think they will work well.
002.webp
 
My biggest headache in this project has been finding the long 8mm X 1.25 bolts I needed to secure the air horn to the intake. Eventually, I just ordered some 8mm X 1.25 SS threaded rod. I cut the rod to length and then put a slot in the end so that I could use a screw driver to seat them solidly. A little trick I came up with is to put the cut stud into a drill and then as the stud spins I touch the end to a belt sander to get a nice uniform bevel around the end. I seated the stud and then slipped the fan hub or air horn over it and then put on a washer, lock washer and nut.
006.webp
007.webp


008.webp
 
I looked high and low for an original alternator bracket and finally found on locally at Legacy Trucks. Then, I found out that I couldn't use a Dodge alternator - the alternator that fit the bracket. I have to use a Chevy single wire alternator. The Dodge and the Chevy alternator use different brackets. I had to fabricate something after all.

Here is what I started with. I had to cut it apart with a cut off wheel.
010.webp
011.webp
012.webp
 
Once I cut the tube portion apart, I used the band saw to square it up and cut the tube apart. Using a section of round stock, I seperated the two pieces of the tube and welded them back to the round stock and then tacked that to the bracket. Oops...Those are the finished bracket.
013.webp
017.webp
018.webp
 
Then I hung the alternator and checked how the face of the pully was in parallel with the crank pully. At that point, the assembly was held together with two tacks. I had to keep cutting and repositioning until the pully faces were in parellel and the alternator pully was back 1/32" (It should have been 1/16"). Basically, I feel like it got that close through pure luck and a lot of patients. I wasn't getting any closer.

BTW, when I got the Chevy single wire alternator, I had to change the pully to an eight groove.

I know the belt is not routed right, but it isn't the right belt.
014.webp
015.webp
 
Last edited:
And, of course, once it was finished I had to paint it and the small two hole attachment that I made for the underside of the alternator.

While the paint was drying I installed the temperature sensor for the electric fan.
025.webp
023.webp
016.webp
 
That is not a stock temp sensor. Where'd you get it and why did you not use the stock sensor?
 
Gotcha, cool. Thanks!

Good work on the alternator bracket. Looks striking similar to the stock GM style 4BT alternator bracket. :D
 
Ok that motor looks absolutely awesome. It's enough for me to question selling my entire set up and trying to do a 4bt myself. That looks great.
 
My biggest headache in this project has been finding the long 8mm X 1.25 bolts I needed to secure the air horn to the intake.

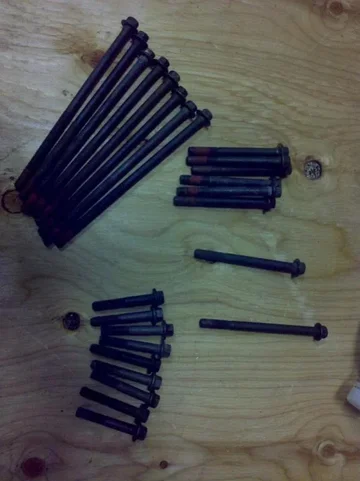
I might just have the bolts you need, if you want to swap those out.

bolts  033.webp

The long ones are ~6.25", then 4", 3.5", 3", and 2". I might have some more of the 3.5" and 4" ones in the buckets I have, just didn't dig that deep. All 8mm x 1.25, off of dodge 5.9 teardowns. Let me know. And send me a PM next time, since I have the bolts from several engines lying around that I probably won't use now. :p
bolts  033.webp
 
If you can find one, a decoupler pulley would be really advantageous on the alternator, the belt and tensioner will last longer and it will be quieter with less bouncing.. It would also eliminate the squeak on shut down which is your alternator trying to keep spinning when the motor is shut off. My alternator guy thinks he can source one- we'll see.
 
If you can find one, a decoupler pulley would be really advantageous on the alternator, the belt and tensioner will last longer and it will be quieter with less bouncing.. It would also eliminate the squeak on shut down which is your alternator trying to keep spinning when the motor is shut off. My alternator guy thinks he can source one- we'll see.

what ?
 

Users who are viewing this thread

Back
Top Bottom