Chevy Ram Jet 350 Project

This site may earn a commission from merchant affiliate
links, including eBay, Amazon, Skimlinks, and others.

Final fan / radiator assembly.

20140621_103502.jpg

20140621_103513.jpg

20140621_112829.jpg

20140621_112848.jpg

20140621_120223.jpg

20140621_120238.jpg

2014-06-21%252023.20.25.png
 
Really nice work! You might consider some bushings for the top mounts to help isolate vibration like the factory ones had. Im not really sure, maybe it will be fine, just thinking out loud. I have always been curious about those motors and how they perform offroad. They seem to have good numbers. How many cores in the rad?
 
Thanks, White Stripe. That's not a bad idea on the bushings, I may add those later once I see how it does after start-up. I used 3/8" high density weatherstripping where the top mount sandwiches the radiator so I'm hoping that is sufficient.
The radiator is a 1" dual core 19" x 26" x 3" Be Cool unit from Summit http://www.summitracing.com/parts/bci-12009/
 
It's been one heck of a challenge but this beast is finally making some noise!


Have a few misc leaks to tighten up. Apparently no one uses true NPT threading machines anymore.

Had to tweak the distributor way around to get 10 degrees set and messed up my pretty plug wire routing. I guess I can pop them off and rotate their location by a couple spaces to take away the stretch on the input terminals.

20140629_215514.jpg


20140629_215550.jpg
 
Stayed up late last night and got all my leaks fixed. Note to self: NPT does not stand for National Pipe Thread; It stands for Needs Pipe Tape.

I moved on to another seemingly minor issue... I had originally installed all the plug wires in the standard Chevy 350 pattern on the distributor cap with the ports on the distributor body oriented to the rear which allowed plenty of slack on the ignition input cables from the ECM. But in order to get the thing running I found I had to rotate the distributor something near 60 degrees clockwise which hosed up my neat spark plug wire routing and put a strain on the input ports.
So last night I tried relocating the plug wires two spaces to put the ports back into a position that would relieve the strain. After I did this I couldn't get more than a hiccup when I tried to start it no matter where I rotated the distributor to.
After some research into the issue I've only come up with more questions:

Is the distributor oriented correctly in the block? (I was meticulous when I removed it and made sure it went back the same way.)
Is the ECM looking at the actual plug wire locations and my relocations will not work?

I'm trying to figure out how to set the initial time once I get it running. But looking at several other forums I have found that no one seems to know what the single notch in the timing belt cover represents. The manual simply says to set it at 10 BTDC but doesn't say if that's what the mark represents! Other people have actually put timing tape on their crank damper and set it that way. But I'm not convinced that's right either. I'm going to see if Summit Racing techs will help me figure this out.

Good news is: It's a long weekend! Maybe we will be cruising before long!
 
What I would do is pull the #1 Plug. While looking at the piston through the hole turn the crank by hand until the piston is at tdc. I would imagine the mark on the timing cover will line up with some sort of mark on the crank. If it doesn't line up then turn the crank another 360 and see if the marks line up. Hopefully they do. Then pull the dist cap and remove the dist also. Re install so that the rotor points to the #1 plug wire on the cap, then put the cap back on. Should do it, then just set the timing.
 
I'm trying to figure out how to set the initial time once I get it running. But looking at several other forums I have found that no one seems to know what the single notch in the timing belt cover represents. The manual simply says to set it at 10 BTDC but doesn't say if that's what the mark represents!


I went through a similar thing when I put a keyed damper and HEI on my lt1 engine, I made up a piston stop out of an old spark plug with a short bit of rod welded on the end, I rotated the engine clockwise until No1 piston hit the piston stop and marked that point on the damper then rotated the engine anti clockwise till the piston hit the stop again and marked the damper, half way between the 2 marks was TDC and I notched my damper accordingly
 
You have to be on the compression stroke,bump engine with key with your finger over #1 hole. When it spits hand crank it to tdc either on the timing plate or use a zip tie down the #1 hole til you get to tdc. You can put # 1 plug wherever you want as long as it is lined up with the rotor, 18436572 and fire away! Engine looks Killer!
 
Thanks for all the input! Turns out she was one notch off on the dizzy gear. And I had a bad spark plug diagram (googled it). After rotating the dizzy and fixing the plug wire locations she cranked right up and put the timing mark in range of the available rotation.

As to the setting the timing; I had a old timing indicator off the previous 350 block so I was able to measure 10 degrees BTDC from that and then mark it on the crank.
Got the initial timing set with the diagnostic tool and took her for a spin in the hood. Sounds awesome! That intake has a distinct sound. :grinpimp:

Found a couple more leaks at the water pump and the return line fitting on the aux tank. But I'm just glad she's rolling again!
The short throw clutch is going to be something to get used to but it's not bad. Seems to engage and dis-engage just fine.

For some reason my Ron Francis fan controller isn't turning them on at 180 or 200 or 220... Got the shop fan cooling her down now.
Back to the grindstone! :smokin::wrench:
 
They come with the MEFI4 ECM. And yes they are pre tuned for the Ram Jet application. They can't be modified without a Chevrolet password or the software that MEFI burn has developed. (http://www.aldlcable.com/ramjettuning.asp) I'm considering their software package that is only for decoding and monitoring just so I have something more intuitive to look at than a flashing red light on the diagnostic tool.
 
I AM IN LOVE.

Took the girl out to do the break-in sequence this afternoon after addressing all my leak issues (I hope). Holy crap... what a difference! And that was with the factory break-in limit set at 4k RPM! This thing truly is a beast! It feels like 100% more power than the last engine already. It's also very quiet with my current exhaust setup, which I like best for trails. The intake almost sounds like a turbo spooling up when you crack it open going down the highway; it just sucks in a breath and you're gone.

Naturally, I still have a few gremlins to address.
The fan controller is a bit funky and doesn't kick on when I would like it to. The temp sensor for it is mounted on the intake manifold "near the water jacket" as the manual recommends under one of the bolts so I may have to adjust the temp-on and temp-off parameters to match the actual water temp. This unit is supposed to fire off each fan separately so there's not a big inrush of current. I grabbed some gas and when I went to crank it back up it started both fans and killed the 30A fuse. Naturally I had cleaned out the glove box and left my spares back at the house so I had to resort to a temporary piece of wire to get home with.

The Dakota Digital gauge cluster is AWESOME. I still have to configure the speedo and tank sender units but I am VERY impressed with their unit thus far.

Here's a few pictures as she sits now:

20140704_171254.jpg


Dakota Digital gauge cluster from Red Line Cruisers. This thing is so sweet! Went off reservation and painted it dark brown metallic to go with the desert theme. (the brights indicator is backlit on the face so the blue rectangle just got painted over.) The two small pushbuttons on the bottom right are for setting up the gauges and scrolling through the info. It even has 0-60 and 1/4 mile info you can retrieve.
20140704_170359.jpg


20140703_233426.jpg


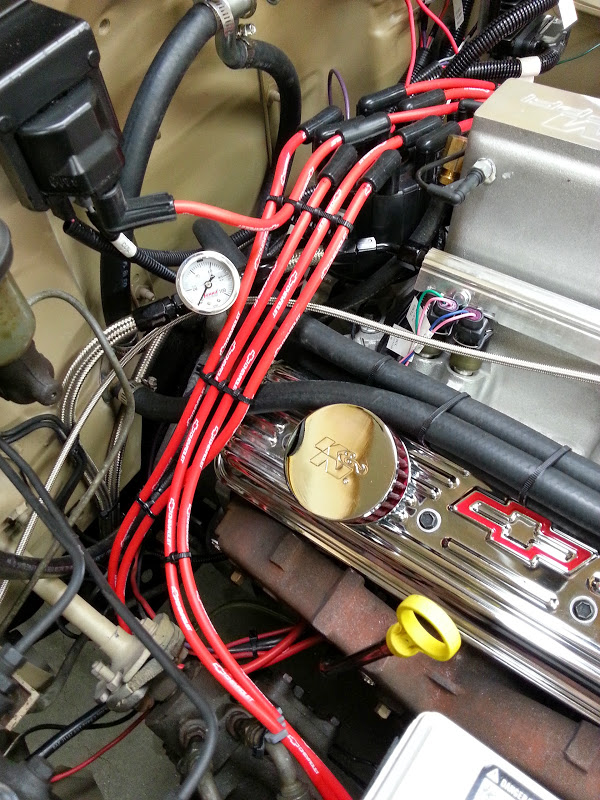
My neighbor stopped by to check it out and showed me this handy trick for taming spark plug wires.

20140703_230127.jpg


20140703_230136.jpg
20140703_233415.jpg


Can't tell you what a relief it is to have this thing back on the road. :steer:

I plan on doing a detailed parts list for those who are considering the Ram Jet as well as a "lessons learned" report to save folks the headache in the future.
 
That looks very nicely done! Depending on how much air the fans move the under hood temps may be high enough to eat the zip ties closest to the ramshorns. I also ended up putting woven heat shields over the plug boots as well after having a few fail.

That gauge cluster is drool worthy for sure.
 
Bret, you have a point about the zip-ties. I will keep an eye on them. I wondered about the plug boots, I may see if Amazon has good deal for them.

I completed the break-in runs and did the first oil change today. (Swapped from 10W-30 to 5W-30 like the manual says) Glad to report there were zero pieces of metal in the magnet trap I made for the drain pan. Just nice even sheen to the oil from the tiny particles.

I also picked up a Spectre air filter at Advance for 25 bucks to have a decent place for the intake air temp sensor to mount. It turned out pretty good after some fitting and trimming of the bottom to clear the water outlet.

20140705_202444.jpg


Now I just need to put 300 miles on it per the manual to finish the break-in procedure so it looks like I'll be taking her to work next week.
 
Now I just need to put 300 miles on it per the manual to finish the break-in procedure so it looks like I'll be taking her to work next week.
Sounds like someone is having to twist your arm a little.
 
At the request of MUD member: rockclimbr I have populated a spreadsheet detailing out most of the parts required for this particular engine along with prices, links, and important comments. I hope it will help others who are considering this build as well.

Here is the link:

https://docs.google.com/spreadsheet...QWJ3anlmWkxGVmc&single=true&gid=0&output=html

I know I've already said it before; but this engine is truly awesome! I have taken it on a few trips so far and love the reliability and power it provides. I haven't had any issues to date and it cranks on command within half a second of bumping the starter.

The Troopy has gotten stares ever since I bought it and people are constantly snapping pictures of it so my ego has already been stroked... now, I love to watch their faces when I mash on the pedal and listen to that intake give an ungodly roar as I leave their jeep in the dust. It's why my fellow Guadalupe Off-Road Club members (the aforementioned jeep drivers) have renamed it "The Beast". :steer:

20140706_200114.jpg
 

Users who are viewing this thread

Back
Top Bottom