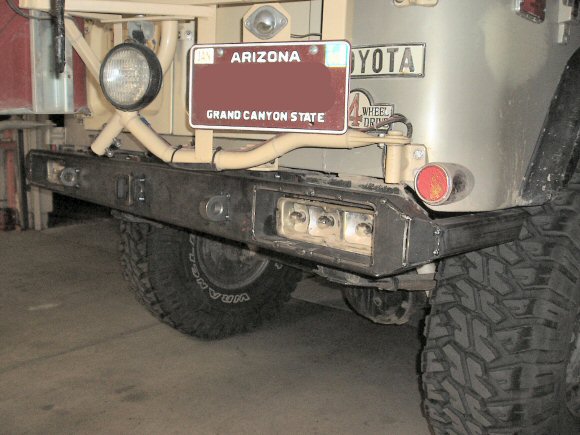
Bumper idea...critiques? (1 Viewer)

This site may earn a commission from merchant affiliate
links, including eBay, Amazon, Skimlinks, and others.

Cdaniel said:
Interesting. Similar to my orginal idea but without the notches to see the lights.
How is it for clearance? Drag it much?
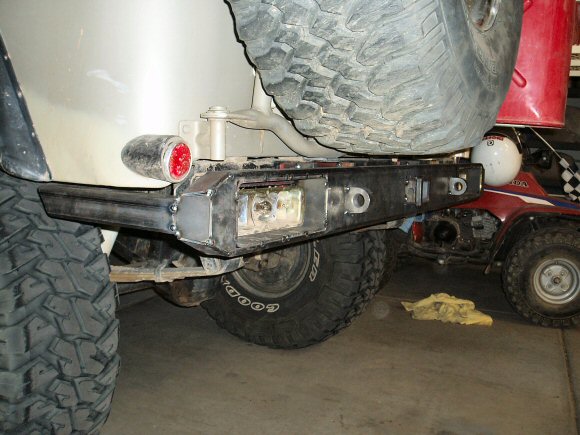
Is that a seperate hitch setup I'm seeing in the underside picture? What is it bolted too?

Here you go.
IMG_2555.JPG

IMG_2556.JPG

IMG_2557.JPG

IMG_2558.JPG

IMG_2559.JPG
 
Dang! that's some serious hitch structure. Looks real close to the rear axle. Is that an optical illusion?

The bumper looks pretty beefy too.
 
Cdaniel said:
Dang! that's some serious hitch structure. Looks real close to the rear axle. Is that an optical illusion?

The bumper looks pretty beefy too.


optical illusion It's about 4 inches away. Yeah Looks real close in the pics though.
 
Ok all you arm chair fabbers and design critics, :D I think this one is a keeper. Moving the stock lights into the bumper. Keeping a similar look from behind.
tub_frame_bumper_5.jpg

picture trashed see below
 
Last edited:
desertdude said:
yes what he said, and plans for tow clevis hooks?

Yeah yeah yeah, I'll move the receiver. ;p That'll come with the details like the intended clevis mounts. Just trying to work out the basics right now so I know what material to by.
 
How will you construct the inside ( or towards the underneath of the truck) especially the wrap arround part? - thinking of trapped mud
 
desertdude said:
How will you construct the inside ( or towards the underneath of the truck) especially the wrap arround part? - thinking of trapped mud

The lower corner protection will be 1.0 or 1.5 square tube, capped on the ends. I may tie a support for it to the frame behind the rear wheel. I plan to leave a gap between it and the tub. I don't think it will catch much and should be easy to flush out what does stick. The original tail light holes will still have the covers behind to keep stuff from flinging through but I may have to make some drain holes in them. The tail light holes in the bumper will be completely enclosed.
 
i tell you what, cliff, in all my years of trying, i've not come up with the perfect rear bumper either. it's always a compromise with departure angle. If i build something that drags, Rob is on the phone the next day chewing me out.
all your ideas look good, the only worthwhile input i can give is pick up
the center mounting holes. They are the strongest.
Off the subject, ... what cad are you using on the drawings?
 
lcwizard said:
i tell you what, cliff, in all my years of trying, i've not come up with the perfect rear bumper either. it's always a compromise with departure angle. If i build something that drags, Rob is on the phone the next day chewing me out.
all your ideas look good, the only worthwhile input i can give is pick up
the center mounting holes. They are the strongest.
Off the subject, ... what cad are you using on the drawings?

So, the metal master comes out of the woodwork again. Good to hear from you. :cheers:
Thanks for the input. The center holes will be part of the mounting, along with tieing the receiver tube to them if possible.
If you build something that drags, it wouldn't matter. Because you build for flight. Right? :D The CAD software is Pro Engineer. I have a student version of what I use at work everyday. Nice stuff but real expensive if you want a legit copy of it.
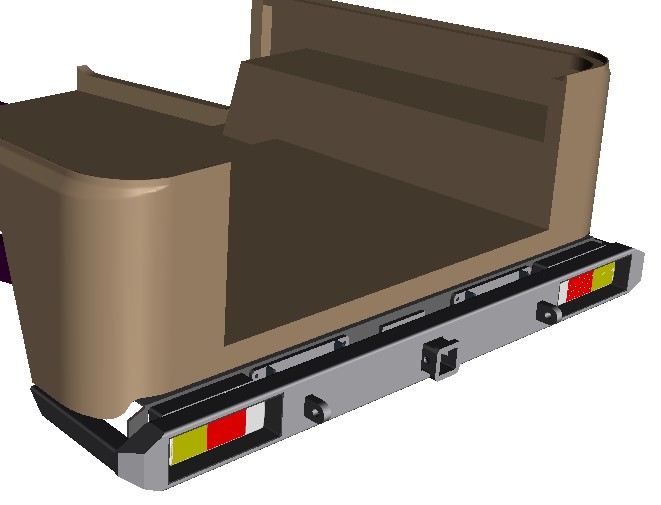
I don't suppose you would know where to find some pre made weld on D ring mounts do you?
 
Finalized

The final cut. Tomorrow I buy steel :D
Sorry Tools, I know you wanted to see that reciever flushed up, but there just wasn't enough room between the frame and bumper to get a pin in and use any standard slide in mounts. I'm confident it won't be much of a "drag". I do plan to tie the corner protecter ends to the frame inside the wheel well though.

Once this is done I'll be moving on to the front.
tub_frame_bumper_5a.jpg
 
Last edited:
Wow! That's a clean looking bumper.
Even the protrusion of the receiver looks ok.
I look forward to seeing it in the flesh, so to speak.
 
Nice Looking! The flush receiver just looks clean to my eye, I doubt that one will ever be an issue on the trail. Shoot some pictures and do a quick writeup of the build for the new tech page on the site.
 
Tools R Us said:
Nice Looking! The flush receiver just looks clean to my eye, I doubt that one will ever be an issue on the trail. Shoot some pictures and do a quick writeup of the build for the new tech page on the site.

I agree, that flush receiver is nice if you can make it work. But I figure if Bman can have his receiver hanging out then so can I. I plan to take pics for my garage web page. stay tuned.

My buggy builder neighbor is about to have to pay up on some CAD work favors. He's got a fancy new plasma cutter. ;)
 
Last edited:
Cliff,
I like the new design alot. I can't recall ever hitting that receiver on anything. There's not enough room behind mine to have pushed the receiver back far enough to allow for a good pin location anyway.
 
Update

Here's some progress finally. So far it's gone pretty well, only a couple minor miscalculations. And I have to fire the idiot that didn't take into account the throw of my tire and cooler rack latches :doh:

I'll be dreaming up something to remedy that next. Meanwhile just a few more pieces to chop and melt. :)

nearly1small.jpg

nearly2small.jpg

nearly3small.jpg
 
Last edited:
desertdude said:
See now you need a new Tire rack/cooler carrier - Starting to look like something nice :)

Gaaaaaaaaa! Noooooo! :eek:
All this metalsmith stuff is wearing me out ;p The weekend fab gig is hard for a guy that has is ass planted in a chair all week.
 

Users who are viewing this thread

Back
Top Bottom