This site may earn a commission from merchant affiliate
Cross member locating jig
type one mounts welded on
type two mounts welded on
Kevin Steinhauer VA6KVN Rocky Mountain Land Cruiser Association This isn't a f”ing hobby. This is the lens through which I see my entire world. Driving and living Land Cruisers is in fact life. It is vitality in the bull**** world that everyone else wants us to buy into. Land Cruisers are the way the world should be. We are just the lucky ones to realize it. -Beno
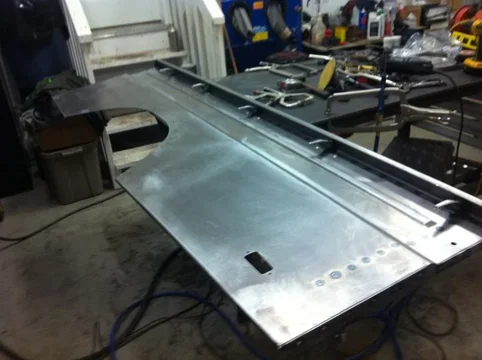
Ready for the floor - tricky to locate the center floor section cuz it dictates where all the rest must go - therefore it must be right or the cross members will end up shifted and the bed will sit funny. May also screw up the sides and where they land at the tailgate.
Kevin Steinhauer VA6KVN Rocky Mountain Land Cruiser Association This isn't a f”ing hobby. This is the lens through which I see my entire world. Driving and living Land Cruisers is in fact life. It is vitality in the bull**** world that everyone else wants us to buy into. Land Cruisers are the way the world should be. We are just the lucky ones to realize it. -Beno
A quick mock up shows me everything is fitting where it should
next update may be more than an hour as I have to tack the center floor in place and flip the whole thing over to plug weld it in place
Kevin Steinhauer VA6KVN Rocky Mountain Land Cruiser Association This isn't a f”ing hobby. This is the lens through which I see my entire world. Driving and living Land Cruisers is in fact life. It is vitality in the bull**** world that everyone else wants us to buy into. Land Cruisers are the way the world should be. We are just the lucky ones to realize it. -Beno
Cross members welded in. I'm going to install the wheel humps and corner floors while it's upside down so I don't have to flip it again.
Kevin Steinhauer VA6KVN Rocky Mountain Land Cruiser Association This isn't a f”ing hobby. This is the lens through which I see my entire world. Driving and living Land Cruisers is in fact life. It is vitality in the bull**** world that everyone else wants us to buy into. Land Cruisers are the way the world should be. We are just the lucky ones to realize it. -Beno
Lotsa measuring slowing me down. My old notes don't have all the little details but I have my original bed still to check them as I go
Wheel humps welded in
Also slowing me down is all the finish grinding and sanding I need to do as I go.
Kevin Steinhauer VA6KVN Rocky Mountain Land Cruiser Association This isn't a f”ing hobby. This is the lens through which I see my entire world. Driving and living Land Cruisers is in fact life. It is vitality in the bull**** world that everyone else wants us to buy into. Land Cruisers are the way the world should be. We are just the lucky ones to realize it. -Beno
Kevin Steinhauer VA6KVN Rocky Mountain Land Cruiser Association This isn't a f”ing hobby. This is the lens through which I see my entire world. Driving and living Land Cruisers is in fact life. It is vitality in the bull**** world that everyone else wants us to buy into. Land Cruisers are the way the world should be. We are just the lucky ones to realize it. -Beno
Rear Floor
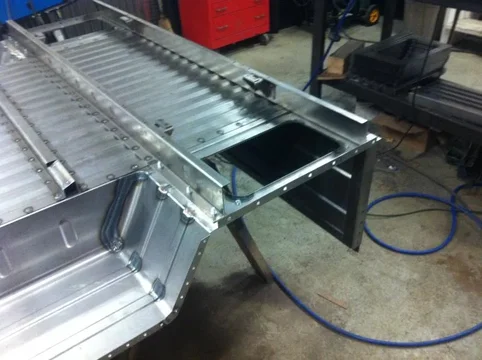
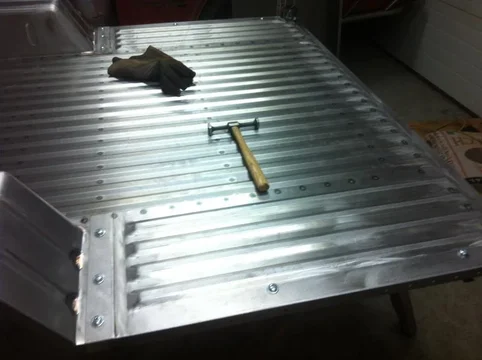
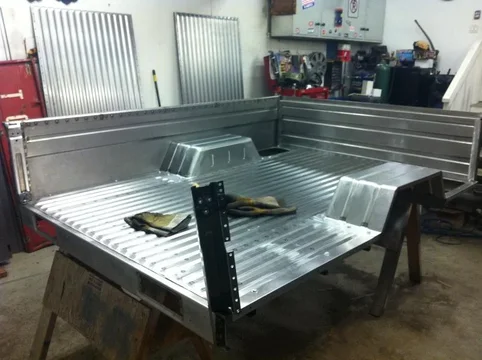
Here is the floor all done, though upside down. I don't want to turn it over yet because I have to weld the front wall in from the bottom.
Kevin Steinhauer VA6KVN Rocky Mountain Land Cruiser Association This isn't a f”ing hobby. This is the lens through which I see my entire world. Driving and living Land Cruisers is in fact life. It is vitality in the bull**** world that everyone else wants us to buy into. Land Cruisers are the way the world should be. We are just the lucky ones to realize it. -Beno
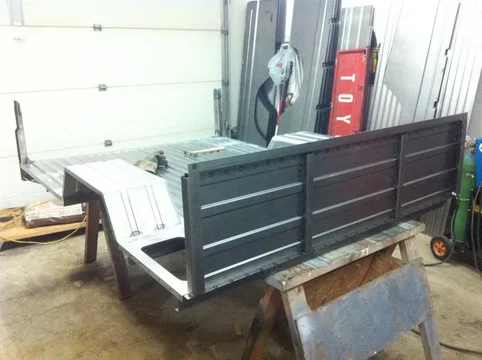
Time to assemble the front wall
and weld it on
Kevin Steinhauer VA6KVN Rocky Mountain Land Cruiser Association This isn't a f”ing hobby. This is the lens through which I see my entire world. Driving and living Land Cruisers is in fact life. It is vitality in the bull**** world that everyone else wants us to buy into. Land Cruisers are the way the world should be. We are just the lucky ones to realize it. -Beno
Kevin Steinhauer VA6KVN Rocky Mountain Land Cruiser Association This isn't a f”ing hobby. This is the lens through which I see my entire world. Driving and living Land Cruisers is in fact life. It is vitality in the bull**** world that everyone else wants us to buy into. Land Cruisers are the way the world should be. We are just the lucky ones to realize it. -Beno
Double Wow...
Man, what a lot of work but the sense of accomplishment.. You got some serious SKILZ!!!!
Yup, lota work for sure. Deffinitely underpriced LOL
Been a busy morning and I haven't hit the garage yet. Bit of a blizzard hit late yesterday - 'bout 6" on the driveway , kinda on the heavy wet side. So I got volentold to take my son to swimming class. We go to Okotoks (small town south of Calgary) for swim classes cuz they are one third the cost. Get halfway there and my wife calls to tell me I'm an idiot and forgot his duffel with the swim gear. She tells me to park and wait for her to bring it. I figure it'll be quicker if I backtrack and meet her closer to the city. So I'm waiting and waiting and finally call her - she went all the way to the rec center
So I go there, we're late. In the change room she calls to tell me she's high centered on concrete in the lot with my matrix- couldn't see it for the snow. Passers by help shove it over. She says she's not doing x-mas baking today for fear of burning down the house LOL
Going to get to the garage this PM after shoveling the driveway.
Kevin Steinhauer VA6KVN Rocky Mountain Land Cruiser Association This isn't a f”ing hobby. This is the lens through which I see my entire world. Driving and living Land Cruisers is in fact life. It is vitality in the bull**** world that everyone else wants us to buy into. Land Cruisers are the way the world should be. We are just the lucky ones to realize it. -Beno
Kevin Steinhauer VA6KVN Rocky Mountain Land Cruiser Association This isn't a f”ing hobby. This is the lens through which I see my entire world. Driving and living Land Cruisers is in fact life. It is vitality in the bull**** world that everyone else wants us to buy into. Land Cruisers are the way the world should be. We are just the lucky ones to realize it. -Beno
Finally got into the garage at 2:00pm. Cleaned up a set of hooks and welded them to the top rails
Welded and finished a left side panel
This particular bed will be for a local who bought these side skins three years ago. They have the bolt on solid wheel arch that I used to make before the welded on sheet metal style. Only difference is the holes around the wheel arch.
Kevin Steinhauer VA6KVN Rocky Mountain Land Cruiser Association This isn't a f”ing hobby. This is the lens through which I see my entire world. Driving and living Land Cruisers is in fact life. It is vitality in the bull**** world that everyone else wants us to buy into. Land Cruisers are the way the world should be. We are just the lucky ones to realize it. -Beno
That bed looks awesome already!
Matt Miller
'77 FJ40 2F "Brahma" + Lockright, tach, Warn 8274,
FJ60 Power Steering , was
Sanden OBA , now Puma!
'96 FZJ80 1FZ-FE, factory diff locks + Safari intercooled turbo, Warn M12000, OME, Puma OBA, heated seats + JDM switches
'97 FZJ80 1FZ-FE, factory diff locks + Safari intercooled turbo, Warn M12000, OME, Puma OBA, Slee Rear
Rising Sun 4x4 Club of Colorado
What I call the front corner post welded in along with the top rail
rear corner post welded in
all the plug welds will be ground smooth later
Kevin Steinhauer VA6KVN Rocky Mountain Land Cruiser Association This isn't a f”ing hobby. This is the lens through which I see my entire world. Driving and living Land Cruisers is in fact life. It is vitality in the bull**** world that everyone else wants us to buy into. Land Cruisers are the way the world should be. We are just the lucky ones to realize it. -Beno
Starting to look like the way it should.
I set it on the side with a pair of vise-grips holding the front
and she fit perfectly - threaded the bolt in with two fingers
I'm glad it fit cuz now that the side assembly is all welded together there is no going back
There is no way to adjust the length. That's why the placement of the front wall is so critical.
Kevin Steinhauer VA6KVN Rocky Mountain Land Cruiser Association This isn't a f”ing hobby. This is the lens through which I see my entire world. Driving and living Land Cruisers is in fact life. It is vitality in the bull**** world that everyone else wants us to buy into. Land Cruisers are the way the world should be. We are just the lucky ones to realize it. -Beno
Nice! ... if I do say so myself. Yup, I
CAN get some satisfaction
I had intended to do both sides today but I only got a little over two hours in the garage before a very uncomfortable headache sapped all my energy so I stopped there. I'll try and work on it Monday after work.
Kevin Steinhauer VA6KVN Rocky Mountain Land Cruiser Association This isn't a f”ing hobby. This is the lens through which I see my entire world. Driving and living Land Cruisers is in fact life. It is vitality in the bull**** world that everyone else wants us to buy into. Land Cruisers are the way the world should be. We are just the lucky ones to realize it. -Beno
wow....i'm in need of some of your skills.



 There is no way to adjust the length. That's why the placement of the front wall is so critical.


 There is no way to adjust the length. That's why the placement of the front wall is so critical.


