Box Rocket homemade trailer build (2 Viewers)

This site may earn a commission from merchant affiliate
links, including eBay, Amazon, Skimlinks, and others.

Surely you know that was definitely meant as a compliment.

OF COURSE! Thanks for the kind words.

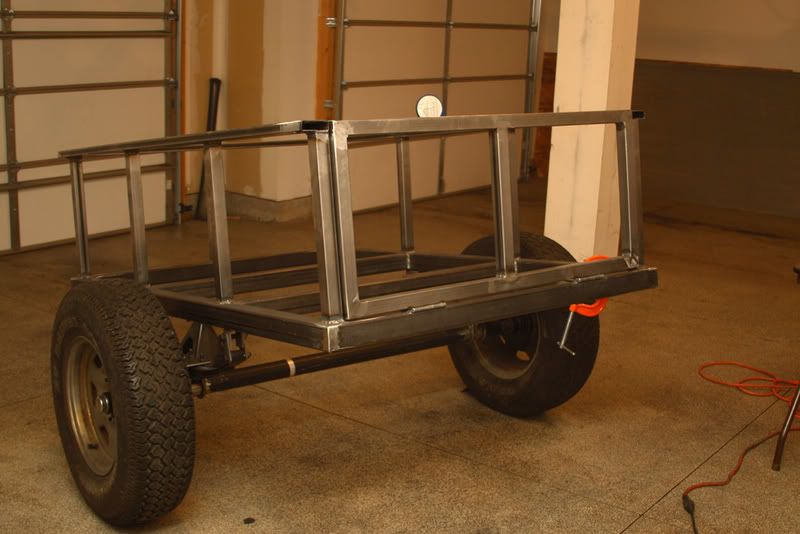
I found some 10" wide fenders that I think will work. Rather than mounting them directly to the side of the box, I'm planning to space them off the trailer just a little to actually cover more of the tire. I think I only need them spaced off the trailer an inch or so. Or maybe I'll just use some of my 1" tubing to build a spacer to mount them too. Anyway I think I can get the prefab fenders to work well.

That should work no problem. I would just reitterate to cover the tires fully... Henry convinced me of that early on and I am glad he did.

Looking forward to what you come up with Adam, I had your 40 as my screen saver for years... still think about painting mine that sweet green/grey color you had.
 
I recommend this one a lot, but it is worth the price:

How to Design and Build Trailers — Vol. 2 | How-To Books | Northern Tool + Equipment

176222_lg.gif
 
Had a fairly productive day today. I have pics to prove it but my card reader on my PC is being stupid and won't read my card from my camera so I can't show them to you yet.

Anyway, I got the entire frame and box all welded up today. Doesn't have skins on the box yet. I also got the suspension attached to the frame and the axle is underneath it and with the exception of the tongue I have a rolling trailer. Didn't expect to get quite that far on the first day so I'm stoked. It's currently got a little set of 235/75 R15s on it until my used set of 80 wheels gets here from Idaho hopefully this week. Then I have a used pair of 285/75 R16 Goodyear MTRs that will go on it. My hitch height on the 80 is about 25" and the bottom of the frame on the trailer is about 23.5" right now with the small tires. With the bigger set on there it should be just about perfect height behind the 80.

I'm using a Miller 175 230V welder, and it's been great. I used it on my rear bumper build and it's been great for this project too. Thanks to Ryan Davis for his sweet lathe skills. I ran out of wire on the welder around 8pm tonight and called Ryan to see if he had any and sho-nuf he had an 11lb spool. I made the 30 min drive to his house and brought the empty 2lb spool with me. The hole in the center of the spool was WAY too big on Ryans spool so we loaded my empty 2lb spool into the lathe and I held onto the 11lb spool while Ryan man'd the lathe controls and we did a high-speed rewind of the little 2lb spool. Once again, glad that Ryan has cool tools.

Still to do list:

cap a couple holes in the top lip of the box, weld the tongue to the frame, build the tailgate, pick up fenders and figure out how to mount them, lights, frame and skin the lid. Paint. My lock-n-roll hitch should show up this week too.

I think I can get most of the remaining construction wrapped up in the evenings this next week (hopefully) and then maybe be ready for paint by Saturday. We'll see, maybe I'm getting a little ahead of myself. I'll post pics when I can get my CF card to read.
 
Ok, I finally got my pictures off my camera. So maybe a quick materials list and some basic dimensions. For the main frame I am using 2.5" .120 and the tongue is 2.5" 3/16. The uprights on the box are 1.5" .063 and the top rail of the box is 1x3" .063. I have two sheets of 16ga. for the skins for both the box and the lid. The lid will be framed with 1" .063 and the tailgate will be using the same 1.5" as the uprights. The outside dimensions of the frame are 4'x6' with a tongue length of 4' so a total length of 120" not counting the length of the lock-n-roll hitch. The height of the box is 19" (18" uprights plus the 1" from the top rail).

tacking the frame on the floor.
_MG_3247.jpg


using my sweet folding table workbench I got the frame assembled at a little easier height than sitting on the floor.
_MG_3248.jpg


frame corners were ground clean
_MG_3249.jpg


On to the uprights, this is probably pretty low-tech but I got the corners set at the right angle and then ran a string to help me line up the other uprights.
_MG_3252.jpg


_MG_3253.jpg


top rail tacking into place. Still need to cap the back end of these at the tailgate.
_MG_3255.jpg


_MG_3256.jpg


Getting the suspension onto the frame. I have the springs mounted just a bit behind the centerline of the trailer to give a little more tongue weight. The idea being that it will be a little more stable with the tongue jack and just the tires supporting it.
_MG_3258.jpg


Axle all mounted up and temp little tires on it.
_MG_3261.jpg


test fitting my Thule load bars. Looks like they'll work perfectly.
_MG_3263.jpg
 
So I need some suggestions on tongue length. Is there an ideal length? I know a longer tongue helps with backing the trailer.

I have a 4' section of 2.5" 3/16 that I've planned on using. And the 4' length will clear the truck if I jacknife the trailer but do I need to be longer? I still have some 2.5" .120 that I used for my frame that I could triangulate off the front of the frame and extend the 4' peice out farther if it would help.

Gimme some suggestions.
 
Adam, mine's 52" from the box section of the frame to the center of the lunette hitch. I don't know about an "ideal" length, but 48" should be fine, it will still allow you to put stuff in front of the tub without fear of hitting the truck if you jacknife the trailer; it will be short enough to maneuver on trails but still easy to reverse with it.
 
The tongue on my TrailBlazer is extendable.
TB-TongueExtended.jpg


The book I mentioned has a Shear-Moment Diagram method of figuring out the tongue length if you know what the loading and load placement will be.

My grandfather's RoT is that the unladen tongue be a minimum of 1/3 of the total distance from the ball to the axle centerline.
 
WOW! Maybe you could slow down a little! Man, I feel like mine took about a kazillion years compared to this!

Great job Adam! I would think 4 feet would be plenty if not a little over kill. I just measured from my hitch to the side of the rig, then I added another 8 inches or so for a little wiggle room. The LNR hitch will add a bit more room too. You gotta remember it needs to clear the rig in a jack-knife situation for sure, but also think of jack-knifing in a little ditch or something where your hitch has become the low-point of a "V" between your rig and trailer. You have to give the trailer a little room to articulate up and down as well... clear as mud?

Great job, looking forward to hassling someone else to get theirs done :D
 
Thanks for the suggestions. It sounds like my 48" tongue will be just fine. So my next question is about any triangulation from the fram to the tongue. I think I need some for sure but how far up the tongue should I go with it? Do I need to keep as much of the tongue just a straight tube in case of a jacknife or is it ok for the tongue to "bottom-out" against the triangulated peice in a jacknife situation?

What say the trailer-Gods?
 
Ok, another question....if I had any brains, I'd maybe ask all of this in the same post rather than in a bunch of different ones. Oh well, pad my post count right?:flipoff2:

So I've got my 16 ga. sheet for the tub skins. I've been planning on welding all the outer edges of the sheet to the tub frame. Probably not a full solid bead but maybe an inch long bead every few inches or so. But I'm a little concerned about rust developing over time in the spots where the skins overlap the frame. Can I just use some seam sealer on the exterior around all of those corners where the frame meets the skin?

Is it a better option to use screws or rivets to attach the skins? That way I can prime and paint the skins and frame beforehand then attach them. Drew, I know you used rivets on yours. Any regrets? I know rivets will be much more time consuming.

Suggestions?
 
WOW Adam, great progress.

I would think 48" would be plenty long for the tongue, you can always add a rack in front of the box if you feel it is to long.

I would think you would need someway to keep rust from starting behind the uprights and skin. I would also prime behind the uprights first.

I really like the look of your top rail, the wide and thin opposed the the square that I have on mine.
 
Thanks. My problem is that if I prime the skins and uprights first, then I'm pretty much forced to use rivets or screws since welding the skins on would just burn off the primer. I also worry a little about vibration and those overlapping surfaces rubbing against each other and removing the primer/paint over time.

I've even been contemplated the idea of cuttings the sheet metal into squares and just welding in the openings. The downside there is not having a smooth inner wall, although I could probably get it pretty close.
 
I wouldn't seam weld it at all. I would pop some holes in the skin and rosette weld them to the uprights. Sort of like large spot welds done with a MIG.

If you use something like POR-15 to paint it then it'll seal the overlaps and even some small gaps.
 
I wouldn't seam weld it at all. I would pop some holes in the skin and rosette weld them to the uprights. Sort of like large spot welds done with a MIG.

If you use something like POR-15 to paint it then it'll seal the overlaps and even some small gaps.

Not a bad idea at all. Then maybe just use some seam sealer along unwelded edges. Hmmm. Don't think I want to use POR-15. I know it works, I just don't like using the stuff.
 
I wouldn't seam weld it at all. I would pop some holes in the skin and rosette weld them to the uprights. Sort of like large spot welds done with a MIG.

If you use something like POR-15 to paint it then it'll seal the overlaps and even some small gaps.

I like this idea. Minimal rust potential and it would look pretty slick from both sides.
 
I guess I just had some bad mojo tonight. Didn't get as much done as I'd hoped. I worked on the tailgate. Smashed the crap out of my finger. Then a few minutes later while I was cutting with my cutoff wheel on my grinder I started feeling a bit warm in my jibblies and I glanced down and sho-nuf it's on fire!:eek: Fortunately the only casualty was my jeans.

_MG_3264.jpg


Then I ran out of gas on the welder. So between the smashed finger, burning my crotch and running out of gas, I took that as I sign that I was done for the night.

Anyway, here's a couple of the tailgate all framed up.

_MG_3265.jpg


_MG_3267.jpg
 
Dude, don't burn off your marbles... that is like rule #1 in making a homemade trailer. ;)

Glad your safe. As for skinning the trailer I used rivets and sealed the seams and used Sika Flex to bond the stuff on. It has held up great!
 
Dude, don't burn off your marbles... that is like rule #1 in making a homemade trailer. ;)

Glad your safe. As for skinning the trailer I used rivets and sealed the seams and used Sika Flex to bond the stuff on. It has held up great!

Thanks, I'll remember not to light my marbles on fire next time. Could've saved a little money on my vasectomy though.

I think I've decided that I'll be welding the skins on. I'm going to weld all the outer edge of the skins and then do some little rosette welds on the uprights. Then I'll use some 3M seal sealer on all the exterior seams. Should be ok with that.
 
Adam, i have a pair of pants that look the same, been there done that.

Rule #2 don't wear tennis shoes while welding or you may end up with 3rd degree burns on top of your foot.
 
Well I will admit a minor screwup as part of my disastrous evening of work last night. As I worked on the tailgate, my primary thought was to keep the hinge flanges hidden when the tailgate is closed. Well I did that. But what I also did, that I was too dumb to think about was to make it so that if I wanted to open the tailgate and be able to use it like a table or work surface, the tailgate sticks up above the floor level the thickness of the gate. So I don't have a flat surface from the floor all the way across the open tailgate. Not a huge deal but I may have to just let the tailgate drop open all the way like you see in the pictures.

One option is that I can just put a hook on the end of the limiting chains for the tailgate. So if I do want have the tailgate as a table or work surface I can just hook up the chain. Or unhook the chain and just let the tailgate drop if I need to slide things in and out of the tub and don't want to bump into the edge of the tailgate.

Oh well. Live and learn.
 

Users who are viewing this thread

Back
Top Bottom