BJ40 Starter problems (1 Viewer)

This site may earn a commission from merchant affiliate
links, including eBay, Amazon, Skimlinks, and others.

....Before ordering the starter I received I had sent lots of pictures to Steve at EBI cruiser parts. I also did a visual check prior to the install and there was nothing that even looked a little different. Even the casting of the housings were visually identical. The front gear seemed to 'match'; 11 teeth on both the old and new. As you say however, I did not measure anything, just by eye......

That's interesting.

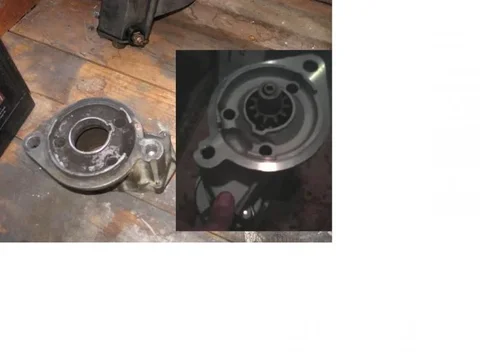
I've just made up an image that has Gizmo's BJ42 starter nose alongside your 56111 remaufactured nose and I can see differences. - Although I don't know whether they are "vital differences" - or even whether Gismo's nose SHOULD be the same as your nose (considering the fact that your cruiser is "without EDIC" and his is "with EDIC" and the fact that the two cruisers are different models within the 40 series). But here is that image:

nosecompare.jpg

Edit - shortly after posting this. :hmm: Now looking at these images again I see the two noses side-by-side do indeed look identical. It is just that Gizmo's is so dirty and it is hard to rotate the noses into alignment inside one's head! So I really don't know what your problem is Albert. If you still have your old nose, perhaps you can do a nose-swap just to prove beyond doubt that the new nose isn't responsible for your problem. I'm as lost as you are here really. (If that remanufactured starter does turn out to both fit and run then I'll certainly add this information to my "B-engine parts interchangeability thread".)

..What do you think about 'jumping' the solenoid as suggested above? I do not want to do any damage but it sounds like a quick way to test my starting system.

It sounds like a good idea to me.

But reading Gizmo's posts I get the impression that the nose-swap (swapping the "alloy nose castings" between your old starter and that new remanufactured starter) should also be easy to do and could be all that's involved in getting your new starter to work properly. And Gizmo says (if I interpret correctly) that apart from that alloy casting - many different starters are identical!

:cheers:

PS. I guess your "remanufactured nose" could still be slightly shorter that your old nose because this wouldn't show up in the above photo-comparison. But this shorter dimension could still prevent the solenoid from achieving "full-travel". But then again, in saying this, I'm probably "just clutching at straws to try and preserve my theory that your new nose is wrong!!!! (And reading posts in the non-diesel forum tells me that petrol cruisers enjoy "quite widespread starter-interchangeability" so why should our diesels be any different?)
nosecompare.jpg
 
Last edited:
Thanks for the image comparisson. I just realized that the side by side pictures I took of the old and new starters are not good enough for me to post. Next time I do a part swap, I'll document the process more carefully.

I think I'll give the above starter jump a go before dropping the starter.

Regarding the nose swap, when I removed my starter for the first time and did a clean-up, I could not remove the three phillips head screws that hold down the nose. I did not try too hard as I did not want to damage the screw heads. I also did not use any liquid helpers. If I must do a swap, I'll have to figure this one out. The downside to having the cruiser has been that I don't have any willing bodies to help, nor can I get myself to trust any local mechanics...this is NJ/NY mentality, everyone will take complete advantage of you if they can.
 
When I took my alternator apart many years ago I used a hand-held manual (you hit it with a hammer) impact screwdriver to loosen the Phillips-head screws with no damage to the screws. Something like that might help you here.
 
Starter jump

Well,

I was successful at melting my power cable from the starter to the positive terminal on the battery. The jumper cable was not connected from more that 1 sec, and poped the terminal right off the battery. That was a quick way to force dropping the starter. Now I have my fingers crossed that I did not melt the inside of the new starter. I'll post picts of what I find. The more I think about the problem the funnier it gets. I hope you guys can have a chuckle at my expense until I can figure this one out, with help of course.

ar
 
Albert,
did you use the small terminal (indicated as '50' in previously posted pictures in this thread) on your starter solenoid to connect the jumper wire to?!!!
If that did melt the jumper then there is really something wrong.

But I guess you've connected it to the big terminal on the solenoid and then it will draw all the current needed for the starter. As this can be as much as ~ 180 to 200 Amps, the lead will melt. No doubt.
Don't worry about having done damage. There will be no damage to the starter caused by this.
 
I used one side of a pair of jumper cables. Connected the alligator clip to the positive battery terminal. The other alligator clip was in hand. I used the loose end to touch the small terminal and got a small noise and then melting...maybe 2 seconds max.

I was thinking...a friend had an old ford thunderbird and had to 'jump the solenoid' every now and then. We would use the car key as it was long enough to reach the positive feed and the solenoid terminal...Is this the same thing? To bypass the ignition switches, wouldn't I just briefly connect the large power terminal with the small terminal using a bridge wire? Would this accomplish the same thing? Not doing it again however.
Next steps are to replace my battery/starter connection, drop the starter, cross my fingers, inspect the inside, compare the old and new starter using calipers, possibly try to turn the engine at the crank (which direction and advice would be appreciated).
 
Yep, the thunderbird-trick is basically the same, however....if you used jumpercables to connect to the small terminal and got them melting.....then there is a big problem in the starter. Unless you didn't connect properly and created a short somehow.

When you are just powering the solenoid the current involved is low, just a few Amps. That's why you could do the thunderbird trick with the ignitionkey otherwise the key would have melted.
The solenoid then takes care of the main power to the startermotor when it engages. And then big current is involved as said, easily in the 200 Amps region.

The reason I said to connect the jumper cable to the solenoid and then to the + post of the battery is for safety-reasons. This way you are away from the engine, should anything unforseen happen.
 
Just to clarify, the jumper cables did not melt. The positve feed to the battery did on both ends. Not sure if the thicker gauge wire of the jumper cable prevented this and I did not think to test how hot the jumper cables got after the brief test, I was more worried that I would start a fire in my garage at that moment. thanks
 
There should be no melting or heating at all. Just a few sparks when making the connection to the battery post. A simpel wire (like one you use to feed a bulb) should be suffcient to carry the load. Using the pliers keeps your hands away from these sparks. That's the only reason to use pliers.

From what you describe I lean toward a defective startermotor/solenoid
 
I agree entirely with Ron's advice Albert.

I don't think that using one lead of a pair of jumper cables was a good idea though.

"Jumper cables" tend to have LARGE "crocodile clips" at either end and perhaps you may have touched something with them that you never intended.

Also, jumper cables use very heavy-gauge cable.

A wise precaution would have been to use small-gauge wire for the test (since the current draw of the solenoid is known to be low) and this would have ensured that your wire would melt/break before any serious damage occurred.

Besides - I'm sure ......a brief "touch-the-battery's +VeTerminal with the end of a little wire" ........was all that Ron intended to see if your starter briefly "came to life".

Are you able to post photos of your installed starter (showing its electrical connections) and of your battery (showing the lead going to your starter)?

PS. I'm sure we can get to the bottom of this.

There are some days when I refuse to work on my cruiser because I know I'm in an "impatient mood where I'll end up butchering things". So I just wait till I feel in a more patient mood where I'll think more thoroughly before acting. And if I need to buy something in order to try a better/safer approach, then I now do that first. .......... Unless your vehicle is a "daily driver" you can do this and the rewards are well worth it in terms of being satisfied with the work you end up doing.

:cheers:
 
theory of confusion

So I uncovered a possible source to my problems after the failed jump test. After looking at the new starter more carefully, I realized the gromet around the 50 terminal had partially broken off during shipping as I found small bits in the box. I must of missed this when I installed the new starter, duh. See picts below. The last picture is of my repair kit. New 2ga battery cable, high temp gasket maker, JB weld and a plastic washer. I was thinking of using the gasket maker to seal the 50 terminal at the starter housing. ( the broken gromet allows the terminal to move side to side and possibly touch the housing). Using the plastic washer as a mold, I was hoping to place JB weld inside the washer and try to form a gromet that will hold the terminal in place and prevent it from possibly touching the housing. I wanted to NOT have the JB weld adhere to the housing so I was thinking of placing a plastic film below the plastic washer and in between the gasket maker and the washer.

So a brief summary of what I was planning:
1. remove the starter and inspect the contacts side
2. compare the nose of the old and new starter
3. use my repair kit to fix the 50 terminal
4. install new battery cable
5. try to hand turn the engine at the crank nut
6. check that the alternator spins freely without the belt attached
7. try to start with the ingition key

This plan assumes the replacement starter was the correct PN and that the 50 terminal somehow caused a short every time I tried to startup the vehicle. If this is not the problem, I'm leeaning towards the alternator repair I made prior to this mess. Maybe there is a short in the alternator causing a problem with the starter??? assuming the alt can do that to the starter of course.

thoughts welcome please.
IMG_0625_2.jpg
IMG_0638.jpg
 
Wow. Great photos Albert. If I'd seen those before I doubt I would have developed the idea that your new starter-nose could be wrong. (The noses certainly look identical now but I'd still double-check this with callipers or similar now that you have them out together.)

........After looking at the new starter more carefully, I realized the gromet around the 50 terminal had partially broken off during shipping as I found small bits in the box. I must of missed this when I installed the new starter, duh.........

Lesson learned Eh?

Parts are always at risk of damage during shipping.

If that terminal took a hard knock (and was perhaps pushed-inwards some distance - It is quite possible that there is "hidden internal damage" that is preventing your solenoid from pulling in fully (which would explain the "clack then silence").

I wonder whether you can "make a claim against the shipper" or something like that. (Although normally they would expect an item to be checked thoroughly BEFORE it was ever attempted to be used. - So they may not be prepared to help you now. And if you put yourself in their shoes - You can't blame them.)

If you can't make a claim or get the supplier to accept responsibility for the shipping damage (or aren't prepared to try), then I'd want to look inside the solenoid to see the extent of the damage before trying to fix it. (I'm guessing you're intending to do this anyway.)

I'm not familiar with "JB weld". Here in NZ I would probably use "Araldite" to hold that terminal in its correct position permanently and away-from-metal. (I know that Araldite doesn't conduct electricity.) - But perhaps "JB weld" is a better product? (Of course I have a lathe here so I could perhaps instead turn-up something in nylon if I was in your shoes.)

I don't see the purpose of the "gasket maker". I think I would just "stick the whole terminal to the alloy" and be done with it. Then, if I wanted to take it apart in the future, I would probably just scr#pe away at the Araldite/JB with a sharp scriber or something like that. (But the method you have in mind may well be better than this. - However don't go overboard sacrificing "permanence" for "ease-of-dissassembly".)

So a brief summary of what I was planning:
1. remove the starter and inspect the contacts side
2. compare the nose of the old and new starter
3. use my repair kit to fix the 50 terminal
4. install new battery cable
5. try to hand turn the engine at the crank nut
6. check that the alternator spins freely without the belt attached
7. try to start with the ingition key

Sounds good except I'd ignore the alternator for the time being and concentrate on trying to get your vehicle to start and run. I say this because - provided your battery is big enough and adequately charged - no fault (that I can think of) in your alternator should be able to prevent your cruiser from starting. (I know you have suspicions about your alternator but I suggest tackling just one job at a time.)

And I think it is a good idea to see if your engine is able to rotate freely because a seized engine would explain much of your symptoms. (It is a simple task to check that your engine is free to "turn-over" and it eliminates another possibility - even though it is an unlikely one.)

The only thing extra (to your list) that I suggest is "bench testing" your new starter prior to refitting it (although I'm a bit reluctant to suggest this in light of what happened in your earlier test).

May I suggest holding it in a vice (or have someone kneel on it to hold it firmly - while taking care not to damage terminals and keeping clear of the drive cog that will "jump out and spin" if all goes well) and putting your jumper leads on it? ("Negative" from the battery to the alloy-body of the starter and "Positive" to that big copper terminal.)

Nothing at all should happen as you do this. (No sparks and no sound at all.) But then get a short piece of insulated wire (similar gauge to those connected to your headlights - perhaps even a bit smaller) and BRIEFLY bridge it between the starter motor's big copper terminal (where your positive crocodile clip is) and the "50 terminal" (touching that black connector shown in the photo will do). As you do this, the starter should come to life (with a "brief healthy spark" as you make that final connection).

As I said, I'm hesitant to make this "bench testing" suggestion in light of the trouble you had when following Ron's advice. But it IS something I think I would do myself. And since there is no load on your starter during this test, it should draw well less than 180A (but I expect it should still draw more than 50A through your jumper leads). Nothing should "melt" and if the crocodile clips are making effective contact, I doubt any "pitting damage" (from excessive sparking) should occur (where the crocodile clips connect) during testing.

....This plan assumes ......and that the 50 terminal somehow caused a short every time I tried to startup the vehicle. .....

I can't see how "the 50 terminal fault" could cause the ends of your big starter lead to melt when you attempted to turnover your engine the way Ron suggested. So, despite you finding the damage around that terminal, there are still things here that puzzle me Albert. (But damage to "C terminal" could cause that melting - so I hope that terminal didn't get damaged too.)

Whatever you decide to do -- Take your time and take care.

Cheers
Tom
 
Last edited:
JB Weld is a 2-part epoxy in a paste form. One component is white, the other black, you mix them together in approximately equal amounts and apply where-ever you need it. Use it as an adhesive or as a filler. It is machinable once it is set. Wonderful stuff. Over here we are not familiar with Araldite.
 
Wow. ........
May I suggest holding it in a vice (or have someone kneel on it to hold it firmly - while taking care not to damage terminals and keeping clear of the drive cog that will "jump out and spin" if all goes well) and putting your jumper leads on it? ("Negative" from the battery to the alloy-body of the starter and "Positive" to that big copper terminal.)

Nothing at all should happen as you do this. (No sparks and no sound at all.) But then get a short piece of insulated wire (similar gauge to those connected to your headlights - perhaps even a bit smaller) and BRIEFLY bridge it between the starter motor's big copper terminal (where your positive crocodile clip is) and the "50 terminal" (touching that black connector shown in the photo will do). As you do this, the starter should come to life (with a "brief healthy spark" as you make that final connection).

As I said, I'm hesitant to make this "bench testing" suggestion in light of the trouble you had when following Ron's advice. But it IS something I think I would do myself. And since there is no load on your starter during this test, it should draw well less than 180A (but I expect it should still draw more than 50A through your jumper leads). Nothing should "melt" and if the crocodile clips are making effective contact, I doubt any "pitting damage" (from excessive sparking) should occur (where the crocodile clips connect) during testing.


I can't see how "the 50 terminal fault" could cause the ends of your big starter lead to melt when you attempted to turnover your engine the way Ron suggested. So, despite you finding the damage around that terminal, there are still things here that puzzle me Albert. (But damage to "C terminal" could cause that melting - so I hope that terminal didn't get damaged too.)

Whatever you decide to do -- Take your time and take care.

Cheers
Tom

Well said Tom.
I fully agree to what you stated.
If the starter is defective you'll find that by bench-testing it (please do it in a vice - don't ask how I know).
In case it is defective I would return it telling the whole story because repair then might be difficult and void any warranty.
 
JB Weld is a 2-part epoxy in a paste form. One component is white, the other black, you mix them together in approximately equal amounts and apply where-ever you need it. Use it as an adhesive or as a filler. It is machinable once it is set. Wonderful stuff. Over here we are not familiar with Araldite.

Thanks Wayne.

Araldite is a 2-part epoxy too but it is "very fluid" until it "goes off". And it is sold in various "grades" depending on how fast it goes-off/cures and how strong it ends up being. ("Minutes" or "many hours" with the longest-cure-time-Araldite having the greatest strength.)

I'm guessing JB Weld is "stiffer" and thus less likely to "flow out of your mould" during application. Also grey is a nicer colour than the "sickly white/off-white" that Araldite assumes.

Araldite is mixed 1:1 as well but I would be reluctant to try machining it so it sounds to me like JB WEld is indeed a far better product. (You get access to sooooooo much better stuff over there.)

I'll keep an eye out for JB Weld here, but as yet I've never seen any for sale.

:cheers:

PS. - It is interesting how people can be on opposite sides of the world working in isolation, yet still come up with similar solutions. Of course "the Internet" is making it easier for us to share our experiences/knowledge. So world-progress in almost everything you consider should be accelerating now compared to in the past.

PPS. I was at the hospital with my son this week and the cardiologist even used her computer to "Google a program off the Internet" to work out his "QT interval" (a technical figure in milliseconds relating to his heartbeat). - It's astonishing how much help The Internet provides.
 
Last edited:
I dropped the starter and am now trying to turn the engine at the crank nut. So far, not even a budge. My half inch wrench handle is a bit too long so I'm off to get a shorter wrench and and test the starter. Judging by the amount of force I was able to put on the nut with the tools I have, I think the motor is seized. I'll post what the starter does when I return.
 
Clueless Again

I just returned from the bench test and was unsuccessful. Given the proximity of the 50 terminal to the starter housing, the terminal touches the housing as soon as the starter engages and nothing more happens. So after several tries, I was only able to get the starter to pop but not spin. See picts below.

I returned home and opened the punger side of the starter. The inside of the 50 terminal interfers with the operation of the plunger, so I think. Comparing the old and the new starter, the old 50 terminal is shorter on the inside (post 21 picture). I placed the plunger back into the starter and pushed down on it and it will not go down towards the contacts without touching the insde of the 50 terminal. Could this be??? Am I just unfamilar with this or is it possible that this starter was never tested properly?

I would like to use JB weld to hold the terminal where it was based on the inside position of the plastic housing around the 50 terminal on the inside. I could then try another bench test BUT, if I were to do that, should the plunger be below or above the 50 terminal? House does the plunger work? Does it need to touch the contacts to move up or down or is it a magnetic thing? Seems odd that someone would put this thing together and it would be worng. Can someone give me some insight, I have to NOT know what I'm talking about here.

Regarding turning the engine, I have not given it another try. I'm hoping I can't turn it because it requires more force than I can muster. I will purchase a shorter 1/2" ratchet to see if I can give it another turn. Also the ratchet I was using interfered with the fan blades because I was only able to use it with the handle facing the passenger's side pulling UP on it until it got close to the fan blades. My tool would not fit in any other position.

Thoughts please....
terminal50.jpg
terminal50_inside.jpg
terminal50_plunger.jpg
 
I dropped the starter and am now trying to turn the engine at the crank nut. So far, not even a budge. My half inch wrench handle is a bit too long so I'm off to get a shorter wrench and and test the starter. Judging by the amount of force I was able to put on the nut with the tools I have, I think the motor is seized. I'll post what the starter does when I return.

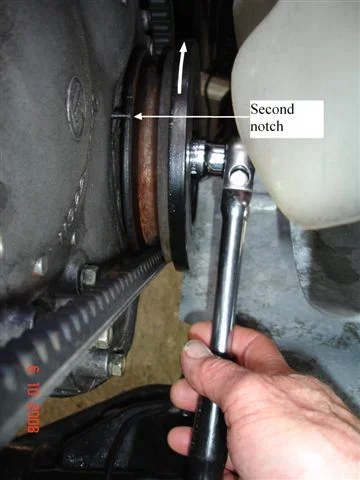
Well I can turn my engine relatively easily just by using a ratchet and socket like this Albert:

Tappets No1TDC.jpg

And a seized engine together with a damaged "50 terminal" would explain all your symptoms.

But what would cause your engine to seize up without you being aware of it? Are you sure your gearbox is in neutral? (Perhaps you should try turning your engine over via a rear wheel as I described in a PM to you. Then you could check that your gearbox is shifting properly at the same time.)

Cheers
Tom
Tappets No1TDC.jpg
 

Users who are viewing this thread

Back
Top Bottom