Navigation
Install the app
How to install the app on iOS
Follow along with the video below to see how to install our site as a web app on your home screen.
Note: This feature may not be available in some browsers.
More options
Style variation
You are using an out of date browser. It may not display this or other websites correctly.
You should upgrade or use an alternative browser.
You should upgrade or use an alternative browser.
Big Muddy's Buildup...
- Thread starter twoturtlesracing
- Start date
This site may earn a commission from merchant affiliate
links, including eBay, Amazon, Skimlinks, and others.
More options
Who Replied?twoturtlesracing
Slowwly but surely...
- Thread starter
- #122
So did you get those 60 springs on there yet?
Not yet...
") Maybe today!
Maybe today!twoturtlesracing
Slowwly but surely...
- Thread starter
- #123
More SOA write up...
So when you go SOA, you have to do something about your steering, as your springs are now above the axle, and your relay rod would now contact the springs in it's current configuration.
Most guys just go with hi-steer, but on the '78-older cruisers your options are limited because of the small pattern knuckles. The only option that I know of is to call Luke at 4X4 Labs and he can build you a set of arms that will work on the small pattern knuckles. However, since I will upgrade to large pattern knuckles when I convert to discs, I didn't want to spend money on that.
The only other option to make the SOA and factory steering work, is an old school double steering arm. You can buy one from Aqualu, but it is also a spendy option. I opted to make my own after getting the facts from this thread.
All I needed to make my own- was an extra passenger side steering arm and some 3/8" plate. I got the extra passenger side steering arm from Kurt @ Cruiser Outfitters for approx. $15. The plate I had laying around; or you could buy a drop at a steel shop.
To make it, I more or less followed the writeup below (Also found here)and used just a grinder and two 7/8" holesaws:
Double arm for SOA crossover steering
Written By: Anthony Bachman (Landcruiser Tech.)
Posted On 12/03/2011 08:39:23
If you are running a Landcruiser and plan on going Spring Over in the front, or have a ’79 thru ’85 truck that you want to do cross-over steering on, this article will show you how to make a double arm for the passenger side of the front axle. This article is based on a truck steering arm which is much thicker than the FJ40 arm, therefore when going spring over on a Cruiser I suggest Swapping over to Truck front knucles which allows you to use this thicker arm. When switching knuckles on a disc front end FJ40 you need only to replace the knuckles. When going spring over on a drum FJ40, I would highly suggest converting over to truck disc, to do this you must swap over the knuckles, birfields, spindles, hub/rotors, locking hubs, calipers, and backing plates (housing requires grinding to fit truck birfield).

To make the double arm, you need two passenger side knuckle arms. Take one arm and saw off the two cylinderical parts (the part that goes into the knuckle). This will be the top half of the arm assembly. I used a bandsaw to cut it. The next step is to clamp the cut arm into a milling machine and mill off the remainder of the cylinder until flush with the flat surface (this can be done with a hand held grinder). Now flip over the arm and mill the top side of the arm until flat (see picture) A steady hand and a lot of patience, and this might be able to be accomplished with a hand held grinder. Next drill out the four holes to a 1 inch diameter. This should allow enough room for the socket which is used to tighten the knuckle arm nuts.

Now take the second knuckle arm and mill (possible grind) the top surface to match the other arm (see picture above). With both arms all machined, clamp the top sides of the two arms together, aligning them by the four holes (not critical, align by eyeball). Now weld the arms together by welding all the way around the two mating surfaces. Next cut a triangle out of at least ¼" plate (I use ½" plate) to fit between the two arms. Weld the triangular brace into place.
Now you are ready to install the arm onto your front axle using the existing studs and nuts!!!
A tip that I might offer to make your life easier, is to make yourself a holesaw guide to cut out the bigger holes in the top knuckle out of a peice of plywood.
That's about it for your steering! Paint it, then bolt your new double steering arm back in!
So when you go SOA, you have to do something about your steering, as your springs are now above the axle, and your relay rod would now contact the springs in it's current configuration.
Most guys just go with hi-steer, but on the '78-older cruisers your options are limited because of the small pattern knuckles. The only option that I know of is to call Luke at 4X4 Labs and he can build you a set of arms that will work on the small pattern knuckles. However, since I will upgrade to large pattern knuckles when I convert to discs, I didn't want to spend money on that.
The only other option to make the SOA and factory steering work, is an old school double steering arm. You can buy one from Aqualu, but it is also a spendy option. I opted to make my own after getting the facts from this thread.
All I needed to make my own- was an extra passenger side steering arm and some 3/8" plate. I got the extra passenger side steering arm from Kurt @ Cruiser Outfitters for approx. $15. The plate I had laying around; or you could buy a drop at a steel shop.
To make it, I more or less followed the writeup below (Also found here)and used just a grinder and two 7/8" holesaws:
Double arm for SOA crossover steering
Written By: Anthony Bachman (Landcruiser Tech.)
Posted On 12/03/2011 08:39:23
If you are running a Landcruiser and plan on going Spring Over in the front, or have a ’79 thru ’85 truck that you want to do cross-over steering on, this article will show you how to make a double arm for the passenger side of the front axle. This article is based on a truck steering arm which is much thicker than the FJ40 arm, therefore when going spring over on a Cruiser I suggest Swapping over to Truck front knucles which allows you to use this thicker arm. When switching knuckles on a disc front end FJ40 you need only to replace the knuckles. When going spring over on a drum FJ40, I would highly suggest converting over to truck disc, to do this you must swap over the knuckles, birfields, spindles, hub/rotors, locking hubs, calipers, and backing plates (housing requires grinding to fit truck birfield).
To make the double arm, you need two passenger side knuckle arms. Take one arm and saw off the two cylinderical parts (the part that goes into the knuckle). This will be the top half of the arm assembly. I used a bandsaw to cut it. The next step is to clamp the cut arm into a milling machine and mill off the remainder of the cylinder until flush with the flat surface (this can be done with a hand held grinder). Now flip over the arm and mill the top side of the arm until flat (see picture) A steady hand and a lot of patience, and this might be able to be accomplished with a hand held grinder. Next drill out the four holes to a 1 inch diameter. This should allow enough room for the socket which is used to tighten the knuckle arm nuts.
Now take the second knuckle arm and mill (possible grind) the top surface to match the other arm (see picture above). With both arms all machined, clamp the top sides of the two arms together, aligning them by the four holes (not critical, align by eyeball). Now weld the arms together by welding all the way around the two mating surfaces. Next cut a triangle out of at least ¼" plate (I use ½" plate) to fit between the two arms. Weld the triangular brace into place.
Now you are ready to install the arm onto your front axle using the existing studs and nuts!!!
A tip that I might offer to make your life easier, is to make yourself a holesaw guide to cut out the bigger holes in the top knuckle out of a peice of plywood.
Here is a picture of mine:

And a picture of the process of cutting the top of the steering arm flat with a cutting disc on the grinder:

Then using soapstone and a flat-edge to make sure it is good and flat (Mark it with the soapstone and then slide your flat adge across the top- it'll scrape off the soapstone on the high spots:


And a picture of the process of cutting the top of the steering arm flat with a cutting disc on the grinder:
Then using soapstone and a flat-edge to make sure it is good and flat (Mark it with the soapstone and then slide your flat adge across the top- it'll scrape off the soapstone on the high spots:
That's about it for your steering! Paint it, then bolt your new double steering arm back in!
Last edited:
twoturtlesracing
Slowwly but surely...
- Thread starter
- #124
More SOA writeup...
Now that your front and back axles have the spring pads relocated- and your steering is taken care of- all you need to do is bolt the springs to your rig, your axles to the springs, and re-connect everything else that was disconnected in post #97 with the exception of driveshafts. (Make sure and bleed your brake system well, as it WILL have air in it now.)
Your rig is now sitting on it's own weight for the first time in it's new SOA configuration!
There's more work to be done before you can drive your rig though...
The next step is driveshafts. You need to clearance them (Unless you are lucky enough to find the rather rare 3speed assemblies that Mark W. mentions a few times) and get them lengthened.
I clearanced mine using a nifty little tool that I bought that turns my grinder in to a die grinder, and just used a carbide burr as you would in a die grinder. I then clearanced them where the shoulders of the yolks hit the flange until I had substantially increased my clearance. This took a lot of time and was very tedious. Definitely the most unpleasant part of the whole SOA for me! Unfortunately, I forgot to take any pictures of the process. However, here are a few of the driveline on the rig, as I couldn't find much when I searched 'Mud and would like to put some on for reference.
Now that the rig is sitting on it's own weight and is driveable- it is now time to go flex out your new SOA, measure travel, and decide what length and how your going to mount your shocks. I will cover this in the next portion of this write up, as I still need to do some R&D before I am totally done with mine- especially since I am going with a set of 60 springs in the back for added travel and better-still ride quality.
Now that your front and back axles have the spring pads relocated- and your steering is taken care of- all you need to do is bolt the springs to your rig, your axles to the springs, and re-connect everything else that was disconnected in post #97 with the exception of driveshafts. (Make sure and bleed your brake system well, as it WILL have air in it now.)
Your rig is now sitting on it's own weight for the first time in it's new SOA configuration!
There's more work to be done before you can drive your rig though...
The next step is driveshafts. You need to clearance them (Unless you are lucky enough to find the rather rare 3speed assemblies that Mark W. mentions a few times) and get them lengthened.
I clearanced mine using a nifty little tool that I bought that turns my grinder in to a die grinder, and just used a carbide burr as you would in a die grinder. I then clearanced them where the shoulders of the yolks hit the flange until I had substantially increased my clearance. This took a lot of time and was very tedious. Definitely the most unpleasant part of the whole SOA for me!
Unfortunately, I forgot to take any pictures of the process. However, here are a few of the driveline on the rig, as I couldn't find much when I searched 'Mud and would like to put some on for reference.Pic #1

Pic #2:

Pic #3:

Pic #4:

Now that they are clearanced, it is time to measure for length. Just using a tape measure, get a good measurement from flange face to flange face, at the same spot on the flanges, with the rig sitting on it's own weight. Take these measurements- and your shafts- to a good driveline shop and and have them lengthened and balanced. The shop will account for droop and compression when they lengthen them, so you don't have to worry about getting measurements for those. Most shops can have them done the same day. My front and rear shafts cost $101.72 and $87.48- respectively- to have lengthened, balanced, and painted! I used Driveline Services in Colorado Springs and was very happy with them.
When you get your shafts back, eyeball them to make sure that your yolks line up. If they do not very closely line up (within a degree or two), point it out to the shop, and have them fix it. I learned this the hard way when I had a shaft lengthened for the first time when I put my SUA lift on. I had u-joints go bad on me very quickly when the shaft that a supposedly good shop lengthened for me wasn't lined up. That was a $200+ mistake that I ate because I had it done at a shop that was 6 hours away while I was on vacation.
Another thing to check, is to make sure that your ujoints are good before you take them into the shop. It is usually much cheaper to buy ujoints yourself than to buy them through the driveline shop. The shop might even press the new ones if for you for free if your nice to them!
Now, put your driveshafts back in, double check to make sure that EVERYTHING is tight and back together and...............the part you've been waiting for............... fire up your rig! 

Now that the rig is sitting on it's own weight and is driveable- it is now time to go flex out your new SOA, measure travel, and decide what length and how your going to mount your shocks. I will cover this in the next portion of this write up, as I still need to do some R&D before I am totally done with mine- especially since I am going with a set of 60 springs in the back for added travel and better-still ride quality.
Please stay tuned!....
I think for now I'm gonna stay SUA with a lift, but I am still interested in how those 60 series springs work out and how much your wheelbase changes. Maybe have Alcan build me some lifted ones as I can only find 2 1/2 in. lifted springs for the 60. I have to fix my rear main seal first.
twoturtlesracing
Slowwly but surely...
- Thread starter
- #126
SOA Conversion cont.....
So I finally got around to getting my 60 series spring on my rig a couple of weeks ago , so I wanted to post some pictures of the wheelbase, bushings, and etc.
I'll let the pictures do most of the talkin...
So I finally got around to getting my 60 series spring on my rig a couple of weeks ago
, so I wanted to post some pictures of the wheelbase, bushings, and etc.I'll let the pictures do most of the talkin...
Old Man Emu bushings (Part#:OMESB30) that allow early-78 40's & 55's to run newer 40/60 series springs (The 60 series and 79 newer 40's spring eyes have a larger spring eye ID on than the older springs.)
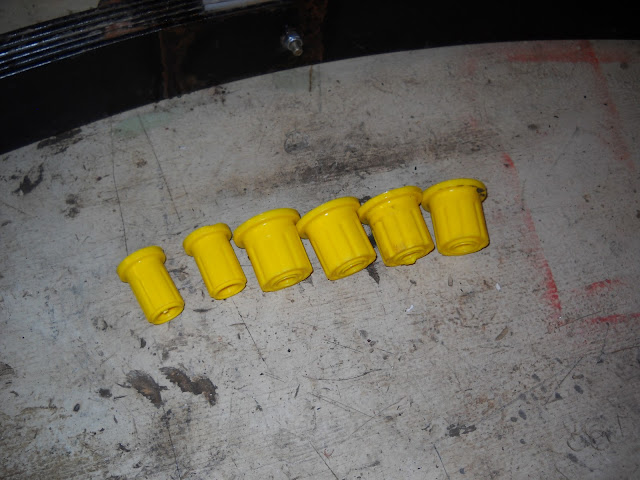
Difference in springs eyes: 40 springs above, 60 springs below

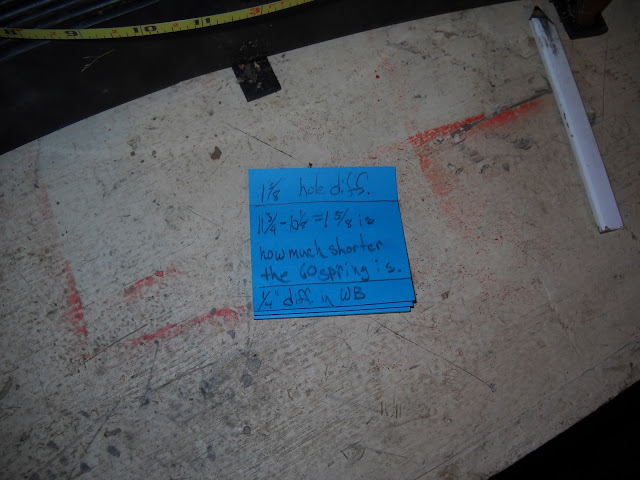
The difference in length of the long side of an FJ40 spring, and the short side of an FJ60 spring. (This was measured with the springs on the vehicle with weight on them. 1' 11-3/4" and 1' 10-1/8"- respectively)

When I reversed the 40 springs for my SOA, I drilled a new hole in the spring perch to bring the wheelbase back- closer to stock. In retrospect, I was glad I did this, because of the difference on length of the springs- If I hadn't of done this, I would have had to have my driveshaft shortened because of the slightly shorter length of the short side of the 60 spring- this would have incurred more cost, but as it was, the difference was only a 1/4".

I drilled the hole back an 1-3/8" and the total difference in spring length is and 1-5/8" for a total wheelbase difference of 1/4"
A not-very-good picture of the rig on 60 springs in the rear:

The longer springs give a nice laid back shackle angle even with my new
6-1/2" shackles
6-1/2" shackles

And lots, and lots, and lots of droop!  :
:
:
Did you guys know that Mitsubishi made the original springs on your rig? When I cleaned and painted mine, i was able to clean them up well enough you could see the logo, then masked it off and painted around it. Pretty cool huh? If you don't believe me, ask Mark A!
(Btw, this set of springs is for sale if you need a good set of original, soft FJ40 springs. They would still work for SUA or great for SOA!)
(Btw, this set of springs is for sale if you need a good set of original, soft FJ40 springs. They would still work for SUA or great for SOA!)

Thanks for lookin, and please stay tuned!
good info thanks for the pics
QuackAxel
SILVER Star
no cut and turn?
twoturtlesracing
Slowwly but surely...
- Thread starter
- #130
good info thanks for the pics
Thanks!
no cut and turn?
No, no C&T, and I am VERY happy with it! It drives better than it did with a SUA lift, as good or better than when I got it stock, and at this point, the only reason I see for a cut and turn would be if you want to keep everything up out of the rocks a little more. But is really going to protect it that much? Wasn't worth it to me.
Last edited:
twoturtlesracing
Slowwly but surely...
- Thread starter
- #131
A couple of pictures of the rig with the SOA completed (Shock mounts etc...):


Alright, enough Cruiser porn- tech writeups on 60 Dizzy swap, rear shock mounts, and more coming soon!
Please stay tuned!
Please stay tuned!
Last edited:
QuackAxel
SILVER Star
well the main reason to cut and turn your housing is pinion angle. regardless of how it preforms now when you have a vehicle lifted over 5" SUA or SOA you should do a cut and turn.
if you dont, which im sure your aware... it creates extreme drive line angles.
which in turn creates binding when flexed out. and binding breaks things.
not taking anything away from your build or rig at all! great build up!
i might have missed it but did you install a wrap/sway bar?
if you dont, which im sure your aware... it creates extreme drive line angles.
which in turn creates binding when flexed out. and binding breaks things.
not taking anything away from your build or rig at all! great build up!
i might have missed it but did you install a wrap/sway bar?
twoturtlesracing
Slowwly but surely...
- Thread starter
- #133
Thanks for the compliments
Not necessarily... I have no binding issues whatsoever. Not at full droop, compression or anywhere in between.
earlier in my thread, you'll find links to discussions that have far more experienced cruiserheads than I explain why and how it works. (Mark W. being the most well known) They are worth reading.
That a cut and turn MUST be done is a myth. One I would like to dispell as much as possible. Earlier in my write up I've also mentioned some of the ways to not have any binding.
Btw, did I mention my SOA cost me less than $400? And that is on the outside?")
Not necessarily... I have no binding issues whatsoever. Not at full droop, compression or anywhere in between.
earlier in my thread, you'll find links to discussions that have far more experienced cruiserheads than I explain why and how it works. (Mark W. being the most well known) They are worth reading.
That a cut and turn MUST be done is a myth. One I would like to dispell as much as possible. Earlier in my write up I've also mentioned some of the ways to not have any binding.
Btw, did I mention my SOA cost me less than $400? And that is on the outside?
Last edited:
Excuse me if I missed the post, but what did you do to your front shackle hangers to be able to mount the 60 rear springs up front? Did you relocate your shackle hangers forward more?
twoturtlesracing
Slowwly but surely...
- Thread starter
- #135
srgould41 said:Excuse me if I missed the post, but what did you do to your front shackle hangers to be able to mount the 60 rear springs up front? Did you relocate your shackle hangers forward more?
Can't remember if I posted up about that or not.... I'll have to go back and edit if I didn't.
And just to be clear: We are talking about the front end of the rear springs right? Nothing was done to them. Just used the man-a-fre conversion bushings. They are in factory location, factory hangar.
Super simple! HTH!That was exactly what I was talking about. So if you used 60 rear springs in front then your shackle angle would be way forward, right? The angle in your pics looked perfect.
Can't remember if I posted up about that or not.... I'll have to go back and edit if I didn't.
And just to be clear: We are talking about the front end of the rear springs right? Nothing was done to them. Just used the man-a-fre conversion bushings. They are in factory location, factory hangar.
I've just finished reading your build up. Very nice truck and very interesting build. Have you gone power steering? I am about to tackle a no c&t spring over in the next few weeks and plan on following the steps you have laid out. Thanks for all the helpful info.
MicahMan
TLCA 20925
Seriously sweet rig. I'm on the fun part of my build now. Mine runs and starts everytime so the lift ideas are going. I am seriously amazed at how smooth your rig is.
tucker74
Moderator
Not going to say anything for or against a double arm, but having wheeled one for 3-4 years I will suggest you keep your knuckles torqued and check them oftenThat's about it for your steering! Paint it, then bolt your new double steering arm back in!
The torque created by the double arm loosens up the nuts and cone washers, especially when wheeling ...Tucker
twoturtlesracing
Slowwly but surely...
- Thread starter
- #140
That was exactly what I was talking about. So if you used 60 rear springs in front then your shackle angle would be way forward, right? The angle in your pics looked perfect.
I think I understand where you are going with this question now- Yes, just putting 60 rear springs on the front would work with a longer shackle and if you put the short side to the frame, it would move your front axle the same amount forward as my front axle is currently- then you would just need a longer shackle. (Although, I have moved my shackle hangar on the back for reasons pertaining to my SUA lift- I moved it back to what I thought it was originally but it may not be exact. If you want to measure the distance from the rear bumper to center of your shackle hangar, I could measure mine also to give you a comparison.)
However, putting the springs on this way (Short side/frame side-long side/shackle side) would put the long side out front with a long shackle and would decrease your approach angle- something I certainly wouldn't want to do. If I ever put 60 rears on the front, I think that I would move the spring hangars from the factory locations so that I could keep the wheels where they are currently in relation to the fender.
Just my .02
I've just finished reading your build up. Very nice truck and very interesting build. Have you gone power steering? I am about to tackle a no c&t spring over in the next few weeks and plan on following the steps you have laid out. Thanks for all the helpful info.
Thanks!
I have not got my PS done yet. As mentioned, I have everything that I would need to go mini-truck power steering, but that is not the stoutest PS out there... Will probably do that just to say I've done it and have PS, but imagine I'll then wind up with 60 Series PS...
Seriously sweet rig. I'm on the fun part of my build now. Mine runs and starts everytime so the lift ideas are going. I am seriously amazed at how smooth your rig is.
Thank you!
Not going to say anything for or against a double arm, but having wheeled one for 3-4 years I will suggest you keep your knuckles torqued and check them often
Tucker
Thanks Tucker! That is good info to have in this thread! I will be certain to keep an eye on them.
I hope to have large pattern knuckles, discs, hi-steer,and better hubs on my rig by fall- I guess we'll see if time and money allow it!
Similar threads
Users who are viewing this thread
Total: 1 (members: 0, guests: 1)