Navigation
Install the app
How to install the app on iOS
Follow along with the video below to see how to install our site as a web app on your home screen.
Note: This feature may not be available in some browsers.
More options
Style variation
You are using an out of date browser. It may not display this or other websites correctly.
You should upgrade or use an alternative browser.
You should upgrade or use an alternative browser.
Builds A few mods from 7-25-06
- Thread starter Corey
- Start date
This site may earn a commission from merchant affiliate
links, including eBay, Amazon, Skimlinks, and others.
More options
Who Replied?- Thread starter
- #42
Nope, up past the Muckleshoot.
Same street too for Central 4WD if I headed North about 11 miles.
Same street too for Central 4WD if I headed North about 11 miles.


- Thread starter
- #44
You are welcome.
FJs are fun to mod")
Looks like you are having fun already with yours.
FJs are fun to mod
Looks like you are having fun already with yours.
- Thread starter
- #46
Good info, but it does not apply to the Cooper STTs which mine are a clone of.
Only time will tell how these hold up, but so far I am diggin' these Dick Cepeks.
My tires are not listed still on Cepek's site, I beleive it is because they were made specifcaly for the Les Schwab Tire Center chain.
Only time will tell how these hold up, but so far I am diggin' these Dick Cepeks.
My tires are not listed still on Cepek's site, I beleive it is because they were made specifcaly for the Les Schwab Tire Center chain.
Corey said:Good info, but it does not apply to the Cooper STTs which mine are a clone of.
Only time will tell how these hold up, but so far I am diggin' these Dick Cepeks.
My tires are not listed still on Cepek's site, I beleive it is because they were made specifcaly for the Les Schwab Tire Center chain.
The STT's are not listed there, but S/T's and Dick Cepek Fun Country II (also produced by Cooper) - which I also considered - are.

I didn't see any reports on various 4x4 forums I researched for tires though.
Maybe we, as a group, tend to take care of tires better...
- Thread starter
- #48
THe 5 minute horn mod 11-14-2006
If it take 5 minutes or less for this old fart to do it, you young buckaroos can do it in half the time
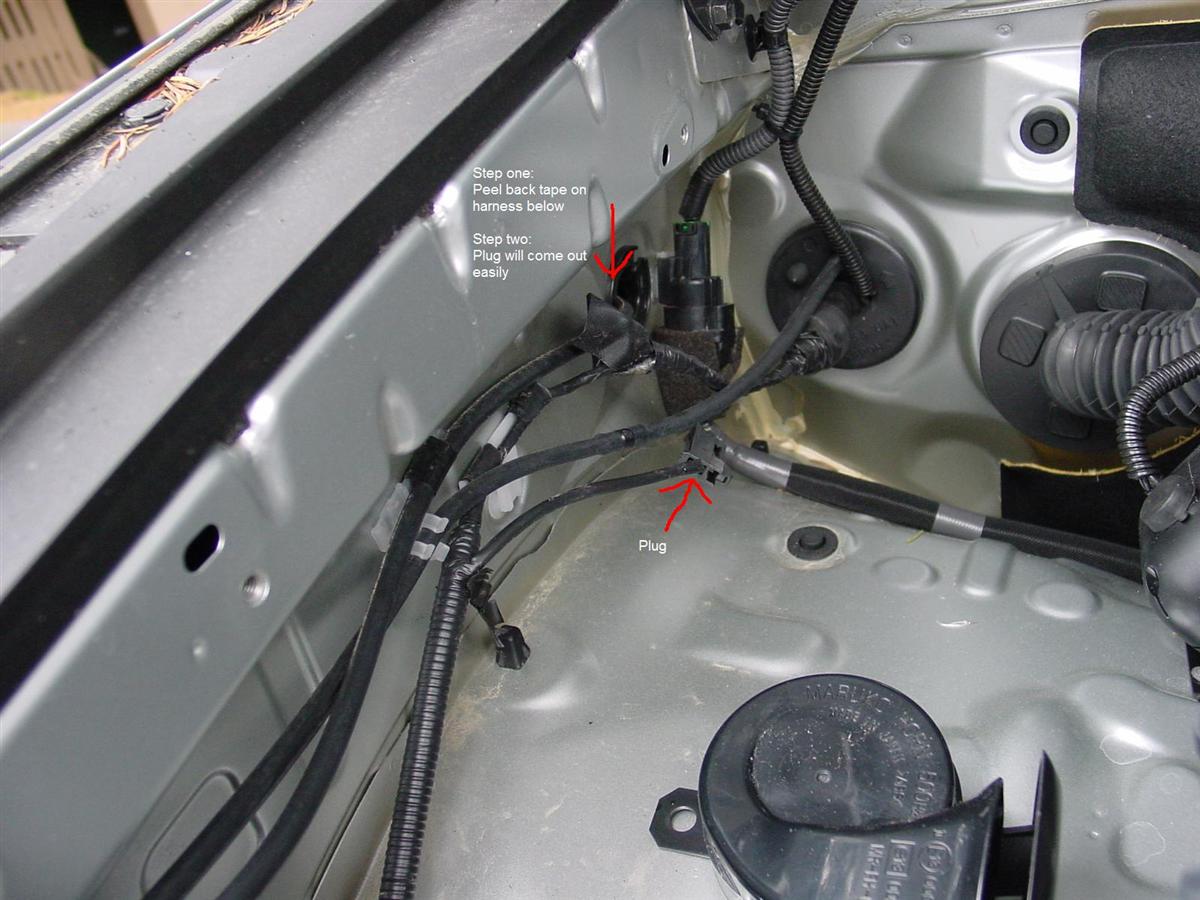
Step one:
Peel back the tape off of the harness under the hood.
Step two:
Harness with plug on it is in there, pull it out, and it has a little bit of gray tape around it holding it to the bigger wire that was under the tape you peeled back.

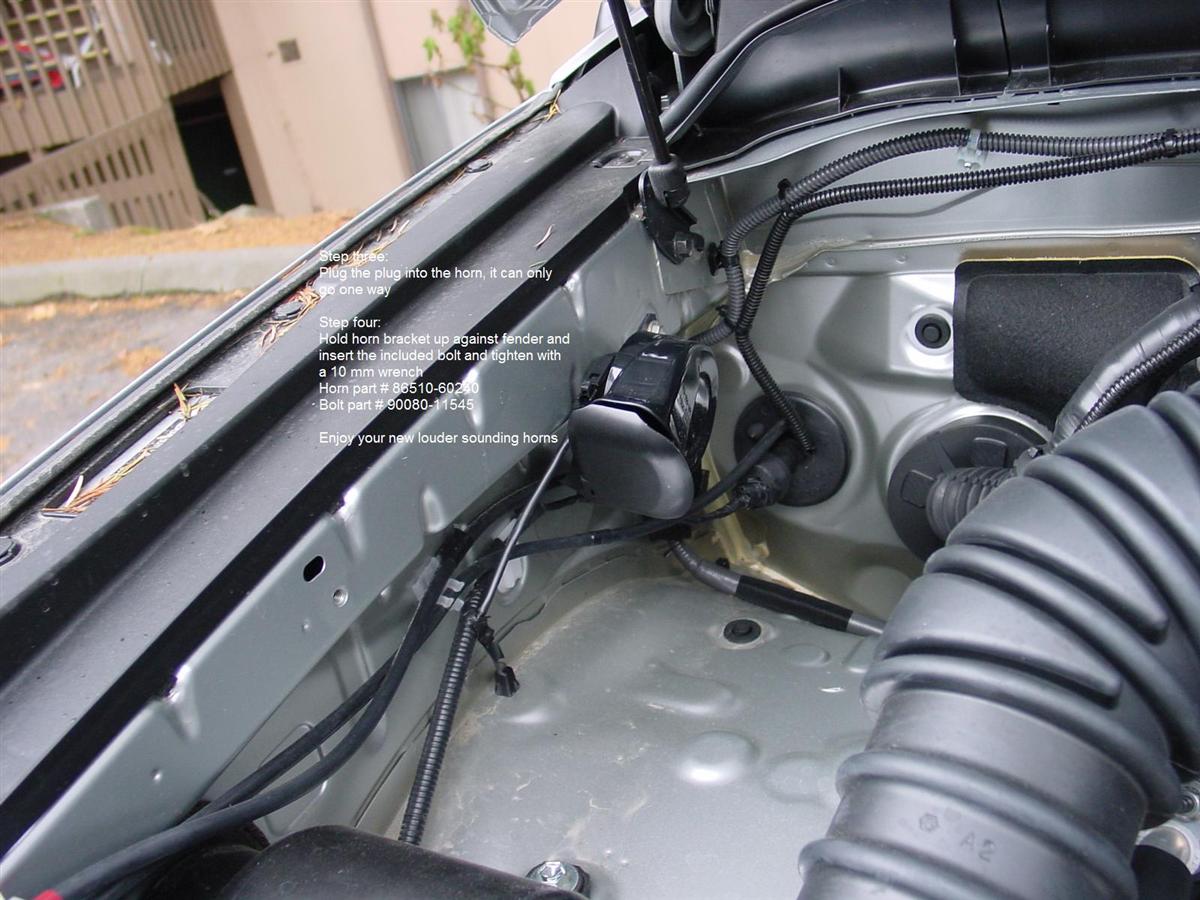
Step three:
Take plug and plug it into the horn.
Step four:
Take horn and position on the fender the way you want it.
Take the included bolt and insert into the hole in the fender and do the righty tighty with a 10 mm wrench.

That is all there is to it.
Very easy.
Here is a 2.5 MB WMV video of before and after.
So easy, and it did take less than 5 minutes to install.
Now I can be heard more easily.
Part numbers are in the vid and pictures, but I will post them here too.
Bought these from TRD Parts 4U
Horn part # 86510-60240
Bolt part # 90080-11545
If it take 5 minutes or less for this old fart to do it, you young buckaroos can do it in half the time
Step one:
Peel back the tape off of the harness under the hood.
Step two:
Harness with plug on it is in there, pull it out, and it has a little bit of gray tape around it holding it to the bigger wire that was under the tape you peeled back.
Step three:
Take plug and plug it into the horn.
Step four:
Take horn and position on the fender the way you want it.
Take the included bolt and insert into the hole in the fender and do the righty tighty with a 10 mm wrench.
That is all there is to it.
Very easy.
Here is a 2.5 MB WMV video of before and after.
So easy, and it did take less than 5 minutes to install.
Now I can be heard more easily.
Part numbers are in the vid and pictures, but I will post them here too.
Bought these from TRD Parts 4U
Horn part # 86510-60240
Bolt part # 90080-11545
- Thread starter
- #49
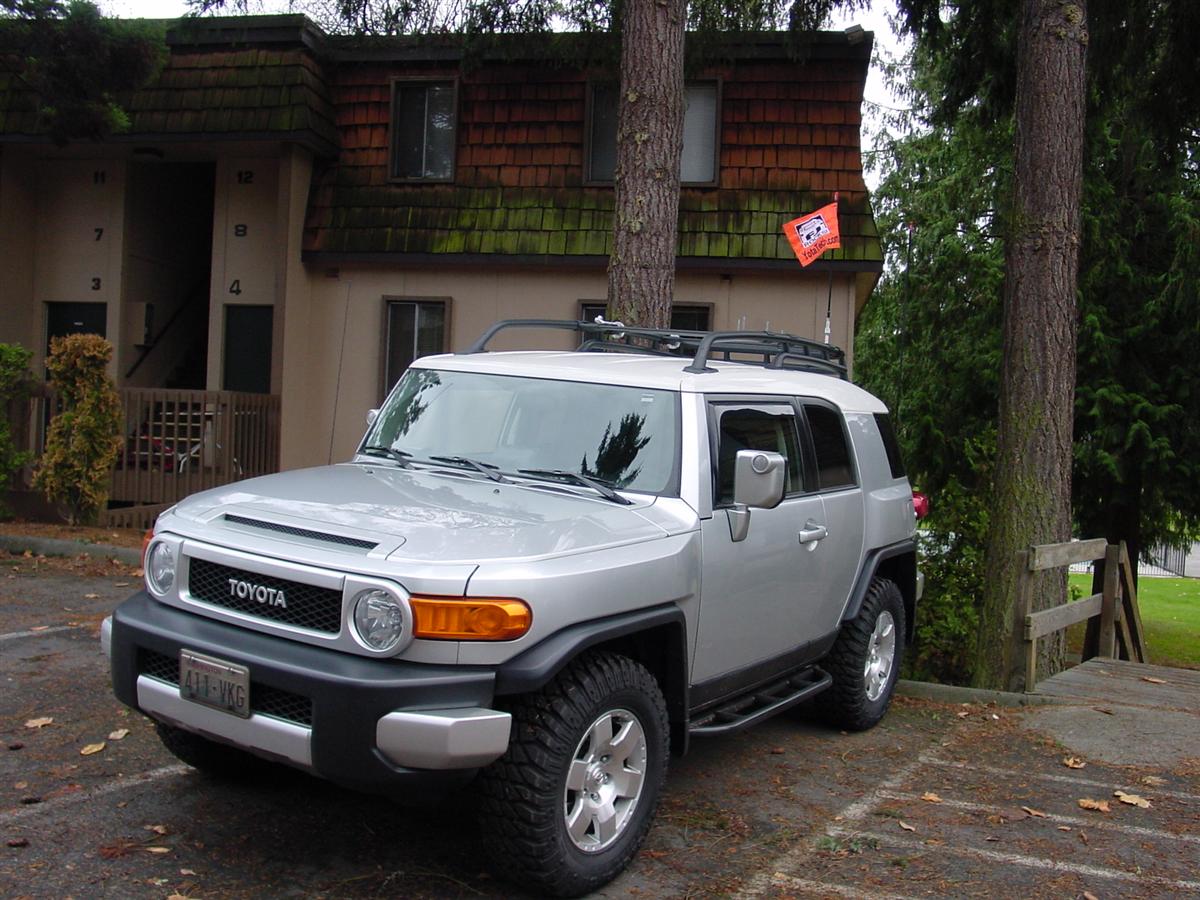
11-20-2006 'Tis a moderful Monday, new flag mount
I was not happy with my 7' Firestik flag pole I had mounted to a trailer hitch.
There was to much sway in it.
I saw this posted by member BDFJ, and I got in touch with his friend who just signed up on YotaTech, and his member name is mschradercnc.
If you would like one of these flag mounts, you can contact him, or PM me for his email address.
From the ground to the top of his mount with the HD CB spring on it, it was around 6'10".
To be legal in WA. and OR. state when running sand dunes, your flag must be about 9' off the ground.
I cut down the 7' pole to 30", that leave me a little over 9' tall.
I am also using a quick disconnect CB antenna mount similar to what I have on my 4' Firestik II CB antenna.
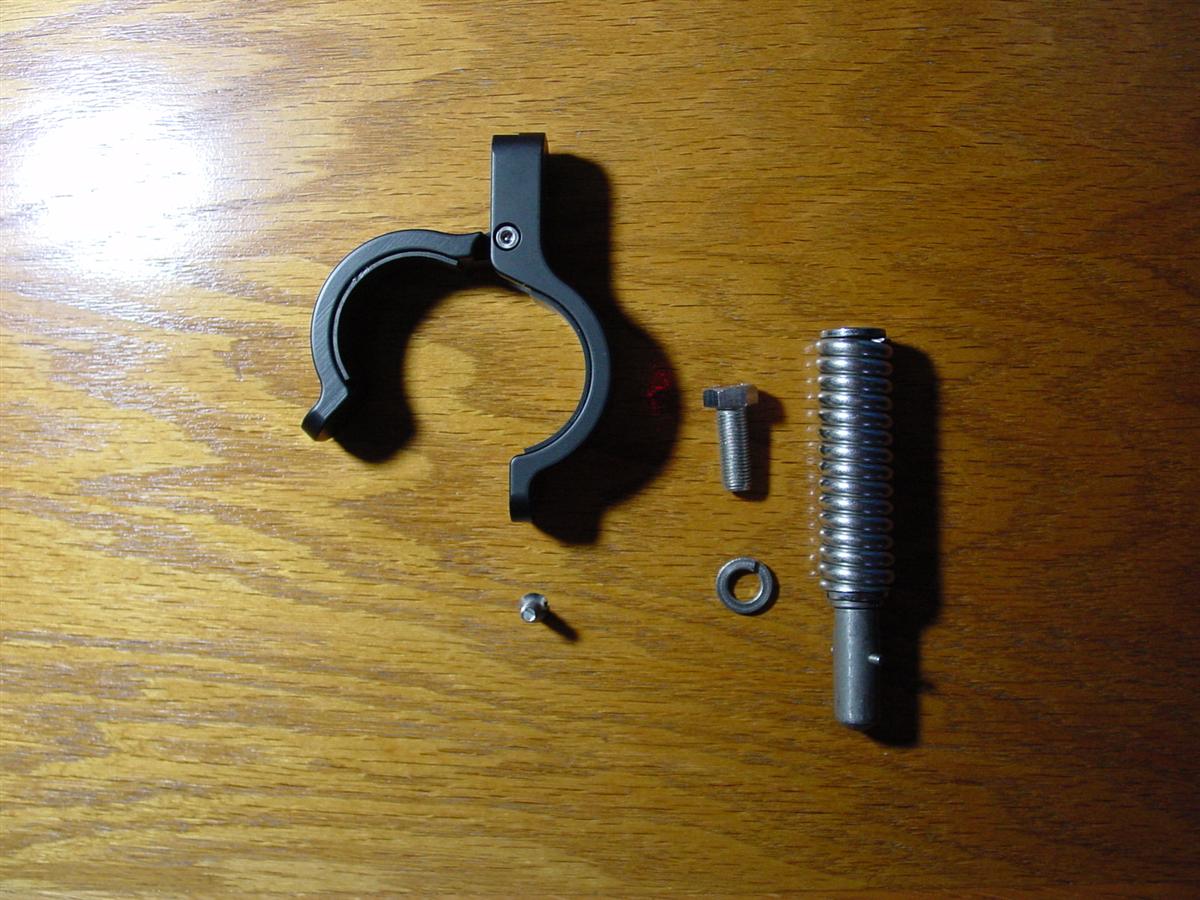
The first picture below shows his mount and the supplied screw.
That is what you get.
The other stuff on the right side of the picture is 1/2 of my quick disconnect mount, a lock washer to go under the spring, and a bolt.
When putting the bolt into the bracket, Mark designed it so you do not have to use a wrench.
The bolt fits in a groove and is held in tight.
You just tighten down your spring, or if not using a spring, the pole.
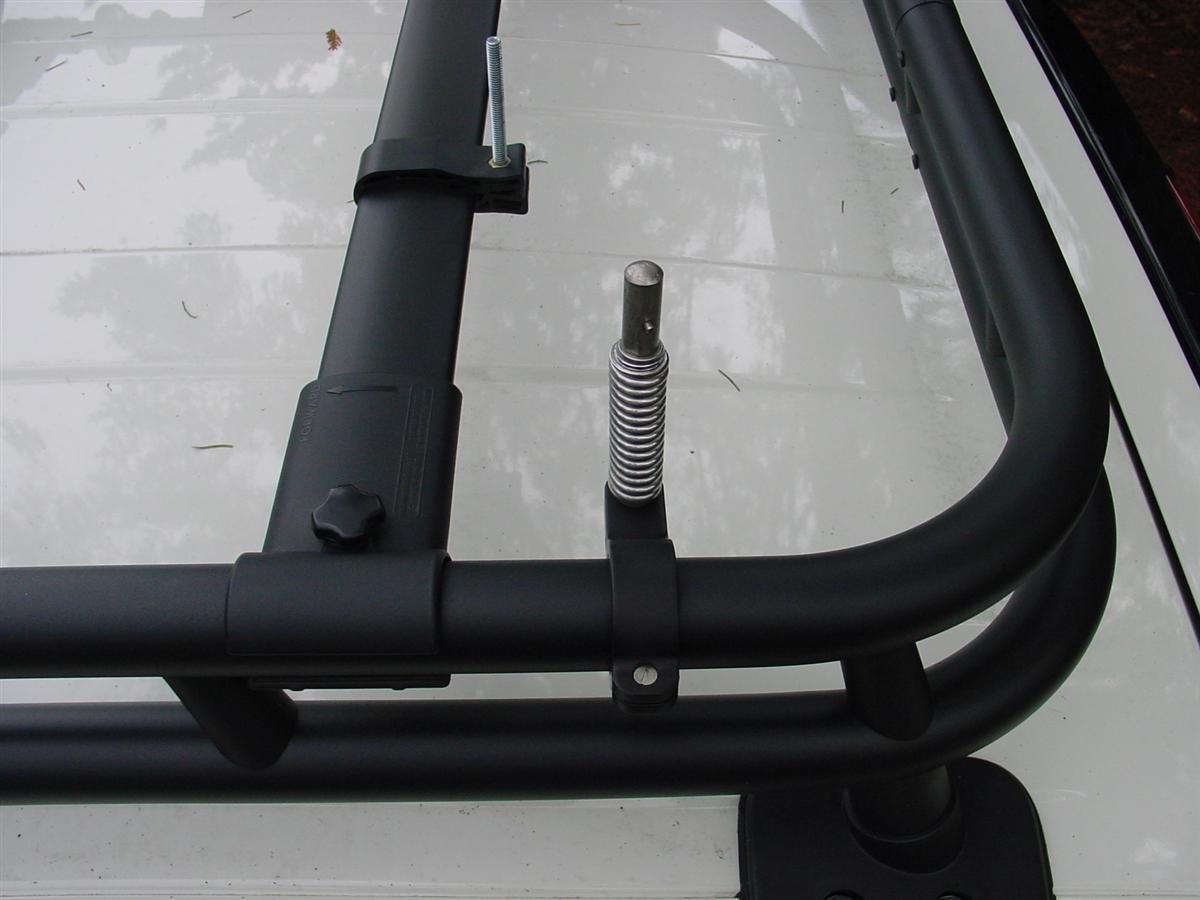
This is really a cool mount, and a lot less sway than using a long pole.
This mount is made for a 1.75" round tube such as the FJ Cruisers round tubes on the rack.
Mark has some other cool stuff in the works for the future, so stay tuned to this thread...
The flag I had made by Devil Woman Flags, a vendor on YotaTech.
You can get just abut any artwork of yours made into a flag, and she also has custom flags already made up.


I was not happy with my 7' Firestik flag pole I had mounted to a trailer hitch.
There was to much sway in it.
I saw this posted by member BDFJ, and I got in touch with his friend who just signed up on YotaTech, and his member name is mschradercnc.
If you would like one of these flag mounts, you can contact him, or PM me for his email address.
From the ground to the top of his mount with the HD CB spring on it, it was around 6'10".
To be legal in WA. and OR. state when running sand dunes, your flag must be about 9' off the ground.
I cut down the 7' pole to 30", that leave me a little over 9' tall.
I am also using a quick disconnect CB antenna mount similar to what I have on my 4' Firestik II CB antenna.
The first picture below shows his mount and the supplied screw.
That is what you get.
The other stuff on the right side of the picture is 1/2 of my quick disconnect mount, a lock washer to go under the spring, and a bolt.
When putting the bolt into the bracket, Mark designed it so you do not have to use a wrench.
The bolt fits in a groove and is held in tight.
You just tighten down your spring, or if not using a spring, the pole.
This is really a cool mount, and a lot less sway than using a long pole.
This mount is made for a 1.75" round tube such as the FJ Cruisers round tubes on the rack.
Mark has some other cool stuff in the works for the future, so stay tuned to this thread...
The flag I had made by Devil Woman Flags, a vendor on YotaTech.
You can get just abut any artwork of yours made into a flag, and she also has custom flags already made up.


- Thread starter
- #50
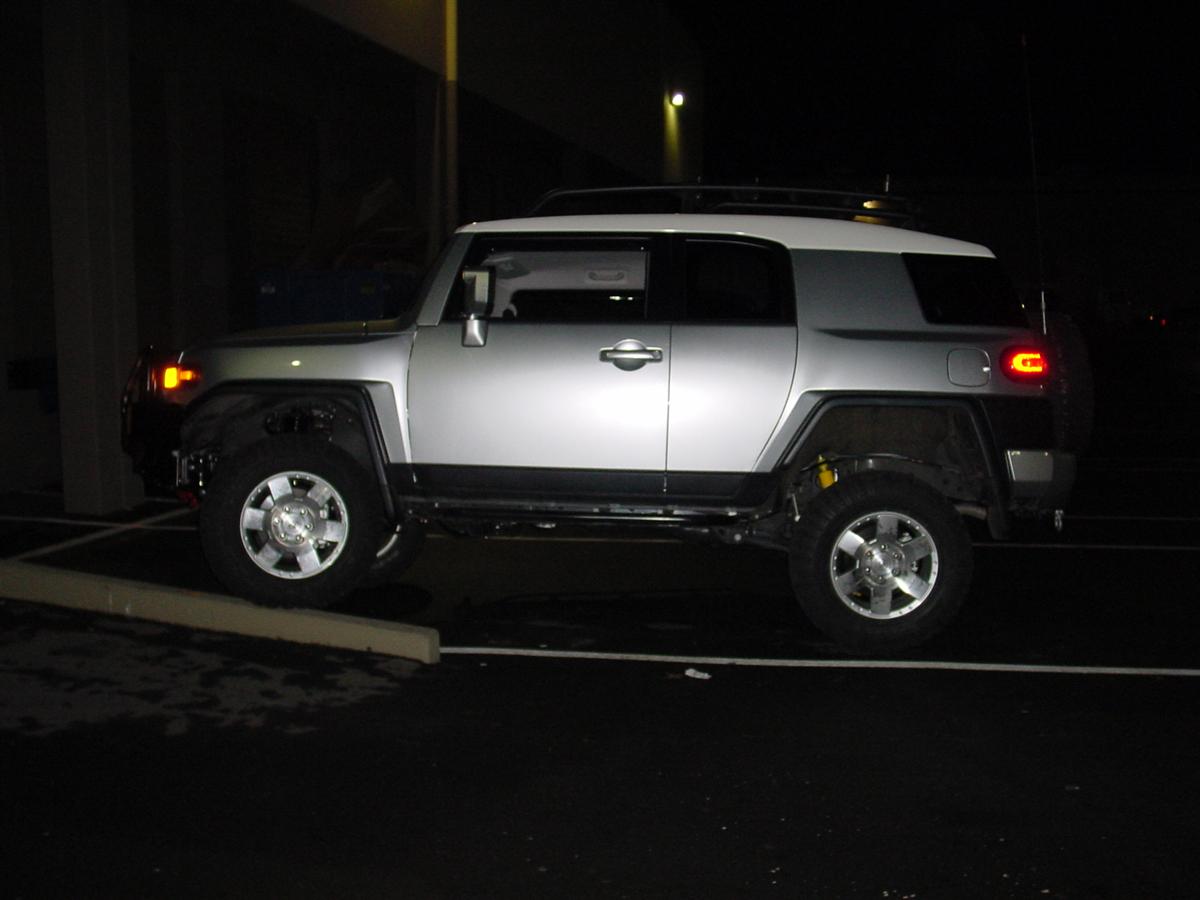
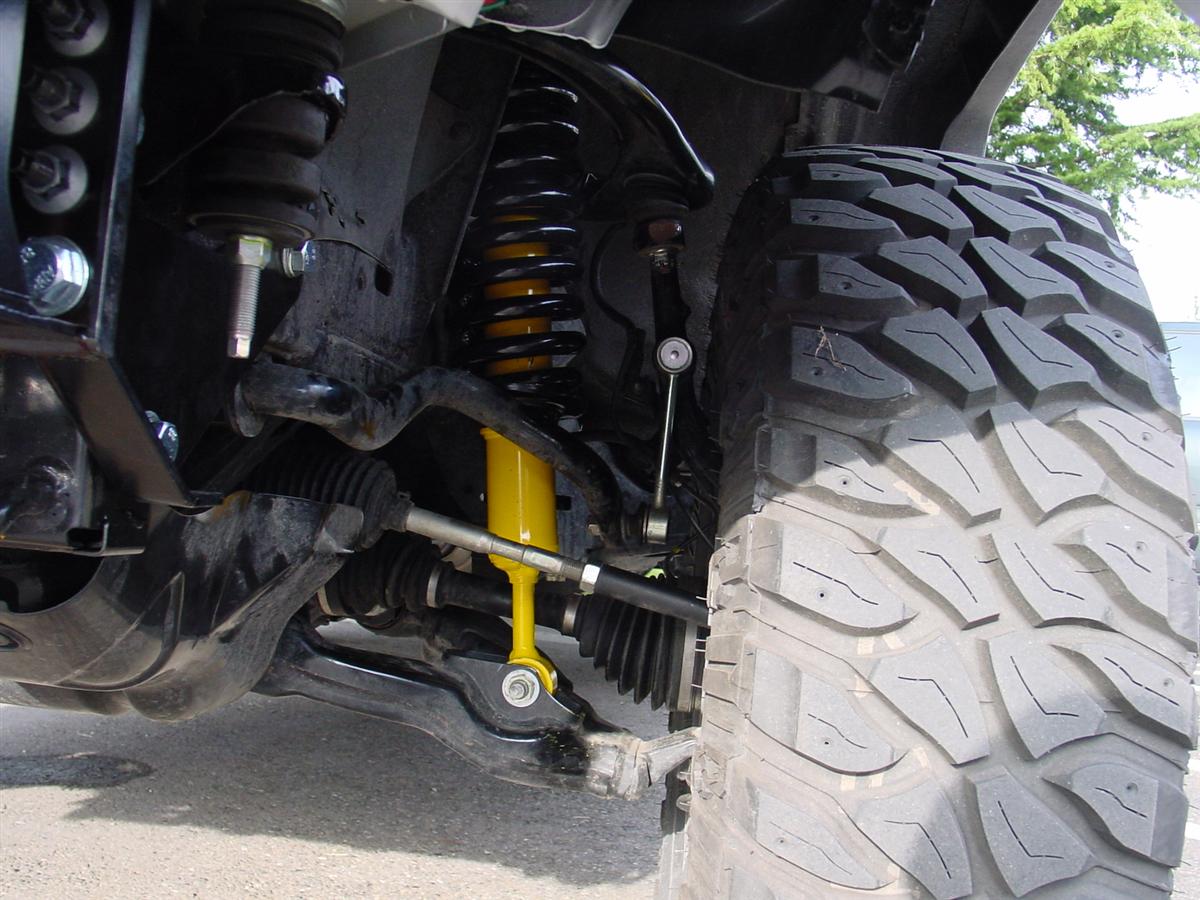
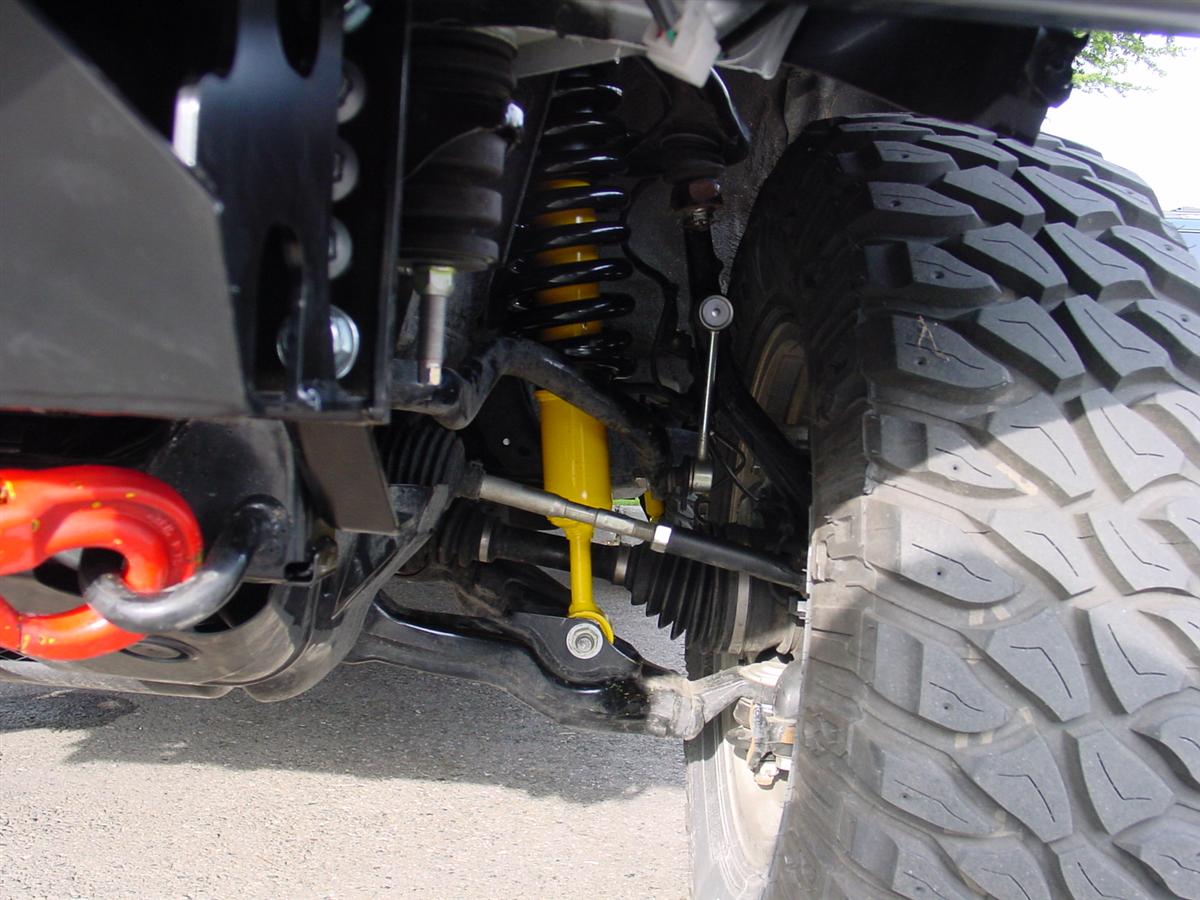
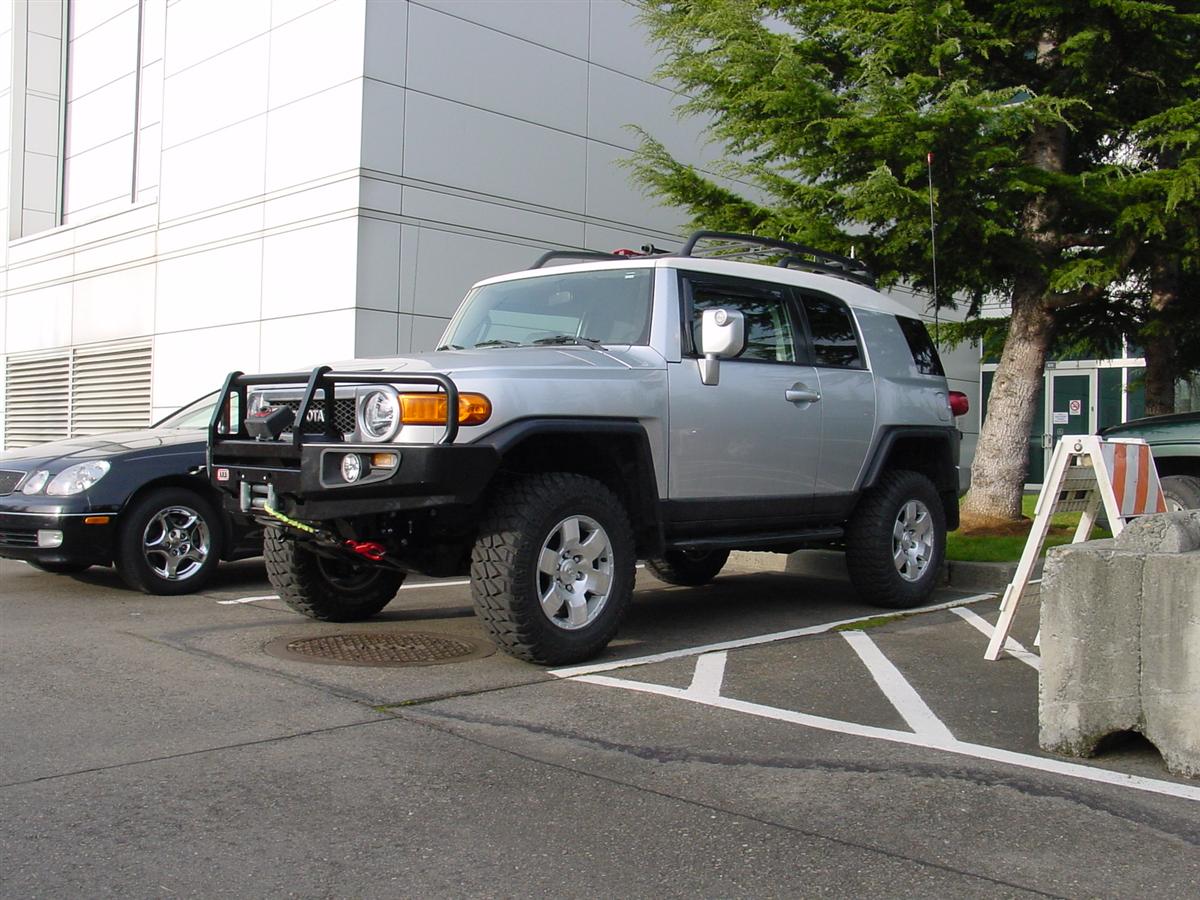
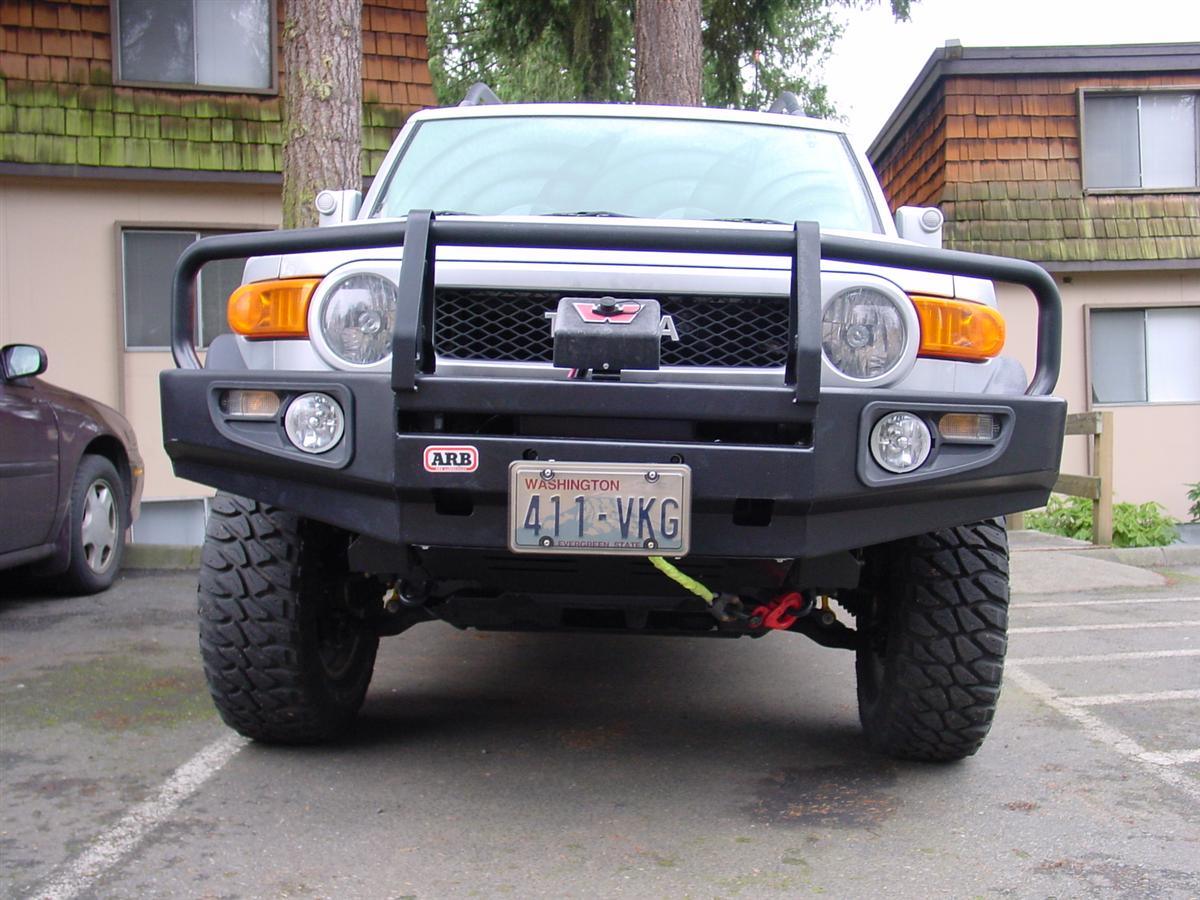
ARB bumper, OME lift, IPF fogs, and Warn XD9000 Installed 12-05-2006
Was to tired to post pics yesternight, got home late and it was dark.
Only got two pics yesternight anyways.
Took some more at work today, but it was very overcast, so they did not turn out the best.
Plus the rig is downright filthy from last weeks snow/ice storm.
Finally got all the goodies installed Tuesday at the shop.
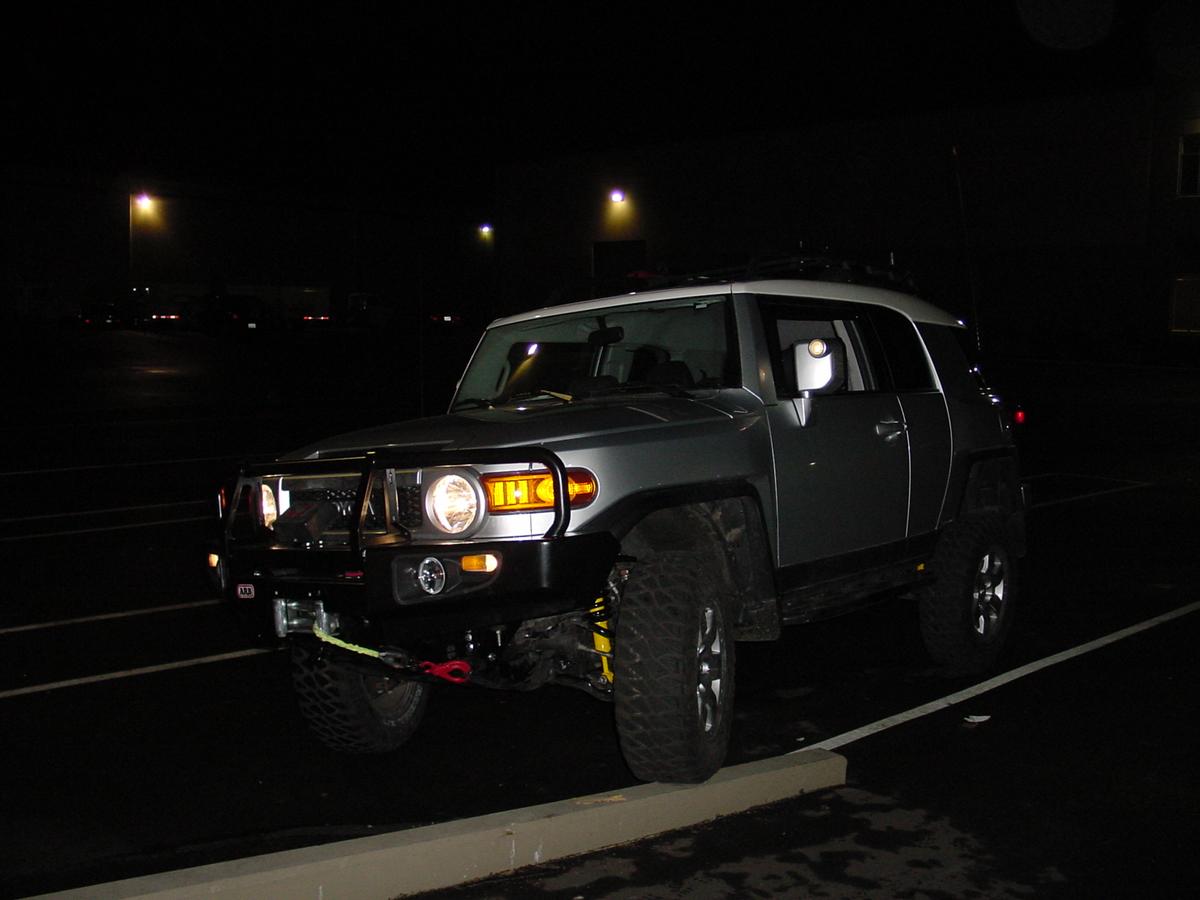
ARB, (A Real Bumper) OME 3" lift, IPF fog lights in the ARB and Toyota switch in the dash, and my old Warn XD 9000 winch from the '91 4Runner.
Why did I go with the ARB bumper when there are others out there too?
ARB has been in the business a long time, and their products are air bag compatible, and I really liked the quality of my old ARB on the 4Runner.
The bumper is top notch material.
The Old Man Emu is a proven lift, and from all the FJ Cruiser owners I have conversed with, they are extremely happy with the setup.
I got the 886 coils up front to handle the extra weight of the bumper and winch, and the 895 regular coils back aft.
I plan on adding an ARB rear bumper later (when available) and I may have to upgrade to the 896 coils, not 100% sure yet.
The Warn XD9000 winch is a workhorse, and perfectly suited for the FJ and other Toyotas.
It is well enough to handle any situation.
The IPF fog lights are installed into the lower part of the ARB bumper and look factory.
A factory Toyota switch in the dash controls them.
I want to thank Phil and company at TRD Parts 4U, they are an ARB dealer, and great to work with.
I have ordered quite a few things in the past for the FJ from them, and the pricing is very good.
I will wait until next week to get the rig into Toyota to get my front end aligned.
I want to let the springs settle a bit.
The drive into work and home was great.
It is stiffer than stock, that is to be expected.
It will lighten up a bit I am told after the springs break in a tad.
But it feels a lot better on the highway, and already corners better.
That was my main concern that it take corners better and faster without understeer or oversteer, I get the two mixed up.
Hopefully I can find some time with my Christmas break coming up to get the rig up to the mountains and test it all out.
OK, on with a few pictures.


Was to tired to post pics yesternight, got home late and it was dark.
Only got two pics yesternight anyways.
Took some more at work today, but it was very overcast, so they did not turn out the best.
Plus the rig is downright filthy from last weeks snow/ice storm.
Finally got all the goodies installed Tuesday at the shop.
ARB, (A Real Bumper) OME 3" lift, IPF fog lights in the ARB and Toyota switch in the dash, and my old Warn XD 9000 winch from the '91 4Runner.
Why did I go with the ARB bumper when there are others out there too?
ARB has been in the business a long time, and their products are air bag compatible, and I really liked the quality of my old ARB on the 4Runner.
The bumper is top notch material.
The Old Man Emu is a proven lift, and from all the FJ Cruiser owners I have conversed with, they are extremely happy with the setup.
I got the 886 coils up front to handle the extra weight of the bumper and winch, and the 895 regular coils back aft.
I plan on adding an ARB rear bumper later (when available) and I may have to upgrade to the 896 coils, not 100% sure yet.
The Warn XD9000 winch is a workhorse, and perfectly suited for the FJ and other Toyotas.
It is well enough to handle any situation.
The IPF fog lights are installed into the lower part of the ARB bumper and look factory.
A factory Toyota switch in the dash controls them.
I want to thank Phil and company at TRD Parts 4U, they are an ARB dealer, and great to work with.
I have ordered quite a few things in the past for the FJ from them, and the pricing is very good.
I will wait until next week to get the rig into Toyota to get my front end aligned.
I want to let the springs settle a bit.
The drive into work and home was great.
It is stiffer than stock, that is to be expected.
It will lighten up a bit I am told after the springs break in a tad.
But it feels a lot better on the highway, and already corners better.
That was my main concern that it take corners better and faster without understeer or oversteer, I get the two mixed up.
Hopefully I can find some time with my Christmas break coming up to get the rig up to the mountains and test it all out.
OK, on with a few pictures.


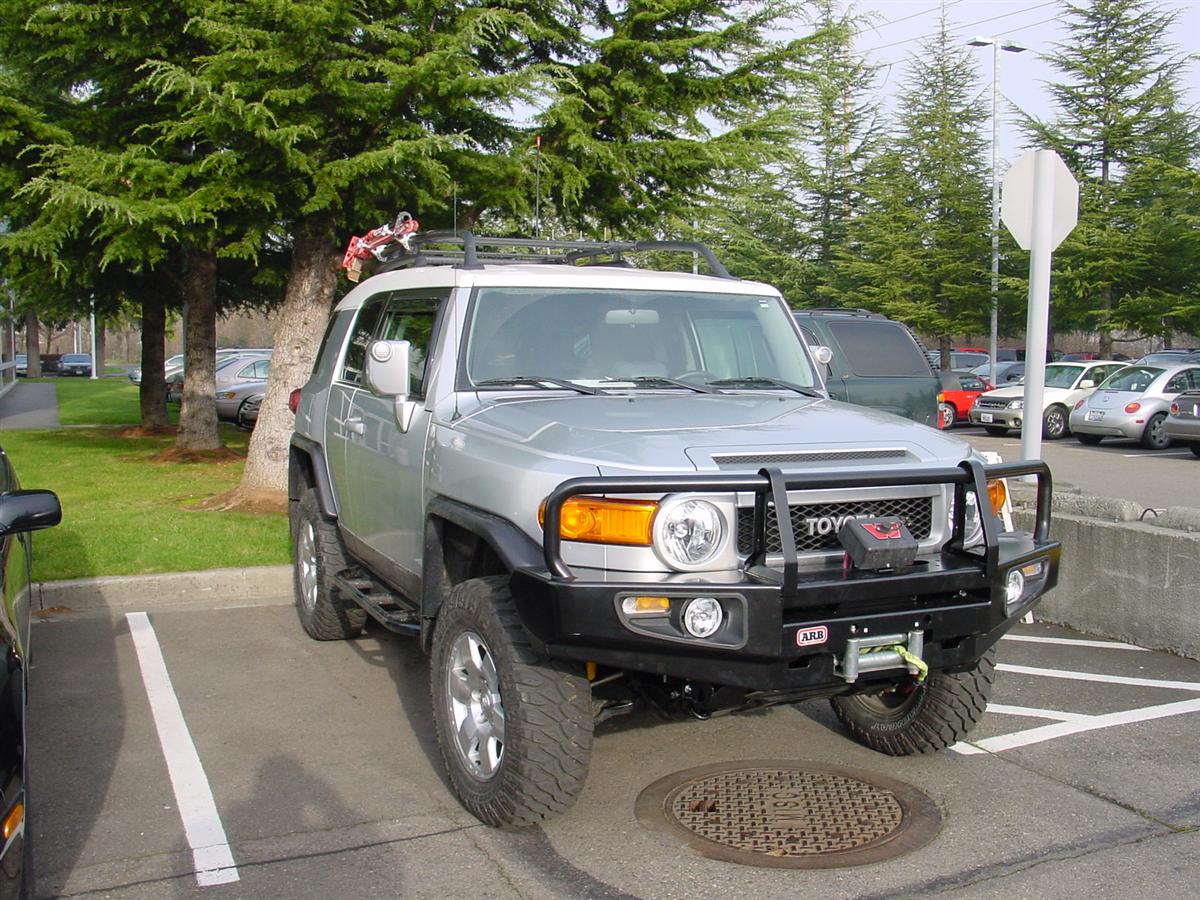
I'm must say i'm jealous of you other Silver Fj owners with the ARB bumper, looks like it belonged there in the first place.
- Thread starter
- #54
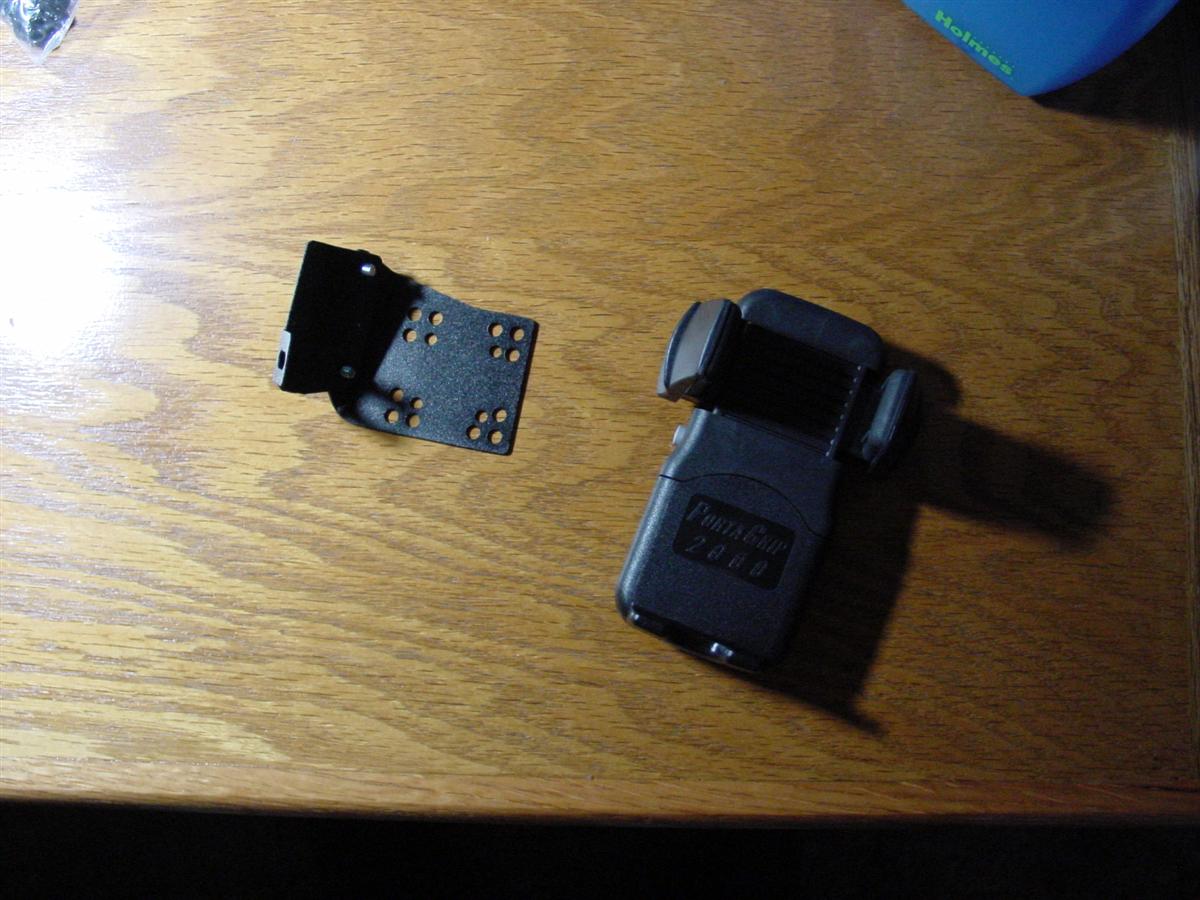
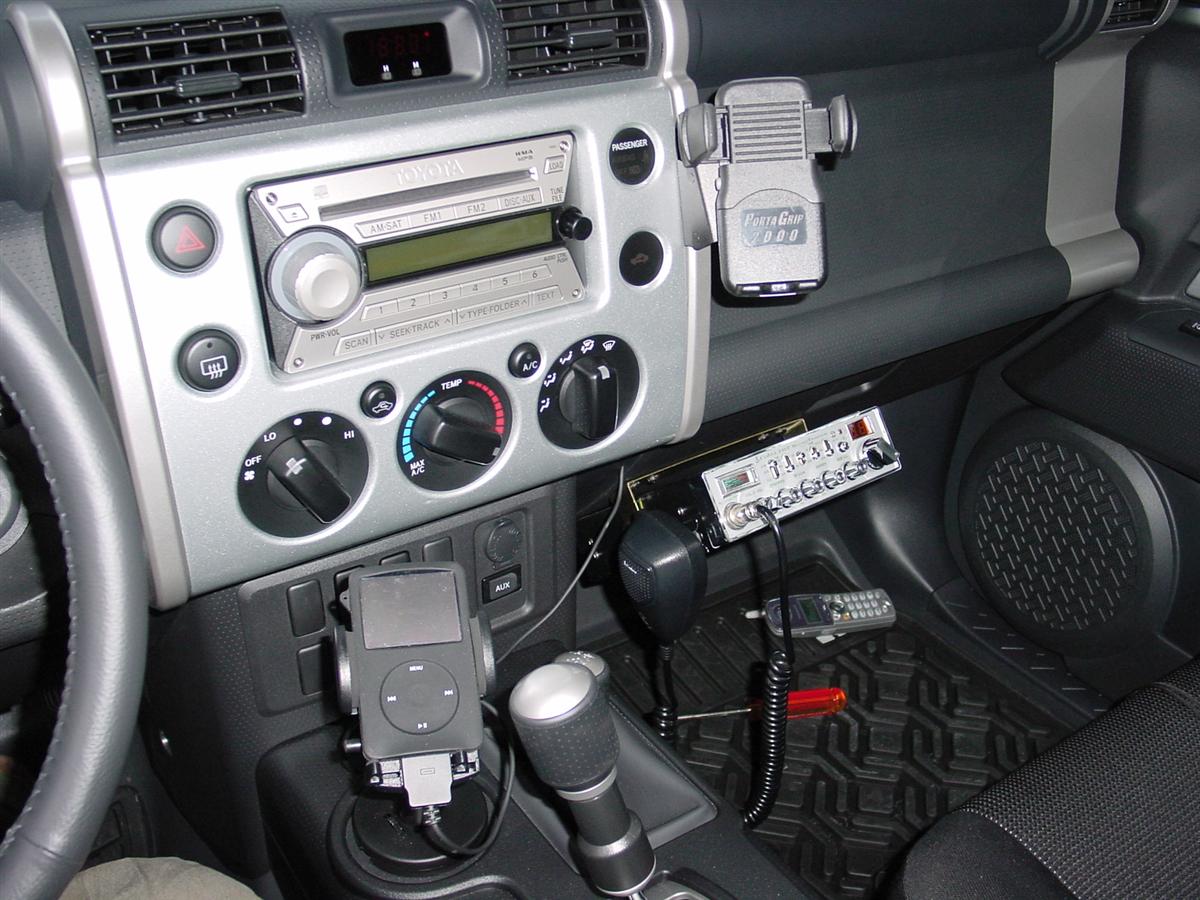
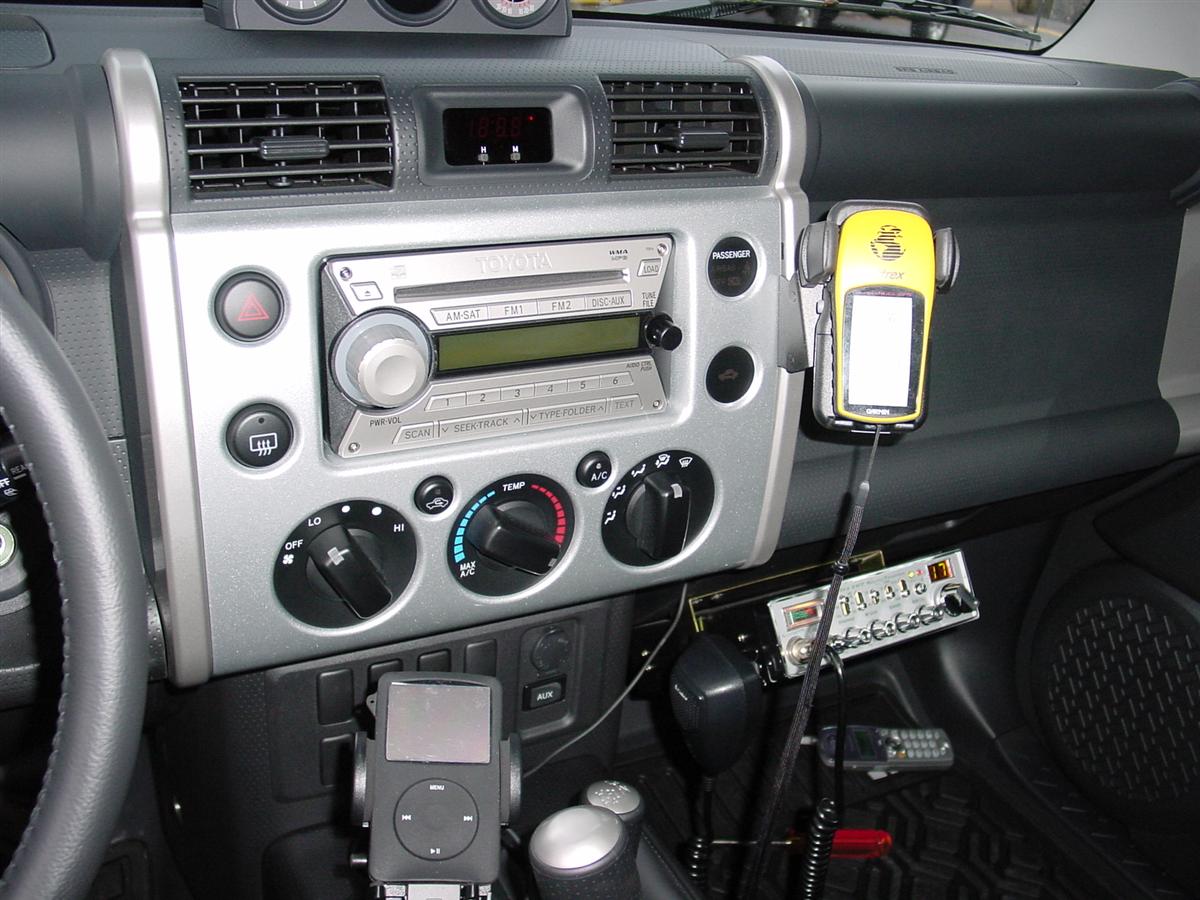
Panavice dash mount/grip installed 12-13-2006
You can use this mount for your iPod, cell phone, or a GPS.
I already have a very nice iPod mount, but it is kind of in the way of my A Trac and E Locker buttons.
I may move the iPod up above now, or use this for a GPS mount depending if I can get a signal there or not.
Very easy to install.
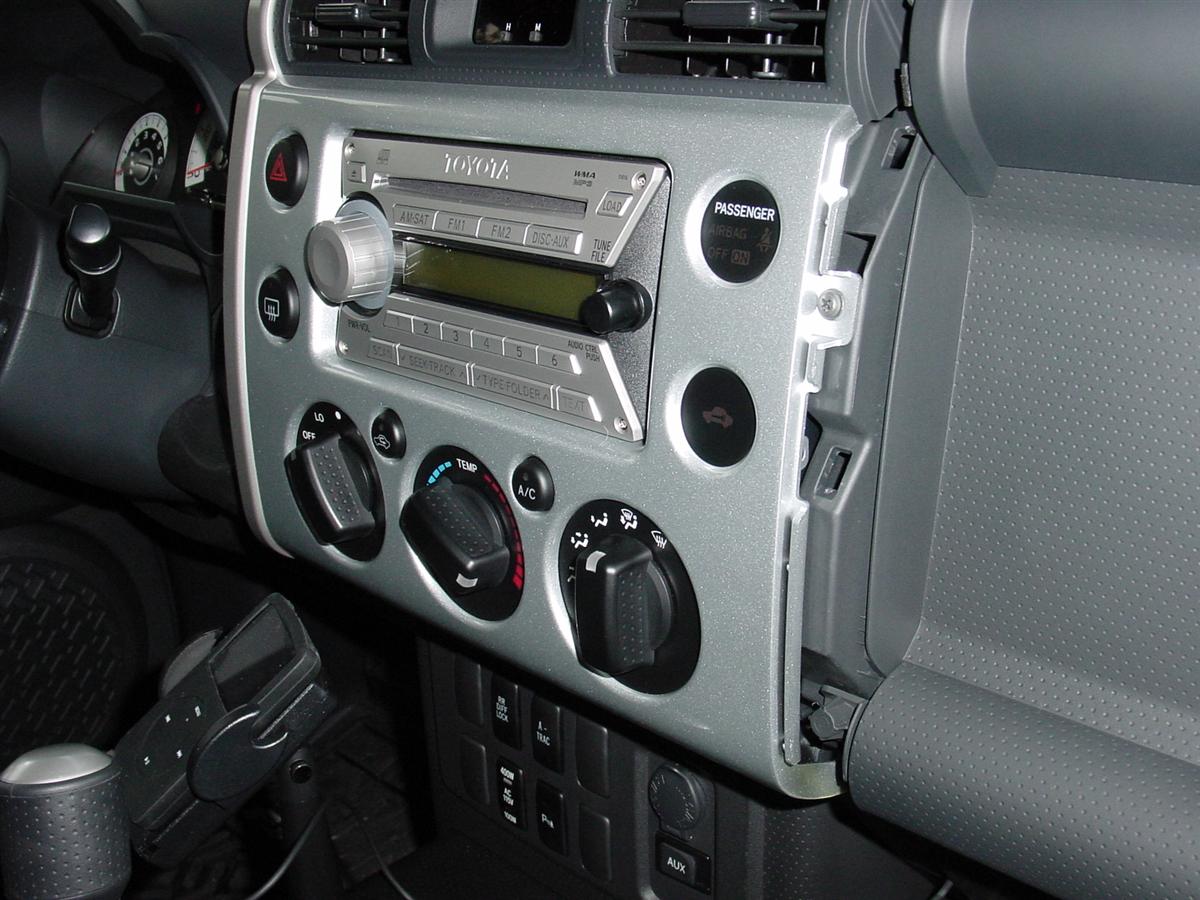
1. Take off the plastic wing with one screw at the bottom of your stereo dash and pull it off.
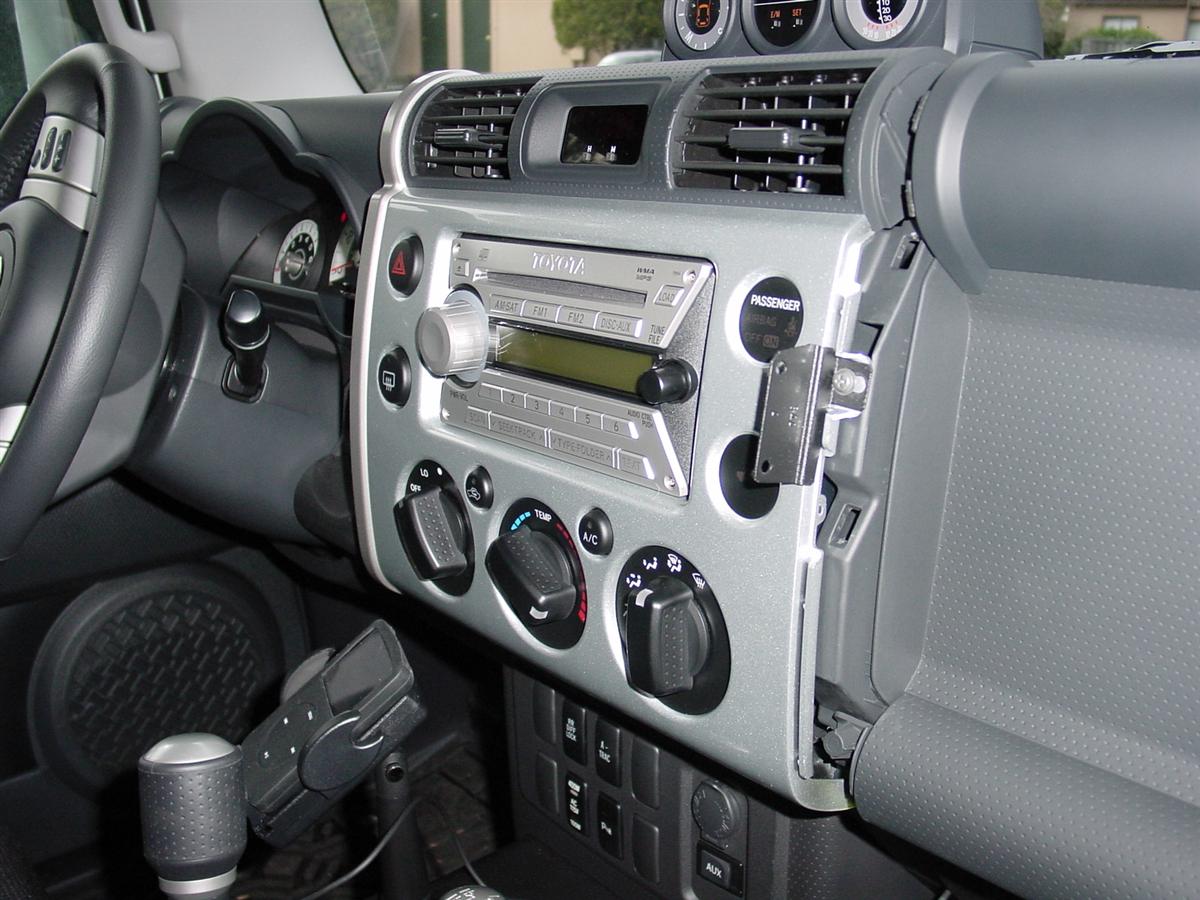
2. Take the small metal piece and put it under the screw by the stereo, and mount it.
3. Put the dash plastic wing back on again.
4. Use the two small acorn nuts to put the rest of the Panavice mount to the smaller piece.
5. You can pre-mount the PortaGrip to the backing plate first like I did.
Here are some links:
FJ Cruiser Panavice mount
Model # 751372007
Panavice PortaGrip mount to put your toys in
Mode #l 702 PortaGrip


You can use this mount for your iPod, cell phone, or a GPS.
I already have a very nice iPod mount, but it is kind of in the way of my A Trac and E Locker buttons.
I may move the iPod up above now, or use this for a GPS mount depending if I can get a signal there or not.
Very easy to install.
1. Take off the plastic wing with one screw at the bottom of your stereo dash and pull it off.
2. Take the small metal piece and put it under the screw by the stereo, and mount it.
3. Put the dash plastic wing back on again.
4. Use the two small acorn nuts to put the rest of the Panavice mount to the smaller piece.
5. You can pre-mount the PortaGrip to the backing plate first like I did.
Here are some links:
FJ Cruiser Panavice mount
Model # 751372007
Panavice PortaGrip mount to put your toys in
Mode #l 702 PortaGrip
Corey, nice look. I connected the DICE electronics package to my ipod and tosed it in the glove box. It all runs thru the radio software. No mount or ipod visable.
- Thread starter
- #56
Thanks.
I could toss mine in there too, and then just pull it out when I want to change playlists.
I find it easier to do it that way than try to do it from the head unit.
I could toss mine in there too, and then just pull it out when I want to change playlists.
I find it easier to do it that way than try to do it from the head unit.
- Thread starter
- #57
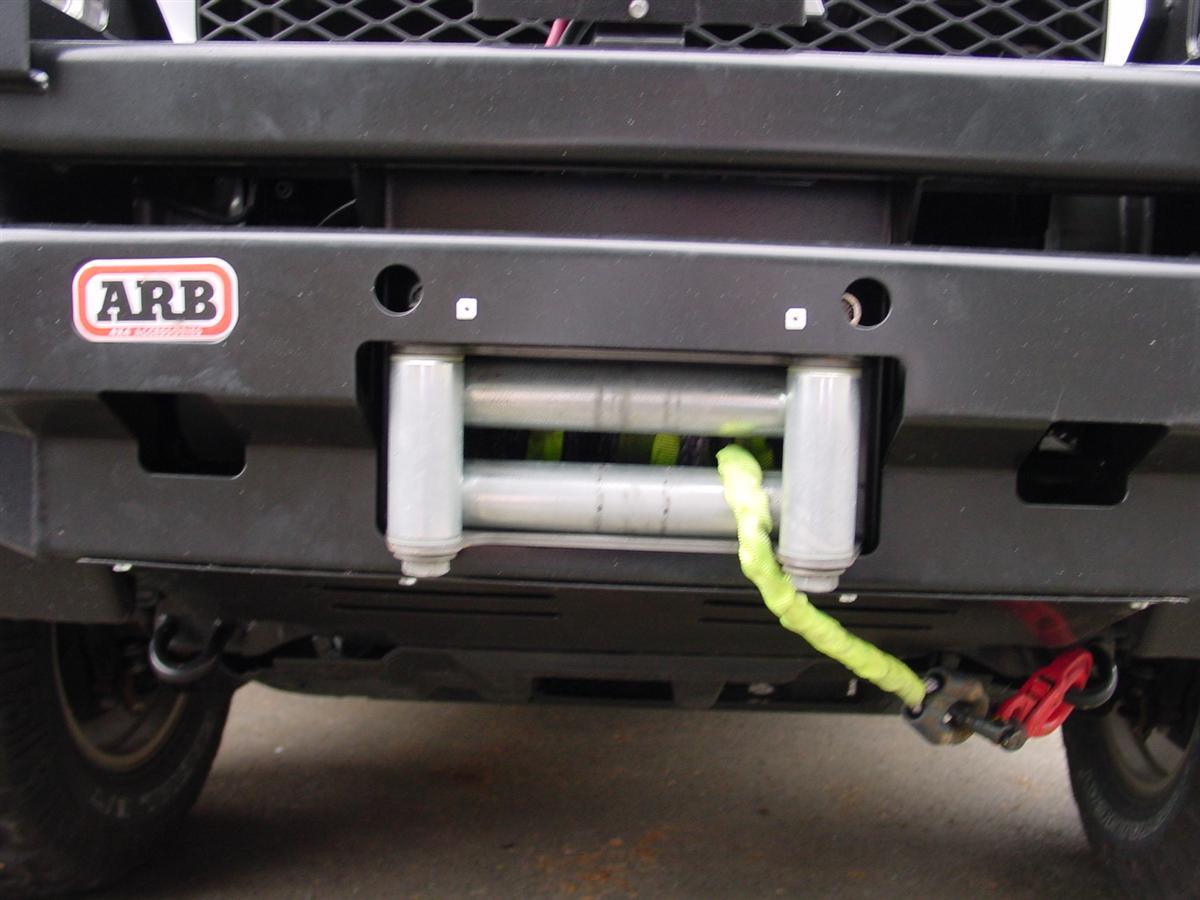
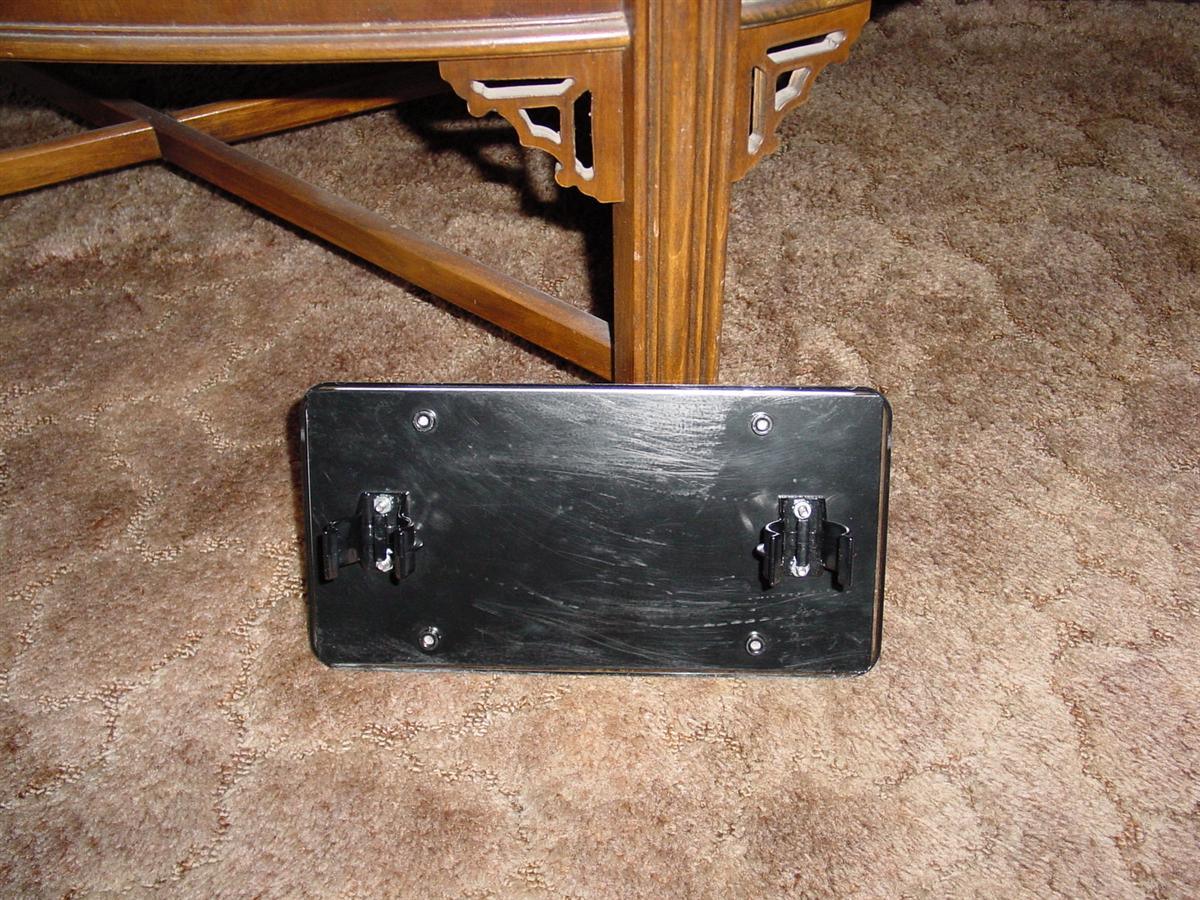
Licence Plate Mount Installed 12-16-2006
I had one of these for the ARB bumper on my '91 4Runner.
To be honest with you, I never ran it.
The mount uses Maglites flash light mount clips used to hold their flash lights to things.
The clips bolt to the black metal plate, and your license plate does the same.
Then you push the clips over your roller fairleads to hold it in place.
I did keep it behind the passenger seat just in case I was asked by the law to put it on.
But in the four years I ran the bumper on the 4Runner, not once was I ever looked at for not having a front plate installed.
The new ARB bumper for the FJ Cruiser has two holes that you insert plastic screw hole mounts into so you can mount your stock plate to.
This will clear your fairleads for your winch.
You can see the white plastic inserts in my first photo below above the roller fairleads.
In the next two pics you can see the roller fairlead license plate holder.
The company that makes it is Kilby Enterprises.
However back then when I was inquiring about them, I found it cheaper to buy from a vendor that sold them for Kilby.
They are 4Wheeler Supply.
The plate will no doubt just reside in the FJ Cruiser until I get pulled over.
The asked where my plate is, I will let he/she know I have one and install it then.
I think they are pretty laxed around my area about having a front plate on an aftermarket bumper.
- Thread starter
- #58
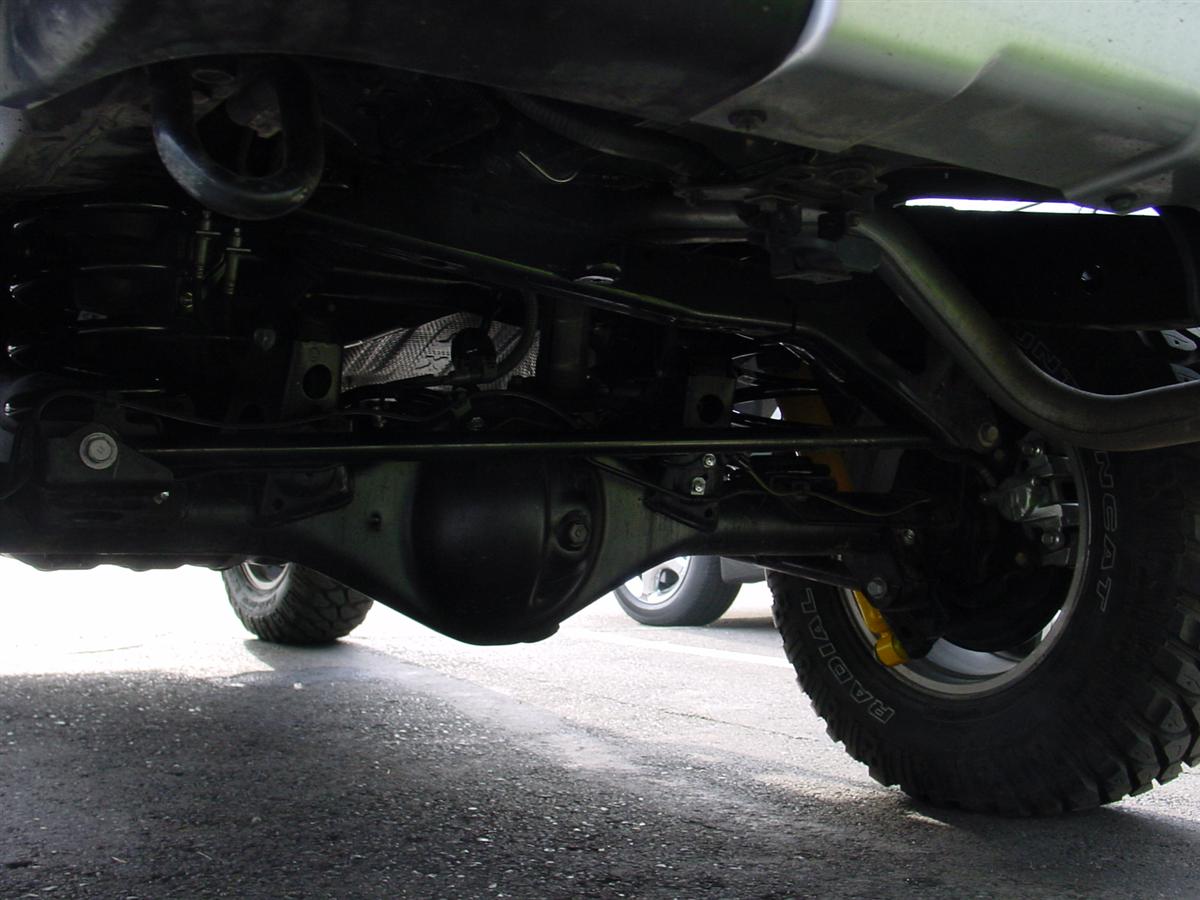
Inchworm Gear Elocker Guard Installed 11-21-2006
I wanted to have protection on my Elocker motor as I have heard they can be quite vulnerable to getting smacked by rocks/logs that you may navigate over while out on the trail.
I contacted owner Jim to see if he had one, and he said indeed he did for the Tacoma, and it also fits the FJ Cruiser to a T.
Here it is on his site.
I do not have an installed picture of it on my rig, so I am using one of Jim's from his website.
The first picture though is mine taken on my PC desk.
It goes on with three bolts that you already have that hold the motor cover in place.
If you pull the bolts out gently and do not break the gasket seal to the motor, there is no need to replace the gasket.
Simply insert the guard in place, and bolt back up.
Last edited:
Similar threads
Users who are viewing this thread
Total: 1 (members: 0, guests: 1)