2M ham install, FJ40 (1 Viewer)

This site may earn a commission from merchant affiliate
links, including eBay, Amazon, Skimlinks, and others.

1911

chupacabra
Joined
Aug 11, 2006
Threads
54
Messages
7,562
Location
Parker County, Texas
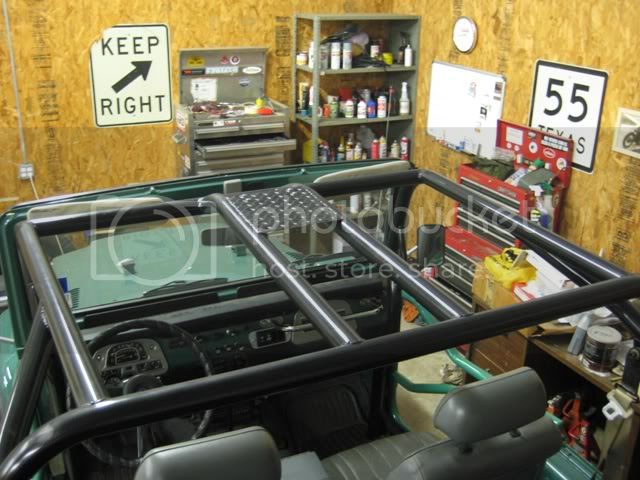
Been wanting to put a 2 Meter radio in the 40 for a while, but didn't want to rush it and end up moving it later. I really like the overhead mount in my FJC,

IMG_0139.jpg


so I decided to do the same for the 40. When the MetalTech cage kit went together, I welded a piece of scrap steel plate between the two overhead bars, as forward as possible (up to the curve of the tubes). A thinner and flatter piece would probably have been better, but this was on hand:

FJ40radio003.jpg


It would be fun to have a fancy new radio (looked with longing at the Kenwood TM-D710A with built-in APRS and the Icom ID-880H with built-in DSTAR), but in a fit of common sense and budget I decided to just put one of the two Yaesu FT-2800M's I already own in for now. I put the overhead tubes of the cage far enough apart to fit most mobile radios up there I believe. The 2800 is actually a pretty large radio, since it has an oversized finned case for a heat sink instead of a fan. So maybe an upgrade later, but for now I can swap the 2800's between the two trucks and my base station as needed, and they're already programmed. :)

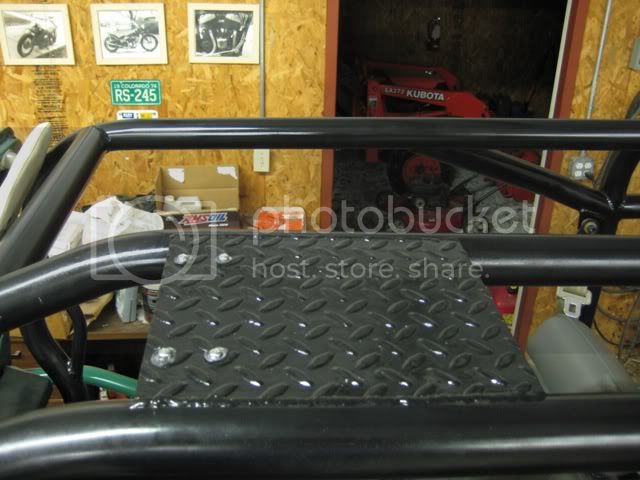
Overhead plate drilled, and the 2800 bracket mounted. I put a dab of black silicone RTV under the washers on top of the plate to try and seal against water on the uneven surface of the diamond plate. Probably anal since I almost always have either the bikini top or hard top on.

FJ40radio007.jpg


FJ40radio004.jpg


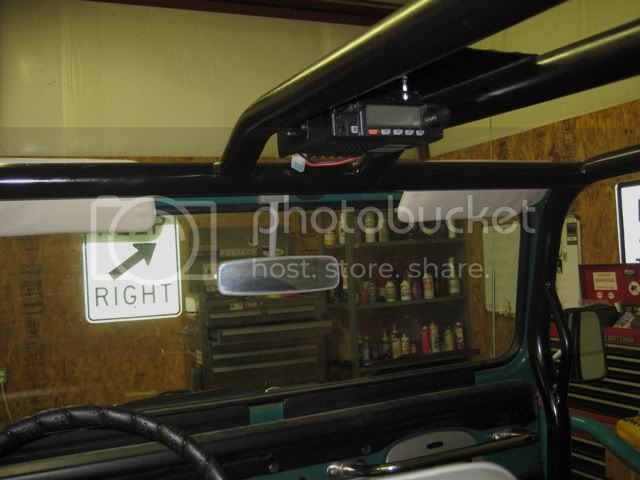
The radio mounted. I like how it is fairly protected by the cage bars, but still easily visible and accessible from either seat. I also really like the speaker on the bottom not far from my ear, as I'm hard of hearing anyway.

FJ40radio009.jpg


FJ40radio010.jpg


Now to hook up power, mount an antenna, and run the coax. Ordered a second power cord with the requisite "T" connector on-line; still waiting for it to arrive.

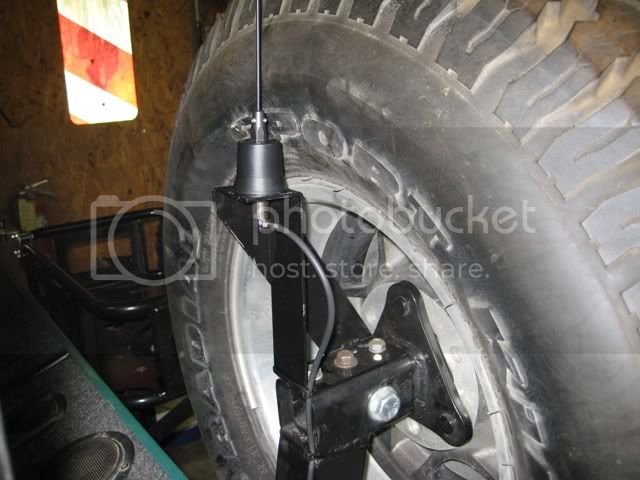
Because I use the hard top seasonally and don't want to drill any holes in the body if possible, I have decided to mount an antenna off of the back of the truck. After looking at several alternatives like the spare tire mount, I believe I will fab a piece of flat stock to bolt to the eight now unused holes that used to hold the stock spare tire swing-out:

FJ40radio012.jpg


I will weld-on or bend a 90-degree angle at the top big enough to drill a 3/4" hole in for an NMO mount. The hardest part looks to be putting a slight bend in the vertical piece of flat stock to match the curve of the body. I think the trick will be using flat stock that is thick enough to be sturdy but thin enough to form. I hope to make it sturdy enough to possibly hold an HF antenna later if desired. I figure I can also make it tall enough to get a few extra inches of height for the antenna. What do you guys think of this idea? There won't be much ground plane back there, so I guess a 1/2-wave antenna will be about the best I can do.

More later when I get more done. I would appreciate any suggestions or ideas for improvement you might have.
 
Last edited:
That's a good solution. I envision all 40's with the MT cage to have the similar mounting solution. You can easily look at it w/o taking your eyes off the road completely and a good audio spread.
 
I was envisioning almost the same radio mount for mine. only change i figured on was the plate will be below the roll bars instead of above. i run a soft top all the time. with the plate below, i can run the antenna cable up the center hoop and down the spreader tube then pop out at the radio.
my cb can then be mounted similarly if needed, farther toward the center hoop, or an external speaker (to hear it better). my antenna mount will be in a different placement, but similar idea.

looks good!
 
by the way, do you even let that 40 out in the sun? it looks pristine!
 
Thanks for the comments and ideas. I have thought about running the wiring and coax through the cage; I guess drilling some small holes in it won't weaken it substantially.

This truck gets driven almost every day I'm home that it isn't raining. The pictures are kind to it, it's actually filthy dirty. It only has 56,000 original miles though. The guy I bought it from stored it in a garage for 15 years and only drove it once a year to get the annual inspection and a new battery. One of these days, I'm going to drive it to an HDC meeting.

Thanks again,
Lee
 
I like it. I'm planning on setting up a similar mount on Dad's 40, but I plan on mounting it about centered in the roll cage (not above or below), and angled down towards the driver a bit.

Whoah! Someone else with a large metal building..... Is that in Santa Fe county?

Dan
 
Thanks for the comments and ideas. I have thought about running the wiring and coax through the cage; I guess drilling some small holes in it won't weaken it substantially.

Lee

Just one thing to note: the power wires and the coax shouldn't run in parallel.
 
Actually, if it's coax it is shielded from the inductance of the current in the power line. There is of course no such thing as perfect shielding though, so it's not a bad idea to keep them separated. If they do have to cross make them cross at 90 degrees to minimize any interference, and twist the power line to equalize the reactance from the two power lines. Making sure the coax is properly grounded is the best way to go though.
 
I like it. I'm planning on setting up a similar mount on Dad's 40, but I plan on mounting it about centered in the roll cage (not above or below), and angled down towards the driver a bit.

One of the neat small features on the Yaesu 2800 is that is has three sets of holes, vertically-spaced, where the radio mounts to the overhead bracket, so you can tilt the radio down or up a little bit to suit the installation. The picture above shows the middle (horizontal) setting, but I will probably try the angled down setting too.


Whoah! Someone else with a large metal building..... Is that in Santa Fe county?

Unfortunately no; it's at our place in Texas. My wife figured out pretty quickly that we bought this place because I wanted it for a shop. :hillbilly: Planning on building something similar at our place there in SF County though. Going to have to build the house first to keep the wife happy this time.


Just one thing to note: the power wires and the coax shouldn't run in parallel.

Actually, if it's coax it is shielded from the inductance of the current in the power line. There is of course no such thing as perfect shielding though, so it's not a bad idea to keep them separated. If they do have to cross make them cross at 90 degrees to minimize any interference, and twist the power line to equalize the reactance from the two power lines. Making sure the coax is properly grounded is the best way to go though.

Thanks for the reminders, I had forgotten about that.

Lee
 
Just one thing to note: the power wires and the coax shouldn't run in parallel.

that shouldn't be too hard to avoid if the antenna is in the back. power will come from the front, cable from the back.
for arguement purposes, what about if they run on separate spreader bars? so they would be just over the distance of the width of the radio apart.
 
If you have a good ground I wouldn't worry about it.
 
Decided to use the spare tire mount for an antenna mount after all; it's higher and more hidden than using the old spare mount holes near the corner of the body.

Drilled and tapped three holes for 10M X 1.25 in the receiver part of the MAF spare tire mount:

haminstallFJ40002.jpg


Made a bracket out of 1/8" x 2" flat stock, being careful to avoid the spare tire, the ambulance doors (when mounted), and to make the platform for the NMO level. The receiver that holds the spare is not level, to aide in keeping the spare on until you can put lugs nuts on it. Hence, the bends in the bracket are not 90*.

haminstallFJ40006.jpg


I also made a side brace that covers the top and bottom of the bracket. Now to drill a 3/4" hole in the top of the bracket for the NMO, and weld on the brace.
 
Finally got this finished!

The finished bracket with brace and hole for the NMO mount:

IMG_0538.jpg


Bracket painted, mounted, and NMO installed:

IMG_0540.jpg


From this angle, you can see how much of the bracket is inside the spare tire and the NMO mount is in between the spare and the body (ambulance doors when they are on):

IMG_0542.jpg


The 1/4-wave Sti-co Flexiwhip is shown in both of those photos.

Per the previous discussion, I ran the power wires inside the driver's side "A" pillar to the floor, then under the rubber mat to a ConFer box behind the seats where I have an auxiliary fuse block. Then I ran the coax cable inside one of the center bars to the "B" pillar, out the base of the "B" pillar , above the rear fender well, and through the body in an unused bolt hole above the tail light. I used rubber grommets throughout to protect the wires and coax; as an example here is the base of the "B" pillar where the coax comes out:

IMG_0544.jpg


One more shot of the finished project in the rear, with the 5/8-wave Hustler antenna on for a trial fit. I will use an antenna analyzer to make sure my grounds and terminal soldering are OK before I power up the radio.

IMG_0547.jpg
 
Last edited:
Final follow-up:

Pretty much like the recent thread on 2M antennas, I couldn't get very good SWR on the 5/8-wave or 1/4-wave NMO antennas that I took off the FJC and tried on this new NMO. It was less than 3 across the band, but never less than 2. I first checked the ground from the NMO mount bracket back to the body of the truck, but it was good. I was worried that it might not be a good path through the greased swing-out spindles, but it was fine. Looking closely at the system as installed (above), I decided that: 1) I didn't like the way the conventional NMO mount sat in the (much thicker than body steel) bracket I made, and 2) clearly the ground plane was not good, even grounded to the bumper.

So, back to the drawing board. Per CruiserDrew's advice, I decided to try a Larsen 150 1/2-wave antenna. While on Larsen's web site, I noticed that they also have a special NMO mount for thick surfaces so I bought one of those too. Bought both (and a new solder-on PL-259 connector) from HRO, and had everything 2 days later. Very impressed with my first order from HRO and will definitely buy from them again.

Replaced the NMO with the new Larsen "thick" one, and I like it much better:

003.jpg


The NMO sticks up much higher above the plane of the mounting bracket like it should now. With the other regular NMO mount, the center electrode part did not stick up very high and did not make good contact with my 1/4-wave Flexi-whip. The new NMO came with its own RG58 coax already attached, so I taped it to the original coax and pulled the new coax through the roll cage backwards by pulling the old coax out. Soldered on the new PL-259 at the radio end and all looked good.

Put on the Larsen 150 1/2-wave,

005.jpg


and fired up the MFJ antenna analyzer. After trimming the 150 for length, I got SWR's of 1.3 at both 144.000 and 148.000 MHz, and a perfect low of 1.0 at about 145.4 MHz! Needless to say I am extremely happy with the final result. Even trimmed, the 150 antenna is still taller than the roof line, so I will probably buy a Comet SBB-1 for wheeling in trees (which we have a lot of here in Texas).

Thanks to CruiserDrew and to HDC members for your helpful advice and comments.
 
Last edited:
Update: Kenwood TM-D710A install

Went a local hamfest and ended up with a good deal on a new radio - bought a Kenwood TM-D710A, dual-band with cross-band repeat and built in TNC for plug n' play APRS. I have been a Yaesu fan, but bought the Kenwood because Yaesu doesn't have anything comparable that is APRS ready. I really like this radio so far. For one thing, the programming software for it is free from Kenwood's web site, all you need to buy is a cable to connect it. The menus are easier to use and more intuitive than my Yaesu radios IMO. You can plug in a GPS or a digital weather station as well as send and receive (short) text messages with the APRS functions built-in.

Still learning how to use it, but programming a bunch of repeaters in it and installation was easy and straightforward. Fortunately, it uses the same "T"-type power connectors as my Yaesu 2800 and it even fit in the Yaesu mounting bracket with some nylon spacers, so it will drop right in either of my trucks. One small gripe is that the face plate cannot be attached to the main unit, it must be mounted remotely. Because of the overhead mounting position in both of my trucks, I would prefer to have it mounted straight to the main unit. In any event, I just attached the face plate mount to my roll cage with hose clamps. Kind of ghetto, but it works. I may make a more elegant mount for it later.

Oh, and you can select either an orange display or green, to match my 40. :grinpimp:

2012.jpg


2011.jpg
 
Looks good! Let us know how you like the radio once you have used it.
 
That looks real clean. I think the detachable faceplate works good.
 
Local hamfest? I must've missed that one. What was the price for your unit, if you don't mind me asking! I like the size of the faceplate and very large letters.
 
Very nice!

I was certainly debating between the DM-710A and the FT-8800r. I went with the Yaesu mostly because everyone else in HDC has Yaesu. But I really, really like the idea of built in TNC for the APRS.

I don't think I could fit that face in the faux-lux, but my 45 very well may demand a DM-710A.

Dan
 

Users who are viewing this thread

Back
Top Bottom