Builds 1979 FJ40 Preservation-ish Project (3 Viewers)

This site may earn a commission from merchant affiliate
links, including eBay, Amazon, Skimlinks, and others.

My dog Otis was hit by a car a few weeks ago and I have really been beating myself up about it. I am going spend a little more time with the family and a little less time working on old cars.

Opportunity cost:
I decided to skip the fun of learning how to rebuild a carburetor and just left it to the professionals. I called Mark's Off-Road Enterprises and a few days later I had a fully rebuilt and upgraded carburetor. It appears to be very well done. Mark even laser cuts an "M" into the sight glass cover so you know he is serious. Tonight I will replace the fuel lines and filter and see if she runs.


View attachment 2108044

View attachment 2108046
View attachment 2108047

View attachment 2108051

Easy!

View attachment 2108052
Build looks great! I'm in the process of returning my carb to OEM from a weber and need some help. I see your hard fuel supply line, do you have a return as well? The weber that was on mine didn't have a return but here is a plugged return going back to the tank. Not sure what the best option will be but the carb arrives next week at which point I'll know what I'm working with. Mines a Dec '78 so may be different. Cheers!
 
@BigHighBlue
My 1979 has the fuel return at the fuel pump, and a single supple line to the carb.

Earlier models had a fuel return line at the carb.

I am not an expert!!

I would think that your cruiser would benefit from having some sort of return line. Kelp keep the fuel temp down and help eliminate air bubbles?

Search MUDI am sure you will find and answer!
Thank you! I’ll keep looking. Cheers
 
I got everything off with out breaking anything!!

no Carb.jpg

carb and head shield removed.jpg

intake-exhaust maniflold removed.jpg
 
The intake and exhaust manifold are flat with .005'' when measured independently. The Exhaust manifold is about .050'' shy of the intake manifold, this created a pretty massive exhaust leak.

A Fel-Pro gasket was used by a PO last time around. Note that the gasket was cut to clear the manifold studs.
FEL-PRO exhusat gasket leak.jpg


I am planning on realigning the intake and exhaust manifolds on the granite surface plate to see if I can bring the surfaces closer to parallel. That in coordination with a Remflex gasket I am hoping is enough to seal the exhaust.
Pretty Flat - exhaust is .05 proud.jpg

intake and exhaust apart.jpg
 
Are you deleting all your pollution crap? I have an 82 with only 43K original miles. Runs great, but I have wondered if I should remove my original pollution stuff. I guess if it ain't broke... but so much clutter. I also wonder about future resale value given that it is so original.
 
I am working on deleting the EGR and heat riser butterfly valve assembly.

The EGR intake tube has been welded shut and machined flat. I am going to drop it off to get zinc plated tomorrow.
EGR OMIT FROM INTAKE MANIFOLD.jpg


I am going to machine some plugs and weld them in where the heat riser shaft comes thru the exhaust manifold.

Ehaust flapper wheel.jpg
 
Are you deleting all your pollution crap? I have an 82 with only 43K original miles. Runs great, but I have wondered if I should remove my original pollution stuff. I guess if it ain't broke... but so much clutter. I also wonder about future resale value given that it is so original.

From what I have gathered from the cruiser gods on Mud. The pollution stuff will not affect the functionality or drivability of your 2F for the most part. That being said, It does adds a lot of time and work to any project.

To date, I have only taken off the Air Injection System and EGR. I am happy that both are gone and I have not felt any negative side affects of removing those systems.

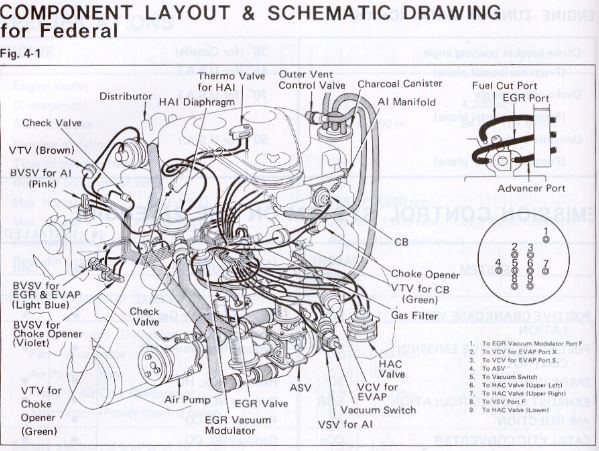
I am currently debating ditching all of the emission equipment and running a Toyota 21100-61012 non-smog compliant carb from CityRacer. I am not sure if the simplicity outweighs the benefits of having these systems:

Choke Breaker
EVAP
HAC
HAI
PCV
SC - would keep with 21100-61012

I am also not sure what systems I would be able to keep if any with the 21100-61012 carb. I need to do more research....
 
Subscribed, Have a 3/79 with CA emissions.
 
:clap:Thanks for the great documentation of this. For my 3/79 I have been researching and considering a desmog. My Desmog Thread over in the 60 section is a good resource for 79-80 desmog technical info. Jim C provides most of the expert level input on that thread. I personally would recommend not deleting the CB, Evap or PCV considering they aren’t failure prone and keep the fumes down. I also have a well functioning HAC system and continually venture between sea level and 5000 ft so I would probably keep it too. I’m super interested in how you fabricate plugs for the exhaust flapper valve holes. I will be doing that sooner or later on both my 40s.
 
Thank you @AntFarm, I had not thought to check the 60 section. I still have not decided what direction I will go. For now, I will probably keep the remaining emission systems in place and get her back on the road.

This has been the thread I have been using as a guide:

Should I do bolt-on or weld-in plugs for the exhaust flapper shaft? I can always make a few extra sets.
 
Should I do bolt-on or weld-in plugs for the exhaust flapper shaft? I can always make a few extra sets.

I’m currently in the middle of removing the PO’s cracked header and starting to rebuild a used exhaust manifold I recently found on mud. Lately, I’ve been doing lots of research reading through many posts here on mud to help me along the way. Not sure if this helps guide your decision or not but several years ago @roma042987 welded up the flapper holes in place of using a plug. It’s documented on posts #105 and #122 of the following thread:
While I’m here I’ll leave this other gem that documents the great lengths that another member went through to completely rebuild his exhaust and intake manifolds with all OEM hardware. Intake/Exhaust Manifold Refresh items - https://forum.ih8mud.com/threads/intake-exhaust-manifold-refresh-items.1233887/
My final link is for the sticky on how to properly assemble intake and manifold in the event they needed to be milled for flatness. Manifold Rebuild Procedure - Land Cruiser Tech from IH8MUD.com - https://www.ih8mud.com/tech/manifold.php
Like I said, I’ve done a ton of research so I hope some of this is useful to you. Looking forward to seeing your progress. Cheers!
 
Last edited:
Do you guys do the ceramic coating yourself at your shop or did you have someone here in town do that?
 
@SlapSmal, we only spray dry powder coat here. I reached out to Engine Armor Coatings in Tampa to do the ceramic coatings, but I ended up using VHT flame proof paint and primer over the weekend. We will see how it holds up over the next few years. The 2F motor is healthy but original and will need to be addressed at some point. I am saving up for a @FJ60Cam Mosley Motors 4.4 Cop Motor.

Basically, I am just trying coping @wngrog
 
Well…..while reassemble the intake and exhaust manifold. I stripped the M10-1.25 threads out of the aluminum intake manifold. 🤬

I was trying to torque to 18 ft-lb when it stripped. Looking back, that was a little aggressive for cast aluminum.

I have a solution, but I don’t want too. I am really mad at myself for screwing up an otherwise perfect intake manifold. I am just going to sit here and cry for a second.
 

Users who are viewing this thread

Back
Top Bottom