1976 FJ40 BUILDUP - Chief $*itty Pants

This site may earn a commission from merchant affiliate
links, including eBay, Amazon, Skimlinks, and others.

Shoots: pm me th measurements you want. It's dark and gett'n late here now but I'll be working on the cruiser tomorrow morning.

Oh, I have a 383cid, stock transfer, all springs reversed but the tranny is an sm465. In any case, the drive line is close to what you have accepting that it is currently SUA and the 465.

FYI: You can gain more room the run the SBC further forward if the stock radiator carrier is moved forward about an inch. There will still be room for an oil cooler in front of the radiator. This will allow the SBC to have a high flow/"tall" water pump with or w/o an electric fan.
 
I assume the measurements you're looking for are for the motor mnt placement. Three things you have to consider are fan to radiator (cooling) engine to firewall ( cooling and occupant foot cooking ) and stick shift position ( needs to be in the cab with you ).
In arizona where cooling is #1 the motor cools best with a stock heavy duty fan/ fan clutch arrangement. Best fan to radiator setup puts the center of the motormount 11 1/2 ~ 11 3/4 inches from the center rib of the shock tower.
Generally you need an automatic to pull this off , or at least a Ranger overdrive to set back the shifter far enough.
If you find a top cover from an FJ60 4 speed your shifter position back 4" which would help. I've only done this once , I believe the 60 tranny I robbed was a 1984.
Using a standard will be a compromise unless you spend the bucks on the Mark's adapter.
 
Code:
FYI: You can gain more room the run the SBC further forward if the stock radiator carrier is moved forward about an inch. There will still be room for an oil cooler in front of the radiator. This will allow the SBC to have a high flow/"tall" water pump with or w/o an electric fan.

Thanks good to know!!

LCWizard I agree those are the three things i am battling and like an idiot I have no reference points to go off of except for any measurements you guys can go off of. I realize I should have mocked it all up before i tore the tub off and I am a one man show with occasional bugging friends and family so i am not wanting to set the tub back on.
Code:
If you find a top cover from an FJ60 4 speed your shifter position back 4" which would help. I've only done this once , I believe the 60 tranny I robbed was a 1984.
Good to know!

As for the Marks I am starting to realize that sure would have been simple if i was going to be stupid and rip off all my reference points.:) Thanks guys I have the mounts coming now and AA gives good instructions and also OrangeFJ45 is going to send me some measurements from his to verify.

TLCHopII if you could measure from center of shock mount back to the center of your motor mount that would be great.
Thanks
 
If you have the opportunity I think you'd be better off with an auto, 700r has the best gearing but even a turbo 350 would be better than the stock 4 speed if funds were tight.
I doubt you'll get many miles out of the stock 4 speed behind a 383 stroker.
The output shafts don't hold up well.
Also the v-8 likes a slightly higher powerband. The 2F will lug down to 400 rpm and pull well . Most V-8 tend to stall there. The 3.7:1 first gear does fine on the street but it really pisses me off on a rough trail. If you can't go auto maybe a SM420 or 465
 
X2 on the sm 420/465.
The sm465/stock transfer is great combination. The trans is near bullet proof and has great granny gear.

Centerline distance from shock tower to motor mount is 13 1/2". It should be noted that the machine has both a spring flip and shackle reversal. Secondly, the 383 started out as a Vette motor which I believe may effect motor mount placement on the casting. Others will have to confirm the validity of this belief.
FYI the stick shift, when placed in 1rst or 3rd hits the heater box. The box is slightly dented. And yes I do use it from time to time here in Hawaii.

An idea for your tub reference points: take heavy piece of cardboard or light plywood. Trace out & cut to match the tub foot print. carefully mark the body mounting holes. place it on the frame and insert bolts through the holes. Now you can level it out with afew blocks cut to size and set the cruisers tunnel cover on it to check your shifter locals. The firewall will take a bit more work but not much. It won't be perfect but it is quick and 1 guy can do it w/o assistance!
If your going to run a std trans and want everything forward then removing the heater box is an option. Some creative bending of the stick shifts will be necessary.


Sorry no pics. till teh camera battery charges. It's always the little things
 
**** I know I had a straight across trade for a sm420 but i didnt want the granny low. I had a samurai with a pinto motor and 3 speed and i hated that dang thing.... (assuming the 4speed with granny low would be the same granted way more power) I weighed the trail vs. street benefits but **** i was afraid of the whole will it hold up....... You always tell yourself you will be somewhat easy on it but :lol: Thanks for the measurements and i wish i wouldnt have just purchased the adapter i would be more likely to go for it. I want to push my shifter all the way up to where i have to bend it to clear. If the marks moves the engine forward 4" then that may be close to the magic number i am looking for to move my engine and cut the tunnel and bend the shifter. I think i will at this point learn my lesson on the factory tranny and then swap I also had a deal on a NV4500 but i didnt like the length of the drive train.

I measured where i was going to fab the mounts in at and i would have placed them about 12.75 from the center of the shock tower. Probably would have been ok?? That is judging off your barely hitting the heater at 13.5 - I would be ok with both
 
Last edited:
Great! sounds like the build is back on track!
By the way nice color! Rockfrog or AAPLKA ("sort of" Hawaiian, kinda like pig latin, for Rockfrog) is the same color.

You'll like the power of the 383. off road or on road the granny has very specific uses. With the power of the 383 and good quality clutch 2nd is functionally used as 1rst. So 1rst is reserved for highly technical trails or crawling in heavy traffic & pulling people out of whatever they got into.
 
So far I am in a stall.......... I am waiting for the:

Recovery Shackle mounts (front and rear shipped on their way)
AA Motor Mounts (Shipped on their way)
AA Cross Member (Shipped on its way)
POR-15 ecapsulator and
chasis black and degreaser (Shipped on its way)
Reciever Hitch (Get off my but and pick up)
Switching to HVLP gun (Get off my but and pick up)

I have the:
383 Motor
AA Bellhousing Adapter to 4 speed
Front Knuckle rebuild kit
Spring Bushings

Trying to find:
Scout Steering box
Chevy tilt column
column adapter
 
Chevy Tilt Column

So far I am in a stall..........

Trying to find:
Scout Steering box
Chevy tilt column
column adapter

You might consider a GMC "Jimmy" or Chev S-10 steering column. I got one out of an 89 Jimmy. Works great. Ignition, turn signals, wipers, and headlight dimmer all on the column and I got a tilt column to boot. The only thing I was unable to get fully operational was the wiper switch. I ended up with on/off only on the column switch and a toggle switch on the dash for high/low speed.
 
i have a scout ps box for sale if you need one. if you get one at the wrecking yards, then buyt the pump and hosesas well. you will be able to use them with the gm V*.

sorry i have'nt gotte back to you with the measurements. the best way to handle the install is to install the rad, hand the engine in place along with the trans and t-case. move the powertrain combo as far forward as possible but allow yourself about 2" of clearance between the fan and radiator. the longer the rear driveline, the less angle and the better it'll work.
hth
georg @ valley hybrids
 
You might consider a GMC "Jimmy" or Chev S-10 steering column.

Ok good idea that opens my search range a bit.

Orange FJ dont worry i understand being busy!!

I lost one leg of the 240 to the shop today so i got one motor mount and both scab plates tacked up and guess what :mad: cant run my welder now!!!!! I have to mark it all where it is and then load it on a trailer and haul it home to weld :mad:
I read the directions and they say 8 - 12" from back of shock tower to center of motor mount. I have it tacked at 9.5" right now. When i hold my driveline up there it appears to be right at 4" forward. I know they say you have to move your drivetrain forward 3.5" minimum for firewall clearance so 4" should be fine. I hate to guess i have a bare block hanging there now i will put the rad. back on and guess where the fan should be and hold it up there. (Good point duh) I will also take into consideration that i can move my rad 1" forward. Thanks guys i cant believe my bad luck. Back in the day we chunked a piece of wire together to save money (15 years ago) to run 300' and the splice must have gave out......
 
Best fan to radiator setup puts the center of the motormount 11 1/2 ~ 11 3/4 inches from the center rib of the shock tower.
Generally you need an automatic to pull this off , or at least a Ranger overdrive to set back the shifter far enough.

First off by the way thanks for the #'s

So if that is the case then i am at 9.5 to outside of shock tower lets see i am guessing here the first hole is about 5/8" center of outside hole. The holes are about two inches apart so I am about 11 1/8" or a touch more from center............ and you say at that case i would probably have shifter clearance problems..... So i should be pretty close. Well i am going to mock it up like i mentioned above with a fan and with your numbers and ideas i am feeling pretty confident. Whats the worse that can happen i have to put a 12" body lift on :lol:
 
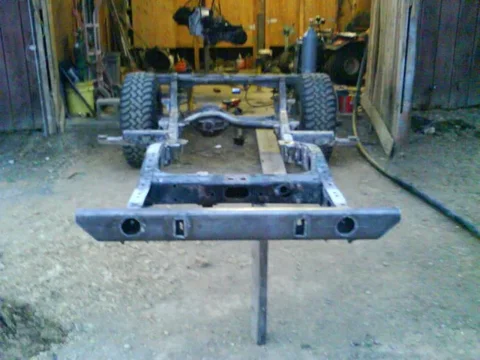
Ok mounts are all on and welded! Front bumper is on. And rear reciever hitch is on i will edit later with pics since who cares about just telling about it.
 
Ok here are some pics:
DSC00596.webp

DSC00597.webp

DSC00598.webp


orangefj45
i have a scout ps box for sale if you need one. if you get one at the wrecking yards, then buyt the pump and hosesas well. you will be able to use them with the gm V*.

How much for the box?


Summary up to this point i am waiting for the recovery shackle mounts to show up, I will burn them on, Scab a plate of 3/4?? (What do you think) For the future scout steering box and then off to get blasted early next week. (4th of July weekend is going to slow my progress) I need to get the Lizard skin ordered (ouch very expensive) so that i have it here and i can be blasting the underside of my tub with my little blaster while the frame is gone. If you are wondering i had to unhook the common wire and use it as a 110v and pound a ground rod at both ends so that i could get back to it. (didnt work very good it is not 100%)

I thought the power thing had me ^*%^ed but i was able to find a way to say :flipoff2:

Oh and as for the front bumper i know the turn signals are kinda a cruiser thing but i hate them so I cut some into the front bumper. I know they wont be legal because of a few factors but at least it will look better to me???
DSC00596.webp
DSC00597.webp
DSC00598.webp
 
Last edited:
3/8" scab plate is more than enough for the ps box mount. i need to get $100 for the box.
 
Ok 3/8" Will i need to tube the bolt holes through the frame with 3/8"? It seams there is a spacing issue and also people tap the thick plate but I dont want to push it out towards the tires any more than i have to so if 3/8" works 3/8" it is. And i will get back to you on the box. I am not against 100 i am nervous about shipping since a carb just cost me 18.00 to ship.

Thanks
 
the ps box mounts to the indies of the frame. sleeving the holes with some thick wall tubing is a good idea and definetly helps keep the frame from compressing and the bolts from coming loose.
 
ps

Chief SP is looking good

I'm looking forward to seeing the scout PS setup as I am getting ready to do the same:D
 
orangefj45
the ps box mounts to the indies of the frame. sleeving the holes with some thick wall tubing is a good idea and definetly helps keep the frame from compressing and the bolts from coming loose.

Sounds good Thanks

Chief SP is looking good

I'm looking forward to seeing the scout PS setup as I am getting ready to do the same:D

I will make sure i add extra pictures and details.

Thanks
 
Ok so Chief %^tty Pants is loaded on my trailer behind my yota headed to get blasted tomorrow! I welded a 3/16 plate on the inside and plan to tube the frame to help support the scout box. I am waiting to check on one more option before i take orangefj up on his offer for the scout box. The POR is sitting here accumulating dust so as soon as i get the frame back it is getting slapped with por. I need to get off my &%$ and order the lizard skin so this build does not get delayed. I promise to make this build at least a little different from what you have seen before. I have built various vehicles before and none of them have ended up normal...... I built a samurai with a fuel injected rotary motor, A samurai with a pinto motor, three speed, yota axles, 9" lift, 35" boggers, a 1978 ford f150 short bed with two tone SWEET paint and insane tweed interior, lift and 35"s, a 81/83/85/80/82 camo long bed yota that i chopped the wheel base down to shorter than a normal shortbed and then bobbed the bed, worked the 4 banger hard, and moved the front end forward for approach angle. The moral of my story is i wont let you down this build will be bad!!!!!!!!! I am shooting for stealth operation look everything will be black or dark grey. If this looks like any other FJ40 you have seen on this site please kick me in the ^%lls since i have failded you!! As for the 40 legends here i understand that FJ40's must have the bezel up and tops white but cut me some slack if all were as they should be yours wouldnt be so sweet for being factory. You are surely thinking this feller has had to many :beer: 's and my answer is :cheers:
 

Users who are viewing this thread

Back
Top Bottom