Time to share my home built trailer project... (1 Viewer)

This site may earn a commission from merchant affiliate
links, including eBay, Amazon, Skimlinks, and others.

Joined
Jun 29, 2006
Threads
179
Messages
4,394
Location
Carolina Beach NC
I've been sharing my build up in the Olde North State Cruisers forum and it was suggested that I share it with the rest of "mud" and post it where it belongs, here in the Trailer Tech section.

I started out buying an M416 (some suggested it is a M614 due to the "helicopter hooks" but I'm no expert) that turned out to be quite a project due to the extensive rust. Upon reflection of what it would take to get it in shape as well as the extensive modifications I'd have to make in order to get it functional as an "expedition trailer", I made the decision to start from scratch.

I've read through most of the "home built" threads and learned a great deal, stealing ideas from many of them. But, I went in a different direction than most. I decided to make mine out of round tubing instead of square stock. Probably made things more challenging for myself but just had to do something different. My rational was that if one were to make a buggy, they'd use round tube.

So, off we go. Ordered a bunch of 1.75"/0.12 DOM tubing from my local steel supplier. I also bought a JD2 model 32 bender with 1.75" dies. I initially planned on mirroring the size/shape of the M416 trailer but, I planned using some influence of the FJ40 to give it a "theme". Yeah, to much time in front of the boob tube watching Orange County Choppers and Monster Garage.

Knowing I had a line on a top off an FJ40 that was in good shape, that became the foundation of things to come. The plan is to give it a track width just inside that of my FJC which meant I'd have to section the FJ40 top to match the width I was looking for. But, enough talk, here comes the important stuff, the pics...

The beginning of the frame, bent to match the angles of the FJ40 top, the masking tape is the planned placement of cross-bars...
tubeexpotrailer-01.jpg

tubeexpotrailer-07.jpg

tubeexpotrailer-09.jpg

tubeexpotrailer-06.jpg

tubeexpotrailer-14.jpg


The top marked with a center line and the portion marked to be removed...
tubeexpotrailer-05.jpg


Frame on stands, cross-bars in place, pile of uprights notched and ready to be tacked in place...
tubeexpotrailer-15.jpg

tubeexpotrailer-17.jpg


Top of the tub on the uprights, caught in the act of working...
tubeexpotrailer-21.jpg


Tongue in place with supports as well...
tubeexpotrailer-a1.jpg


Axle, springs, hubs from ABC Trailer parts in place, went with 3500lb "package" with e-brakes...
tubeexpotrailer-a2.jpg

tubeexpotrailer-a3.jpg


Had to throw the top on to make sure it still fit after removing the section...
tubeexpotrailerlid-3.jpg

tubeexpotrailerlid-4.jpg

tubeexpotrailerlid-5.jpg


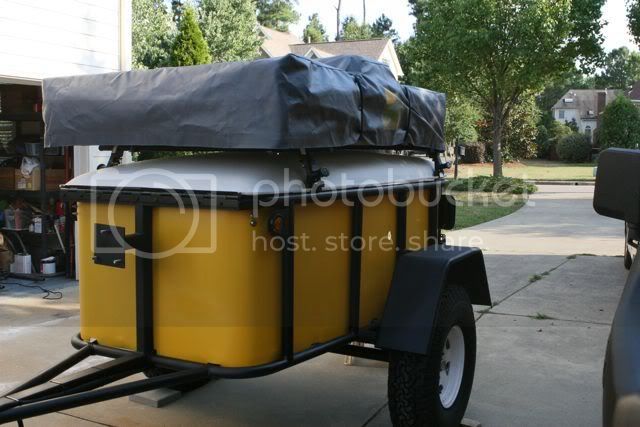
Had to throw a wheel on for the side shot for the full effect...
tubeexpotrailer-a6.jpg
 
Last edited:
Part 2, continued...

Worked up the spare tire mount and hinge for the sectioned FJ40 top/lid...
ExpoTubeTrailerc1-1.jpg


Fenders on, lid on, wagon wheels freshly blasted and painted, it almost looks like a trailer now...
ExpoTubeTrailerc1-3.jpg

IMG_9248.jpg


Freshly skinned with 16g steel, like the "naked" look before paint...
expotubetrailerc2-1.jpg

expotubetrailerc2-2.jpg

expotubetrailerc2-3.jpg


Freshly painted with "Raptor" tintable bedliner, black for the tubing. I got it color match to my FJC and it came out very close...
IMG_9287.jpg

IMG_9297.jpg


With the FJ40 "ambi" doors installed. It started out as a good idea having found a set of well used fiberglass ambi doors that I had to section down to fit. Once installed, I'm not digging the look and changing to a more conventional tailgate instead that matches the look of the tubing/sheet metal of the rest of the trailer...
IMG_9293.jpg


I opted to go with an "old school" look of a wood plank truck bed, using steel runners and red oak, finished in a clear sealer...
tubeexpotrailer-3-4.jpg

tubeexpotrailer-3-5.jpg


Camping Labs RTT in place, ready for deployment...
TubeExpotrailer2a-8.jpg

TubeExpotrailer2a-7.jpg

tubeexpotrailer-3-7.jpg


Daughter playing with the water, spraying her FZJ80 out of the 20g tank...
tubeexpotrailer-3-3.jpg


RTT deployed...
TubeExpotrailer2a-3.jpg

TubeExpotrailer2a-4.jpg


Everyone relaxing inside, all done, finally...
TubeExpotrailer2a-2.jpg

TubeExpotrailer2a-5.jpg

TubeExpotrailer2a-6.jpg
 
Last edited:
Do those bed rails allow for positionable D rings for tie downs? I have seen some pretty slick "tracks" that work pretty well.
 
nice job, that came out great. P.S. I like the look of the 40 rear doors.

Thanks, and I'm still torn on the doors...

Do those bed rails allow for positionable D rings for tie downs? I have seen some pretty slick "tracks" that work pretty well.

I don't think this will but I was thinking about running a set along the base and along top of the tub...
 
that is one sweet trailer eh !!

Love the color and the fj40 top... very unique !!!
Thanks for sharing/posting.....
 
W O W !!!!!!!!!!!!!!!!!!!!!!!!!!!!


Beautiul Job :clap::clap::clap::clap:
 
that is one sweet trailer eh !!

Love the color and the fj40 top... very unique !!!
Thanks for sharing/posting.....

Thanks, I'm not one to follow the pack and the 40 top just worked in perfect...

W O W !!!!!!!!!!!!!!!!!!!!!!!!!!!!


Beautiul Job :clap::clap::clap::clap:

More thanks, I appreciate the compliments...
 
Looks great. Funny how it works when you never see anyone do a tube trailer, so my shop just started building one for production...then you come along and beat us to it!


Awesome job, expecta PM so I can pick your brain on some of your accesories!

Scott
 
Looks great. Funny how it works when you never see anyone do a tube trailer, so my shop just started building one for production...then you come along and beat us to it!


Awesome job, expecta PM so I can pick your brain on some of your accesories!

Scott

Thanks and yes, I saw your thread after I posted this one. It is funny how things work that way.

I'd been talking with my fellow off-roaders about it as well and just decided to do it...
 
I don't want to seem ungrateful...but I'd like to see a few more details on the water tank..and , what kind of dog is THAT?!....OMG...I just want to kiss him!! He's (or she) is addorable!

Also..was the skin "pre-bent" when you installed it? :doh:

Thanks, Pat
 
I don't want to seem ungrateful...but I'd like to see a few more details on the water tank..and , what kind of dog is THAT?!....OMG...I just want to kiss him!! He's (or she) is addorable!

Also..was the skin "pre-bent" when you installed it? :doh:

Thanks, Pat

I used a "tank" I found at West Marine which is actually a "bag" that is mounted under the floor, above the axle in a "cradle" that I made out of the 16g sheet metal. The pump is mounted there also and can be accessed from underneath and removing the left wheel. The bag holds ~25 gal but since I put it in a space that doesn't allow it to fully expand, it was measured to hold ~20g.

I did do most of the bending on the sheet metal before install but finished forming it to fit with some clamps and "manual pressure" before attaching it. For future builds, I'll be using a roller to make this part of the job easier. That 16g steel is not very pliable.

The dog is a Tibetan Mastiff, a relatively rare breed and she is very sweet but protective of her family. They are bred to be the protection system for the Tibetan monks and their sheep, being released at night to be on alert. She is my trail dog and has been across the country, on the Rubicon, Moab and everywhere between...

Beautiful trailer!

Thanks for the compliment, its nice to have a vision come to reality in this way...
 
That is a very impressive build. It looks like you put a lot of thought into it. The wood floor looks great. How easy was the tintable bed liner to work with ? :cheers:
 
That is a very impressive build. It looks like you put a lot of thought into it. The wood floor looks great. How easy was the tintable bed liner to work with ? :cheers:

Thanks, yeah, it kind if just came to me, with some help from my friends.

The Raptor bed liner worked well. It was easy to apply and coverage is really good with the black, less in the yellow. It took 3 good coats for the yellow to hold the color, 2 for the black where one would probably have been sufficient...
 
I dig it. It is styled very nice. Great job.
 
So how'd teach the Mastiff to climb the ladder?
 
Must've had D'Animal stop by and had the beagle show her the way....beagles rule ya know!! :rolleyes:

I'm still blown away by the simplicity (not saying it was easy to build by any means) and ruggedness of it...matching to the FJ was unfrigginbelievable.
 
I dig it. It is styled very nice. Great job.

Cool, there may be more to come...

So how'd teach the Mastiff to climb the ladder?

Very carefully...

Must've had D'Animal stop by and had the beagle show her the way....beagles rule ya know!! :rolleyes:

I'm still blown away by the simplicity (not saying it was easy to build by any means) and ruggedness of it...matching to the FJ was unfrigginbelievable.

Sometimes simplicity is complicated. I'm still working on the removable drawer system to make it all come together...
 

Users who are viewing this thread

Back
Top Bottom