Writeup: 1988 FJ62 4WD Solenoid fix for $17.77

This site may earn a commission from merchant affiliate
links, including eBay, Amazon, Skimlinks, and others.

You only need to replace one. The way they designed the system one solenoid was always active or on and it fails after years of staying on which in turn doesn't let you get your truck out of 4wd.
Does this mean that two different solenoids are required, or is that achieved by wiring the same solenoid differently? I want to bench test the two based on an excellent how-to video ( ) and wasn't sure if one of the valves is open when you blow and one closed (prior to activation).
 
That is a good question and I am not sure off the top of my head. hmm.
 
/ Problem: 4WD light stays on.
1. Check the front driveshaft under your car. If you press the 4WD button to the off position in your car and you can't turn your front driveshaft then your solenoid is probably burnt out.

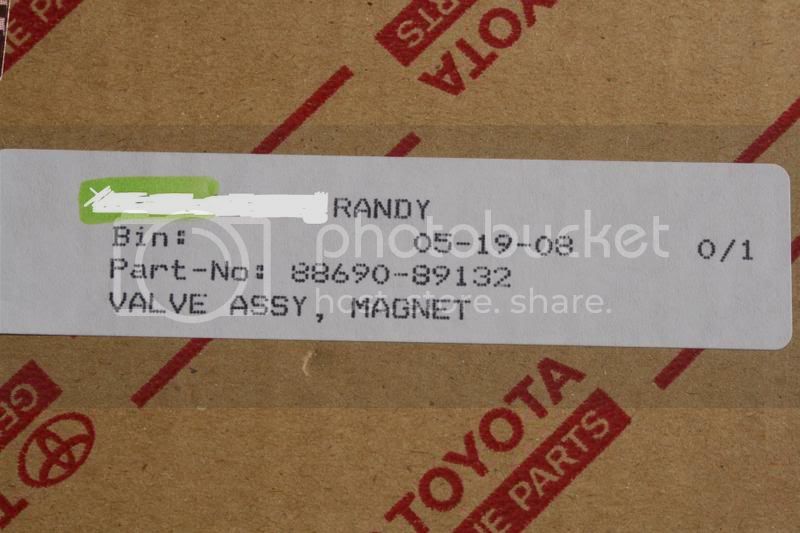
4WD VSV Replacement: Toyota P/N 88690-89132
Part Name: Valve Assy, Magnet
Price from CruiserDan: 17.77
No Discount Price from Toyota: 23.70
This part is off a 1988 Toyota Pickup. It's off the 22R Engine.
PartNumber.jpg


Tools Needed:
1. 12 mm wrench or socket. (unbolt VSV bracket from firewall)
2. Screw driver (remove bad VSV from bracket)
3. Angle grinder or file or hack saw (modify metal notch on VSV to fit original bracket.)
4. File, pocket knife, or razor blade (remove connector lip to fit original clip)

For reference: VSV = Vacuum Solenoid Valve

Steps to repair electronic 4WD in an FJ62 (mine is a 1988)

1. Remove Bad VSV (red one) This picture shows the passenger side firewall. You need a 12 mm wrench to remove the bracket. Unclip the wires and hoses. Make sure to label everything or keep it half hanging and connected like I did.
burntoutredVSV.jpg


fasteners.jpg


2. Unscrew the new bracket from the new VSV. We don’t need it. Also, take off the 2 hoses that come with the new VSV as well (not shown in pics)
newbracketdontuse.jpg


3. Now we need to modify the new VSV before it will fit. Compare the two VSV’s and it’s obvious that we need to trim the metal tab on the VSV and remove the lip off the new electric connector. I had already trimmed mine prior to this picture so use your imagination.
NewvsOldVSVtopview.jpg


This second picture shows the two metal tabs. They are different sizes. The new one is too big and needs to be trimmed down.
bracketcomparison1.jpg


Wear safety glasses and use proper tools and techniques. Don’t stab yourself with a pocket knife while trying to remove the electrical connector lip. Point is, be safe.

4. Now that you’re new VSV is modified; check to see if the electrical connectors fit. Also check and see if the metal tab on the VSV fits into the firewall bracket you unbolted. Connect up the proper hoses. The vertical hose coming straight out the old VSV is the Vacuum line one. The new VSV Vacuum line is the one on the outside. I hadn't trimmed the metal tab yet, so again, use your imagination. Sorry for the lack of proper pictures.
NewvsOldVSVsideview.jpg


5. Attach everything and don’t worry about sucking on the tube or switching hoses anymore! I have only just installed this. ***DISCLAIMER: Worst case scenario this VSV may burn out early. Who knows, maybe it’s not supposed to be used for this. I hold no responsibility for you trying this. I tried it and it works but I cannot guarantee for how long. My guess is that everything will be ok but I’m just letting you know, do this at YOUR OWN RISK.***

Keywords: four wheel drive solenoid, VSV, vacuum solenoid valve.
Thanks for the guidance, just like that the green 4X4 light is out
--NJ 1988 FJ62
 
Great write up guys. I’m down in Australia. Has anyone come across this? My solenoid doesn’t have a plug for the electrical connection but is one piece so I can’t simply replace and plug in.

86B01D09-85CC-4170-9356-8C818C483C48.jpeg
 
I have not come across this. I suspect this is a 24 volt diesel cruiser you have? That is my only thought.
 
Great write up guys. I’m down in Australia. Has anyone come across this? My solenoid doesn’t have a plug for the electrical connection but is one piece so I can’t simply replace and plug in.

View attachment 2793504
Those are aftermarket knock-offs. Toyota does not use those types of connections or the cloth sheathing.
 
Last edited:
Those are aftermarket knock-offs. Toyota does not use those types of connections or the cloth sheathing.
Thanks Dan. I got a new solenoid but obviously can’t use it as I can’t unplug the existing one. I would need to replace that whole section yeah? From solenoids to white connector?
 
Maybe they were made just for the Aussie market?

View attachment 2794498
That's a new one for me. Our JDM HJ61 and HJ60 don't look anything like that. Looks like that number is early JDM FJ62, Canadian BJ60 and a few general countries 60s. Very odd looking and OEM. The others posted above are out of the bracket which added to my misidentification.
You can't win them all. If the part number on your set is the same as the above set, those are discontinued.

This one has an integrated harness with a single connector.
Screenshot 2021-09-23 at 21-26-49 84-01 SWITCH RELAY COMPUTER diagram, 10 1982 TOYOTA LAND CRU...png
 
Last edited:
Awesome resource.
ordered the part... 5 minute test, by plugging connector and hoses into new part... 4WD light turned off immediately.
20 minutes to modify and install.
I'm so happy!!!
 
So I did the vacuum switch to try to get the light to turn off and its still on. I used the 4wd yesterday briefly and the light has been on since. Thoughts?
 
So I did the vacuum switch to try to get the light to turn off and its still on. I used the 4wd yesterday briefly and the light has been on since. Thoughts?
Post #120 mentions that the original "brown" solenoid keeps in in 2WD, so if you've confirmed you are really stuck in 4WD (test method per original post #1) then check that solenoid and/or possible leaks in tubing. I posted how to bench test the solenoid on post #162, but maybe you can do this on the car without removing it? Finally, there is the switch on the transfer case itself. I had a different problem where my solenoids worked just fine, but my light would not turn on...it was that transfer case switch. Probably not your issue?
 
Kinda late to the party but…just did as instructed on page 1. Worked like a charm. Thank you very much for sharing this many years ago.
 

Users who are viewing this thread

Back
Top Bottom