What Did You Do With Your 120 Today? (12 Viewers)

This site may earn a commission from merchant affiliate
links, including eBay, Amazon, Skimlinks, and others.

OME front coil part number, 2885, 2887.

I spent some time over the weekend to wet sand and clear coat my headlights. I used 2k clear and the finish is very good but I have pretty significant amount of crazing in the lenses. This bought me some time before I have to replace them.

View attachment 3278171
View attachment 3278172
Also replaced the bulbs with Phillips H9 and 9011 bulbs.

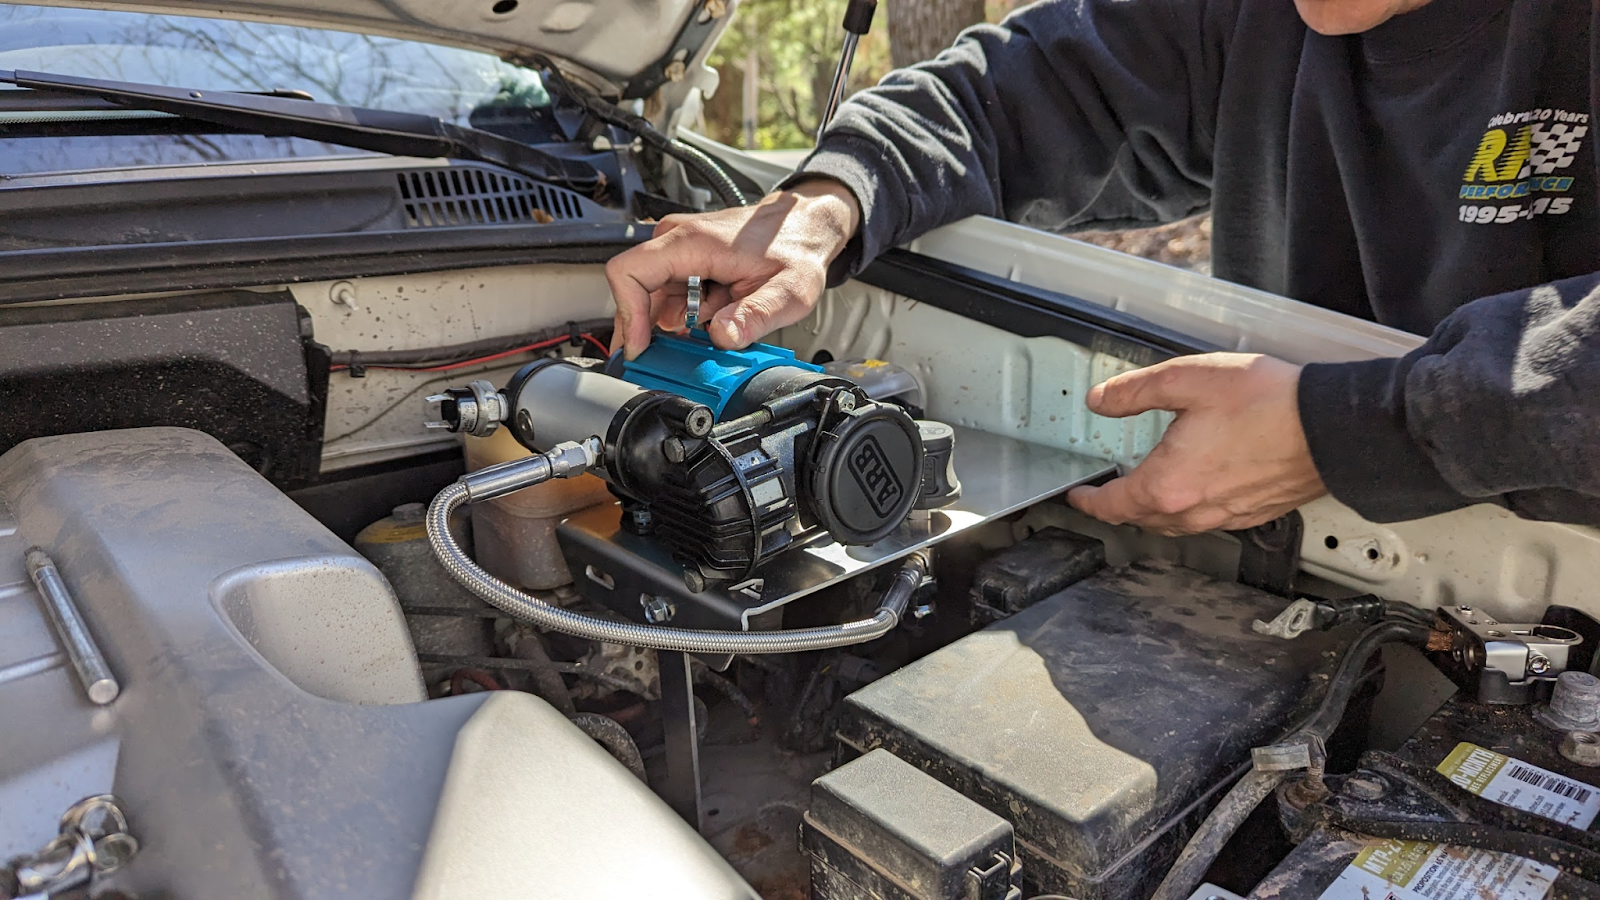
Since we are sharing winch solenoids here’s mine I finished a few weeks ago. It’s an Albright solenoid and I also remote mounted the control plug. I wanted to keep the constant hot wire as short as possible so I mounted it on the drivers side.
View attachment 3278174
View attachment 3278175
View attachment 3278176

In the 2nd to last pic you need to add some split loom to cover the wires where the wires go through the the hole under the headlight or they will rub through. I was adding a trans cooler to mine last weekend and looked at my winch wires routed in the same place. The insulation is showing a small divot where it was against that edge. Anywhere where wire touches an edge you want some split loom or other abrasion resistant sheath even if the edge seems really blunt. Its crazy what road vibrations will do over time
 
In the 2nd to last pic you need to add some split loom to cover the wires where the wires go through the the hole under the headlight or they will rub through. I was adding a trans cooler to mine last weekend and looked at my winch wires routed in the same place. The insulation is showing a small divot where it was against that edge. Anywhere where wire touches an edge you want some split loom or other abrasion resistant sheath even if the edge seems really blunt. Its crazy what road vibrations will do over time
Good point. It’s hard to see in the photo but I ran plastic edging along the sheetmetal seam, it’s this stuff:


Do you think I would also need loom on the wire?
 
It will probably be fine with the edging but if the insulation can rub on any edge I would add some split loom personally. Even if its not sharp it will rub away like an eraser eventually.
 
Good point. It’s hard to see in the photo but I ran plastic edging along the sheetmetal seam, it’s this stuff:


Do you think I would also need loom on the wire?
Anytime you have a wire on a metal edge, it needs to be removed from the edge and secured so it cannot migrate there in the future. Particularly true of high amperage wires coming off battery posts where the possibility of fire exists. I really like your use of adel clamps.
 
Last edited:
Old man emu springs
Thanks to you guys I dug into my front springs and discovered they're not the correct spring for the additional weight up front, i.e. bumper and winch. New heavier springs have been added to the mod list. Finish wiring up the switch pro and Phoenix, replace rear drive shaft. Then I'll get to the springs.
 
Anytime you have a wire on a metal edge, it needs to be removed from the edge and secured so it cannot migrate there in the future. Particularly true of high amperage wires coming off battery posts where the possibility of fire exists. I really like your use of adel clamps.
I didn’t know those were called adel clamps. I also used them along the bottom of the radiator support with M8 nutserts. That’s 2/0 wire and a lot of weight to be flopping around.
06A7872E-205B-45ED-AAC7-22221B0D0B71.jpeg
 
I didn’t know those were called adel clamps. I also used them along the bottom of the radiator support with M8 nutserts. That’s 2/0 wire and a lot of weight to be flopping around.
View attachment 3279209

I know that you have a short run from the battery to your winch controller but I think you should add a battery disconnect in between those for safety. If those 2/0 wires short circuit they're going pull the full CCA of your battery which will almost certainly cause an electrical fire. Better to keep power off to the winch most of the time and turn it on only when you're planning to use it. A friend of mine in my local Toyota offroad club had his new 5th gen 4runner burn to the ground earlier this year from a short in the power cable in his stereo wiring installed by Best Buy. You can't really fuse a winch so a battery disconnect is the next best thing
 
I didn’t know those were called adel clamps. I also used them along the bottom of the radiator support with M8 nutserts. That’s 2/0 wire and a lot of weight to be flopping around.
View attachment 3279209
Your use of the adels is really smart , looks like a nice install.
Yes, they are used extensively in aviation applications to keep wires and wire bundles routed correctly and safely.

I like to use them on the 470 too as you can see by my overkill running wires off the spare tire swingout. 🤣

20230227_184304.jpg


20230227_184319.jpg
 
Last edited:
Today I finished the wire run from the rear bumper up into the engine compartment, back up sense wire, back up video wire, rg 239 cable for 2 way Radio, and the finally power and ground for the E locker .. yeah!!!
 
And here’s my actual setup. The sticker is peeling so that’s custom lol
Did you end up having to trim the mounting studs to fit D rings? Or I guess soft shackles would still work.

I think I’m going to trim the “handle” piece of the bolt for the d ring (see pic below) rather than trim the mounting bolt. I just can’t get my angle grinder in there to trim the mounting bolt. Also have soft shackles in my recovery gear kit.

474E523E-5FBF-446E-AB89-E742E039B181.jpeg
 
Nice s-works back there!
Oh yea, thanks, that's my baby besides the gx, its a clean machine , 2013 but I take real good care of it so its clean as a whistle.
 
I know that you have a short run from the battery to your winch controller but I think you should add a battery disconnect in between those for safety. If those 2/0 wires short circuit they're going pull the full CCA of your battery which will almost certainly cause an electrical fire. Better to keep power off to the winch most of the time and turn it on only when you're planning to use it. A friend of mine in my local Toyota offroad club had his new 5th gen 4runner burn to the ground earlier this year from a short in the power cable in his stereo wiring installed by Best Buy. You can't really fuse a winch so a battery disconnect is the next best thing
I hear you and I don’t necessarily disagree, I considered using one when I was planning this out and decided against it. I don’t think that a battery disconnect would make my setup any safer. My rationale is that the constant hot wire is only about 1’ long and runs along the positive side of the battery and the fuse box. In a crash scenario where the wire could get damaged there would probably be bad enough damage that the hood, rad support, fender, or engine would already be grounding out on the battery or fuse box. Adding a disconnect would shorten that run but not eliminate it.

That weighed into my decision to put the solenoid under the hood. Both to make that constant hot wire as short as possible, and also for security (someone can’t Hotwire the winch). If I had a solenoid at the winch or the solenoid on the other side of the engine bay I would use a disconnect.
 
Your use of the adels is really smart , looks like a nice install.
Yes, they are used extensively in aviation applications to keep wires and wire bundles routed correctly and safely.

I like to use them on the 470 too as you can see by my overkill running wires off the spare tire swingout. 🤣

View attachment 3279233

View attachment 3279234
Nice wiring! I like how everything is mounted and concealed. Giving me some ideas with this one!
 
Nice wiring! I like how everything is mounted and concealed. Giving me some ideas with this one!
Thanks.. yea.. It took me awhile to dream it up. I can't tolerate crappy wire jobs. Its 35 years of avionics tech coming out. My last build was an 88 f150 , I ripped every bit of the po's hatchet work out and started over.
 
Last edited:
Finished wiring up Harrup E locker to the switch pro 9100, ops checked locker and it works.Replaced the rear driveshaft that had a Remco drive shaft disconnect with a new shaft no disconnect.
 
Last edited:

Well after waiting for sales and parts to come in I was finally able to get my new to me ARB CKMA12 On-board air compressor installed this past Sunday.


It was a 2 banana install. The hardest part was the wiring simply because I suck at electrical work but I was lucky to have my good buddy who is an auto mechanic helping out.

It was perfect weather this Sunday with the sun shining and temps in the upper 50’s low 60’s… great weather for Maryland this time of year!

First order of the install was to take off the plastic cover over the fuse and batter side of the engine bay as well as the brackets that were not needed anymore…. Easy and quick.

Took off the factory battery terminals and replaced them with upgraded ones with more wire mounting options
Amazon product ASIN B09LYFTPSB
HsjvVh9K2CfAJUVx1FftgJobp2ULUQeLKyVBV082yizsJ3bfkTKdaOQmGtk93L8m7WYGDO0KMblR52ElUJICEhwOjPHGpRkALZsg48vnjLgqaKZ5Ct3h8J1LZqEk6mMJcL0TKW8G9vN7JxZla3d-hsI
HgiD31JMqSGZGdiz9abE9spty79tetbGwttbpc8rSddm1H_StKkhS8uESrMQa91Kul4pCivkQcMZT-MYjtEworNcxx-H72MSV9vBzJQkySAN8UXhCx3gVUoPsqF7C0g42Hay_IPEkFrNy2T3RJEyDEc


My only complaint about these was that both covers are the same. I think it would have been MUCH cooler if one of the covers was red or at least tinted red. I made due with making sure the power cable was a big honking red one.

Next was the test fitting of the tray to hold the compressor. There are not a ton of different options out there, at least not when I was shopping around but I decided to use the blank option from Power Trays and I am very pleased with it!
Blank PowerTray > 4Runner/ FJ Cruiser/ GX - https://www.powertrays.com/collections/gx470/products/1-blank-powertray

Blank PowerTray > 4Runner/ FJ Cruiser/ GX
LQ0czuPA9RVGvHH70ON2q1m9nQSuc4F_zoxcxXpvSFgEDw1NNalMHFntO9uUtgujnTxAknMjJOYBN4g_bp8btc9zo8DDxQ-9Mro2Fe8YAKTNzCKTP3Q3NqtHYu6Kq719s6fPaiI1V84Gi0JxZ_uCYEM


It’s hard to screw up just a piece of Aluminium but it is nicely made with eased edges and it fits perfectly in its spot. Also it was very easy to drill our mounting holes exactly where we wanted them and didn’t have to use any premade layout since the parts I was using were not any of the options they had predone. Just remember to use the right bits and step bits as well as put a center punch in BEFORE drilling!

Fist step was the test fitting and putting everything where it would be mounted. We did this in the actual engine bay so we could also test for hood clearance at the same time. After a few changes and turns we had it all set. Then it was time to drill….. And drill… a total of 12 holes for everything to be mounted and to run wires through as well.

t8uiFdNrgr5WzVeXlXsJi7MPFmNoXEBOpEv7G_3YtqKXVOlJ76S136YQJc-ABfsVqjVKBI81haWucy8ErY1OhcMarf6vrPIlKvoeiJBvESBHe4iAPsRJQTWIvj2DMqwrmeN3DWaxiZ0CmsMQce56e2g
YCdrES3DOOBg1KBhH4LUOQLPNoMxLaAfgoA1JCQU9fvWDEKVNSgpEWaF9AToHVDR596JhGoTSEcL3Q5HG0mbgTscofWBt9vQDilFGdlBqsWHN1bXM_R2iyh8tCtHyyBvGzkFDBTyUWqZ15rXgQJmRw4


Now with the ARB compressor installed we also put in a Blue Sea Systems 5025 Fuse block to help clean up some of the wiring that was in place for the Diode Dynamics S3 Ditch lights and to also make any future wiring installs easier with a single point to run all power to and from.
Amazon product ASIN B000THQ0CQ
We drilled two holes on the side of the fuse block to run cables from underneath and keep the area as clean and neat as possible. To avoid any rubbing issues we put two small rubber grommets in to hold the wires off the edges and to also give it a cleaner finished look.

Once everything is mounted to the Power Tray it is back to the engine bay…

XIiQwIz_usBl3suGVSShrZ7TRQA7oFCgynzEIx6pmWh7PPlyBMspnQGWodRI7VIkxHwFRnR4i2tlaYuulivTWEzXUoVlDQugCqA23lVIqd2ZXxDmQ90HiH5am4RJoC6n3b0UXBDINI8gfePZ4YlnRrw


With the tray installed we ran the power and negative cables and put in the ring terminals and heat shrinked it all to keep them secure and weather protected and again a finished look.
hjv-lkSkEVeffWhsj4xjIK1PV3btqzldmBs7l60h1IXTX9RWEIIXE5YZfY1QixYHGfiEWB9qpYyRB0SntXZcVnfSM5srdeDrhpDoe0fNPQR5aagWhF1QfDTTUI5XlwSiT3IAU4opuUz6hG_ynN64bIM
VH91yu0j8Qd7ync0uqObWxcfO0MZ5s2HlIh97Nr-CI2jVRVgCNZLHEW1YBlpvK7XABJB1mitKDGzKOgaNXEI6LuQwJcCJ4Wvbbv6sTG3NjevwVp5_9qlVI-NJ2HVyZQEDj1DPVgt893GXxcIw39yGlk

Once we, and by we I mean my buddy Tommy, had it all wired up and knew it all worked Tommy took out the “factory” harness that I had gotten when I bought the unit ( used ) and cut out all the leftover wiring that was not going to be needed. Not running air lockers or anything like that with this setup. Once he had it down to just what we needed and wanted for this everything got taped, loomed and secured out of the way to make for a clean presentation and to keep the engine bay from looking like a rats nest.

I had bought a nice rocker switch to install on the tray but after trying to figure out the best and cleanest way to install it with the tools on hand we opted for a basic round switch that we could simply use a step bit to drill out a proper sized hole for. I might go back at a later date and change it but for now its clean and works just fine. I mounted it on the Power Tray instead of running it into the cabin for a couple of reasons.

  1. It is simpler to do it this way
  2. Did not have to worry about where to mount it inside to keep everything looking as factory as possible.
  3. The only time it needs to be use the hood will be open to give the compressor as much open air flow as possible so having the power switch there must make it more convenient, in my mind at least.


xq8XKI5NDTXpQE5qFwBGloBjtXmXaaF2nPSWXdn4U_zFvBMh8dsXTW1XrQBQ2gH6lJCEnj5SapolUx1b9uJhKA4yg7ZmTrbNIijXgc9dlsSpK_n-sD4sddzVlAg7Y9r-bW2SOh9zJuSXilTJHNy_6Tw

… and the finished product!! Everything is wired in and works great. The compressor is ready to go in about 3 seconds after power is turned on!

4wawLqMxqLFRkGYd8Ubjak75N0is9eghuj7SZkI1eFSoTU2slG0UjP-AkOs0Xtia8xrikcIyIF6E8eGpb3zYuhNRB0Ure9U0P6HGLrG2h2uogS3nCjJZDYnhv5vrUViZMG1icISzDjmP5wzuhC8IX5E


Users who are viewing this thread

Back
Top Bottom