
-
North American Clubhouses - East RegionCA.ON- SOTEC CA.ON- Upper Canada Land Cruisers CA.QC- Club TORQ CA.QC- Quebec Cruisers AL- DixieLand Cruisers AL- Hot South Cruisers FL- Florida Land Cruiser Association FL- Northwest Florida Toyota 4WD FL- Tampa Bay Land Cruiser Association GA- Pavement Pounders GA- Georgia Cruisers GA/FL/AL- Red Hills Land Cruiser Club GA- YOTA IL- Windy City Land Cruisers IN- Hoosier Cruisers IN- Indiana Land Cruisers KY- Kentucky Landcruiser MA/NH- Yankee Toys MI- Lake Michigan Land Cruisers MS- CottonLand Cruisers NC- Olde North State Cruisers NJ- Garden State Land Cruisers NY/CT/MA- FJNortheasters NY- Gotham City Land Cruisers OH- The Buckeye Birfield Syndicate PA- Keystone Cruisers PA- Steel City Land Cruiser Club SC: Land Cruisers: Charleston SC- Palmetto State Land Cruiser Association SC- Upstate Cruisers SC- Swamp Fox Land Cruisers SC- Low Country Land Cruisers TN- Appalachia Cruisers TN- Bluff City Cruisers TN- STLCA VA- Bay to Blue Ridge Cruisers VA- COVA CRUISERS VA/DC/MD- Capital Land Cruiser Club VA/NC- Mid-Atlantic TLCA VA- Star City Land Cruisers VT/NH/MA/ME Acadian Overlanders WI- Land Cruiser Legends WV- Mountaineer Cruisers
-
North American Clubhouses - Central RegionCA.AB- Oil Country Cruisers CA.AB- Rocky Mountain Land Cruiser Association CA.AB- Toyota Ghost Wheelers AR- Razorback Land Cruisers AR/MO- Ozark Mountain Cruisers CO- BookCliff Cruisers CO- Colorado Land Cruisers CO- Derailed Cruisers CO- Rising Sun 4WD Club CO/WY- Horsetooth 4 Wheelers Cruiser Club IA- Tall Corn Cruisers KS/MO- Tornado Alley Cruisers LA- Bayou State Land Cruisers LA- Louisiana Land Krewesers MO- Gateway Cruisers MT- 406 Cruisers MT- Big Sky Cruisers NE- Flat Land Cruisers NM- High Desert Cruisers OK- Green Country Cruisers SD- Dakota Territory Cruisers TX- Alamo City Land Cruisers TX- Bayou City Land Cruisers TX- Lone Star Land Cruisers TX- Lone Star Land Cruisers - Austin Chapter TX- The White Trash of the Elwood Chapter TX- Toyota Trail Riders
-
North American Clubhouses - West RegionCA.BC- Coastal Cruisers CA.BC- Okanagan-Similkameen Land Cruisers CA.BC- Peace Canyon Toyota Swamp Donkeys CA.BC- Calgary Chapter: Swamp Donkeys
CA.BC- Vancouver Island Cruisers AZ- Copper State Cruisers CA- Beach-n-Toys CA- Central Coast Land Cruisers CA- Central Valley Crawlers CA- Gold Country Cruisers CA- Inland Empire Cruisers CA- L.A. County Trailcrew CA- Mountain Transit Authority CA- Pacific Mountain Cruisers CA- San Diego Cruisers CA - Santa Cruz Land Cruisers CA- SoCal 80's CA- Southern California Land Cruisers CA- Toyotally Awesome Cruisers HI- Hawaiian Island Land Cruisers ID- Treasure Valley Land Cruisers NV- Battle Born Cruisers of Northern Nevada NV- Southern Nevada Land Cruisers OR/CA- Jefferson State Cruisers OR- Cascade Cruisers OR- Central Oregon Cruisers OR- Portland Metro Cruisers UT- Red Rock Cruiser Club UT- Wasatch Cruisers WA- Central Washington Cruisers WA- North Sound Cruisers WA- South Sound Cruisers WA- Spokane Land Cruisers
Navigation
Install the app
How to install the app on iOS
Follow along with the video below to see how to install our site as a web app on your home screen.
Note: This feature may not be available in some browsers.
More options
Style variation
You are using an out of date browser. It may not display this or other websites correctly.
You should upgrade or use an alternative browser.
You should upgrade or use an alternative browser.
Throwing parts at a 60 build thread. Now Featuring V8 swap
- Thread starter dbbowen
- Start date
This site may earn a commission from merchant affiliate
links, including eBay, Amazon, Skimlinks, and others.


- Thread starter
- #83
Got all fluids drained today without spilling a drop in the driveway thanks to the radiator box, and everything disconnected and labeled that was attached to my 2f. It is freaking hot in my driveway. Sucks to suck


All thats left is to disconnect 2 fuel lines, the motor mounts, and the crossmember and this sucker is out of there and off to @FJ60Cam for some work for the dude who bought the motor and for shipping.
Came a long way from my 4runner project where i had to use tiki torches for a lighting source in my 5x8 shed haha
- Thread starter
- #84
Parts list so far. Just in case anyone was looking to do the same. You never know who is reading this.... so the prices have been secretly omitted.
Ended up getting the Advanced adapters T case adapter at @torfab they had one in stock, but are trying to find me a missing gasket. AA is months out on the main adapter aluminum chunk. The current line is 35 people deep
Was originally going to get a Walbro fuel pump, but the market is really oversaturated with fake chineese knockoffs of them, and its just about impossible to spot a fake. The DeatschWerks is a proven fuelpump that is commonly used in drift cars with LS swaps and they are very easy to spot fakes with. Fingers crossed i dont have any fuel pump problems with it.
- Thread starter
- #85
Had some buddies come by and pulled the motor making sure to leave some good love taps on my sheet metal with the transfer case on the way out. Pea gravel driveway and engine hoist do not go well together. At all.
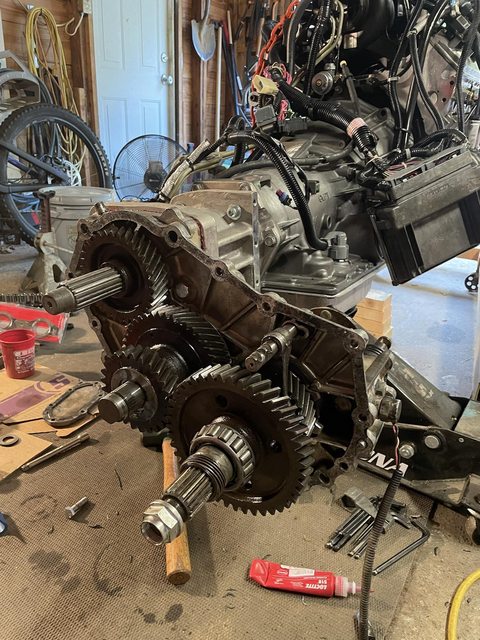
next is to remove the Tcase and clean this motor up and get it 3 miles down the road to Camerons shop.


next is to remove the Tcase and clean this motor up and get it 3 miles down the road to Camerons shop.


- Thread starter
- #87
Going to have to cut the top of the shifter bracket off so the lever has room to move. The little plastic square isnt fully engaged in the shifter cut out when i use the lock washer. When i dont use the lock washer it sits in there flush but i have even less clearance with the top of the shifter. Going to see if its any better with the bracket cut up tonight and see if i have full range of motion.
If i have to lose the lock washer for the shifter bolt, im assuming some red loctite will work to hold the bolt in


If i have to lose the lock washer for the shifter bolt, im assuming some red loctite will work to hold the bolt in
- Thread starter
- #88
Some actual tech for the thread...
If you are using a gen3 dbw system and want to have your ac idle up run like factory, youll need to control it through the PCM. The AC amp mod will need to be done still, but you need an extra driver chip and an extra capacitor on your PCM. Most silverados and tahoes do not come with this pcm but a lot of the express vans do. I lucked out and popped my pcm open and had the extra capacitor and chip installed already.
Basically this is the hardware needed to let the pcm control your idle. If you want to run drive by cable, you need this pcm as well. Drive by cable does not work on a dbw only pcm. You will basically get the computer on HP Tuners and tell the pcm to accept 12v for the ac request signal and splice into the wire connector.
I might not be using the correct terminology for some of this stuff but its all on ls1tech. Here are the photos of the extra chip and capacitor on the pcm board.
- Thread starter
- #90
Since i'm swapping to the GM Compressor, all of the AC stuff is getting replaced. Knocked out the Evaporator today. Gotta say, this was much easier than i was planning on it being. Just unplug everything. Undo 2 bolts and like 5 screws in total and pull the box out.
Old cruddy Evaporator. Theres got to be a way to add a filter or something somewhere inline to keep this debris out

New Evaporator and expansion valve. Probably should have swapped that little switch in there too but it works fine so it stayed.

AC Amp mod. Supposedly this will disable the rpm sensing circuitry so the compressor doesnt kick in on start up or low idle. Then, by using the extra driver chip and extra capacitor in my GM PCM i can control the Idle up with the engine computer via HP Tuners by using 12v. Both of these things together SHOULD give me a stock running AC system, as it was designed to be ran.

I also decided to just use the Silverado gas pedal, as it was matching to the Tac module that came from the donor truck and it was all matching. Seems like other folks use car pedals for the positioning but with some "mods" the Silverado pedal works and fits just fine in there. Also, this was included with my motor so i didnt have to spend any more money. I just traced out the land cruiser mounting bracket onto some cardboard and made the one usable mounting hole on the silverado pedal line up with the left mounting hole on the LC template.
I basically cut the entire bottom off of the bracket, then recycled one of the mounting tabs from it. Then I made it oblong to give me some adjustability in mounting it to the firewall. On the side of the Silverado pedal, I ground down a groove for the tab to ride in and welded it in.


I forgot to take pictures of this, but i just cut off the majority of the Silverado pedal arm. Then cut off the LC pedal about an inch after it gets straight towards the top. I threw down some welding blanket on my floor and mounted the new hacked up pedal to the firewall and tacked in the land cruiser pedal to the new bracket. After verifying it was in a good location i took it all off and burned it in. Probably should have cleaned the material a little better but whatever it works. No one will see the welds and its going to be painted black.


Old cruddy Evaporator. Theres got to be a way to add a filter or something somewhere inline to keep this debris out
New Evaporator and expansion valve. Probably should have swapped that little switch in there too but it works fine so it stayed.
AC Amp mod. Supposedly this will disable the rpm sensing circuitry so the compressor doesnt kick in on start up or low idle. Then, by using the extra driver chip and extra capacitor in my GM PCM i can control the Idle up with the engine computer via HP Tuners by using 12v. Both of these things together SHOULD give me a stock running AC system, as it was designed to be ran.
I also decided to just use the Silverado gas pedal, as it was matching to the Tac module that came from the donor truck and it was all matching. Seems like other folks use car pedals for the positioning but with some "mods" the Silverado pedal works and fits just fine in there. Also, this was included with my motor so i didnt have to spend any more money. I just traced out the land cruiser mounting bracket onto some cardboard and made the one usable mounting hole on the silverado pedal line up with the left mounting hole on the LC template.
I basically cut the entire bottom off of the bracket, then recycled one of the mounting tabs from it. Then I made it oblong to give me some adjustability in mounting it to the firewall. On the side of the Silverado pedal, I ground down a groove for the tab to ride in and welded it in.
I forgot to take pictures of this, but i just cut off the majority of the Silverado pedal arm. Then cut off the LC pedal about an inch after it gets straight towards the top. I threw down some welding blanket on my floor and mounted the new hacked up pedal to the firewall and tacked in the land cruiser pedal to the new bracket. After verifying it was in a good location i took it all off and burned it in. Probably should have cleaned the material a little better but whatever it works. No one will see the welds and its going to be painted black.
Last edited:
- Thread starter
- #92
My what a big pedal you have……
Looks great.
haha it’s easily 4 times bigger than the old bracket

- Thread starter
- #93
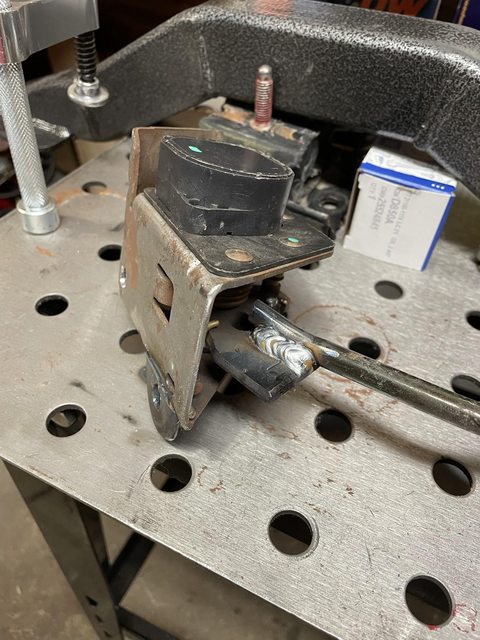
So the Landcruiser Shop mount and bracket kit only works with 4l80e transmissions. I have a 4l60e so i had to go a different route. Using @Well Sorted motor mounts and the Advance adapters crossmember mount. Going to sleeve the bolt holes on the crossmember because tehy look like they will crush with enough torque but Here are the mounts. One side had a little bit of a gap that i had to fill because the frame isnt a completely squared surface and the weld looks kinda wonky there but you win some you lose some.


Solid supervision to make sure welds were up to par

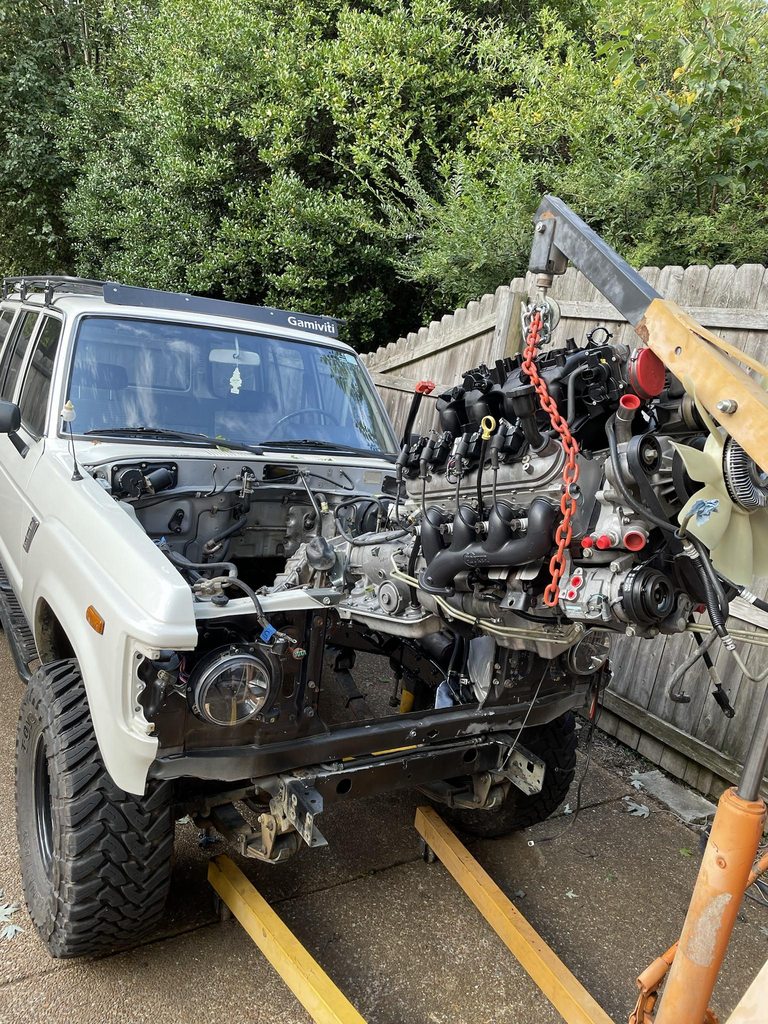
Aaand the motor goes in.


Solid supervision to make sure welds were up to par
Aaand the motor goes in.
- Thread starter
- #95
Get that. Looks awesome
Fingers crossed the hood closes!
Fingers crossed the hood closes!
Fingers crossed the weight of that chain against that plastic intake didn't fubar it. They are sensitive creatures.
I'm liking the motor mount solution. Hopefully it dampens the vibrations better than the OG AA setup I have (which vibrates pretty bad).
- Thread starter
- #97
Fingers crossed the weight of that chain against that plastic intake didn't fubar it. They are sensitive creatures.
I'm liking the motor mount solution. Hopefully it dampens the vibrations better than the OG AA setup I have (which vibrates pretty bad).
Yeah I was nervous about that but so far after checking everything looks good. If it’s cracked, I guess it’s a good excuse to swap to a Ls6 intake and fuel rail I guess. I took off the fuel rail for that very reason.
I am hoping the same on the mounts. My original mounts were poly, so these rubber mounts will hopefully be much softer. Once my trans mount gets in I’m planning on getting the crossmember burned in and get driveshafts ordered. Wondering if I can run LC ujoints on the front with a thin tube to clear the trans pan. Those small spicer ujoints don’t look too promising
A pto drive shaft on the front is about the only option to clear the trans
- Thread starter
- #99
Pto?A pto drive shaft on the front is about the only option to clear the trans
Pto?
Google?