Split Case Rebuild (1 Viewer)

This site may earn a commission from merchant affiliate
links, including eBay, Amazon, Skimlinks, and others.

It always feels good to take something that looks completely roached and make it look shiny and new but just because it looks great doesn't mean that it is mechanically great. Doesn't mean it isn't either, just be on the lookout for potential problems. You don't want to destroy whatever new parts you put in when something else wears oddly or fails. It may be pits in the gears that cause excessive wear, or slop in a retainer that can cause premature failure.

On the other hand you can get it together and feel very good about turning a turd into a jewel, just keep tabs on the magnetic drain plug, maybe take good pictures of the gears to compare wear to later and give it a shot. The rebuild experience is great regardless

Looks great so far.

Bret
 
Nah..its not that... its just hard to believe those gears aren't anything but toast.. and as Poser stated on the front bearing retainer, it should be easily removed by hand and most cases it'll just fall out.....so carry-on Man! I won't disrupt this build any farther...GL..:beer:

The rebuild experience is great regardless

Bret

Well thanks. I know that this case is way far gone as you will see from the picks that Steve asked for. But also I think that as Bret pointed out, what I would expect to see is large shavings on the magnetic plug once it goes into service as it begins to deteriorate. At that point I will be willing to rebuild again. I am not kidding myself by thinking this thing is going to last 50K miles or even maybe 10K but if the bearings don't get thrashed I will not mind getting into it again and doing another.

For me this is a hobby and if I come up with something that works I will be pleased. I also figure this thread - good or bad parts included, will be useful down the road.

What I did not realize was that the retainer should be very loose as the FSM says you need a puller to remove it. It came out easily once I got the puller under it. I had troule just getting the puller on it.

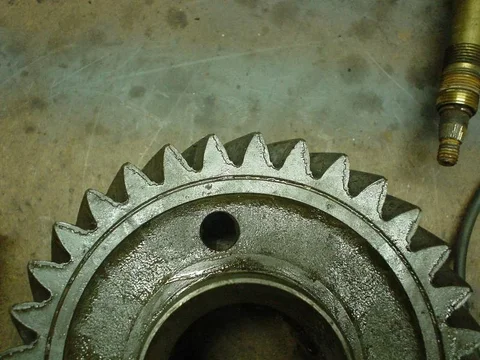
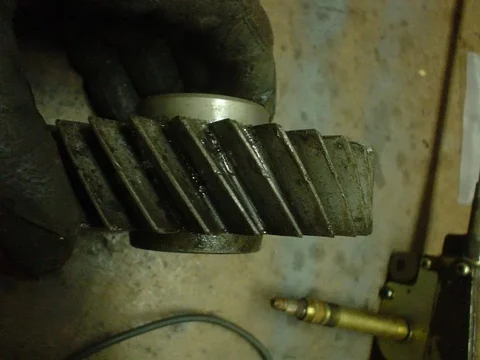
Everything is still round, so that it a good thing. The gear teeth are another story and I am certain I will have problems down the road. Sorry for the huge pics but I did them 2 meg so you guys could enjoy the damage (This appears to be the worst of what I could find and note that there is considerable amount of PB anti corrosion spray on them):

Input1.jpg

11-24-2007 004.jpg

input2.jpg

Input1.jpg
Input2.jpg


So pile on!
11-24-2007 004.jpg
input2.jpg
Input1.jpg
 
Last edited:
Another area of concern would be the "inner bore" of the idler,low,and high speed gears, as it acts as an outer bearing race for the new bearings.:idea:
 
Update:

I got the case hot tanked and cleaned it some with oven cleaner after that so it is nice a clean.

Got hold of CDan and have what I need coming sans the dimpled FJ60 transfer shaft as that was only available from Japan and I figure for the price I can just dimple the one out of the FJ62.


Another area of concern would be the "inner bore" of the idler,low,and high speed gears, as it acts as an outer bearing race for the new bearings.:idea:

The inners look good and feel smooth. I did not check them with a dial indicator when I had it, however, and may do that before moving on.
 
All looks good except it looks like you are working on the floor, where is your dryer for a workbench!? :flipoff2:
:lol: Not sure everybody will get that but it made me LMAO!!!!:flipoff2:
 
Hugh, how are things going with the rebuild?:cheers:

Lou
Waiting on parts from CDan. Will start to get things back together then but will not finish it until I get my H55. I also am waiting on a loaner shim set from a member so it will be a bit. Everything is very clean now though!

Edit: I failed to list the items that needed replacing that I got from Dan. Maybe these part numbers will come in handy for somebody else:

36222-60020 (Need 2 Ea) Idler gear thrust washer

33481-60051 Speedometer Drive Gear

90364-40001 (Need 2 Each) High speed output shaft bearing

90501-14029 Detent Compression Spring

90360-10003 Shift Detent Ball

90341-15001 Shaft Detent Ball Spring Plug

33403-69195 Speedo Driven Gear Assy (18x6)

33404-30040 Speedo shaft sleeve sub-assy

90301-18004 O-ring for speedo shaft

90310-09001 Speedo shaft oil seal

36726-60020 Idler Shaft Lock Plate

36313-60050 Transfer Front Drive Shift Shaft

90930-03075 Breather plug

33124-36010 Oil Receiver pipe

36323-60080 Transfer Shift Lever Guide

36362-60020 - Lever, Transfer High Low shift outer

36341-60032 Front drive shift link support
 
Last edited:
I am willing to bet once you are done the t-case is going to last a long long time. It may be a little louder but those cases are tough. Even if there is small pitty of the gears there is a chance they will wear smooth once in some clean gear oil for a few thousand miles.

Good work man, and again I think that case will last a long time......good save.
 
Just a quick update.
Came home yesterday to a box from American Toyota. Thanks Dan!
I had to call him back though as I discovered I was missing a needle bearing. No worries there since I will have to wait until February to order my 5-speed.
The funniest part, I thought anyway, was to look at the little 4x6x14 inch box and think, "Wow - $200." Then I picked up and it was so lite I thought again, "Man - $200!" Then I opened it, tossed the paper wrapping and pulled out the little American Toyota bag and said aloud, "I can't let :princess: know this was $200!" And quickly hid it amongst the other piles of parts in the shop!
 
Last edited:
If you ever order a rebuild kit for a PS box from toyota...you"ll feel much worse as its around 120 dollars and is nothing more than a few o-rings. Feather lite too.
 
OK. I got the last bits I need for the rebuild with the exception of the bolts I need. I made a list of the Toyota Part numbers but could only find a few of them listed and defined in the micro fiche. [EDIT: When I got them from CDan I measured them.] Here is the list:

90119-08353 x 2 Discontinued *Can use 91651-60830 (Split case inspection cover)
91651-60830 x 4 Bolt w/washer and split washer 8mm - 1.25P x 30mm (Split case inspection cover)
91611-60610 x 3 Bolt w/washer and split washer 6mm - 1.00P x 10mm (Oil receiver bolts)
90119-10262 x 6 Bolt w/washer and split washer 10mm - 1.25P x 40mm (Speedometer gear housing to split case)
90119-12047 x 4 Bolt w/washer and split washer 12mm - 1.25P x 125mm (Split Case Front to 5 Speed)
90119-12235 x 3 Bolt w/washer and split washer 12mm - 1.25P x 170mm (Split Case to 5 Speed)
91611-61020 x 6 Replaced with:
90080-11445 Bolt w/washer and split washer 10mm - 1.25P X 20mm - 20 threaded (PTO Cover)
91651-61030 x 3 Bolt w/washer and split washer 10mm - 1.25P x 30mm all thread (t-case halves)
91651-61040 x 8 Bolt w/washer and split washer 10mm - 1.25P x 40mm - 30 threaded (t-case halves)


Anybody know where these items may be listed in the fiche or tell me what size, pitch and length they are? (Taken care of)

I looked in the alphabetical section as well as the section listing parts by number and came up with nothing.

And here is a tech question. I think I know the answer but I don't want to screw up:

If I set this thing up on a tranny that I am not planning on using (like the free FJ62 auto trans I got with it) will the shim set up remain the same? I should be able to just take it back apart and remove it and swap it to the new tranny when I comes without making any new adjustments right? I plan on mating this to a 5-speed but have not purchased it yet since I am trying to ketchup on the holiday bills and the wife's PhD tuition!
 
Last edited:
The plan is an H55 and a split case in a 40 that I am going ground up on and the truck is to be a camping/lite trail and daily driver so to get where I want to be I want a 5 speed.

I like your work and progress with this rebuild. One aspect of your plan that I have not seen you mention is your plan for mounting of the drive line. The late models Cruisers with the split transfer cases used a 'three point' mounting configuration (L & R engine mounts + a mount under the transmission), but the earlier models had a 'four point' mounting configuration (L & R fwd motor + L & R rear motor). [I think the rear mount was on the engine rather than on the bell housing] What direction does your research and combined 'mud wisdom indicate you should take?
 
Most of those part #s show up on the various internet parts sources (like 1sttoyotaparts.com, toyotapartscheap.com., and all-foreignparts.com). So I'm sure CDan can hook you up with the parts and get you the deal.
 
I like your work and progress with this rebuild. One aspect of your plan that I have not seen you mention is your plan for mounting of the drive line. The late models Cruisers with the split transfer cases used a 'three point' mounting configuration (L & R engine mounts + a mount under the transmission), but the earlier models had a 'four point' mounting configuration (L & R fwd motor + L & R rear motor). [I think the rear mount was on the engine rather than on the bell housing] What direction does your research and combined 'mud wisdom indicate you should take?

I plan to copy Poser's mounting here:

https://forum.ih8mud.com/40-55-series-tech/139889-h55-splitcase-into-02-79-40-series.html

Looks very clean and I also like the skid plate that he made - may have to get him to do one for me as I lack the mad fab skilzz. I have already scord the ealry FJ60 crossmember. I do not mind that the drive train will be a bit lower as i do not intend to take this truck to the extreme.

Most of those part #s show up on the various internet parts sources (like 1sttoyotaparts.com, toyotapartscheap.com., and all-foreignparts.com). So I'm sure CDan can hook you up with the parts and get you the deal.

Yes, I am sure Cdan can help. I was just hoping to use my available resources, come up with the bolt descriptions and find them locally at Ace or some of the other good nuts/bolts houses nearby. Those are two sites Ihave not used however so those are very useful.
 
Looks very clean and I also like the skid plate that he made - may have to get him to do one for me as I lack the mad fab skilzz. I have already scord the ealry FJ60 crossmember. I do not mind that the drive train will be a bit lower as i do not intend to take this truck to the extreme.

The FJ60 frame rails are wider than a 40, so you will probably need to modify this cross member to fit in your 40. If you were at GSMTR in May, Barry McCoin brought his 40 just after completing installation of a 13B-T with the 5 speed. He was able to buy a cross member for a late model (Aug 1980 & on) 40 with a split case transfer so he was able to fit it up with limited modifications. He will probably be at GSMTR this May if you want to look under the truck for reference ideas & solutions.

FYI This is one of the pictures I sent to Barry of this cross member in my 1981 FJ40. This was back ground info that he wanted to plan the details of the 13B-T conversion.
CrossMember.jpg
 
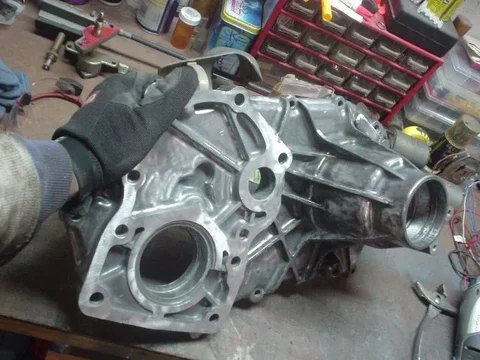
Well it was so cold here today and I could not get my head wrapped around anything on my trail truck so I started to polish the casing today. I finished and went on to better things.

08-01-02 003.jpg

Nice.

08-01-02 004.jpg

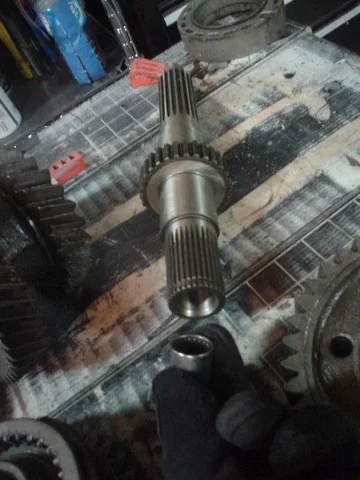
I went ahead an laid out all my beat gears and checked some clearances and found everything to be worn but within tolerance.

08-01-02 005.jpg
08-01-02 003.jpg
08-01-02 004.jpg
08-01-02 005.jpg
 
So hopefully Woody will not get mad at me but I took a bunch of pictures as I could not stand having all that stuff sitting out and not do anything with it!

I followed the FSM word for word and started by pressing the new pilot bearing into the rear output shaft.

08-01-02 006.jpg

I used the ever present shop "SST" to assist in the pressing:

08-01-02 008.jpg

It slid in with little effort into the new shaft that comes with the parking brake kit.

I then drove the old rear outout shaft front bearing race from the housing:

08-01-02 009.jpg

It came out easily.
08-01-02 006.jpg
08-01-02 008.jpg
08-01-02 009.jpg
 

Users who are viewing this thread

Back
Top Bottom