Rusty Wagon Rebuild (1 Viewer)

This site may earn a commission from merchant affiliate
links, including eBay, Amazon, Skimlinks, and others.

Is that one of the VersaTie kits?
Naw, I just pieced together the parts I wanted.

The stuff from US Cargo Control is exactly the same quality, and much cheaper.
L Track Tie Down - Airline Track Cargo Tie Down Rails & L Track Straps
Nice find Tony, their rails are $0.52 per foot rather than the $0.66 for the macs stuff, tie down rings are a dollar cheaper each one. I do like that I was able to get longer lengths from Macs though, I wanted continuous pieces over 4' in length.
I'll give these guys a shot next time.

Looks good to me. :p Glad I could help get you away from the computer.

:cheers:
 
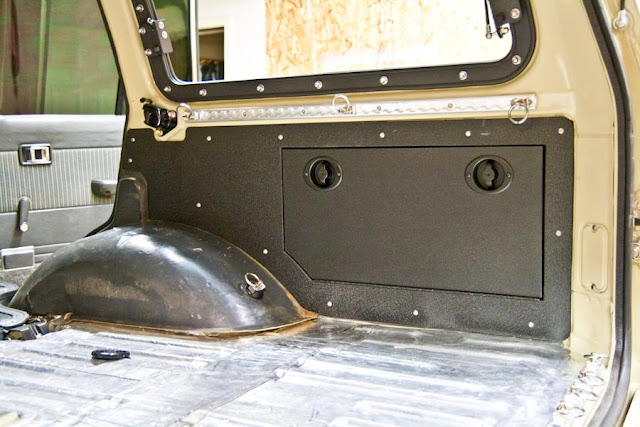
IMG_7581.jpg

Man, I have pictured that exact cargo rail setup in my wagon so many times after seeing those in the back of a Nissan Navara ute. Same colour too!!!'

Thanks for that photo!!!!
 
About the same as it was before!
Feels better though, a bit more solid, certainly quieter without all the holes. :p
Most of it is probably mental though.

I have a few photos I need to upload, only had chances to do truck work on the weekends now that I have it out of the way in the shop, trying to get caught back up.
 
Then that weekend I got around to finishing up the back bumper, I had a good one before but it needed some work and after having it sandblasted it was just to rusty and I didn't have the time to deal with, had to start fresh.

IMG_7618.jpg


IMG_7621.jpg


IMG_7622.jpg


Somebody stole the camera:
IMG_6752.jpg


Need to get some better shots so you can actually see what it is, but you get the idea.
In this shot you can see the light bar from the 80 series on the tailgate s well, I think it looks just fine.

IMG_7634.jpg
 
Last edited:
Put a new headliner in.
Like I had before since it worked good; there is double foil bubble padding against the metal roof, sound foam on the front 1/4 and then wool carpet padding over the whole thing and down the pillars, then trimmed off with the new headliner. I've only reinstalled old ones before, this is the first time starting from scratch, it's an aftermarket headliner from SOR, not usually a fan of their stuff but this was a pretty good item. I did the best I could getting it installed (took all day) and it came out ok. Not great, but it's clean and even after just a week I don't even notice it.

IMG_7636.jpg


Also made new bolt-down brackets for the rear drawers, there are four of these that bolt right to the new tie-down rails.
You can see that I also powder coated all the rails, too shiny as raw aluminum.
IMG_7646.jpg


Lots more to come but those are the only pics I have for now.
:cheers:
KR
 
That's shekshee. I have bumpah envy.

I really wish the airline tracks were steel. Mine are all still in a box, 6 months after I ordered them. I'd like to weld them to the floor, instead of having to drill and bolt. I'm lazy that way.
 
Eh. Those pics were alright :D

Good work Kevin. Love watching it progress. Looking forward to a shot with the doors on and the newly painted black rocker.

:beer:
 
Good work Kevin. Love watching it progress. Looking forward to a shot with the doors on and the newly painted black rocker.
Hummm, yeah, I guess I didn't post anything that shows that.
You can kind of see it here:

IMG_7633.jpg


It looks better, you'll just have to take my word for it for now.


I really wish the airline tracks were steel. Mine are all still in a box, 6 months after I ordered them. I'd like to weld them to the floor, instead of having to drill and bolt. I'm lazy that way.
No kidding that would really open up the mounting possibilities. All the drilling and countersinking an threaded inserts get old, lots of chances to screw it up as well.

I'm working on the carpet now though and it's nice to be able to unbolt the rails and then bolt them back down over the new carpet.
So it has it's advantages.
 
kevinmrowland said:
It looks better, you'll just have to take my word for it for now.

Thanks for the picture! I don't think there is a soul on this forum that doesn't trust you... so you're good :)
 
Kevin, could you please post an overall pic of the cargo area and where you mounted your L-Track.
Awesome work!
 
I ended up ordering some tie down tracks from US Cargo Control because they come in anodized black. Very nice, equal in quality to those from Mac's on casual inspection. The rings are exactly the same. Haven't installed them yet.
 
Last edited:
WOW!!!

Again, Kevin that is just awesome!
 
Kevin, could you please post an overall pic of the cargo area and where you mounted your L-Track.
Sure, here you go: :p

IMG_7852.jpg


It's not done yet!
I'll get pics of the whole thing once it's back together.


I ended up ordering some tie down tracks from US Cargo Control because they come in anodized black. Very nice, equal in quality to those from Mac's on casual inspection. The rings are exactly the same. Haven't installed them yet.
I think Macs or somebody had powder coated ones as well. I didn't want to go that route since I wanted the black to match the wrinkle coat I use on everything else. The parts from US Cargo look like it's nice stuff.


Great work!
You put the license plate exactly where I plan to put mine, thanks for that pic.
What did you do for a light for it?
I ordered a license plate light from superbrightleds.
I'm not starting from scratch on this stuff, that tire holder is built from the same parts I've been using for years, take a look at the first page or two of my ROTW thread and I have some more photos there.
The current version is not quite all together yet so I'll take some better pics once it's all there.
(oh, short answer, I made the light)


It seems to be crying out for some of these:
Redline Motorsports

On a sidenote: Since I got another 60, I'll be hitting you up for my THIRD tailgate storage lid....:rolleyes:
Yup, I left easy access for a bar of some kind in the future, that's what I said on the last body as well but it rusted out before I ever got around to it. :p


Again, Kevin that is just awesome!
Thanks Jay! I thought you just said nice things when I was still close enough to weld things for you. :cheers::
 
So as you can see in the pic above I've been trying to work on the carpet a bit.
Really couldn't afford any other option other than to do it myself, and even then I'm in for $200 in materials. I went with a nice marine carpet since it was a color I liked. :cool:

The back was pretty easy, just cut to shape. I ran it a bit different than typical, took one piece from the back all the way up to under the front seats (marine carpet is 8' rolls). Normally the cargo carpet goes up the back seat but that doesn't work real well with my set up (back seat is always in and out). I did not glue the padding down but I did glue the pad to the carpet.

IMG_7846.jpg


I've been keeping an eye on craigslist for an industrial sewing machine since I really miss having one, no deal to be found there so I was just going to muddle through it, turns out one I my friends had this in storage:

IMG_7850.jpg


That being that case I was able to cut the carpet around the tunnel and seam it back together.

IMG_7848.jpg


You cant see crap in this photo, but it came out ok. I've got a double layer of padding under the front carpet will get a better pic tomorrow along with other details....

IMG_7853.jpg


It for now.
 

Users who are viewing this thread

Back
Top Bottom