Navigation
Install the app
How to install the app on iOS
Follow along with the video below to see how to install our site as a web app on your home screen.
Note: This feature may not be available in some browsers.
More options
Style variation
You are using an out of date browser. It may not display this or other websites correctly.
You should upgrade or use an alternative browser.
You should upgrade or use an alternative browser.
Builds "Red Lobster" Build
- Thread starter pandathrust
- Start date
This site may earn a commission from merchant affiliate
links, including eBay, Amazon, Skimlinks, and others.
More options
Who Replied?- Thread starter
- #142
how wide is that tuffy, 8"? id like to put one in my truck too.
Yeah it’s the 8” one without the radio storage up front. Didn’t feel the need for that and figured the extra space without was an upgrade.
- Thread starter
- #144
I got started on trying to catch up on the engine leaks this weekend. I knew I would have to do the valve cover since it was leaking but when I removed it the OEM gasket still seemed fairly newish and pliable. I still replaced it with a new one. Here is what it looked like to begin with

Stripped all the essential stuff off to get to the cover bolts and got to this point and was able to check out the head condition. I noticed when taking it off that the spark plug deals were very much gone. They were super hard and the #4 spark plug was getting oil on it. I decided that I would also take the time to replace the spark plugs with OEM ones since Im not sure when those were last changed. Not really expecting much of a change in performance obviously but more for peace of mind for less than $15 in parts.

I decided that I would get the valve cover powder coated to add a few HP by Smoking Gun over at ACC. As usual they were super quick and let me swap out the powder coated valve cover with mine to minimize down time.

I replaced the PCV seal and valve and bought a new oil cap. Changed out the spark plug seals

While I had the valve cover off I decided to wrap the engine harness with some DEI 400 degree reflective tape. It looks like chitty duct tape, but its wrapped as best as I could with my big hands back there. There was one area where the factory sleeve was burned through, but thankfully the wires were not exposed. I rewrapped and secured so they would no longer contact hot areas.

FIPGed the half moons in and valve cover back on with new bolts torqued to spec

The spark plug wires were pretty oily so I cleaned them up and reinstalled with some dialectic grease to better protect the connection.

After putting everything back together and firing it up to notice there was coolant dripping down from the rear throttle body hose and pulling it again to push it on more, the engine is back together. One leak down, 3 more to go...

Looks pretty sick now, just need to spend some time cleaning out the engine bay. It's just going to get dirty again though, that's my excuse for now
Stripped all the essential stuff off to get to the cover bolts and got to this point and was able to check out the head condition. I noticed when taking it off that the spark plug deals were very much gone. They were super hard and the #4 spark plug was getting oil on it. I decided that I would also take the time to replace the spark plugs with OEM ones since Im not sure when those were last changed. Not really expecting much of a change in performance obviously but more for peace of mind for less than $15 in parts.
I decided that I would get the valve cover powder coated to add a few HP by Smoking Gun over at ACC. As usual they were super quick and let me swap out the powder coated valve cover with mine to minimize down time.
I replaced the PCV seal and valve and bought a new oil cap. Changed out the spark plug seals
While I had the valve cover off I decided to wrap the engine harness with some DEI 400 degree reflective tape. It looks like chitty duct tape, but its wrapped as best as I could with my big hands back there. There was one area where the factory sleeve was burned through, but thankfully the wires were not exposed. I rewrapped and secured so they would no longer contact hot areas.
FIPGed the half moons in and valve cover back on with new bolts torqued to spec
The spark plug wires were pretty oily so I cleaned them up and reinstalled with some dialectic grease to better protect the connection.
After putting everything back together and firing it up to notice there was coolant dripping down from the rear throttle body hose and pulling it again to push it on more, the engine is back together. One leak down, 3 more to go...
Looks pretty sick now, just need to spend some time cleaning out the engine bay. It's just going to get dirty again though, that's my excuse for now
- Thread starter
- #145
I also reset the toe in on the front axle to a little less than .250" less in the front measurement with math for the 37" tire. I realized the panhards had not been torqued to spec when I decided to recenter the axle by changing the length. I torqued them and not my steering wheel wobble is gone. Tested it up to 90 mph today and there is no vibration or anything so I'm happy. I'm still going to get a steering box rebuilt by west texas off-road and will most likely go hydro assist to help turning the big tires in the near future.
I took this time to take my truck to a wall to check the headlight height. Set it to about 36" at 20ft away from the wall with the passenger side slightly above the driver cutoff.

color messed with to show off the individual cutoff of the projectors

Might still have to mess with the high beams a little but this is where I left them for now. these are the bi-xenon projectors and the morimoto 2stroke LED in the stock high beam position. It is really bright, lights up the whole road for at least 250 feet in front. Might as well get rid of that useless tiny light bar on the bumper.

I pulled the truck up to the wall to see if I could get a good picture of how much light these put out. The "usable" light is about 120 feet I'd say, but the light really just keeps going.

Similar intensity for the wall distance (~100 feet) with the low beams only

high beams (bi-xenon projector/ 2stroke bulbs). I think together they work really well. I disconnected the 2stoke LEDs and the projectors throw a ton of light by themselves, but the LEDs kind of spread the light out up closer to the truck. Together, they make a really good high beam, but I think that just the low beam would be enough of most roads.

Overall, I'm pretty happy with the outcome of the projectors and I'm looking forward to using them a little more when driving at night. Might be a little pricey for lights, but I think it was well worth it after getting able to really see the light output and most importantly being able to see at night better than my brother's 100, but were going to fix that soon...
I took this time to take my truck to a wall to check the headlight height. Set it to about 36" at 20ft away from the wall with the passenger side slightly above the driver cutoff.
color messed with to show off the individual cutoff of the projectors
Might still have to mess with the high beams a little but this is where I left them for now. these are the bi-xenon projectors and the morimoto 2stroke LED in the stock high beam position. It is really bright, lights up the whole road for at least 250 feet in front. Might as well get rid of that useless tiny light bar on the bumper.
I pulled the truck up to the wall to see if I could get a good picture of how much light these put out. The "usable" light is about 120 feet I'd say, but the light really just keeps going.
Similar intensity for the wall distance (~100 feet) with the low beams only
high beams (bi-xenon projector/ 2stroke bulbs). I think together they work really well. I disconnected the 2stoke LEDs and the projectors throw a ton of light by themselves, but the LEDs kind of spread the light out up closer to the truck. Together, they make a really good high beam, but I think that just the low beam would be enough of most roads.
Overall, I'm pretty happy with the outcome of the projectors and I'm looking forward to using them a little more when driving at night. Might be a little pricey for lights, but I think it was well worth it after getting able to really see the light output and most importantly being able to see at night better than my brother's 100, but were going to fix that soon...
- Thread starter
- #146
Started getting the 80 ready for GSMTR this year. I have been trying to catch up on things I have been wanted to switch for a while. I bought a new radiator/coolant lines/ heater valve about 10,000 miles ago and since getting the ultragauge, the temps are looking good. But I still wanted to change over some of the parts to actually know when they were replaced. I picked up a new water pump, fan clutch, thermostat, along with a new distributor cap/rotor, and seals to make the small engine leaks stop. First up, I did the landtank blue fan clutch mod to open up at 95F and switched out the oil with 15k. Really easy job once you get all the hardware off.

I didn't like the cross panhead screws it originally game with so I swapped out with some socket heads to be able to crank them tight.

After finishing the valve cover job and noticing all the oil in the throttle body, I looked into oil catch cans with the PCV line. The new PCV should be better than a 200k one, but I still added the catch can to see what it was all about.

Used a air compressor water separator and jb welded the hole in the bottom closed, some correct sized brass fittings, and some 3/8" fuel line. Probably all in at $50 which wasn't too bad if it actually does the job.

I've had it in for about 500 miles and it is catching oil. It is probably about 1/8" full which I guess is pretty good. should have installed it before changing the PCV to see how just changing that affected it.
Changed out the rear corner light that I smashed on a tree a while ago. Crazy how new it looks in comparison to the old one.

I had some rust on the rear hatch handle bracket and decided it was time to change that thing out. It looks like the original was coated but somehow just started with some rust. New one looks nice though.

It was an easy install, took like 10 minutes to do. Now it looks much better.

Took the 80 out on some FSR mostly so I could get activate the ABS some so I could clear air bubbles, if any, from the ABS. Decided to take some pictures of the FJ cruiser steelies, since those will be going bye-bye in the next few days. The back spacing is the same as stock alloys (4.5") but the offset puts the tires inward more and on full turns the tire contacts the radius arm before the steering knuckle stops do. Decided against spidertrax spacers since I don't like the look or idea of running spacers. New wheels should be here today and hopefully installed and balanced in the next few days.

I didn't like the cross panhead screws it originally game with so I swapped out with some socket heads to be able to crank them tight.
After finishing the valve cover job and noticing all the oil in the throttle body, I looked into oil catch cans with the PCV line. The new PCV should be better than a 200k one, but I still added the catch can to see what it was all about.
Used a air compressor water separator and jb welded the hole in the bottom closed, some correct sized brass fittings, and some 3/8" fuel line. Probably all in at $50 which wasn't too bad if it actually does the job.
I've had it in for about 500 miles and it is catching oil. It is probably about 1/8" full which I guess is pretty good. should have installed it before changing the PCV to see how just changing that affected it.
Changed out the rear corner light that I smashed on a tree a while ago. Crazy how new it looks in comparison to the old one.
I had some rust on the rear hatch handle bracket and decided it was time to change that thing out. It looks like the original was coated but somehow just started with some rust. New one looks nice though.
It was an easy install, took like 10 minutes to do. Now it looks much better.
Took the 80 out on some FSR mostly so I could get activate the ABS some so I could clear air bubbles, if any, from the ABS. Decided to take some pictures of the FJ cruiser steelies, since those will be going bye-bye in the next few days. The back spacing is the same as stock alloys (4.5") but the offset puts the tires inward more and on full turns the tire contacts the radius arm before the steering knuckle stops do. Decided against spidertrax spacers since I don't like the look or idea of running spacers. New wheels should be here today and hopefully installed and balanced in the next few days.
- Thread starter
- #147
Got the new wheels and started to mount them up yesterday. I'm terrible at searching for stuff so it was pretty easy choice when I knew that Hutchinsons would push the tire out 25mm from where the fj cruiser steelies were and that I could stay away from tire shops forever. Once I knew I was going with them, it was a matter of finding someone in the US with them available. Hutchinson makes the military stuff too and that takes precedent over consumer orders, makes sense. I think I called pretty much everyone who offers them and was told 6-8 weeks lead time, and I knew how long it actually takes since my brother had some and it took forever to get them. I got super lucky and found a place that had 4 ready to go and a 5th would take a month or two to get.

I feel bad for the UPS man who had to carry 4 of these boxes up my long ass driveway.

These things are pretty easy to put together. Shove the rubber donut into the tire, put the back half in the tire, then the top after lubing/putting the giant o-ring on, and tighten everything up. The front half of them have little alignment nubs that if you don't tighten the two halves together evenly, you'll crunch. So I was pretty careful when putting those together. I torqued all the bolts to 30 ft-lbs, then 60, then 100 because I wanted to make sure they were all getting tightened evenly. I was going to use dynabeads to balance the tires, but Hutchinson didn't recommend that. They said to use some sort of liquid balance or something if you really needed to. They said they are checked at the factory for a balance spec and probably wouldn't need balancing unless the tires are super imbalanced, so I didn't use anything. If I need to, I'll take them to a tire shop and get some sticky weights put on.

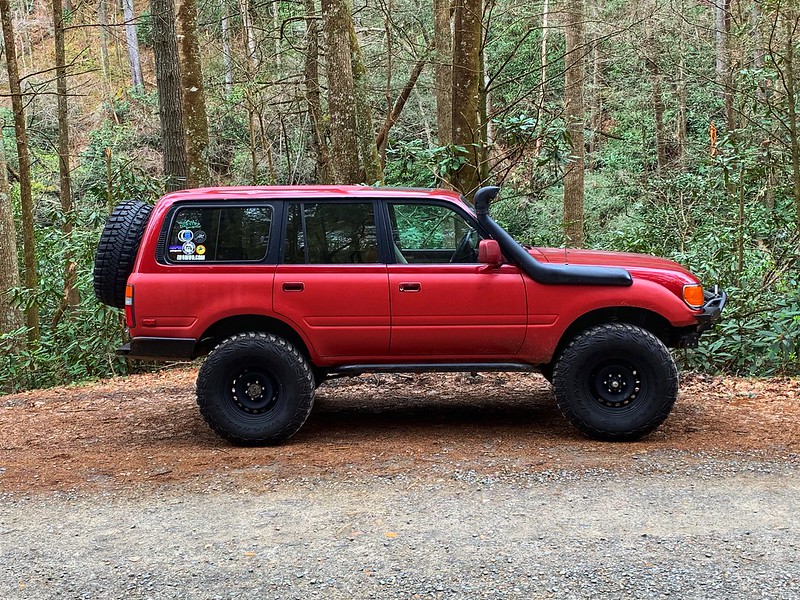
But no one cares about how to put them on, it's super easy. Here is one up to the car to see if I actually liked them.

Mounted up. I used some gorilla locking flange style lug nuts. I can't wait to lose the key and not be able to take my tires off. I checked the lock to lock turn of the front axle and it clears the radius arms now.

I marked all the nuts/studs with a paint pen so I could easily check for loosening of the nuts. I doubt it will happen, but it was a pain to torque them all in the first place and I don't want to have to do that all over again unless I'm changing tires.

They have some pretty interesting split jam nut kinda nuts. It looks like to actually back out the top half would have to jump over a little bump on the lower nut that locks the two halves together. Then they can loosen together. Good luck with that. I got the tires mounted, but need to put the rest of the wheels on today. Hopefully all goes well and I won't have to take them off again to balance.
I feel bad for the UPS man who had to carry 4 of these boxes up my long ass driveway.
These things are pretty easy to put together. Shove the rubber donut into the tire, put the back half in the tire, then the top after lubing/putting the giant o-ring on, and tighten everything up. The front half of them have little alignment nubs that if you don't tighten the two halves together evenly, you'll crunch. So I was pretty careful when putting those together. I torqued all the bolts to 30 ft-lbs, then 60, then 100 because I wanted to make sure they were all getting tightened evenly. I was going to use dynabeads to balance the tires, but Hutchinson didn't recommend that. They said to use some sort of liquid balance or something if you really needed to. They said they are checked at the factory for a balance spec and probably wouldn't need balancing unless the tires are super imbalanced, so I didn't use anything. If I need to, I'll take them to a tire shop and get some sticky weights put on.
But no one cares about how to put them on, it's super easy. Here is one up to the car to see if I actually liked them.
Mounted up. I used some gorilla locking flange style lug nuts. I can't wait to lose the key and not be able to take my tires off. I checked the lock to lock turn of the front axle and it clears the radius arms now.
I marked all the nuts/studs with a paint pen so I could easily check for loosening of the nuts. I doubt it will happen, but it was a pain to torque them all in the first place and I don't want to have to do that all over again unless I'm changing tires.
They have some pretty interesting split jam nut kinda nuts. It looks like to actually back out the top half would have to jump over a little bump on the lower nut that locks the two halves together. Then they can loosen together. Good luck with that. I got the tires mounted, but need to put the rest of the wheels on today. Hopefully all goes well and I won't have to take them off again to balance.
davidp14
SILVER Star
thats forkin kewl!!!
I'm running the same setup for the catch can and it works great. You should cut a piece of scotch-brite pad and put it inside the collection canister so the oil vapor has something to grab on to. Then just replace the pad when you clean the canister out. Also, don't use brake cleaner on the canister, it clouds up the plastic. I learned the hard way on that one.
smittycrusher
"Hey big guy, you a golfer" - Roger Dorn
Aidan, you have seriously built one of the nicest 80s I have ever seen. Maybe one day we will actually wheel together since we live so close 
smittycrusher
"Hey big guy, you a golfer" - Roger Dorn
Oh and my white powder coated valve cover from Smoking Gun added multiple HP fo sho.
- Thread starter
- #152
I'm running the same setup for the catch can and it works great. You should cut a piece of scotch-brite pad and put it inside the collection canister so the oil vapor has something to grab on to. Then just replace the pad when you clean the canister out. Also, don't use brake cleaner on the canister, it clouds up the plastic. I learned the hard way on that one.
Yeah I think I’m going to take the filter out and put something like that in. I’m not sure if the filter is letting all the oil through. Thanks for the tips.
Aidan, you have seriously built one of the nicest 80s I have ever seen. Maybe one day we will actually wheel together since we live so close
I appreciate it Scott! Your 80 is awesome too. I know it’s crazy we don’t cross paths more being so close. Are you gonna be at GSMTR? Patrick and I will be getting up there Thursday and staying the weekend.
Oh and my white powder coated valve cover from Smoking Gun added multiple HP fo sho.
Exactly. I saw your picture of the cover and that’s what reminded me to get mine done. I was talking with Brian about yours since they look so good, especially on a white truck.
Last edited:
I tried mine with the filter and the back pressure pushed oil out past the spark plug gaskets. Def do not use the filter the piece came with.
- Thread starter
- #154
I tried mine with the filter and the back pressure pushed oil out past the spark plug gaskets. Def do not use the filter the piece came with.
Yeah I figured the 5 micron or whatever it is was too fine. Took it out a while ago. I'll switch to the scotch brite.
smittycrusher
"Hey big guy, you a golfer" - Roger Dorn
I appreciate it Scott! Your 80 is awesome too. I know it’s crazy we don’t cross paths more being so close. Are you gonna be at GSMTR? Patrick and I will be getting up there Thursday and staying the weekend.
Exactly. I saw your picture of the cover and that’s what reminded me to get mine done. I was talking with Brian about yours since they look so good, especially on a white truck.
Unfortunately no GSMTR for me. It is baseball tourney season for my 12 year old and my six year is dealing with some health issues that have me cancelling all overnight travel until late summer. One of these years I want to make that event. I know it is a great time.
Smitty
- Thread starter
- #156
Unfortunately no GSMTR for me. It is baseball tourney season for my 12 year old and my six year is dealing with some health issues that have me cancelling all overnight travel until late summer. One of these years I want to make that event. I know it is a great time.
Smitty
I’m sorry to hear that. The kids are definitely more important and we’ll be thinking about y’all. We will have to plan something else. The Atlanta 80 meet up sounded good to me, but I don’t have a good feel for setting that up. But I look forward to seeing you at some point soon.

- Thread starter
- #157
About a week after GSMTR now and I managed to crappily clean all the mud off my car and fix the front end noise that started after a loud pop on the trail. I thought it was the sway bar mount since I didn't disconnect it, but it ended up being the sway bar bushing that ended up getting shredded up. Thankfully, when I replaced the rears, I bought some extras for the front. Popped those in and the jingling noise was gone. Met with a bunch of new people and had a good time with the STLCA guys and hit a bunch of trails that I have no clue of what they were. The new lift and everything handled really well on the road ( the first ~250 mile trip i had done) going around 85mph the whole way there and offload although I think low TC gears will be in the near future along with regearing the axles. Put some good gouges in the Hutchinsons to make people think I'm a s***ty driver at the mall and everything it back in order. Here are some pictures that I managed to take.


Looking forward to next years GSMTR
Looking forward to next years GSMTR
Where did you find this tool roll?I got tired of having to reach into my tool bag with a jumbled mess of tools in it to find what I needed so I decided to make a tool roll to try to make it easier to get what I need.

Imagine this jumbled mess but in a dark ass tool bag and you can never find that 10mm socket that you are looking for. These are all the tools that I managed to fit into the tool roll, although I probably should've just filled it with rows of 10mm and 12mm sockets/wrenches and maybe an adjustable to take care of the odd ball sizes. Just trash the rest of the tools...
The main construction is 18oz beeswaxed canvas and 6oz leather. I also got some mil spec velcro to hold the straps down. Didn't like the idea of buckles or studs to hold the straps down because they all look like something that belongs on your mom's purse.
Every tool has its own pouch so its easy to locate and use. The leather cover makes sure that none of the wrenches fall out of the top.
Still have some other zippered/velcro bags in the works so I can put the longer tools that wouldn't fit well in a roll in. Then I can finally toss my old tool bag in the garage and work with just these from now on.


Thanks,
Petr
- Thread starter
- #160
Where did you find this tool roll?
Thanks,
Petr
I made that one a while ago. Look at blue ridge overland if you want something similarish.
looks like a lot of fun! where are those trails??
Windrock in Tennessee
Similar threads
Users who are viewing this thread
Total: 1 (members: 0, guests: 1)