Rear underseat storage in my 60

This site may earn a commission from merchant affiliate
links, including eBay, Amazon, Skimlinks, and others.

Joined
May 15, 2005
Threads
311
Messages
11,995
Location
Ladysmith
I have always hated the wasted space of folded seats. Since I don't have passengers, except hitchhikers I decided to remove the rear seats. I also travel a long ways on trips, sometimes hunting, sometimes not. But I still like to carry the shotgun and .22 just for fun. But long guns are a pain to carry, and hide.
I don't want giant sliding drawers. I also have a large pack of Rhodesian
Ridgebacks that I haul around, not to mention the JRT's and Chi's.
I also just finished stripping a junker BJ60. So the rear seat was a donor for my project.
The first pic is the area of wasted space, as I see it.

P1020623.webp

Then this is the idea, I measured the thickness of the area under the seat with the foam and packing removed. I plan to use the eggshell foam top and bottom. With extra foam under the scoped rifle for extra support.

P1020629.webp

P1020623.webp


P1020629.webp
 
I originally only wanted an area 16" wide, but after laying the guns in there I decided I was going to have to go all the way to the seat bottom hinges. In a way it is better, a whole lot less screwing around. This area is 19" wide and I will add a thin wood surround for side cover and support when it's finished.
 
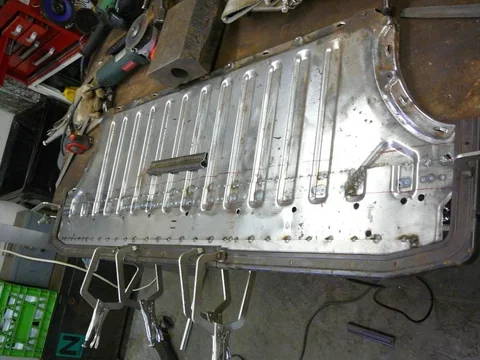
So the first step was to take the seatback pan and figure out how it was going to work. One of the deciders was the 1" round tube that is structure for the seat back. It coincidentally lays right over the flat part of the seat bottom hinges.
I had no idea how I was going to attach the seat pan to the hinges yet.
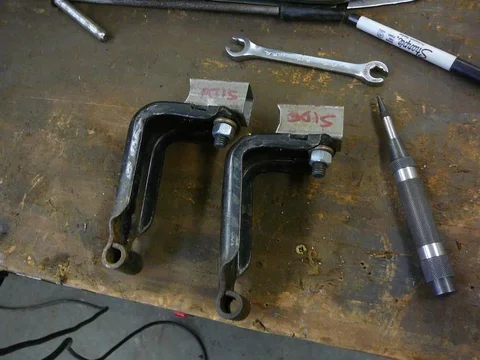
What I want is to still be able to fold the cover back to get under it. MY intentions are to grind the end off the hinge pins and have the top drop into the hinges and just slide the hinge pins in and out. I also will have on hand a long shaft master lock. I will be able to slide it in place of a hinge pin and it will be totally locked and secure, as well as out of sight.
P1020628.webp

P1020628.webp
 
So I took the seat back and drew a few lines. Of course all for show, cause as usual it changes. I wanted to make it a bit narrower than a stock seat, again the inner structure tubing dictated.

P1020626.webp

P1020627.webp

I also wanted to keep the factory trim so it finished off well, and didn't have any sharp edges. This welded bracket was for the locking latches. It had to go. The 1" tube is really thin! kinda pathetic really, very unlandcrusier-like! I used a thin 4" cutoff wheel.

P1020626.webp


P1020627.webp
 
I cut across the rib structures at the full width, and then I cut the top edge off just capturing the ends of the ribbing. My intent was to lay the pieces together with about 1" overlap, and spot weld it full width. It worked as well as I hoped. I ended up cutting the ends off and then adding pieces as I went along.
P1020633.webp

P1020635.webp

P1020636.webp

I forgot to mention I had to drill all the spot welds that held the seat backing from the 1" tubing. I have a set of spotweld drills. For body work these are required. Get the good ones, with the spring loaded center drillbit.

P1020633.webp


P1020635.webp


P1020636.webp
 
It got a bit weird as I tried to keep the original drill tabs for the trim which I wanted to use later on. What I didn't realize is they were going to change locations, but no big deal. I didn't want the trim to be recessed lower, so again I spot welded the tabs to the tubing and removed the extra later.
 
I spot welded it together. I didn't take a pic of the front piece, sorry about that. It's an important piece as it was shaped and positioned by laying the trim over the leading edge of the seat. I have to thank Rob @ Metal Supermarket for a piece of 14 ga I grabbed from the garbage. It was perfect fit, no cutting required. I made cardboard templates in the corners for the trim.

For the trim I had to narrow the front edge. I had removed the trim from both halves of the rear seat. I took the center piece from the seat bottom that was bevelled for overlay and centered it on the seat front. Then I took the long front piece and cut it in half, then removed an equal amount from both sides, making them equal.

P1020638.webp

P1020639.webp

P1020638.webp


P1020639.webp
 
Because the metal was 14 ga I only had to drill 1/8" holes as I needed through the flat and the tubing underneath. I used the factory chrome screws, carefully as they are in questionable shape. At this point I had to do something about the structural strength. The tubing had a slight bend from years of use and laying flat. I also wanted a bit more strength through the seat pan as I didn't want any flex at all. Can't crush my rifle!
I cut a 1" square tube into separate pieces of 1" angle. I have a band saw for this cut, makes it easy and very accurate. I had no small round tube, so I had to make do.

P1020640.webp

This made it strong enough to stand on. As you can see, it is all small spot welds. I also welded a piece of 1" square tube between the seat back pivot points. I didn't want any gaps. I want to be able to leave the windows open and have it look like the entire floor is a single piece.

P1020640.webp
 
Special thanks to Kevin for the hat! I'm officially an old fart now, can't do any welding without my $4 princess auto +1.50 reading glasses.

P1020649.webp

P1020649.webp
 
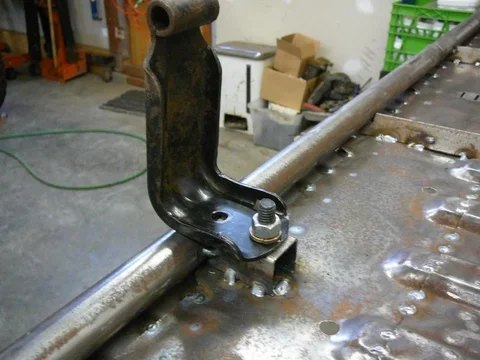
This is the part where it may fall apart on me. I want to be able to lift the seat up as normal, so I decided to grind the ends off the hinge pins. The reason being again for security, when lifting on the seat it will seem secure. In fact it will be bolted down. I layed the seat back down over the hinges and put small
1" square blocks in. I left the lower hinge bolts in the floor loose, there is in fact a fair amount of play in the system, so it made it plausible to try this.

P1020641.webp

P1020642.webp

P1020641.webp


P1020642.webp
 
Little tricks - You'll notice the bolts I used are header small head bolts, this allowed me to insert the brake fitting wrench into the 1" square tube to tighten the bolts down. Other wise this would have been an entirely new problem. I could have used 1"x2" sq tube, but I am trying to keep it all consistant and light in weight. I did have to drill a large hole on top to insert the bolt into the tube. It is covered and has no effect on structure strength.
 
Here is couple of pics just fitting the seat hinges with vise grips.

P1020645.webp

P1020647.webp

P1020645.webp


P1020647.webp
 
They lined up well, and I then welded the 1" blocks to the seat back. I tightened the bolts up max at this point.

P1020648.webp

P1020650.webp

P1020648.webp


P1020650.webp
 
Now if person wanted to just have a heavy wing nut here, it would be simple. I may in fact fall back on that. It will all hinge ( pun!!:clap: couldn't pass that one up! ) on how removing and replacing the hinge pins will work out.


P1020644.webp

I have insulation and then carpet. Not to mention the rubber diamond plate from SOR. So it may be a real pain in the ass to be screwing with the hinge pins. But that is the route I've taken so I'm gonna see how it works out. I found a clevis pin, and will grind the washer part off of one side of it, see how freely it slides in and out.

As far as seat movement, it is really nice and when I drop the seat down it falls right into place in the hinge location for inserting the pins

P1020644.webp
 
I lost this pic from previous post, so here is the clevis pin I will try out

P1020643.webp

P1020643.webp
 
So here is final attachment of the trim. I am really happy with keeping it. Makes the whole thing look totally stock.
The rubber diamond plate is from SOR, expensive. I'm not sure I'd go this route again. It's not nice to kneel on, and it doesn't provide the max grip for the dogs feet that I had hoped for. On the plus side - it repells diesel, grease and it keeps it dry.
In the end, the last pic shows from the rear. I realized early on that the seat hinges will elevate the front of the seat slightly. I don't think it is a full 1". I can sure live with it. And it looks complete, no one is going to go snooping around under that seat back, and if anyone lifts it up, it won't move.

P1020651.webp

P1020652.webp

P1020653.webp

P1020651.webp


P1020652.webp


P1020653.webp
 
I had my clutch slave cylinder spring a leak last night, so I didn't get to town to find any foam. Tomorrow I will frame up the under seat area with some light plywood, probably 1/2". I'll post pics of that once it's complete.
I don't have to tell any one how much room is behind the seats, as the hinge is in the factory location. I always try to keep things consistant, and I didn't want to screw with any structure of the truck. This took me about 6 hrs from start to finish. I was going to post as I did it, but too much running back and forth. If anyone wants pics from a different angle, just ask, I can go out and do that.
 

Users who are viewing this thread

Back
Top Bottom