New Thule Trailer (3 Viewers)

This site may earn a commission from merchant affiliate
links, including eBay, Amazon, Skimlinks, and others.

@lonekazoo So just to confirm, these trailers were made by Brenderup and they are still in business. TrailerTek sells a lot of the accessories and granted they are in the UK but I had good luck purchasing from them. Here's the page you can check out: Brenderup Trailer Parts - TrailerTek.

That said, I think there may a dealer here in the states that can get this stuff plus @perkj mentioned a few pages back a manufacturer of similar trailers that have lids, they might be a good source for a custom lid.

Good luck with sorting out your trailer, it looks as though it gets a good bit of use!
 
@lonekazoo your other option would be to utilize these: Harbor Freight Frame Smooth Riding Spring Retrofit kit

I've actually got a set as I eventually want to add them to mine to allow me to run a larger offload tire. The brackets will bolt up nicely to the trailer frame (you'd want to double check measurements for you frame b/c its shorter) and then you can order a custom axle from Compact Camping Concepts : Custom Axle Scott (the owner) will help you sort out the proper length axle as well.


BTW: any idea as to how your hub spacer came loose? is it a case that you didn't have lock tight on the bolts attaching the spacer to the hub? Do you have any pictures showing the damage? I've been going back and forth on whether utilize spacers to fit larger tires or just to go with a new axle.
 
Last edited:
@lonekazoo your other option would be to utilize these: Harbor Freight Frame Smooth Riding Spring Retrofit kit

I've actually got a set as I eventually want to add them to mine to allow me to run a larger offload tire. The brackets will bolt up nicely to the trailer frame (you'd want to double check measurements for you frame b/c its shorter) and then you can order a custom axle from Compact Camping Concepts : Custom Axle Scott (the owner) will help you sort out the proper length axle as well.


BTW: any idea as to how your hub spacer came loose? is it a case that you didn't have lock tight on the bolts attaching the spacer to the hub? Do you have any pictures showing the damage? I've been going back and forth on whether utilize spacers to fit larger tires or just to go with a new axle.

I don't know exactly how the spacers came loose, but I do know that the trailer had a lot of usage/miles on it since the mods (mostly by my brother, who upgraded to a Ruger trailer). I don't know if locktight had been applied. It's in storage at the moment, but I'll try to check.
The spring retrofit kit looks like a great solution, thanks for the links!
 
I’ve lurked on this topic for about a year, since buying a Thule 3205 off CG, by necessity during a summer road trip. I liked it so much I’ve ordered the lifted SPACE trailer as an upgrade.

Therefore, I will put the the Thule up for sale locally and on various forums soon. I figured I’d put the word out here before anywhere else. The 3205 has interior dimensions about 7.5’ by 4.5’. Trailer is fully functional and ready to roll. Even has a spare tire! Location is 62626, but I travel a lot. Thanks.
 
Well it's T-minus 48 hours and counting.

This year's trip is to the Sierras again and we've already had to make a change to the trip. I was planning on staying 5 days in Yosemite but the fire just outside the valley squashed that. We were going to stay in the tent cabins at Half Dome village but the valley is closed at least until this Sunday due to smoke levels and firefighting logistics and I'm betting that it will be pushed out further. By the way any tips or tricks to getting a campsite there? Maybe next year...

I hope everyone is out enjoying their summer!
 
Craigslist is always a good place to check for folks who are selling their campsite reservations at the last minute.

Hmmm hadn't thought of that ;) I wonder if people just snag them to resell, I couldn't get a thing folks must be hitting the enter button repeatedly at 6:58 like some kind of online Flash game lol
 
Wow! I came back to this thread to share some information on the trailer mod/build for a friend and....

First thing, up until end of December, I always got an email notification when some replied or posted in this thread. That apparently stopped sometime in December/January. So I was surprised by not just a few posts but 6 pages of new posts! And I apologize @perkj for not responding to your inquiries. Your trailer mod looks great! I like these kind of threads where ppl build on other ppl’s feedback/guidance/ideas. I love the “track” on the sides of the trailer.

Second thing, as I was catching up on the new posts, I saw it was mentioned that my old posts were gone. And sure enough, some of my posts are gone! Bit concerning since I don’t see anyone else’s posts that have been removed or disappeared. Coupled with the fact I didn’t get any email alerts and I had to reset my password to get back in.... I’m thinking I might have been hacked. Just odd, I would expect if it was a hacker or something, more would have been done like spam posts but I didn’t see anyone complain about or indicate there was a problem in the thread???

Third, my past experience with the modified Thule trailer from this summer. Over 6,500 miles were put on it. Going from Connecticut to Kentucky and then further West to Wyoming and Montana. The 80/20 posts handled it all like a champ. I was very happy and I was confident of its stability the entire trip no matter what the conditions were on the road. I got a lot of looks and compliments especially from other tent campers.

And finally, my current living situation. During the earlier part of the year, we found out we were moving back to Japan in the summer. So it was a busy Spring that was followed with a long 5 weeks of Summer vacation. Right after I returned from my road trip and parked my trailer in a storage unit in Kentucky, myself and my 3 kids got on the flight to Japan. So we are here in Japan until summer of 2020 or 2021, most likely.

6BD393AB-6673-4AB2-8084-9137364B1A3B.jpeg 8D1FE76C-86DC-4253-858F-3F7F1F504712.jpeg
5B6E2C5B-B3F7-413D-9B05-607D218AFF30.jpeg 7DBF1D0B-F8BD-4A0E-AA3F-6C0F4A195360.jpeg

The stuff on the car roof rack was transportred to my parents’ home in Kentucky for storage (while we are temporarily living in Japan). I also left the blue Yeti bucket in Kentucky to let my dad use it while I am away. The rest, especially the aluminum boxes, all went on the road trip!

C70980EF-9441-4E86-8ED2-52BB5B357910.jpeg
Note: No, I did not pack a tipi in the trailer! At one of the final campgrounds during our trip to Kentucky, I opted for the tipi for the kids and to give me a break from setting up a tent. This was near the Badlands National Park.
 
Last edited:
Catching up on all the additions/changes I made since the beginning of the year.

Sometime in early January, this was where I was in my project.
F0976838-108F-45AE-AC4D-74753290A295.jpeg

For Christmas I got a GoalZero Yeti generator which prompted me to think about the best place to put it for the camping trip (the car's rear cargo hold?, a dedicated spot in the trailer bed? and so on). But before I found a place for it, I was at an estate sale by chance. I scored two Zarges cargo boxes and a couple of aluminum fly fishing tubes (Sage brand) for cheap, cheap, cheap! I never heard of Zarges but the boxes are awesome and cool looking. The lid is sealed and it is solidly made but super lightweight. Perfect for the top of the rack I was already in process of building. I liked the boxes so much I decided to get a larger one to squeeze in the middle. They are pricey but they ran a sale for 20% and free shipping so that helped some. This brought me to re-think how I wanted to organize and design the top cargo frame.

I used an app called "Graphic" on my iPad Pro to do some design work. There was a lot of tinkering with the proper setup before I actually put the ‘idea’ to practice. Spent hours refining my design on this app.
629A58DD-6DC0-4599-A033-FCC6B6B4F22E.jpeg . More CAD design photos here.


00D24249-A437-43F4-840F-ABD0E48BF6A5.jpeg
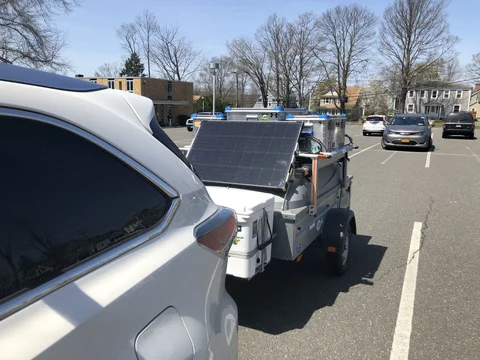
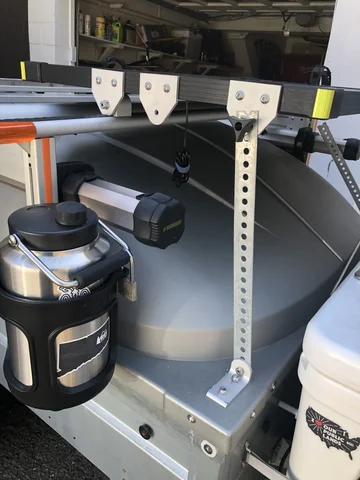
At some point in my design, I decided that adding a solar panel for the GoalZero Yeti battery generator would be beneficial for some the campsites that don't have a nearby electrical outlet. I wanted the panel to be tiltable for best sunlight gathering and mounted in a proper place. That place turned out to be in the front of the crossbar. I was going to have 80/20 fabricate a custom ‘adjustable leg’ for the panel but their quote was costly. So I just picked up some galvanized bars from Lowe’s. Much cheaper and works just as well. Maybe I can get a big discount or something in the future to complete "the look" but for now, it looks fine.
12A41763-F5C0-4241-A074-D4221399417F.jpeg 5CC1408F-795E-48F9-B92D-389A86EE5795.jpeg
 
Last edited:
Mods to the rack, securing the Zarges boxes.

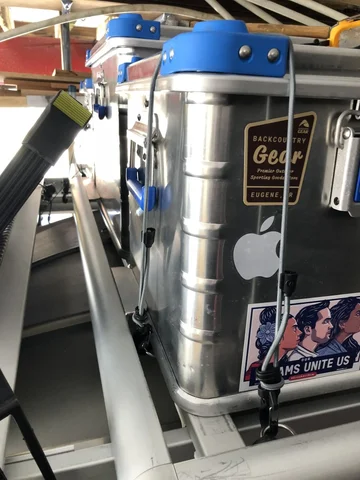
More pictures but closeups on how I mounted the boxes. Originally, I planned to strap down the boxes using common trailer tie-down straps. But, since I'm hard of hearing, having straps making those flapping sounds at 65+ mph would just make things less discernible for me should something else make noise (indicating a likely problem).

So I researched by finding overland Jeeps/FJ Cruiser/Trailer mods on google search and finally found a better solution. I saw another brand that makes similar aluminum boxes and sold a rack adapter where you can secure its boxes to the rack.

Borrowing from this brand's design, I used aluminum L bars from Lowe’s and cut them down to size (I don't know the exact measurements). I rounded the ends to prevent accidental cuts or dents into the aluminum boxes. I left the right amount of space between the rack bars to attach the L brackets to both slide the boxes in and hold the boxes securely. The small straps (noiseless) was just added security for peace of mind on a 6,500 mile road trip. I never needed them but I kept it anyway... just in case!

A8136BE5-9CEB-432B-BBE5-70A1D9C28EAB.jpeg 95F99C35-64C4-4802-8AE2-0CAE76B130C9.jpeg 7FCE03B6-42D7-44EA-A3F0-FBB9395F057F.jpeg 9F4E6511-1538-44F1-92AA-69156C562F0B.jpeg 586C3004-6E48-426F-83A0-5176734AF62B.jpeg
 
Last edited:
I'm limited to 5 pictures per post, so one more so you can see the 'bumper' I put on the two smaller boxes. In the above photos, you can see that the smaller box has the L bracket to secure it but in practice it was too tight to get the box to slide into place because the cargo rack’s outer rail is a little higher then the ‘floor’. This meant I had to tilt the box in an angel to get under the L bracket and force it to slide in. There was too much pressure/stress and it was hard to slide the box back out. So I had to re-think this part of the setup.

There is a rubber bumper strip that you can get from 80/20 that slides into the T-slot. I also purchased 4 18” (?) bars for the rubber ‘bumpers’. With this I can put one long end of the box in first, then push against the front bumper and lower it down and the rear bumper would secure it (no sliding vertically on the rack). I moved the 2 L brackets that were originally at the long ends of the box to the outside part of the cargo rack.

Finally, as you can see in the photo between the larger and smaller boxes, I had 1/2" aluminum bar, from Lowe’s, that runs the length of one side of the box and locked that in place. This is what kept the smaller boxes from popping out and also kept the larger box in place (it has no bumpers since I can easily just slide it in place since it is in the middle).

E393F0B8-42AD-4569-9983-C50C7BB5543E.jpeg
 
Last edited:
And now, why I built this mod on the trailer.

The trip out West consisted of 6 kids, aged from 5 to 10, and 4 adults. My sister and her 3 kids did not have a tent nor any camping gear and they were driving from their home in Chicago (in a rental car with limited space). My parents had a 5th wheel who joined us but not everyone could sleep in there.

I had already accumulated a good amount of a Japanese outdoor brand called Snow Peak. I basically see their car camping gear as the "legos" of car camping. And I love versatility! Some nights, we had a buffet and other nights after a long day hiking or driving, we had movie night under the tarp.

With 6 kids and 4 adults, endless days on the road or the hiking trail, having these options was a godsend. A few times, we made friends in nearby campsites and had a potluck at our campsite and the table setup could be turned into a buffet! Most of the time, I had simple kitchen setup, a tent, and the tarp w/ the movie screen when our stay lasted a week or more.

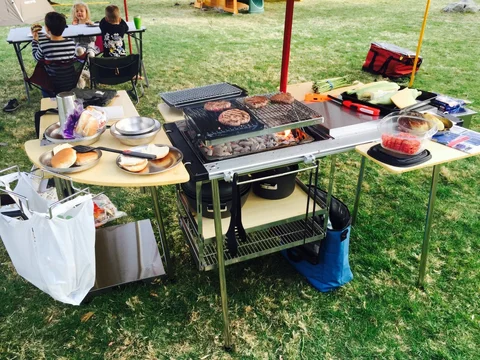
Note: the last photo is not mine but this is the same setup I used in Yellowstone. Our tent site was on this soft, grassy ground. Everyone enjoyed cooking their own meal around the fire as the clear skies filled bright stars above us. Awesome experience and lots of quality time spent with the family. :)
8E17541A-91C6-42BA-A5A1-BB8598C96393.jpeg 136A1733-AEC4-46F1-84AD-18DEFF2EC409.jpeg IMG_0123.JPG
 
Last edited:
Wow! Holy mother of all trailer build-outs Batman! The Zarges boxes don't come cheap, they're basically commercial shipping boxes/containers so estate sale prices would be hard to resist! And the Snow Peak table setup is the shiznit. Wow, wow, wow! I may have to make the small GoalZero kit a must have item for the next trip. Time for you to build up a trailer for touring Japan lol

Happy New Year!
 
Hi all,

First post here on ih8mud and wanted to keep this thread alive. Yesterday I purchased a Thule Adventure 1700 trailer and my decision to purchase was based on what I saw in this thread so thank you all that have posted. My new trailer is 2006 model year however wasn’t purchased until 2009. Bought it from the original owner and he stated it only had 1100 miles on it. It’s in beautiful condition and the seller even still had the original instruction manual. I can make a pdf of it if anyone is interested. Pic of my new trailer when I got it home below.

View attachment 1603311

I’ve already got a call into Autoflex Knott and Katie is working to get me a price on a spare for it. I’ll post the price she comes back with here once I have it...she said she should have it by morning.

@theOz Im very interested in duplicating much of your rack. Hoping you can provide me 80/20 parts details (i.e. part numbers, excursion lengths, etc).

Also, @Sir Velo and @theOz - what tire size are you both running on your trailers? The 145/80-13s on mine are the originals however are hardly used given the low miles. I will need a tire for the new rim I’m attempting to source from Knott and given that a 145/80-13 is impossible to find in the US, I’m thinking I’m going to need to purchase 3 new tires so they all match so interested to hear what tire size you all are running.

@Sir Velo do you have the part numbers for the bearing and seals you purchased from Trailer Tek?

Finally, I’d like to start a community of sorts for owners of these trailers so we can share ideas, where to source spare parts, etc. I’ll begin to consolidate finding from this thread into a single source to get started. Hope to have this done in the next day or two.

Thanks again for all that have posted to this thread and I’m looking forward to having some fun with the family with this trailer!!

Jason
Greetings, I also have this tralier and am interested in pdf plans if they exist. Fantastic job!! thank you for sharing....
 
@Sir Velo @theOz I found a smoking deal on three Goodyear Wrangler AT tires in a 195/75-14 and couldn’t resist as I’ve wanted ATs on this trailer since purchasing it. This “forced” me to purchase three of the 14x5” 4x100 ET30 rims from Knott. They mounted just fine on the trailer with zero rubbing, however the trailer was begging to be lifted to make it look complete, so I finally executed on my “lift” idea for the trailer. If you recall from some of my initial posts my idea was to put a 2x2” square tube between the frame and the axle here:
D10956F3-2572-4973-A7EF-70E8C468F5E4.jpeg


Here it is now after the “lift” installed:
ACE3CD73-483A-4758-B2B9-D7B78915BCA1.jpeg


And here is the wheels pre lift:
002EC6C2-C88B-4320-B2CD-FA53FA134D50.jpeg


And now post lift:
4CF1B5CE-037D-47A5-9FD8-B3DC88C83B67.jpeg


Another successful project!
 
Last edited:
An addition pic of the new lift:
0AAA9F53-707D-41F9-B6DF-20113FD1D875.jpeg


Also a picture of the latches I added:
1960F4D1-AA64-408A-B804-7561EDD1F46F.jpeg


And finally the a-frame reenforcement bracket from Brenderup:
2BAA77B8-0FED-46C4-A708-B57C23CE4916.jpeg


3313C7AF-A687-455B-91A3-573CAC64B3A7.jpeg
 
@perkj Excellent job with the tires, that thing looks beefy and ready for anything! Tell me more about the A-frame bracket if you can, I'm curious as to it's function. Those latches are a plus as the OEM lock is rather weak (and has a tendency to leak I've found...).

All that said, this year takes us back to the Sierras. We will be staying Yosemite at a campsite by the river! I got totally lucky this year and managed to snag a great campsite. Then we go to Twin Lakes in Mammoth to the exact spot we stayed last year. Plans for this excursion are to pare down the crap and streamline the load. I also want to do some maintenance and my youngest wants to add some stickers we've accumulated lol

Cheers all and here's to summer!
 

Users who are viewing this thread

Back
Top Bottom