My drawer/fridge slide mod (1 Viewer)

This site may earn a commission from merchant affiliate
links, including eBay, Amazon, Skimlinks, and others.

Joined
Apr 16, 2008
Threads
79
Messages
1,204
Location
Denver
Purchased the rig with dual ARB drawers. Loved the fit and finish but 3rd row is too valuable and the fridge was too high. I sold them off and started making plans for a different setup which would allow for relatively painless install/removal depending on my needs.

I could have built my own drawer but would have messed it up and it would have looked terrible so I purchased a single Reef from @cruzerDave.

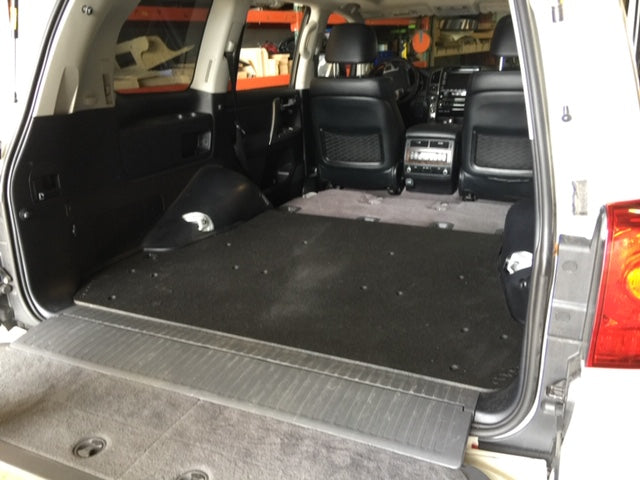
I started by building an easily removable base to which the drawer and fridge slide could mount but also allows for using the 3rd row seats:
IMG_6971.JPG

It's made of 3/4" birch, reinforced with 1/4" aluminum plate and attached to the 3rd row seat mounts with u-bolts. Eight nuts and it's in or out in a jiffy. It has t-nuts on the underside for mounting the drawer and fridge slide. You can just barely make out where they are on the pic above where I removed some of the carpet covering.

I bought a set of 600# heavy duty slides from Accuride and mounted them up:
IMG_4650.JPG


Then I used the cut out from the hole needed for attaching to seat mounts to fill back in for a finished look:
IMG_3069.JPG

The fridge slide is easily removed with 6 screws.

Mounted a single Reef drawer covered in same carpet on the other side along with the side wing fit kit:
IMG_8747.JPG

This is easily removed by pulling the drawer out completely and removing 4 bolts.

Attached a piece of 1/4" aluminum plate to the slides for fridge mounting:
IMG_0317.JPG
 
Last edited:
Kind-of-finished product:
IMG_0320.JPG

I've since added heavy duty footman loops to the front and back of the fridge slide with 1" nylon cam straps. And that's a 75L Dometic that fits snug as a bug in rug with ~1/4-1/2" of space on each side.

Will snap a pic of the footman loops and straps and add later.
 
Last edited:
So after a touch under 10,000 hours of design and labor it's done, almost. I'm still deciding how I want to finish the drawer front. And I want to add some L track on the drawer top.

Overall I'm happy with how things came out. Because I mounted the slides flat they definitely sag at full extension. If it's excessive with a full fridge I'll fashion a little support block that will let it rest level on the tailgate.

Now if my 2 kids each want to bring a friend where ever we're going I can just pull the fridge slide in a minute or two and we have seating for 6. If for some reason we need room for a 7th or 8th passenger, I can remove the Reef drawer in a minute or two as well and pop the other 3rd row seat in (I expect this to be exceedingly rare...drawer is staying in semipermanently as it's the dog's seat). Fridge will go the camping trailer or stay at home when we have 6th passenger.
 
Last edited:
Great design. I might steal the way you mounted the platform and redo mine the same way!
 
Great design. I might steal the way you mounted the platform and redo mine the same way!
Thanks.

And sorry, it's patented. Kidding of course. That's why we post things here, so other's can take an idea and run with it, ideally making improvements along the way.
 
Kind-of-finished product:
View attachment 2320867
I've since added heavy duty footman loops to the front and back of the fridge slide with 1" nylon cam straps. And that's a 75L Dometic that fits snug as a bug in rug with ~1/4-1/2" of space on each side.

Will snap a pic of the footman loops and straps and add here later.
Awesome! Thanks for sharing. Look forward to the follow up pictures.
 
The metal bars that each have the 4 bolts in them attaching to the seat anchor points, can you describe how you anchored these/take some under pics? I have a system that I'm going to rebuild soon too, would love it if the whole thing could easily be removed.
 
The metal bars that each have the 4 bolts in them attaching to the seat anchor points, can you describe how you anchored these/take some under pics? I have a system that I'm going to rebuild soon too, would love it if the whole thing could easily be removed.

I would guess:

- flat bar of around 3/16" - 1/4" thickness
- bottom of the plywood routed out to recess the flat bar such that it sits level with the bottom of the plywood
- bolts or screws through the flat bar into the plywood; possibly glue between the metal and plywood, too

I think that when I re-do my mounting system, rather than cutting one big rectangular area over both mounting points (on each side of the vehicle), I'll cut a smaller rectangular hole for each mounting spot individually, to leave more rigidity/strength in the plywood platform itself, forego the metal plate altogether, and mount the u-bolts right into the plywood.
 
The metal bars that each have the 4 bolts in them attaching to the seat anchor points, can you describe how you anchored these/take some under pics? I have a system that I'm going to rebuild soon too, would love it if the whole thing could easily be removed.
I just knew someone was going to ask and out me. See below...
I would guess:

- flat bar of around 3/16" - 1/4" thickness
- bottom of the plywood routed out to recess the flat bar such that it sits level with the bottom of the plywood
- bolts or screws through the flat bar into the plywood; possibly glue between the metal and plywood, too

I think that when I re-do my mounting system, rather than cutting one big rectangular area over both mounting points (on each side of the vehicle), I'll cut a smaller rectangular hole for each mounting spot individually, to leave more rigidity/strength in the plywood platform itself, forego the metal plate altogether, and mount the u-bolts right into the plywood.
Close, very close. Plywood, even 3/4", as a mounting plate for a few hundred pounds of gear is not ideal. I originally planned 1/4" aluminum plate for the base but due to my general lack of handy-ness, I was unable to make it work well. I had intended to mount the aluminum plate to the OEM anchor captured nuts but missed the mark. I wasn't about to pay a hefty fee for more and knew I could repurpose it. So on to plywood...

Because I made the above compromises, I wanted to reinforce the plywood with some of the 1/4" plate aluminum. I routed out a recess for that and attached it to the plywood with screws and t-nuts, no glue. I was going to mount the base with the other side down but that would have left screws and nuts sticking up. I thought, let's flip this thing over so the screws and nuts can be covered with a filler piece. This defeats some of the purpose of reinforcing with the aluminum plate but again, compromises.

Your idea of cutting individual holes for mounting is good and I considered it, but if you look at how the 3rd row attaches to the floor you'll see why it probably won't work. It's not just little feet that flip down from the seat but a long piece. If I recall there really isn't enough space for it to flip down into smaller holes. See below:
IMG_5368.JPG

IMG-3342.jpg
 
Last edited:
Very nice, we originally planned on doing something very similar in the back of our rig 👍

Just remember that when you mount slides flat, you reduce their capacity by ~70%.
 
Very nice, we originally planned on doing something very similar in the back of our rig 👍

Just remember that when you mount slides flat, you reduce their capacity by ~70%.
Where did you find that 70% number? I know it reduces it significantly but didn't know how much.

0.3 x 600 lbs = 180 lbs. The fridge and aluminum mounting plate are less than 65 lbs. so I have quite a bit of beer carrying capacity.

I think I'll end up putting a little support block under it.
 
Where did you find that 70% number?

They put it in their brochures. They also used to rate the slides’ capacity at 22”, but it looks like they’ve upped it to 36”. Brochure
C325D749-4C47-43A4-B72C-F8EAFE22659D.png
 
Kind-of-finished product:
View attachment 2320867
Wow, extremely nice and very clever installation @jfrench ! I'd love to talk to you more about the fridge slide design work and going to PM you also to ask about posting this on the website :cool:

How much demand is out here for this sort of setup? I'm pretty far behind on dev since covid hit but open to bumping things up the list?

I was just thinking that someone should take this idea and make a commercially available, CNC-cut base plate that others could then use to do whatever they want. Hint hint, nudge nudge, do it already! :)
 
I was just thinking that someone should take this idea and make a commercially available, CNC-cut base plate that others could then use to do whatever they want. Hint hint, nudge nudge, do it already! :)
Agree 100% - base plate out of CNC, but not wood. Like OP said, even if you use 3/4" ply it will flex with a lot of weight above (mine does!). Modular design would be key from there, ability to add one or two drawers, or a drawer and a fridge, etc... with ability to remove fairly easily.


Oh yes, I'm well aware of that one, but $625 USD for a piece of line-x'd plywood and a handful of t-nuts is ludicrous.

I could stomach around $150-$200 USD for a nicely made, CNC cut platform. Beyond that I'll stick with my DIY version.
 
Oh yes, I'm well aware of that one, but $625 USD for a piece of line-x'd plywood and a handful of t-nuts is ludicrous.

I could stomach around $150-$200 USD for a nicely made, CNC cut platform. Beyond that I'll stick with my DIY version.
Sorry, I didn't know if people were trying to reinvent the wheel. I agree that it is a big chunk of change. I'd love a Reef version of the same for a much more modest price.
 
Oh yes, I'm well aware of that one, but $625 USD for a piece of line-x'd plywood and a handful of t-nuts is ludicrous.

I could stomach around $150-$200 USD for a nicely made, CNC cut platform. Beyond that I'll stick with my DIY version.
Was going to say the same thing. And it requires using seat mounting captured nuts that I believe would make switching back and forth between seats and cargo difficult.

I considered buying the universal plate from Goose Gear because it's a little more than half the cost of the 200-specific iteration, but still not worth it in my estimation.
 

Users who are viewing this thread

Back
Top Bottom