Migaloo the white Turbo 80 (1 Viewer)

This site may earn a commission from merchant affiliate
links, including eBay, Amazon, Skimlinks, and others.

Joined
Jan 21, 2012
Threads
14
Messages
581
Location
Qld, Australia
After owning a gen1 Hilux for 15 years l was looking for a comfortable touring vehicle I could go camping and do some beach work and Fraser Island fishing trips.
So in 2018 the search began for a new rig. The choices were an 80 series or 100 series wagon with solid front axle.
A white 80 series with a blown head gasket came up and looked good with no rust.
So l bought the 80 series petrol manual for 3 grand thinking a cylinder head job would sort it out.
The plan from day one was to run a turbo set up on the factory ECU.
This can be done with the later model 80 series, and wanting a manual gearbox for the strength.
3BD536D3-090B-4153-9A6E-46F85EF86146.jpeg
E6E879DB-24DF-4CBB-9B51-B476BB613386.jpeg
 
Last edited:
Once I got it home the wife made a comment of how white it was with the colour coded bullbar and named it Migaloo the White whale.
All our vehicles have names.
So into the shed she went and a check over and cylinder head removed.
Once the head came off I could see water had been sitting in the bores and etched the cylinders. So it was either rebuild or buy another motor.
After searching for a motor one came up a few hours away which was removed for a LS and auto conversion.
So $700 later I had a complete motor with a new clutch and spare H151 manual gearbox, winning👍
Found some old pictures of the original motor, note the water marks in the cylinder
F01439FC-A648-431B-A949-3D42BFE48224.jpeg
2E7E8F31-67C9-4C3C-8B65-3ED16E6228FC.jpeg
 
Last edited:
So after swapping the new motor and fitting the new clutch we had her running sweet.
Next was to change all the bushings so went with super pro bushings.
The steering was a bit vague at 100 km/h so decided to do the castor washer mod on the front bushes. Made a huge difference.
The 2” lift springs still had standard shocks so replaced the shocks. Rear shocks were 2” OME so they stayed.
Got the full treatment of all diff and gearbox oils, radiator checked and flushed. New heater tap and belts, viscous hub repack.
And registered and ready for the Annual family Fraser trip.
But before we hit the beach I wanted to fit my warm winch just in case since I was towing my camper. Bought a winch mount bracket and cut and shut the bitch in.
Also had a diff lock out of my FJ40 that needed a rebuild, so grab a spare 60 series centre and set that up. Wired in all the switches and we we’re good to go.
Camper in tow ready to leave.
On the Fraser Island barge and on the beach at Fraser.
DBE68927-519E-4077-91F1-761A57A7C133.jpeg

EC12B521-89DA-45B3-9F35-B0024E1F9940.jpeg

87A665A8-9D7D-44A4-9B8E-B9082E49AEB2.jpeg
 
Also picked up a Airtec snorkel for $50 but had no stencil for the cut out. After searching I found someone who had the stencil in a PDF and they sent it too me.
Cruiser went great up at Fraser. Towing the camper through the sand is always an adventure and we got stuck a few times but with my brother and a few other friends we were on our way..
After we got back I realised the factory headlights were rubbish and started checking for upgrades.
Came across some LED inserts from Ultra flex which were the same price as replacement headlights so bought them.
They came with a new wiring harness and relay set up. Lights are awesome, probably didn’t need the spotlights.
Fitted some kings LED spotlights and a 20” light bar.
You can see I had to trim the alloy bar for the winch fairlead to fit.

E061C615-A2EB-45F4-AD85-8BB80A8ABA57.jpeg
9310F4EC-06E6-4A8B-B3D1-88AD2FE7589D.jpeg
 
Last edited:
Meanwhile l have been collecting turbo parts and working out the best and most cost effective way to run a turbo with out a ECU upgrade.
Bought a Mishimoto intercooler 600 x 300 x 76 which just fits. Was going to get a black one but my research tells me the plain alloy dissipates heat better.
Made up some mount brackets and used rubber mounts as it’s mounted to the chassis and body.
Also had to rotate the winch free spool lever to help clear, it’s tight.
0C839920-E0C7-40C2-B72D-54977A9BEAAE.jpeg
BF8F2243-5364-4BC6-8607-2B042A5B4451.jpeg
E3650C64-15F3-4A7C-B0EA-4D6FED94AD7A.jpeg
C3E41CE5-BB4A-4A5F-99C3-38FE7A4D65F1.jpeg

C96006DA-E4AA-4FF4-978E-2D7187237547.jpeg
4663786D-92A7-412C-9188-03249EEE7D22.jpeg


CAC508EF-F8F0-4654-9E59-59F6C8BB7009.jpeg
 
Last edited:
All this work has taken place over the last few years. Would like a nice low profile winch bar but that’s on the wish list.
Really liked the turbo J pipe made by Witsend as it uses the standard manifolds. These are two separate casts manifolds which I like better than a single piece.
Other options were 6 Boost high mount or Turboglide low mount. I really liked the turboglide but needs the engine mount modded to fit a GT3582 turbo and cost $1300.
So being a cheap bastard I thought I could build a J pipe for cheap. $160 later I had all my steam pipe and turbo flange.
I used the old engine to mock up all my work to minimise the down time once the turbo set up is ready to be fitted.
C87BADB7-7ABC-4C64-8F46-4BF7601A7A53.jpeg
213358B6-D2AF-4FFC-8BEB-36598428D723.jpeg
 
The turbo I choose is a Pulsar brand GT3582 to suit a Ford falcon XR6 Barra. The Barra is a 4 litre engine.
When l purchased the turbo they were only new to the market but the Ford guys were getting good results and big power numbers.
Recently they have become very popular for this.
Turbo is ball bearing with 4" inlet and 10 blade inlet, 1.06 exhaust housing and has an internal wastegate.
Specs are similar to a GTX
D4A46363-611F-464A-AADC-8475602231D3.jpeg
 
Last edited:
You live in a different world. Love it and your prices. Enjoy the pics but you may find more similar folks in the diesel area rather than entertaining us common gas auto trans folks
 
I bought the cruiser a few years ago, pre Covid so prices were still reasonable. Things are getting out of hand price wise down here.
Looking to buy a rolling chassis 80 series so l hope the prices come back down.
 
Wanting to baseline some engine temps and wide band 02 readings to compare too before l fit the turbo.
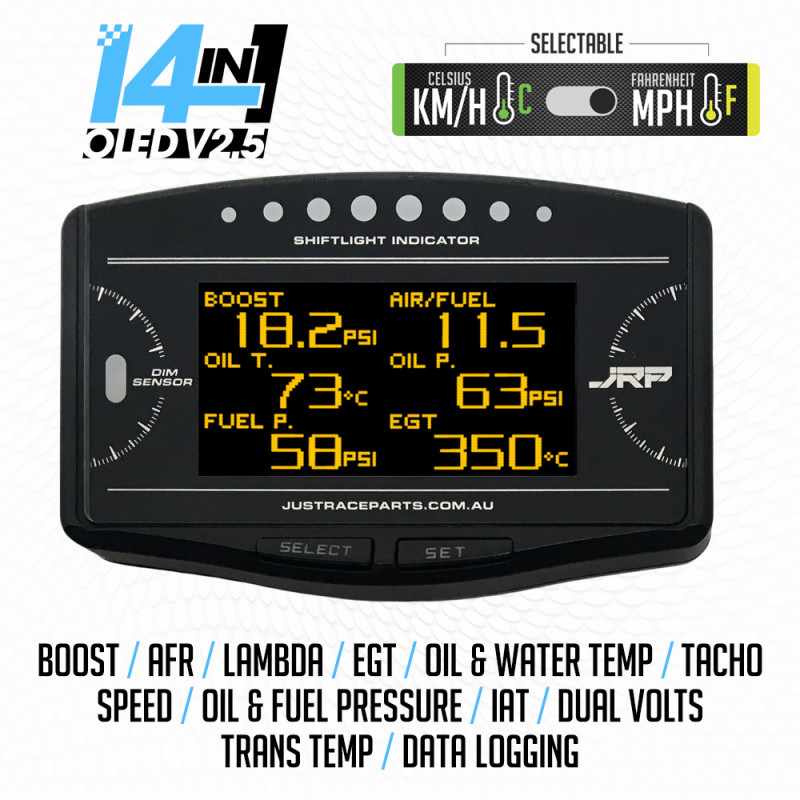
Came up with the JRP gauge and a Spartan 2 wideband. The gauge is a 14 in 1 and l like that it has audible alarms which you can set. Nice little compact unit.
I have moved it to the top of the dash now as I couldn’t see my high beam light. Much easier to read now.

B1ED865D-C408-4A95-A38E-3FC2EA208A1A.jpeg
BD1240FE-8CA5-4F76-A16C-6EBCB589C1F4.jpeg
 
Enjoy the pics but you may find more similar folks in the diesel area rather than entertaining us common gas auto trans folks
This is petrol, not diesel but they definitely have some of the best options we only lust for.

OP, sweet 80, and looking forward to seeing more pics of the progress.
 
After the castor was corrected to give better highway manners it became evident that the front tailshaft angle was now out.
So l ordered a solid diff centre for the transfer to make it part time, l was always considering this as the manual in full time had some backlash.
I used some old asian hubs l had from a 60 series. I cleaned them up and gave them a overhaul, painted them red and black.
I did have to cut another groove in the cv shaft to fit the hubs.
Also painted the alloy rims as the clear coat was buggered. Painted them a graphite colour.
Then fitted some Nitto Terra grappler tyres, also have these on the wife Prado. Great all terrain tyres
1A8B4F4D-8832-47C5-A84A-204A17646C3A.jpeg
 
Last edited:
Wow, I was just thinking how a turbo and manual gearbox would make my 97 LC sooo much more fun to drive. Too bad they never offered it as a factory option. Thanks for sharing, looks great!
 
One thing is pretty consistent with this forum and it's that if you post a picture someone's going to notice a potential issue and ask you about it... I'll fill that role for today :)

Are your studs too short for those wheels or are those just extra tall/deep lug nuts? I don't know what the official recommendations are but notice the studs not filling the lug nuts so wanted to ask in case it's something you should look into.
Ha ha, you beat me to it was going to ask the same thing.
 
One thing is pretty consistent with this forum and it's that if you post a picture someone's going to notice a potential issue and ask you about it... I'll fill that role for today :)

Are your studs too short for those wheels or are those just extra tall/deep lug nuts? I don't know what the official recommendations are but notice the studs not filling the lug nuts so wanted to ask in case it's something you should look into.
Hahaha I had to go and check as that picture makes it look bad, the lug nuts are actually longer or deeper than standard. They have the same amount of thread engagement as a standard nut, but have extra 5mm internal thread showing. The wheels are aftermarket so assuming the nuts are too.
Thanks for the heads up.
 
Last edited:
So after enjoying the 80 as a daily driver and a few trips away and several side builds going on. Including my long term FJ40 build, then a old HJ47 farm truck that I been working on and the small progress on the turbo build.
Also helping my brother fix up several cruiser utes he bought.
Bought a kit to make up my coolant and oil hoses for the turbo.
Oil will be plumbed into the pressure sender via a bspt tee piece.
Coolant lines will be taken from the throttle body coolant lines, won’t need them in the beautiful Qld climate.
Also plumbed up the return into the upper alloy sump. Rather than use a threaded fitting l choose to use a fitting with an oring and tapped in two mounting bolts, happy with the result.
Fitted heat sleeve on the Teflon braided lines.
In the second picture you can see how the lines use a barb fitting, instead of this l tapped a thread into the thermostat housing and fitted one coolant line, this eliminates extra fittings and possible leaks. The other coolant line goes over to the cylinder head fitting and uses a barb fitting to connect.
The last picture shows the Fuel Pressure Regulator with the restrictor in the return line. I came across this while trying to reduce fuel pressure, more on this later.


16129C1F-B63A-45FF-BAF2-06DBC214625D.jpeg
21960ED4-7106-49B5-97E7-A7BB6C4C0252.jpeg
4B49C2C1-7CFF-4EB1-8F49-F68E7B05ABFD.jpeg
 
Last edited:

Users who are viewing this thread

Back
Top Bottom