KDSS rust

This site may earn a commission from merchant affiliate
links, including eBay, Amazon, Skimlinks, and others.

Brett19648

2006 LX470
Joined
Jul 10, 2016
Threads
29
Messages
212
Location
PA/NJ USA
So I knew when I purchased my 09 last month that there was a little rust on the frame. To me it appeared to be superficial surface rust, mostly on weld seams, a little worse in some areas than others but nothing crazy. My plan was to hit it with a wire brush and repaint it then hit everything with fluid film... I was not aware that the kdss valves had the potential to rust and seize though (or that they were on the frame under the truck), so it was not something I inspected prior to purchase. I had figured dealing with the frame would be a project for the spring...

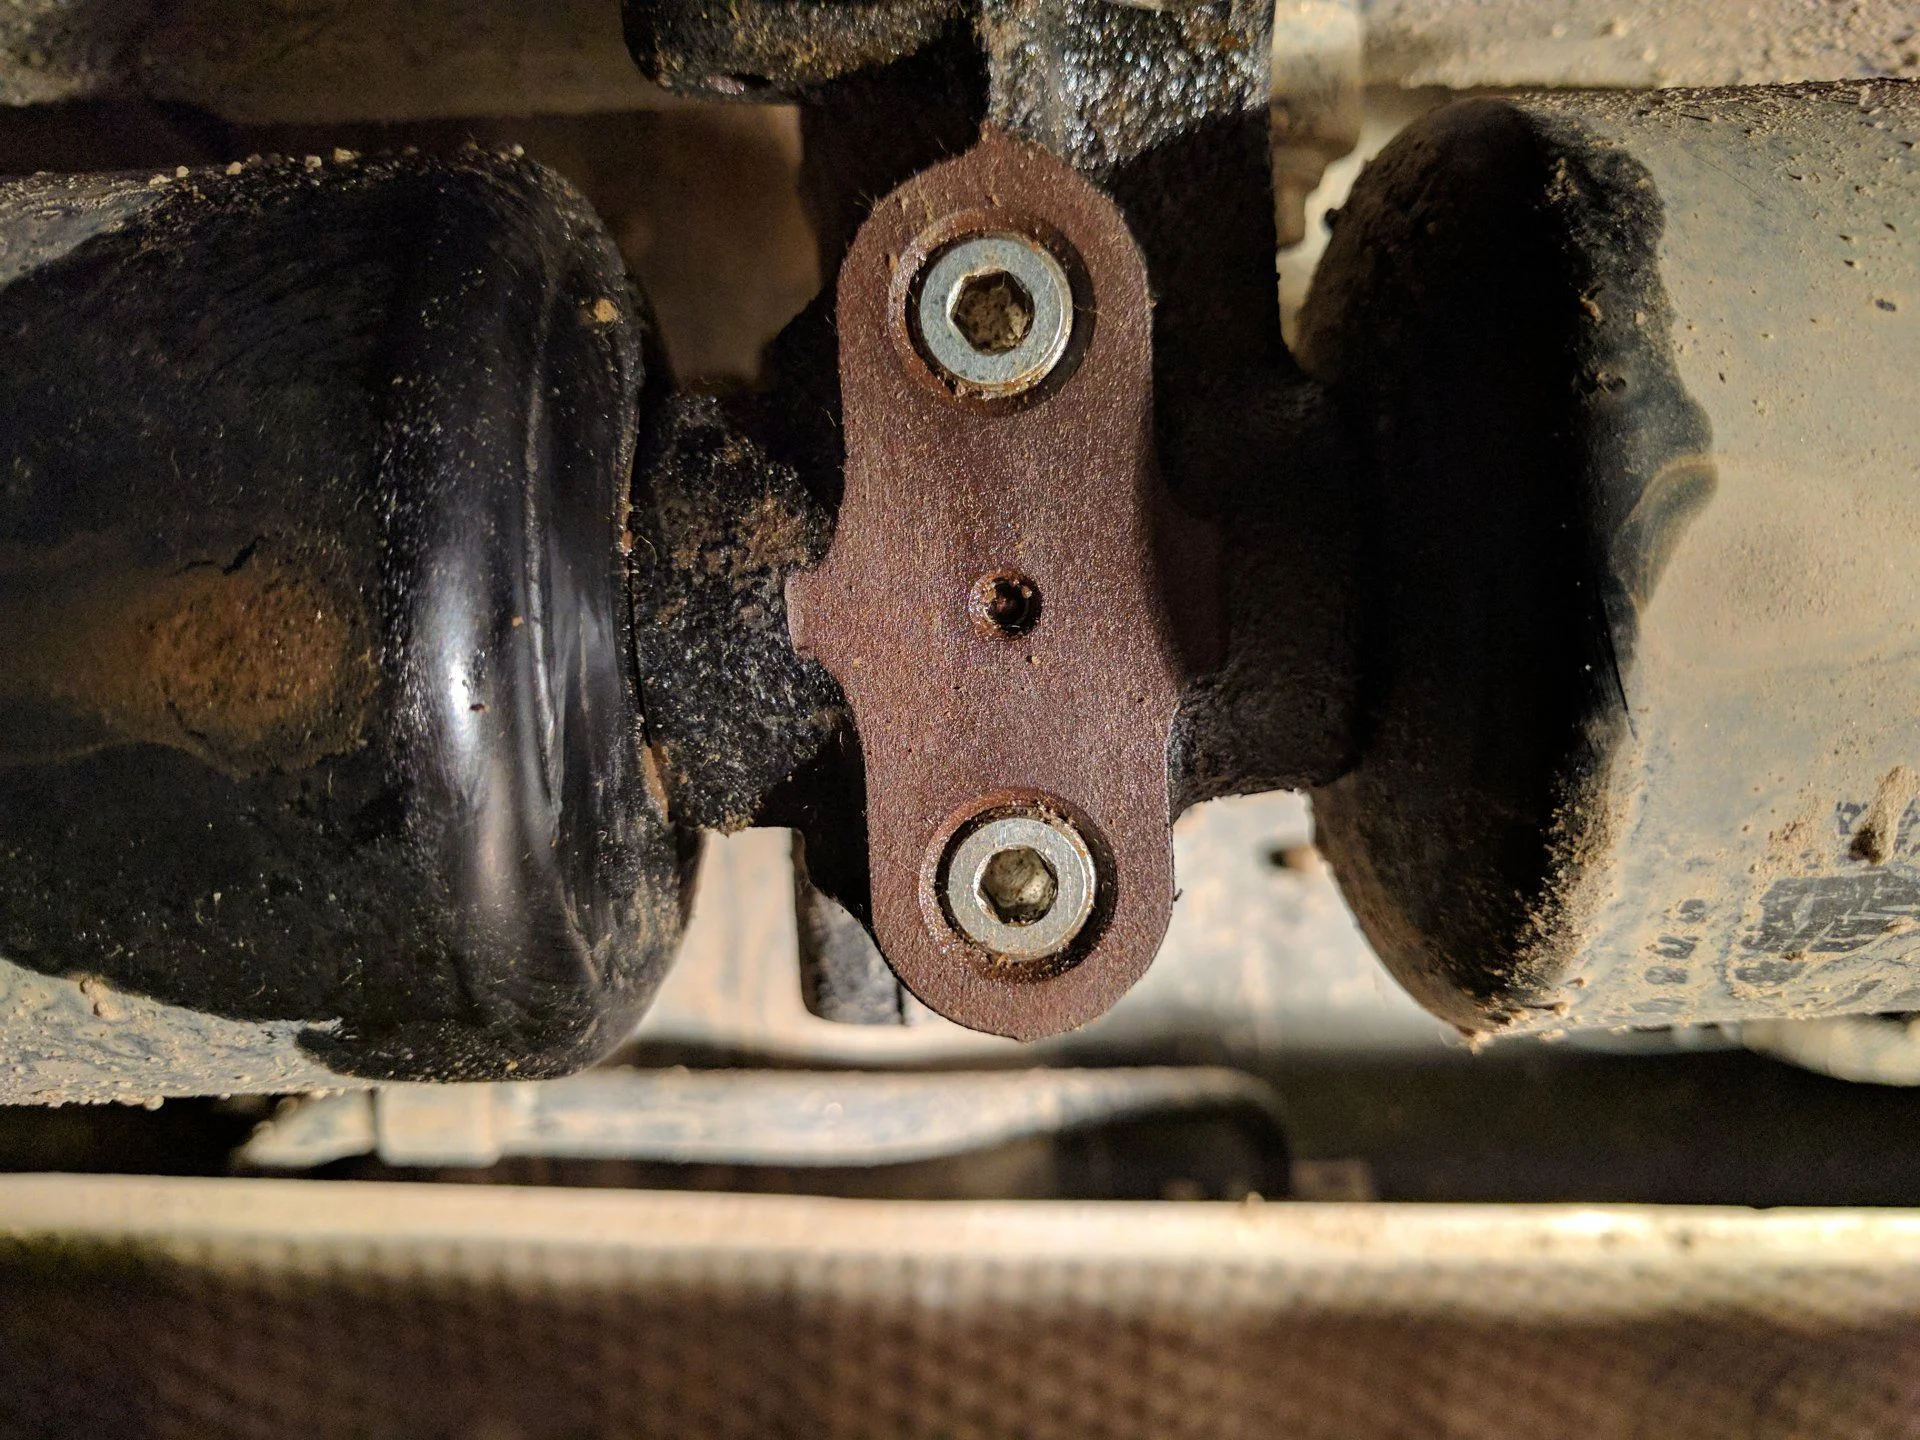
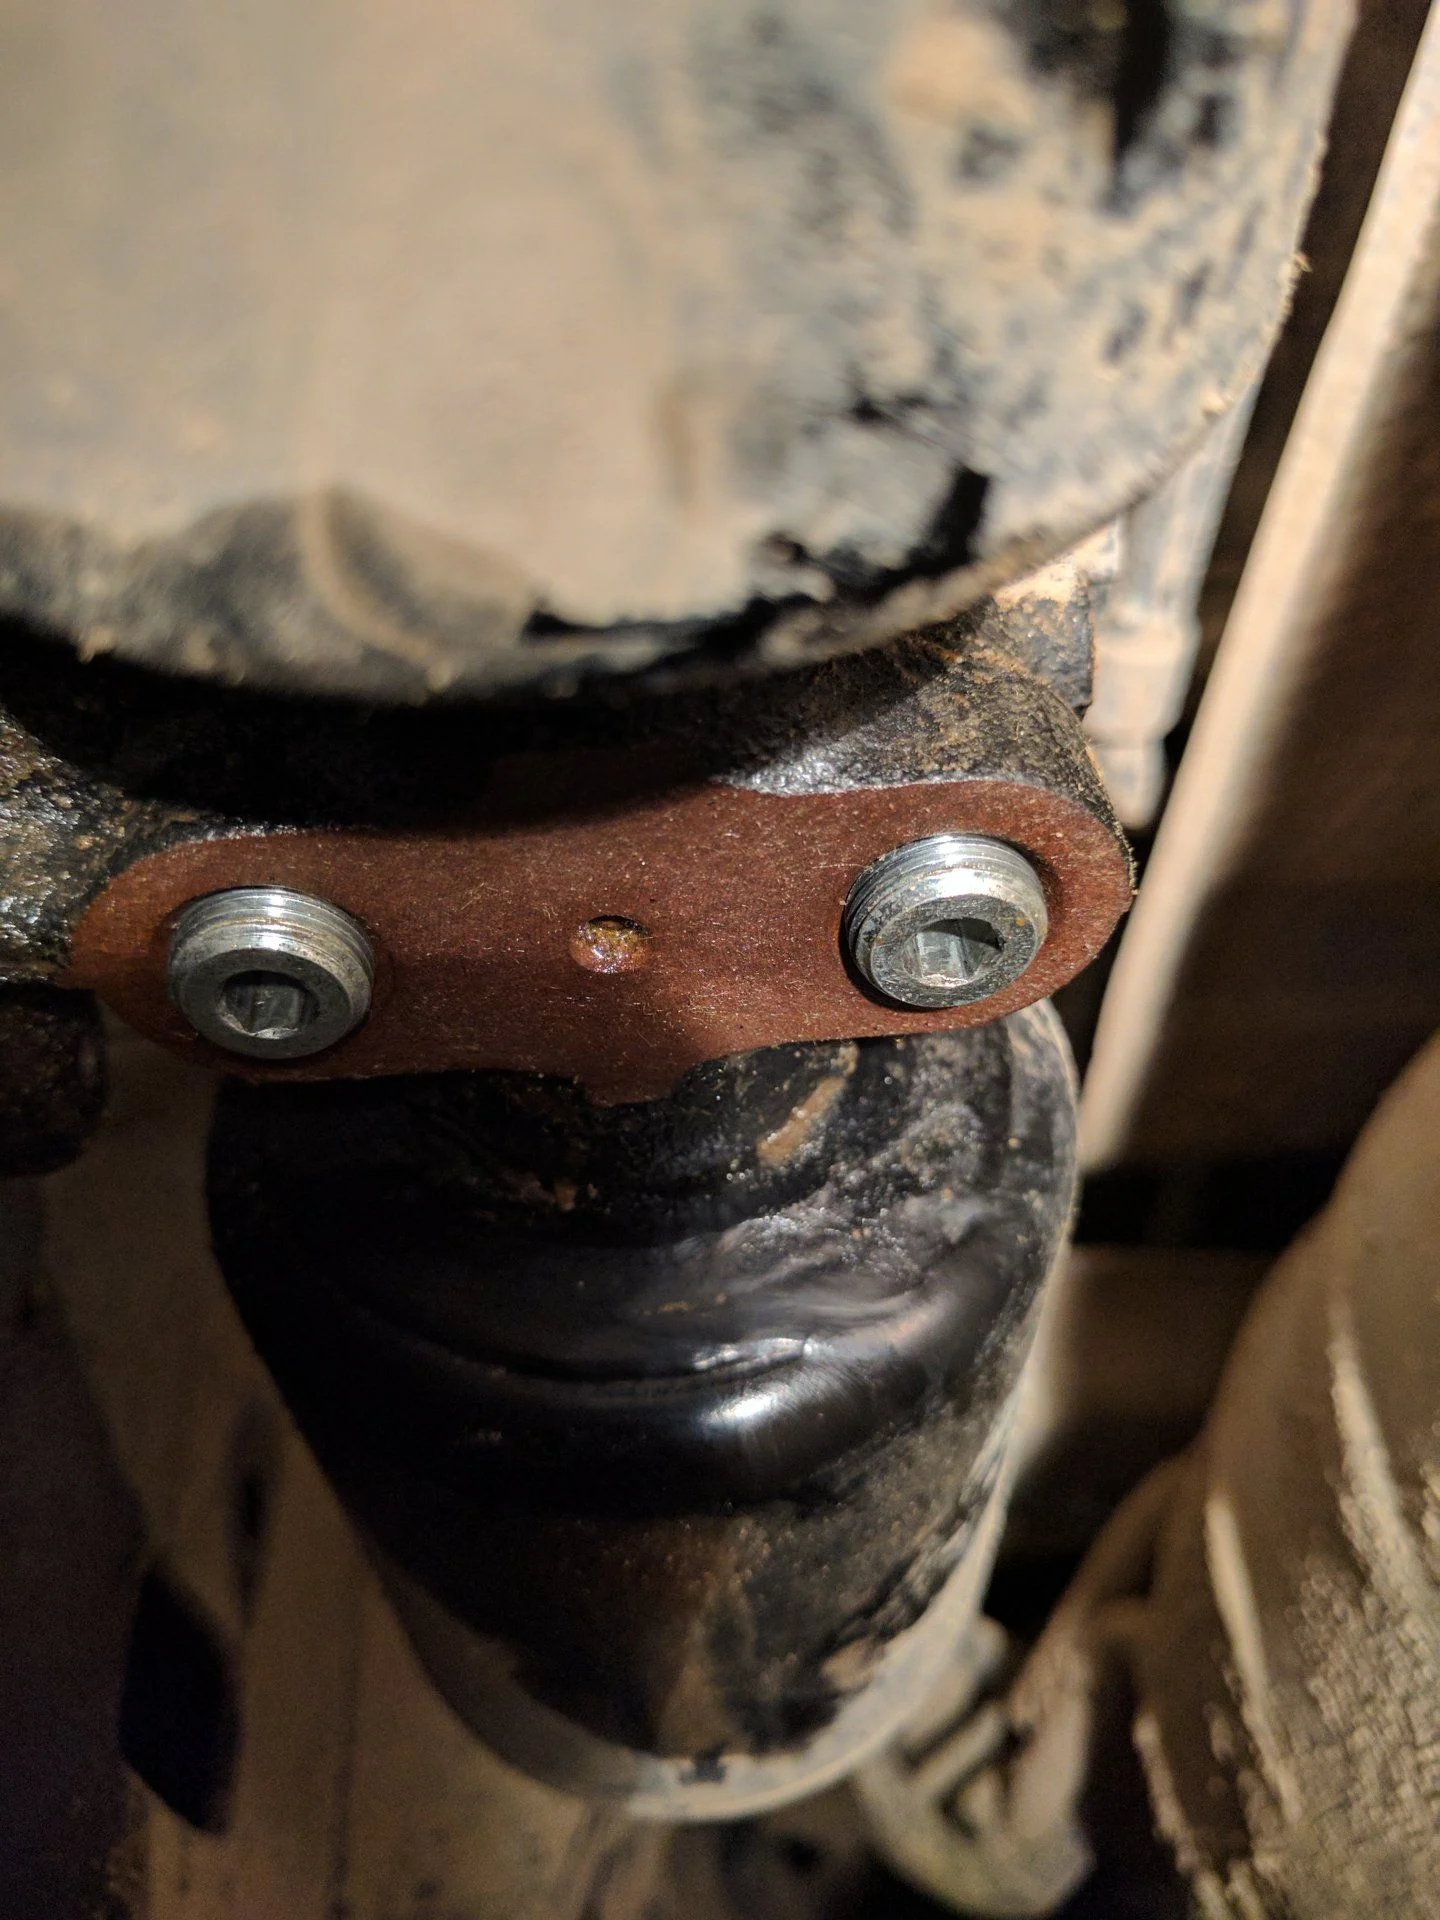
I was greasing the drive shaft today and figured I'd check out the kdss valves while I was under there. I hit it with some liquid wrench and figured I'd come back in a day or 2 and see if they move. I'm not holding out much hope.

I still feel like the rust everywhere else is just superficial. Sucks these kdss valves are so prone to rusting...

Anyone know a good mechanic in south jersey or is this a job for the dealership?

AFCF17E3-00E8-4815-8AF5-35F0EC0B7468_zpsdukmutvq.jpg
 
So upon further reading it sounds like it's definitely a dealership job. Any recommendations for a dealership nearby (near Cherry Hill NJ) that has a good service department and the equipments to repressurize the KDSS?

(Planning for worst case scenario)
 
Last edited:
Let us know how much it costs to fix it. I've got a '13. I haven't checked mine, but I bet mine are rusted as well.
 
wow..that sucks.
 
Jimmy Cricket says:

"Go out and check ASAP...and if it's good, apply a thick grease completely filling in the hole, the round metal around it and glob some over the round seam."

Markuson says:

"I applied a thick *marine* grease, and it's stayed in place nicely for over a year & counting. Peace of mind is good!"

JiminyCricket-8Ball.webp


:hillbilly:
 
Last edited:
yes good tip. We should also always make sure to chime in and remind people to check when they're going to look at a vehicle they may purchase. definitely a decent number of people asking for a "200 series checklist" of things to look for when buying. This should be near the top of that list...
 
To follow Jimmy Cricket's reminder... :hillbilly:

-For those unfamiliar, this is super easy to check and protect.

It's on the driver's side, just under the body a bit past your running boards or sliders near the passenger door.

See here to locate if you've never looked at them...Marine grease works well...

KDSS1.webp
KDSS2.webp
 
Yep. Three bolts. 13mm if I remember correctly. Good luck with those man. A wire wheel/penetrating oil/and repeat process can do amazing things if you're patient and calculated.
 
Yep. Three bolts. 13mm if I remember correctly. Good luck with those man. A wire wheel/penetrating oil/and repeat process can do amazing things if you're patient and calculated.


Yeah, that's my plan. I'm not even attempting to turn them till I go at it with a wire brush and penetrating oil a few times... want to give myself the best chance at getting them to move. figured if I tried now they're probably not going anywhere and I'll just screw the bolt up.
 
Mine were like that and I was able to get them free. As long as you don't bugger up the hex holes in the screws you should be fine. To get them free you'll want to use a combination of penetrating oil, a dental pick, and some heat. Spray them with the oil and then use the dental picks to clean out the circle where the screws and the body meet. You'll want to get to the point that you can move the point of the pick smoothly around in a circle around the edge of the screw. Once you can do that then you'll want to alternate heating it up a bit with a portable torch and trying to break it free by hand. Make sure you have the hex head cleaned out enough that you can full seat the hex wrench and don't put so much force that you mess up the heads. Just keep heating it up, trying to break it free, letting it cool, then heating it up again. You'll eventually be able to break it free.
 
And, of course, once they loosen up DO NOT completely unscrew them! No more than 2 to 3 turns or you'll be in a world of hurt.
 
Just curious, but what happens if the screws are turned more than 3 rotations? Does fluid come spraying out at a psi of >600 like i am imagining it does? Seems like a pretty dangerous thing to mess with if that's the case.
 
Just curious, but what happens if the screws are turned more than 3 rotations? Does fluid come spraying out at a psi of >600 like i am imagining it does? Seems like a pretty dangerous thing to mess with if that's the case.

Yes. Toyota can only pressurize if using a unique tool and it is SERIOUSLY HIGH pressure.

It's only dangerous if you don't know to stop after exactly 3 full turns.

I've done it several times... -just count those turns!
 
Finally got a chance to check out my KDSS valves and was able to open them with no issues. Opened, added anti-seize to the exposed threads and closed them back up. 2013 SoCal all its life, 85k miles. The brown you see to the sides is mud. First picture is before opening, the 2nd is opened after 3 turns. Did not appear they were ever touched before today.

 
Finally got a chance to check out my KDSS valves and was able to open them with no issues. Opened, added anti-seize to the exposed threads and closed them back up.

Awesome. I'd give the whole housing a good coating of Blaster Corrosion Stop (Home Depot sells in tool dept.) or Fluid Film to be safe.
 
Back
Top Bottom